
DOCKER COMPOSE | Complete Guide with Hands-On Examples
Welcome back to our page! Today, we’re going to talk about Docker Compose, a powerful tool that helps you define and run multi-container Docker applications. If you’re new to Docker Compose, don’t worry, we’ll guide you every step of the way and help you get started quickly.
Prerequisites
If you want to use Docker Compose effectively, you need to know the basics of Docker first. Docker Compose is a tool that helps manage Docker containers, but it’s important to understand the foundation before diving into it.
If you’re new to Docker, we recommend starting with our introductory videos. We’ve created a YouTube playlist dedicated to Docker just for you!
What is Docker Compose? 🐙
In today’s software development landscape, two prevalent architectural paradigms are monolithic and microservices architecture.
Monolithic architecture involves creating a single, large application that includes all the necessary parts. This approach makes it hard to modify or scale individual components independently because all the code is connected.
Microservices architecture, on the other hand, is a collection of small, independent services that communicate with each other through APIs. Each service performs a specific function and can be developed, tested, and deployed independently. Microservices architecture provides more flexibility, scalability, and resilience.
The choice between these two approaches depends on factors like the application’s complexity, the development team’s skills, and the business requirements.
🚨 If you haven’t done it already, and you want to find out more about this… Go and check out our latest YouTube video on Docker Compose that is a Complete Guide with Hands-on Examples! 🚨
Use Cases — Before and After

BEFORE ⬅️
In the pre Docker Compose, managing multi-container applications was complicated and time-consuming. Developers had to handle container dependencies, networking, and service discovery individually, which often led to complex configurations and potential errors.
Docker simplified application deployment and scalability, but managing multiple containers required careful coordination and scripting. With Docker Compose, however, managing multi-container applications has become much simpler and efficient.
Now, developers can easily set up Docker containers, networks, and orchestration without worrying about the complexities of the process. This makes it much easier to ensure that all containers are running and communicating with each other seamlessly.
DEMO TIME 🤩
Let’s see this in a demo example. We will start with setting up the environment on our local machine and testing our apps locally first:
Step 1 — Create Frontend and Backend app files, environment setup and local test of the services:
To ensure a smooth and organised development process, it is recommended that you create dedicated folders for each service that you are working on.
For instance, you can create two folders named “frontend” and “backend” for each service. Once you have created these folders, it is advisable to add Dockerfiles, and other relevant app files, in each folder so that you can easily build Docker images.
mkdir frontend && mkdir backendFrontend — Python Environment Setup:
# Create a virtual environment
cd frontend
python -m venv venv

# Activate the virtual environment (Mac/Linux)
source venv/bin/activate

# Check it's activated
which python3
~/Users/user/docker-compose-demo/frontend/venv/bin/python3
Step 2 — Install Flask and Requests: With the virtual environment activated, you can now install Flask and Requests using pip. Create a requirements.txt file in your project directory with the following contents:
vim requirements.txtFlask
RequestsRun the following command to install the dependencies:
pip install -r requirements.txt
...
[notice] A new release of pip is available: 23.3.1 -> 24.0
[notice] To update, run: pip install --upgrade pip
You might also have to run this command for a new release of pip:
pip install --upgrade pip
...
Successfully installed pip-24.0
Step 3 — Frontend Application Python with Flask (frontend/app.py): We’ll use Python to create a user interface that displays a list of items from our backend API. In this demo, we’ll be using Python frameworks like Flask, which require specific libraries. We’ll also create a basic index.html page to make the user experience more interactive and easy to use.
In frontend dir create a new file app.py:
vim app.pyPaste in the code below:
# frontend/app.py
from flask import Flask, render_template, jsonify
import requests

app = Flask(__name__)

# Define the backend API URL
API_URL = 'http://localhost:3000/api/items'

@app.route('/')
def index():
 response = requests.get(API_URL)
 if response.status_code == 200:
     items = response.json()
     return render_template('index.html', items=items)
 else:
     return "Error fetching items from backend"

if __name__ == '__main__':
 app.run(debug=True, port=8000)
When testing Python code locally using the command “python app.py”, and you have both the frontend and backend applications running on your local machine, you should use “localhost” in the API URL.
In this setup, when you run “python app.py” locally, the frontend application will try to communicate with the backend application running on localhost at port 3000.
To make sure everything works correctly, you need to ensure that your backend application is actually running locally on port 3000 when you test the frontend application. Otherwise, it will cause an error. 😵 We will see an example later.
Step 4 — For the frontend app, we will now create an HTML template (index.html) in order to display the items:
<!-- frontend/templates/index.html -->
<!DOCTYPE html>
<html lang="en">
<head>
 <meta charset="UTF-8">
 <meta name="viewport" content="width=device-width, initial-scale=1.0">
 <title>Items List</title>
</head>
<body>
 <h1>headintheclouds - Items List</h1>
 <ul>
     {% for item in items %}
         <li>{{ item.name }}</li>
     {% endfor %}
 </ul>
</body>
</html>
Step 5 — Test the app locally first, before containerising it in case of any errors:
python app.py
 * Serving Flask app 'app'
 * Debug mode: on
WARNING: This is a development server. Do not use it in a production deployment. Use a production WSGI server instead.
 * Running on http://127.0.0.1:8000
Press CTRL+C to quit
 * Restarting with stat
 * Debugger is active!
 * Debugger PIN: 492-298-542
Go to your internet browser and paste in there http://localhost:8000.
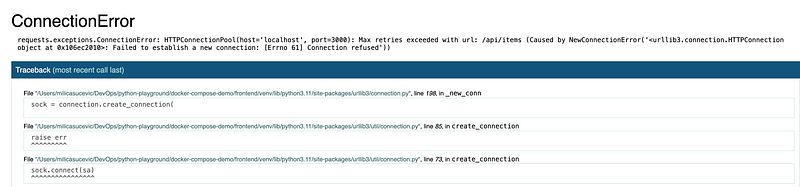
You will see some connection errors on your browser and in your log files in terminal, but that’s expected as we haven’t defined and started the backend just yet.
    raise ConnectionError(e, request=request)
requests.exceptions.ConnectionError: HTTPConnectionPool(host='localhost', port=3000): Max retries exceeded with url: /api/items (Caused by NewConnectionError('<urllib3.connection.HTTPConnection object at 0x106ec2010>: Failed to establish a new connection: [Errno 61] Connection refused'))
127.0.0.1 - - [24/Mar/2024 12:04:18] "GET /?__debugger__=yes&cmd=resource&f=style.css HTTP/1.1" 200 -
127.0.0.1 - - [24/Mar/2024 12:04:18] "GET /?__debugger__=yes&cmd=resource&f=debugger.js HTTP/1.1" 200 -
127.0.0.1 - - [24/Mar/2024 12:04:18] "GET /?__debugger__=yes&cmd=resource&f=console.png HTTP/1.1" 200 -
127.0.0.1 - - [24/Mar/2024 12:04:18] "GET /?__debugger__=yes&cmd=resource&f=console.png HTTP/1.1" 304 -
HTTP Status 304 Not Modified
The HTTP 304 Not Modified client redirection response code indicates that there is no need to retransmit the requested resources. This response code is sent when the request is a conditional GET or HEAD request with an If-None-Match or an If-Modified-Since header and the condition evaluates to false. It is an implicit redirection to a cached resource that would have resulted in a 200 OK response if the condition evaluated to true. [link to site]
NEXT STEPS — In order to:
1️⃣ Build the backend API,
2️⃣ Containerise frontend and backend apps,
3️⃣ Run them to further test their communication on our local machine
🚨CHECK OUR DOCKER COMPOSE COMPLETE GUIDE WITH HANDS-ON EXAMPLES NOW ⬇️
AFTER ➡️
Let’s explore the world after the introduction of Docker Compose to test our services efficiently. Docker Compose helps manage multi-container Docker apps using one YAML file. This simplifies the process of setting up and organizing our microservices for testing.
We will create a single docker-compose.yml file to define our frontend and backend services. We’ll also show you how to use temporary containers to test each service’s functionality independently and how they interact with the app ecosystem. You can use tools like curl to interact with the microservices during testing. By using Docker Compose, we can simplify the process of managing microservices, making it easier to test their functionality.
To make a new file called docker-compose.yml for your project, head to the root of your project folder. This file will be used to manage the frontend and backend services of your project.
Before, we had to manually enter the following commands to
- Create a network:
docker network create hitc-network2. Build frontend and backend images:
docker run -d --name frontend --network hitc-network -p 8000:8000 frontend-image
docker run -d --name backend --network hitc-network -p 3000:3000 backend-image
3. Run containers with specified port numbers and network:
docker run -d --name frontend --network hitc-network -p 8000:8000 frontend-image
docker run -d --name backend --network hitc-network -p 5000:5000 backend-image
Which in total included running 5 docker commands. Imagine if we had more services to manage 😓
With Docker Compose we can define all of these steps in a single yml file and execute a single Docker Compose command to get our network and images created, and containers up and running! Fascinating right! 🤩
Let’s create our docker-compose.yml file in the root folder of our project:
version: '3.8'

services:
  frontend:
 build: ./frontend
 ports:
   - "8000:8000"
 networks:
   - hitc-network

  backend:
 build: ./backend
 ports:
   - "3000:3000"
 networks:
   - hitc-network

networks:
  hitc-network:
 driver: bridge
In there you we have defined container/services names (frontend and backend), ports and network. It is advisable to give your containers names that are easy to recognise and use. Determine which ports your applications will use to communicate with each other. Previously, we used port 8000 for frontend and 3000 for backend in our examples.
You can then proceed with building your Docker images by running the following Docker Compose command
docker-compose build
OR we could run directly docker-compose up and it would create those images for us as it has build stated in the docker-compose yml file already to build those images for us and take care of the rest.
docker-compose -f docker-compose.yml up
[+] Building 0.0s (0/0)                                                                   docker:desktop-linux
[+] Running 3/3
 ✔ Network docker-compose_default    Created                                                           0.0s
 ✔ Container docker-compose-frontend-1  Created                                                           0.1s
 ✔ Container docker-compose-backend-1   Created                                                           0.1s
Attaching to docker-compose-backend-1, docker-compose-frontend-1
docker-compose-backend-1   | Server running on port 5000
docker-compose-frontend-1  |  * Serving Flask app 'app.py'
docker-compose-frontend-1  |  * Debug mode: off
docker-compose-frontend-1  | WARNING: This is a development server. Do not use it in a production deployment. Use a production WSGI server instead.
docker-compose-frontend-1  |  * Running on all addresses (0.0.0.0)
docker-compose-frontend-1  |  * Running on http://127.0.0.1:8000
docker-compose-frontend-1  |  * Running on http://172.31.0.3:8000
docker-compose-frontend-1  | Press CTRL+C to quit
docker-compose-frontend-1  | 192.168.65.1 - - [19/Mar/2024 10:40:10] "GET / HTTP/1.1" 200 -
Lastly to test our frontend and backend services, as well as to learn other useful Docker Compose Commands
🚨CHECK OUR DOCKER COMPOSE COMPLETE GUIDE WITH HANDS-ON EXAMPLES NOW ⬇️
Closing Thoughts

We have reached the end of our comprehensive overview of Docker Compose. We hope that this guide has provided you with enough insights, tips, and tricks to effectively work with Docker Compose. In our next video, we will be covering Docker volume, a powerful and versatile feature that allows you to manage data in your Docker containers. Docker volume is essential if you want to persist data across container restarts, share data between containers, or even backup and restore data.
If you have any questions or thoughts to share, please feel free to leave a comment below. We highly value your feedback and your input can help us improve our content and make it more useful for you. 🙏
Also, don’t forget to hit the like button and subscribe to our YouTube channel to stay updated on our latest content. We regularly publish new videos on Docker, Kubernetes, DevOps, Cloud Computing, Web Development and other related topics.
By subscribing to our channel, you will never miss a new release and you will have access to exclusive content, giveaways, and discounts.
Thank you for watching, and we look forward to seeing you in our upcoming videos! 🎬🤗


