
Django and Stripe subscriptions — Part 2

In case you missed Part 1, you can find it here:
In the previous part of this tutorial series, we perform the following:
- Started our Django project and membership application
- Created and setup access to the Admin interface on Django
- Authentication with the default Django plugin
On this Part 2, we will learn how to create the memberships itself and how to use Stripe to charge our costumers.
1) Stripe configuration
I assume that you have a Stripe account, if not you can quickly register for one that allows using test data, you don’t need to activate the account.
On the Stripe side, we will configure our Products and Prices. This will allow us to then create subscriptions based on that. Furthermore we can also configure coupons to offer discounts to new members.
On Stripe go to Products and add a new product with the following configuration:
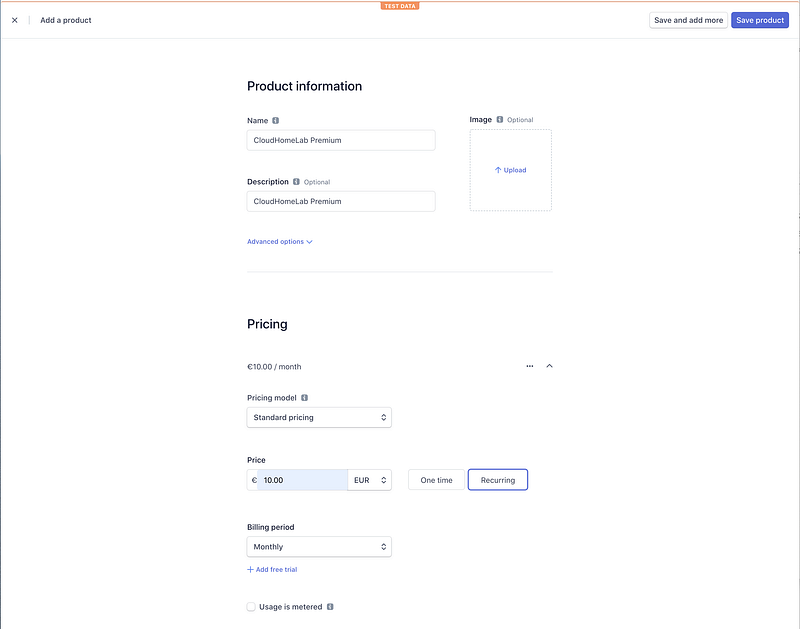
The product is configured with a name and an initial price, in this case a Monthly subscription fee. As you can see, all subscriptions and pricing is manage by Stripe.
Like all other websites, we want to add also a Yearly subscription to provide a small discount. We can do that on Stripe by adding a new Price in the Product:
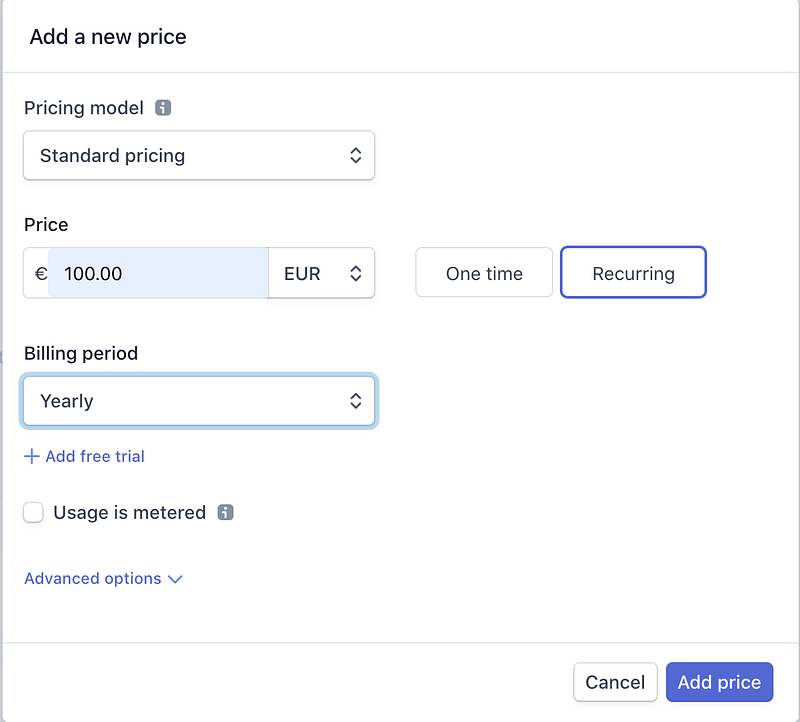
As you can see, we price our Yearly fee with a 2 month discount and we will marketing that in our website as a very nice discount and saving.
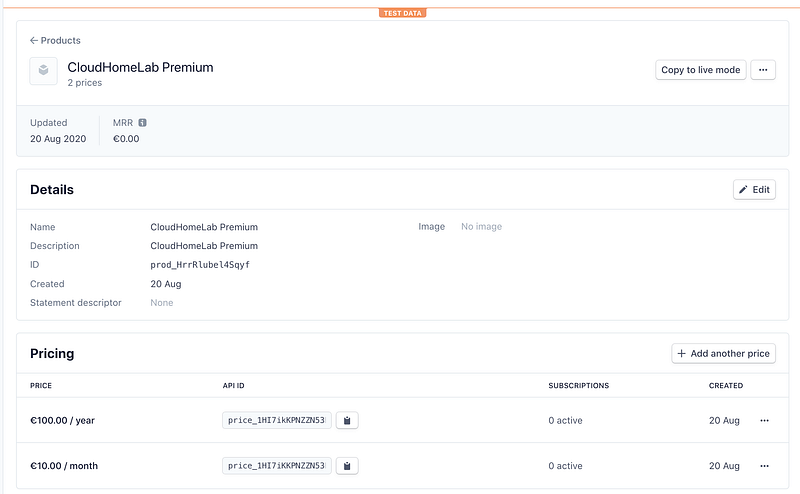
Let’s see how our full product configuration looks on Stripe:
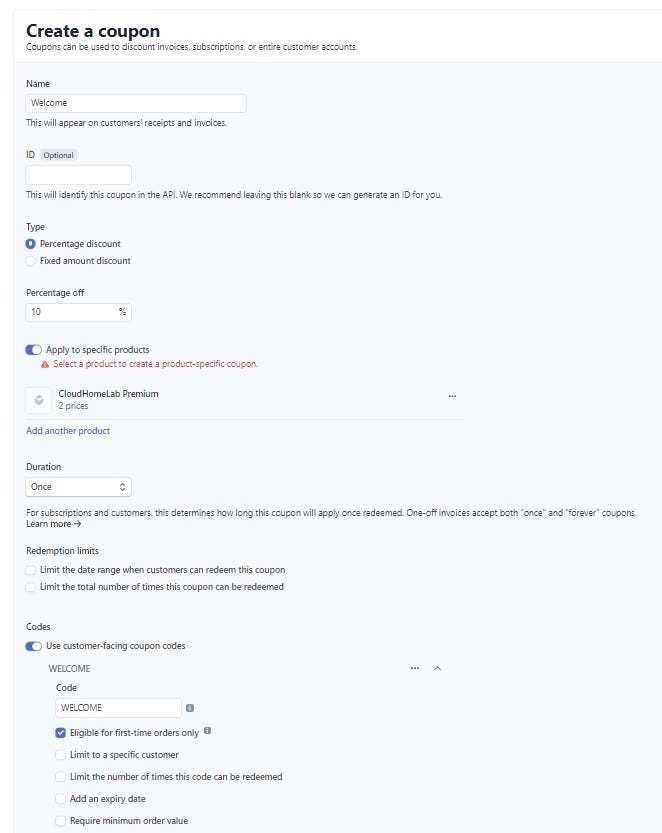
We will also add Coupons that new customers can use when signing up to get a 10% discount:
2) Setup Membership on Django
To setup the membership on Django we will need the following items:
- Model to support Subscriptions
- Views to join a subscription
- Views to see the subscription details
- Views to cancel the subscription
So let’s start by defining our model by editing our membership application model file at ‘cloudhomelab/membership/models.py’:
Our model definition help us store our membership and subscriptions, the Customer class is our main class that will store all the information regarding subscriptions, including Stripe id’s and of course link that to our user.
After adding the models we need to update our database by performing the Django migrations:
python manage.py makemigrations
python manage.py migrate
Now that we have the model to store information, the next step is to create the views that allows the users to join and checkout with the payment, but before the definition, let’s map the urls in ‘cloudhomelab/urls.py’:
As you can see, there are two special url’s, success and cancel, that will be used to handle the replies from Stripe Checkout.
Now let’s add our views logic to our ‘cloudhomelab/membership/views.py’:
Let’s talk a bit about our logic in the views.py:
- checkout function, this function performs the main logic to setup a Stripe Checkout session, we get our type of membership (montly or annualy) and set the corresponding membership_id (this will match the proper product id configured in Stripe). Finnally we create the Stripe session, set it to subscription mode and define our success (which we will use to create our Costumer) and cancel urls
- success function, this view gets called by Stripe Checkout after a sucessfully payment. We retrieve the session id from the GET request, get the details from Stripe and create our costumer.
A word of advice, it is not recommended to depend on the success call for our after payment logic since the user can close the browser or a sessionId can be injected and the page called without a payment being made.
The best way is to implement web hooks to handle the communication of the payment status, please check the Stripe documentation for more details at: https://stripe.com/docs/webhooks
But for our test purpose the call to the success url is sufficient.
To finalize, we need of course to add our html files on the ‘cloudhomelab/membership/templates/membership’ folder:
3) Performing checkout
For our checkout page, we will need to include the html template that will be used by the view:
Lets examine our checkout.html file:
- There is a checkout button that contains our session id, created in the view, and before that we include the Stripe javascript library
- For the button to perform the checkout we need to add a bit more of javascript to attach an event to the button, for that goal we import the checkout.js file
- For our javascript to work as intend, we need to perform two actions. First proper import our static files with ‘load static’ and second pass the session id as a javascript variable to the checkout.js file
In order for our ‘load static’ call to work, we first need to ensure that we define the correct path for our static files in the main settings.py:
STATIC_URL = '/static/'We can now created our static javascript file checkout.js:
The goal of this file is to add an event handler to our checkout button that will launch the Stripe Checkout with our session id.
After a successfully payment we will be redirected to our success url or in case of an error or the payment is canceled the redirect happens to the cancel url.
We have seen the code from the view before, let’s create the html templates now, both of them quite simple, just success or error messages:
4) Run it
Let’s point our browser to http://127.0.0.1:8000/join and pick a plan and perform the checkout.
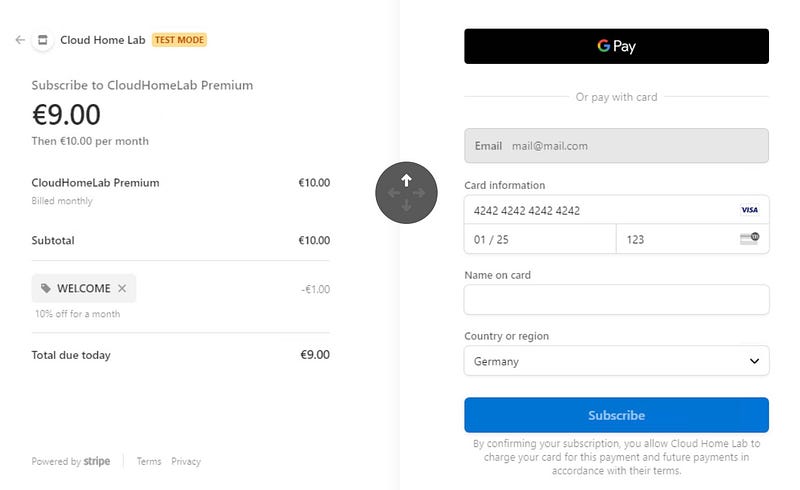
We will be redirected to the Stripe Checkout page were we can redeem our coupon code and perform the payment.
A test payment can be made by using the credit card number seen in the screenshot:
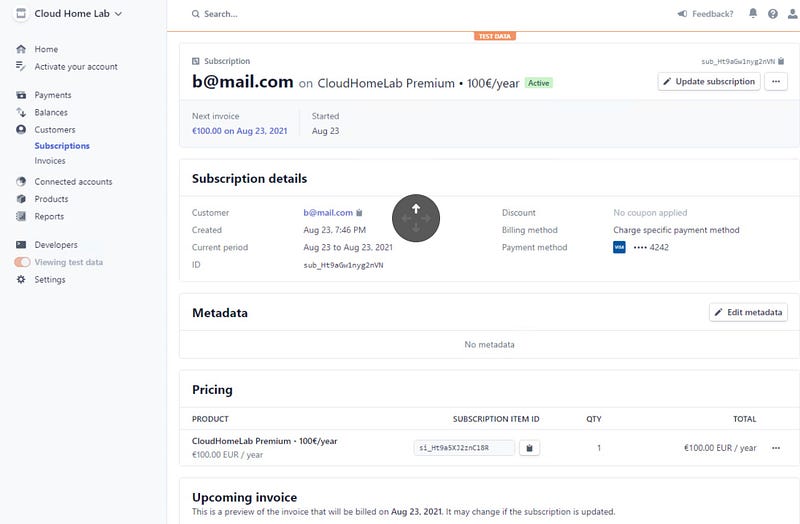
After our payment is successfully, we can check out Stripe Dashboard for the new subscription:
5) Conclusions
We saw how easy it is to collect payments with the Stripe and in particular with the new Stripe Checkout.
A simple html template and a bit of code to create a Stripe session and we are ready to receive payments.
On this part of the tutorial series, we did:
- Stripe configuration, products and coupons
- Views and html templates for checkout
- Configured the static javascript files
- Colllected a test payment
On the next article we will add the ability to manage subscriptions to our test website.
You can check out my GitHub at https://github.com/nunombispo
Or check my website at https://developer-service.io
For low cost Nextcloud hosting, check out: https://cloudhomelab.com (50% discount with promo code 50OFF)
Check out part 3:
If you enjoyed reading this article and found it usefull, you can support me by signing up for a Medium membership (if you are not a member). It will only cost you $5 a month — this will give you access to all stories on Medium! (and I will receive a small commission)
Besides that, if you want to stay updated when I post a new story, you can signup for my free newsletter!


