
Django And Flutter — A Step by Step Tutorial for a Boilerplate Application
Introduction
Django and Flutter are two fundamental backend and frontend tools for entrepreneurs and programmers to develop their applications. Django is well-known for its flexible and fast development capabilities based on Python programming language and Flutter is a platform-independent frontend technology based on the Dart language. In this tutorial, it is going to be shown step by step how to create a Django and Flutter application and what changes are needed to be applied to both that they can communicate with each other.
I publish every week technical articles in this channel, so please follow me, and subscribe to my channel. Please check my other articles from my listings related to Spark and Scala, Streamlit, React, Django, AWS, Machine Learning, Startup, Cheatsheets and miscellaneous development topics.
please use this link to join medium. Thank you for your great support.
Preparing the Environment and the Requirements
For this tutorial, it is required that you install Flutter based on your operating system. Also, you need to install VSCODE IDE for your machine. After, the installation completes, you need to open VSCODE, and create a folder to keep your Django and Flutter code like the following empty folder named DjangoFlutter (You can choose your own name):

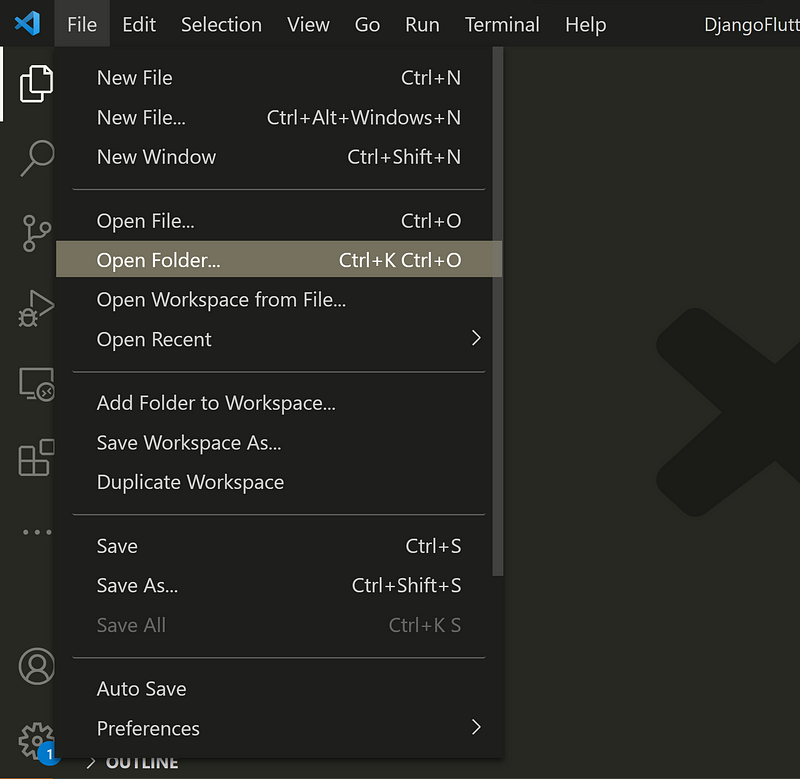
After, you open the VSCODE, you can open the DjangoFlutter folder by clicking on File and Open Folder as follows:
Now, you can see the DjangoFlutter folder on your VSCODE explorer as follows:

Open a new terminal as shown below:

Now, you can create a folder named backend using the mkdir command:

Then, a folder named frontend is created using mkdir frontend command like following:

It is recommended to work within a virtual environment, so let us create a virtual environment for installation of the libraries, so we use “pipenv shell .” as follows:

In case, you do not have installed Python , pip or pipenv, you need to install them. You can have a look at this article “Installing pip” for the installation of pip. Especially, you can refer to the following section for installing pip:

Now, one can go to the path containing all the virtual environments and see the created virtual environment:

You can see all your virtual environments, you can now activate your virtual environment by using “.\” like the following picture. Please pay attention that there is a Scripts folder inside as well as an activate file so you need to run the following command (On other operating systems like MAC it may be slightly different); however, you may still face the following error as you may be on powershell and you need to switch to command prompt (cmd):

Now, it should be possible to see that the virtual environment is activated:

We can install django by using “pip install django” as follows:

Click on the extensions and install the useful extensions including “Awesome Flutter Snippets”, “Dart”, “Flutter”, “Prettier”, “Python”, “Django”

Creating And Running the Django Backend
Let us switch to the backend folder, and create a django project named backendapp using “django-admin startproject backendapp .”:

The beauty of Django is the possibility to create various apps for different purposes e.g., user management. Let us create an app named backendcore by using “python manage.py startapp backendcore”

Now, we need to add the created app to the list of installed apps in Django. So, we can do it by referring to the apps.py file inside the backendcore, and using the backendcoreconfig function

Now, it is needed to add this line to the settings.py file which is the central setting of the whole application:

It is needed to migrate the changes by using “python manage.py migrate”:

It is the time to see that we can run the Django server by writing “python manage.py runserver”:

If one goes to the browser and write 127.0.0.1:8000, s/he can see that the Django is up and running and you can access it through the browser:

Improving the Django Setup
It is time to improve the Django setup, and it is important to keep in mind three main things:
- Timezone: You need to adjust it to your timezone.
- Secret_key: You should not reveal it to the public, otherwise, it can endanger the security of your application.
- DEBUG mode: You need to change it when moving to production but for development being in DEBUG mode is fine.


Let us explore how it is possible to consider the above matters. It is a best practice to consider .env file and keep the environmental variables like secret_key in that file and avoid pushing it to the public repositories. Therefore, let us create .env file and copy and paste the secret_key from the settings.py to the .env file:

Now, we need to import these variables to the settings.py but for doing that, we need to install djangoenviron by using “pip install django-environ”:

It is needed to add these lines of codes specified in red to import the variables from the .env file and keep the environmental variables in a central and safe place:
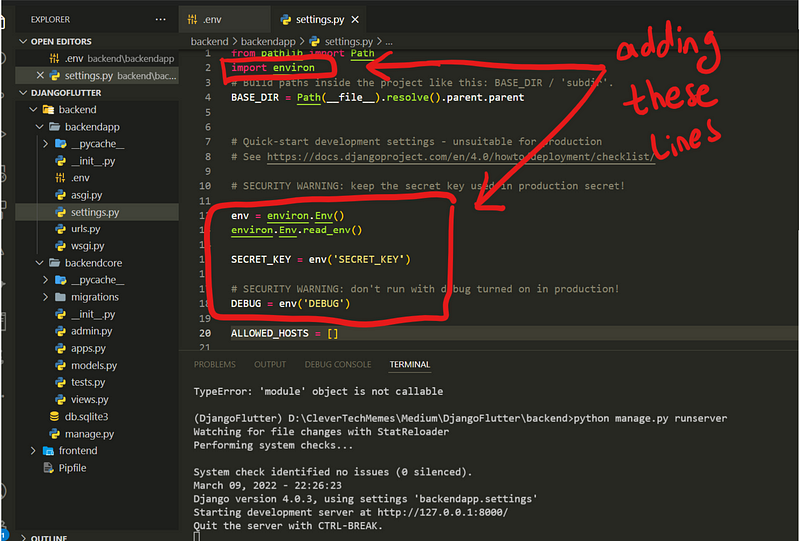
You can see in above picture that we can still run the server properly.
Writing a Simple View and Routing in Django
Let us now write a hello world view in Django: For doing that, it is needed to open views.py in the backendcore, and write the following function

It is needed to route the incoming requests to the defined view, so we can edit the urls.py inside backendapp folder and add the following:

This means that paths with ‘app/’ will be routed to the backendcore; however, there does not yet exist a urls.py file, so, let us create a urls.py inside the backendcore:

You should be able still to start the server, and now it is time to add the Flutter frontend
Creating Flutter Frontend
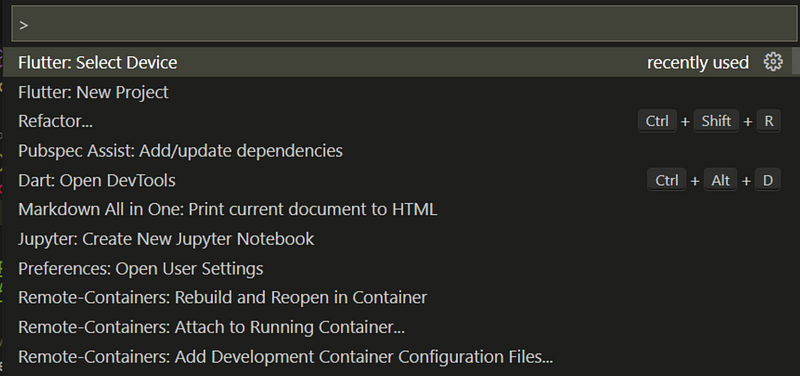
You need to first install Dart and Flutter — I assume it has been done. We can create a Flutter project in VSCODE using “CTRL + SHIFT + P” and selecting “Create Flutter Application”, and then select the folder for creating the flutter application


Now, the flutter project is created

we can select the device, and start running our first Flutter application:


Now, it should be possible to see the flutter demo web page:

Now, let us delete the content of the main.dart file inside the lib folder, and write the following content:


In this tutorial, the goal is to prepare boilerplate program and the way to make Django and Flutter work so I assume, the reader is familiar with the Flutter syntax. However, the above code adds bar, a welcome message and a button. Also, buttonPressed function sends a GET request to the Django backend as soon as the button is pressed. So, here there is not much coding on Flutter side but only the necessary things are brought for the communication and demonstration purposes.
Communication Between Backend and Frontend
For the communication between the Django backend and Flutter Frontend, it is needed to add http dependency to Flutter, so we can write:

It is now possible to import the http library by writing import ‘package:http/http.dart’ as http and send a request using http.get() in Flutter as follows:

As soon as we run Django server by writing “python manage.py runserver”, and we click the button in the browser, we can see that we receive requests in Django i.e., 200 is generated which means that the request is successfully received.

We can still make sure by writing in the Django view a printing statement like “request received” and figure out if the request can be printed, and it is working as follows:

However, if we right click on the frontend page and inspect element, we can see that we receive the CORS Origin Error as the Django does not know Flutter as a reliable frontend to communicate.

Resolving Django Cross Site Origin And Using REST
To resolve this issue, let us install Django Rest Framework by writing the “pip install django-rest-framework”, and add the rest framework to the installed apps:

And add the following to the settings.py file as follows:

Let us install the simple-jwt and the django cors headers. We require simple-jwt, to activate the token authentication in Django and we require cors-origin because we need to communicate with an external frontend like Flutter, so let us install these libraries by writing:
- pip install django-cors-headers
- pip install djangorestframework-simplejwt
In REST_Framework, it is needed to add simplejwt as follows:

Also, we need to add the SIMPLE_JWT configuration as shown below:

We need to add corsheaders to the installed apps:

Still, we need to add the following to the MIDDLEWARE in settings.py as follows:

Flutter needs to be allowed to communicate with Django so we need to add localhost to the list of allowed hosts and the CORS_ORIGIN_WHITELIST sending request to backend in settings.py:

Let us use the Response from the rest_framework to slightly change the views.py file and send a proper message back to the client as follows:

Please note the we need to add decorators like @permission_classes and @api_view. You can imagine them as wrap functions in which allow the function to process the request as well as receiving a GET request.
Now, if we click the button in the browser, we can see the successful communication between the Django and Flutter:

Summary:
Django and Flutter are two important backend and frontend technologies in which has helped developers and entrepreneurs to create useful applications. Django is popular due to fast-development cycle and its root in Python programming language and nowadays wide range of practitioners can use it. Flutter is getting momentum in the market by being platform independent and it means writing your code once and run it everywhere. In this tutorial, it is shown step-by-step how to create boilerplate Django and Flutter application that can communicate with each other.
I publish every week technical articles in this channel, so please follow me, and subscribe to my channel. Please check my other articles from my listings related to Spark and Scala, Streamlit, React, Django, AWS, Machine Learning, Startup, Cheatsheets and miscellaneous development topics.
please use this link to join medium. Thank you for your great support.


