
Distributed Data Parallel with Slurm, Submitit & PyTorch
PyTorch offers various methods to distribute your training onto multiple GPUs, whether the GPUs are on your local machine, a cluster node, or distributed among multiple nodes. As an AI researcher, you probably have access to a GPU cluster or a couple of GPUs lying around, and you’re wondering how to modify your single GPU script to make use of the available resources and speed up your training. This article will cover how to use Distributed Data Parallel on your local machine with multiple GPUs and on a GPU cluster that uses Slurm to schedule jobs.
Since you don't have to re-write the code for distributed training for every new project, I have written a template repository with all the DDP code set up. To use the repository, all you have to do is switch out the architecture with your model, add a dataset and define the loss function. The repository will automatically handle all the distributed training code, whether you are submitting a job to Slurm or running your code locally (or remotely via ssh) on a couple of GPUs. The code can also run on a single GPU if needed. That being said, I recommend reading through this article to understand what is happening under the hood and the purpose of every line of code.
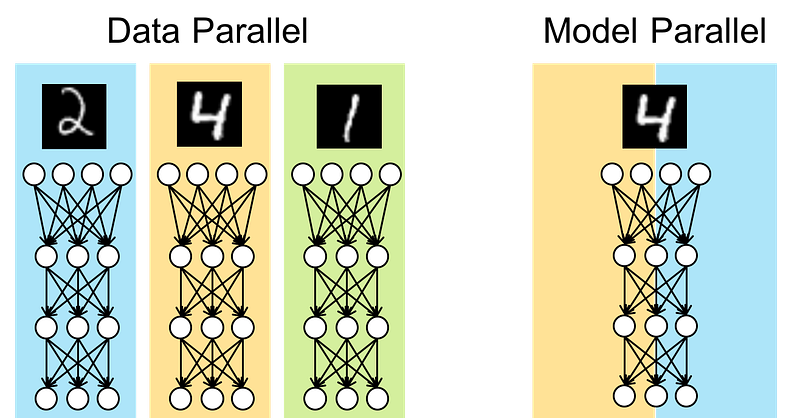
Data Parallel vs. Model Parallel
When considering distributed training, you have to think about what you want to be distributed on the GPUs. You have two options; Data Parallel and Model Parallel. If your model fits on one GPU, but you want to speed up your training by increasing the batch size, then you want to distribute your batch on multiple GPUs by using a Data Parallel scheme. But if your model parameters don’t fit on a single GPU, then you want to assign different parts of your architecture on different GPUs, aka Model Parallel. This article only covers Data Parallel, assuming that your model fits on a single GPU.
DataParallel vs. DistributedDataParallel
Like I mentioned before, PyTorch offers many tools to help you quickly convert your single-GPU training script into a multiple-GPU script. Most people start by trying out DataParallel due to its simplicity. You can easily just wrap your model with the nn.DataParallel class and it will automatically handle cloning the model on your cuda_visible_devices (GPUs) and split (batch-wise) the data on them. While the DP class offers a straightforward approach, you must have realized that it is neither efficient nor scalable (otherwise you wouldn’t be here :P). DP uses multi-threading and a single process to distribute the training on GPUs, which is not as efficient as using a separate process for every GPU and communicate the results (or parameter gradients) when needed. Also, since DP uses a single process, it cannot be used across multiple machines/nodes. So, if you need to train on two or more nodes, each with 4 GPUs, you must use DDP.
Distributed Data Parallel
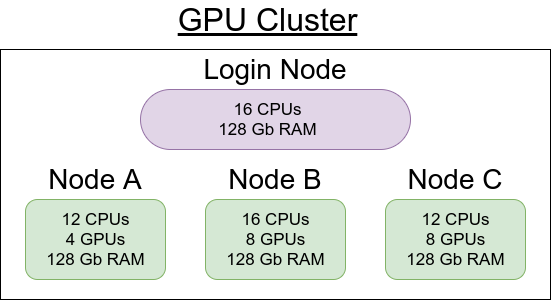
As you may have guessed, DDP is not as easy to set up as DP, mainly because of the initialization code required for communication between the GPUs (potentially on multiple nodes). Still, it’s much easier than you think. Let’s first define some terminology. When using a GPU cluster, a node is a single machine with a variable number of GPUs (or none), CPUs, RAM, etc. The cluster connects these nodes and uses some scheduling software (such as Slurm or SGE) to schedule jobs on one or more nodes.
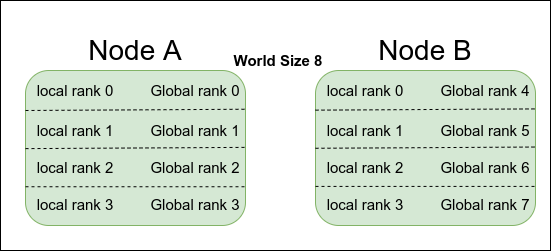
When your training script utilizes DDP to run on single or multiple nodes, it will spawn multiple processes; each will run on a different GPU. Every process needs to know how many other processes are out there doing the same job (world size) and how to reach the main process. Every process needs to have a local rank and a global rank. The local rank defines its order within the node it is running on, while the global rank defines its order within all the processes.
After spawning the multiple processes and giving each process a copy of world_size, local_rank, global_rank, and address of the main process, you need to split the dataset into world_size chunks so that each GPU gets a different part of the dataset. Then you can wrap your model in a nn.parallel.DistributedDataParallel class, and you’re basically done. In the rest of the article, we will go into more detail about how to go about each of the above steps and some helper functions for checkpointing, Tensorboard visualizations, scheduling on Slurm using Submitit, and more.
Initialization on Single Node
Let’s start by attempting to spawn multiple processes on the same node. We will need the torch.multiprocessing.spawn function to spawn args.world_size processes. To keep things organized and customizable, we can use argparse.
It is very important to distinguish the code running on the main process from the code running on the children processes. For example, we have to define the CUDA_VISIBLE_DEVICES on the main process before we spawn the train function on the GPUs. We also define the dist_url for all GPUs to communicate back to the main process. Since we are running locally on a single node, the URL can be localhost and a random port. This URL will be given to all GPUs so that the main process can be reachable from any process.
The code running on the child process (on the GPU) will have specific initialization variables, such as the local rank. The torch.distributed.init_process_group does all the heavy work; it initializes the communication between processes and waits until it makes sure they can talk to each other. We set the seed on all GPUs to be the same for random initializations of parameters. The rest is to get the dataset loader, model, loss function and pass them to the trainer function.
This code can be easily modified to run this training on multiple nodes, not necessarily on the same cluster. You will need to manually change the “localhost” in args.dist_url to Noda A address and set the args.world_size to the total number of GPUs you intend to use from all nodes. You also need to pass the node rank to the train function, which can be added to the local rank to get the global rank of the GPU, as shown below.
args.rank = args.node_rank + gpuThat’s it; you can now run multiple copies of this script on different nodes and see the training happening on all GPUs simultaneously.
Data Loader
As we mentioned before, the dataset needs to be split into chunks, where the total number of chunks should be equal to args.world_size. The DistributedSampler class can easily do that for us. You simply just need to define your dataset and pass it as an argument to the DistributedSampler class along with other parameters, such as world_size and the global_rank of the current process. The output will be a sampler object that you can pass to the DataLoader class.
Get Model, Loss, and Trainer!
The rest is as easy as defining your architecture and wrapping it in the nn.parallel.DistributedDataParallel class, defining your loss function, and starting to train! :)
Slurm
Slurm is a job scheduler used on clusters to accept job submission files and schedule them when the requested resources become available. The usual procedure is to create a separate script file with Slurm-specific arguments:
#!/bin/bash
#SBATCH -w "[node_name]"
#SBATCH -p [partition]
#SBATCH --mem=100GB
srun python train.py
And “submit it” with sbatch as follows:
sbatch script.shWhile you can follow the above steps and get it to do what you want, there is an easier way by utilizing a library called “Submitit” that was recently open-sourced by Facebook AI Research (FAIR). The idea is to use Submitit to generate and submit the job script for us. We can easily define how many nodes and the number of GPUs on each node. We can even define a function to re-submit the job if it gets preempted for any reason.
Submitit
To generate and submit jobs to Slurm using Submitit, we need to get a submitit.AutoExecutor object. We can use the function submitit.AutoExecutor.update_parameters to provide Slurm-specific parameters. Submitit will take care of spawning the different processes on the GPUs (even if on different nodes).
As seen in the code above, we can define a slurm_trainer class and pass an instance of this class to the executor.submit function. This submit function will spawn the __call__ function of the slurm_trainer instance on multiple GPUs as defined in the executer parameters. The slurm_trainer still calls the train function, which gets the dataset, model, loss function, and starts the training. Note: You won't need to define args.gpu and args.rank in the train function anymore because they are now defined on lines 44 and 45. The provided template combines training with Slurm and training locally in one script.
Tensorboard
The utils directory in the template provides some helper functions for automatically starting Tensorboard writer and server. When running the script on a remote server, I recommend starting an Ngrok server that forwards port 6006 to an Ngrok domain. The Ngrok domain can be accessed from anywhere, even on your smartphone, to check your training progress.
Using the Template
The template follows a modular approach where the main components of the code (architecture, loss, scheduler, trainer, etc.) are organized into subdirectories.
- The train.py script contains all the arguments (parsed by argparse) and nodes/GPUs initializer (slurm or local). It also contains code for importing the dataset, model, loss function and passing them to the trainer function.
- The lib/trainer/trainer.py script defines the details of the training procedure.
- The lib/dataset/[args.dataset].py imports data and defines the dataset function. Creating a data directory with a soft link to the dataset is recommended, especially for testing on multiple datasets.
- The lib/core/ directory contains definitions for loss, optimizer, scheduler functions.
- The lib/utils/ directory contains helper functions organized by file name. (i.e., helper functions for distributed training are placed in the lib/utils/distributed.py file).
For single node, single GPU training, try:
python train.py -gpus 0For single node, multi GPU training, try:
python train.py -gpus 0,1,2For single node, multi GPU training on SLURM, try:
python train.py -slurm -slurm_nnodes 1 -slurm_ngpus 4
-slurm_partition general
For multi node, multi GPU training on SLURM, try:
python train.py -slurm -slurm_nnodes 2 -slurm_ngpus 8
-slurm_partition general
Tips:
- To get more information about available arguments, run:
python train.py -h - To automatically start the Tensorboard server as a different thread, add the argument:
-tb - To overwrite model log files and start from scratch, add the argument:
-reset, otherwise, it will use the last weights as a checkpoint and continue writing to the same tensorboard log files - if the same model name is used. - To choose specific node names on SLURM, use the argument:
-slurm_nodelist GPU17,GPU18as an example. - If running on a GPU with Tensor cores, using mixed precision models can speed up your training. Add the argument
-fp16to try it out. If it makes training unstable due to the loss of precision, don't use it :) - The template allows you to switch architectures, datasets, and trainers easily by passing different arguments. For example, different architectures can be added to the lib/arch/[arch-name].py directory and passing the arguments as
-arch [arch-name]or-trainer [trainer-name]or-dataset [dataset-name] - The stdout and stderr will be printed in the shared directory. We only print the first GPU output. Make sure to change the shared directory in lib/utils/distributed.py depending on the cluster you are using.
Conclusion
In this article, we went over how to distribute your training using DDP on multiple GPUs in few easy steps. The main difference between DDP and DP is defining communication parameters, such as world_size, ranks, and URL. We also went over Slurm and how to automate the script generation process using Submitit. Both Slurm-based jobs and locally-trained jobs are combined under one easy-to-use template. Please let me know if you face problems by commenting here or opening an issue on the Template repository.
Happy Coding :)