avatarFuji Nguyen

Summary

Tutorial 6 demonstrates how to implement claims-based policy security in a WebAPI using IdentityServer4 to achieve granular access control.

Abstract

This tutorial is the sixth in a series that focuses on securing WebAPIs. It builds upon the knowledge from Tutorial 4, where basic JWT security was established using the "Authorize" attribute. The current tutorial delves into the implementation of policy-based security to refine access control, specifically for role-based operations. It outlines a use case where only admin users are permitted to delete data in the EmployeeProfile WebAPI. The tutorial is divided into three parts: setting up an admin role and assigning users to it via the IdentityServer4 Admin UI, configuring oAuth2 scopes to include roles in the access token, and implementing a policy within the WebAPI to restrict the delete action to admin users. The process involves updating configuration files, adding code to set up the policy, and applying the policy at the action level in the controller. Testing instructions, a login account, and links to the Angular SPA and WebAPI Swagger interfaces are provided, along with the source code repository for further reference.

Opinions

  • The tutorial emphasizes the importance of granular access control for secure WebAPI operations.
  • It suggests that using IdentityServer4's Admin UI simplifies the management of roles and user assignments.
  • The inclusion of roles in the access token is highlighted as a crucial step for enabling role-based policies.
  • The tutorial advocates for the use of policy-based authorization to enhance security beyond basic authentication methods.
  • It provides a practical example of securing a REST API endpoint, demonstrating the real-world application of these concepts.
  • The tutorial is part of a series, indicating a structured approach to learning WebAPI security with IdentityServer4.
  • By providing a test drive section with a sample login account, the tutorial encourages hands-on learning and experimentation.
  • The availability of the source code on GitHub offers transparency and a resource for troubleshooting or further study.

IdentityServer4 Claims-Based Policy WebAPI Security | Tutorial 6

Photo by Matt Seymour on Unsplash

In Tutorial 4, you learned how to secure WebAPI with valid JWT using the “Authorize” attribute. In this tutorial 6, you will learn how to implement policy to provide granularity access control.

Prerequisites

  1. Visual Studio 2019 (community edition is ok)
  2. Git client

Tutorial Content

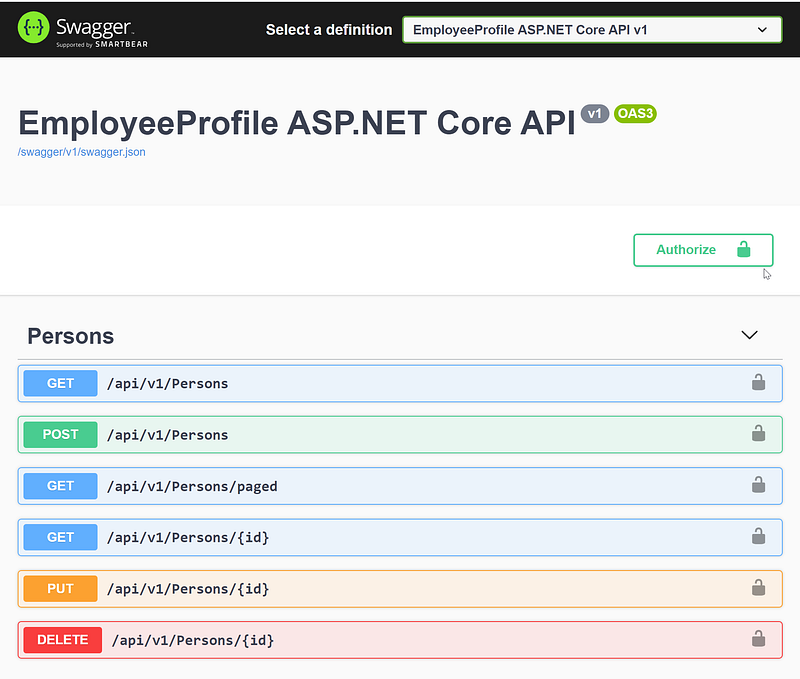
Use case: Let’s say you want to do role-based access in your application. For example, only admin users can DELETE data in the sample EmployeeProfile WebAPI (from tutorial 4). See Figure 1 for the Swagger of the Employee Profile API.

Figure 1 — EmployeeProfile WebAPI in Swagger

This tutorial contains three parts

  1. Setup admin role and assign users to the admin role using IdentityServer4 Admin UI
  2. Configure the oAuth2 scope to include “role” in Access Token using IdentityServer4 Admin UI
  3. Implement a policy to limit Delete action to only users in the admin role

Part 1 — Setup admin role and assign users to the admin role using IdentityServer4 Admin UI

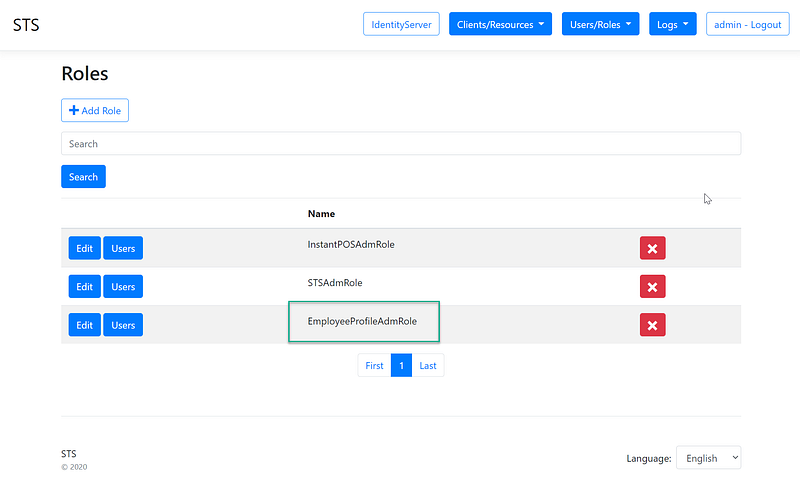
Task 1 — Add admin role. See Figure 2.

Figure 2 — Add admin role

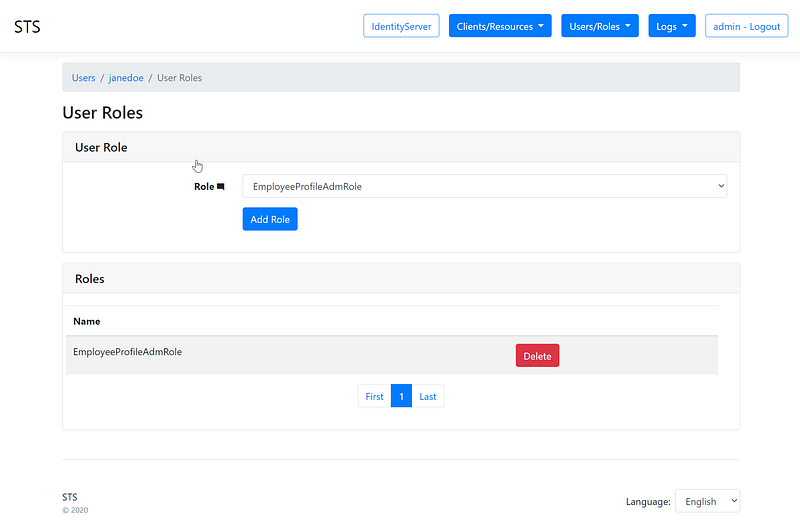
Task 2 — Assign the user to the admin role. See Figure 3.

Figure 3 — Add user to the admin role

Part 2 — Configure the oAuth2 scope to include “role” in Access Token using IdentityServer4 Admin UI

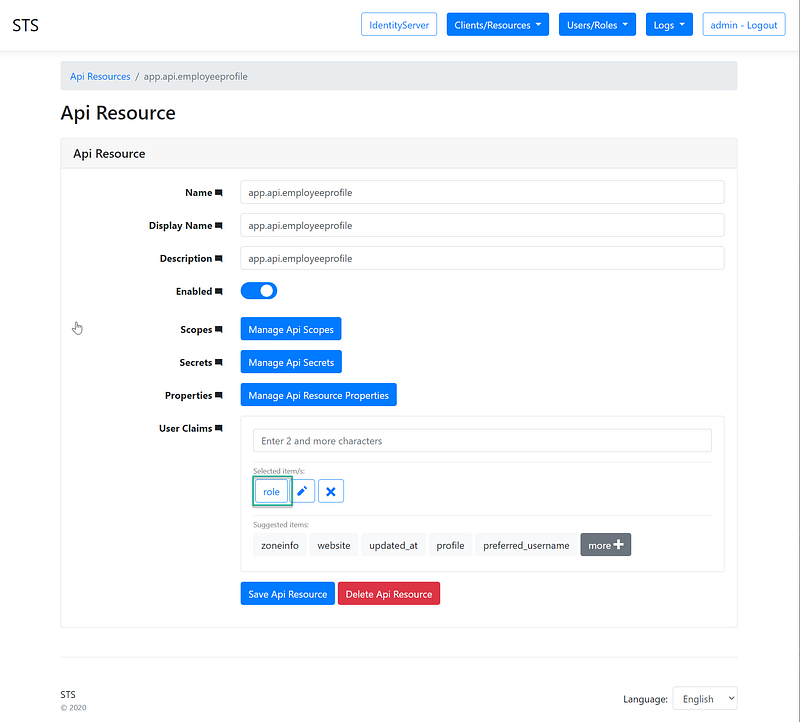
To add a role to the access token, navigate to the Api Resource, and add “role” to User Claims. See Figure 4.

Figure 4 — Add role to Api Resource > User Claims

Part 3 — Implement a policy to limit Delete action to only users in the admin role

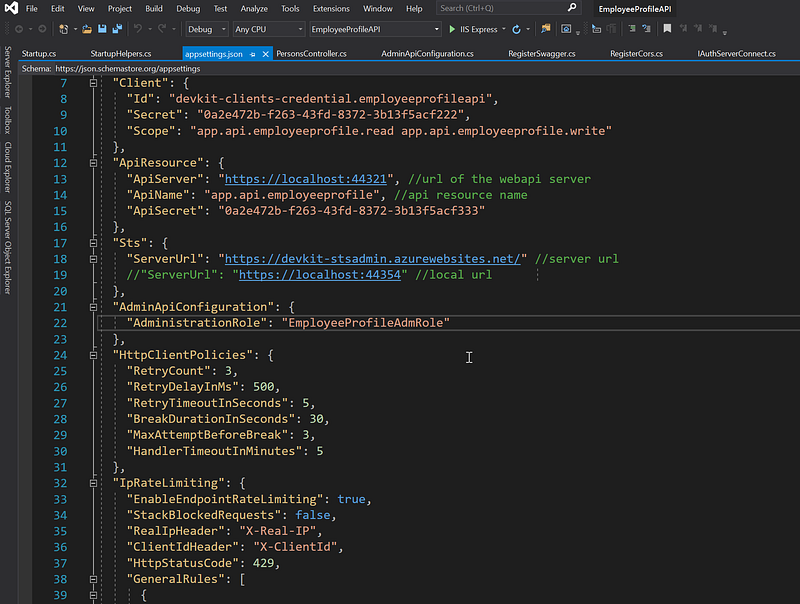
Task 1 — Update appsettings.json with a configuration setting of the admin role name. See Figure 5 (line 22)

Figure 5 — Admin role name settings in the appsettings.json in the EmployeeProfile WebAPI

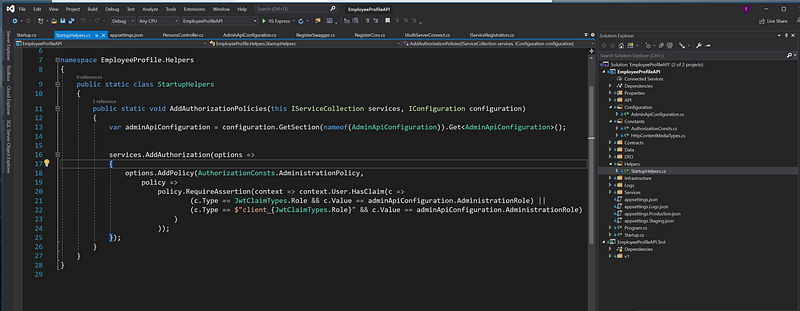
Task 2 — Add code to setup Policy. See figure 6.

Figure 6 — code to setup add authorized policy

Task 3 — Add the policy to the Authorize attribute at the action level in the controller. See Figure 7.

Figure 7 — Add a policy to the “Authorize” attribute

Test Drive

Login account: (janedoe, Pa$$word123)

Angular SPA: https://devkit-cli-angular-oidc-oauth2.azurewebsites.net

WebAPI: https://devkit-api-employeeprofile.azurewebsites.net/swagger/index.html

Source Code

Git Repo: https://github.com/workcontrolgit/devkit-apiresources-employeeprofileapi

Related Tutorials

Rapid Prototype Asp.Net Core REST API using KissApi Template — use Visual Studio template to generate Clean Architecture solution based on Repository Pattern, Unit of Work, Dapper, SQLKata, and Swagger.

Summary

This tutorial provides step by step instructions to set up and configure a policy to secure the REST API. The source code for this tutTo view all other related tutorials, visit DevKit WebAPI Security.

Identityserver4
Identity Management
Angular
Aspnetcore
Recommended from ReadMedium