
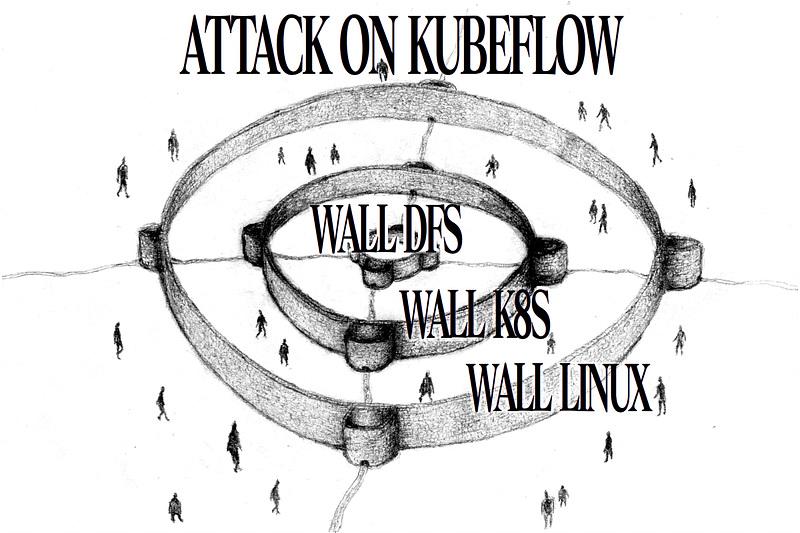
Deploying Kubeflow to a Bare-Metal GPU Cluster from Scratch
My experience of deploying Google’s Kubernetes ML toolkit on physical servers with multiple GPUs
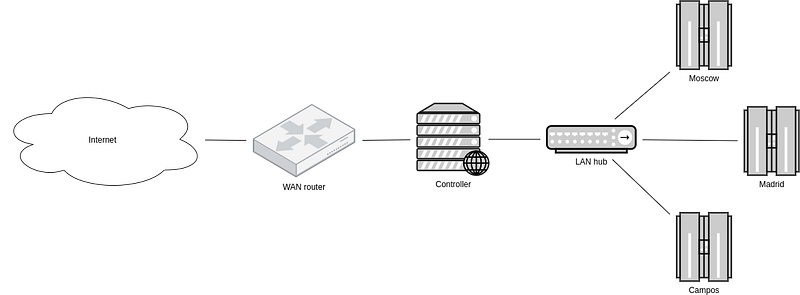
Hardware
I’ve got 3 standard Supermicro towers with 256GB RAM, an SSD, 5 HDDs, and 4 GPUs each. Ethernet connects them to the “controller” Dell server with access to the internet and is supposed to gate SSH connections to the cluster. I name the towers by native cities of the team’s members; I find that scheme more interesting than assigning random adjectives (“aardvark”, “intrepid”), prefixed indexes (“data-science1”, “data-science2”), or Greek alphabet letters (“alpha”, “beta”) that I’ve seen too many times everywhere I used to work. When somebody asks you on which server are you training a network, you can answer, “I am in Madrid” or “I am in Moscow”.
Installing Linux
I installed Ubuntu 20.04 on each machine. There were certain difficulties on this step already: without configuring PXE (boot over the network), the only civilized way to install OS is by booting from a flash stick, and the Dell server did not support it. I mean, there were USB ports, of course, but their UEFI did not see a bootable device. I had to burn a DVD in 2020, and I still cannot believe it. Installing Ubuntu on the Supermicro ones wasn’t a breeze, either. GRUB could not install due to a screwed UEFI, so I had to drop into the kernel shell during the installation and hack fixes on the fly.
PXE stands for Preboot Execution Environment. PXE specifies that the machine boots from an image that downloads by TFTP instead of reading from disk as usual.
I always disable the kernel security patches on computing instances if I know they operate in a trusted network with whitelisted users. The collateral performance penalty is much more expensive than the imposed risks. So I edited /etc/default/grub on the GPU towers like the following:
GRUB_CMDLINE_LINUX_DEFAULT="pti=off spectre_v2=off l1tf=off nospec_store_bypass_disable no_stf_barrier"GRUB is an open-source bootloader that can execute the Linux kernel as a regular ELF application. The command line flags in
/etc/default/grubare realargv.
As I mentioned in one of my old blog posts, it is critical to disable IOMMU if you plan peer-to-peer GPU communication, e.g., multi-GPU model training in Tensorflow or PyTorch. This is no secret and often bubbles up in their GitHub issues.
GRUB_CMDLINE_LINUX_DEFAULT="intel_iommu=off rcutree.rcu_idle_gp_delay=1"IOMMU stands for input-output memory management unit. In our context, IOMMU relates to the virtualization of direct memory access (DMA). Intel CPUs implement it under the name Intel VT-d, “Virtualization Technology for Directed I/O”.
I set up static DHCP leases of the intranet in the controller using udhcpd, which is easily installable with apt. Here is my /etc/udhcpd.conf:
start 192.168.2.2
end 192.168.2.16
interface eno2 # eno1 interface connects to the internet
max_leases 32
static_lease 0C:C4:7A:80:09:1F 192.168.2.2
static_lease 0C:C4:7A:8A:18:87 192.168.2.12
static_lease AC:1F:6B:20:F6:F9 192.168.2.3
static_lease 0C:C4:7A:ED:F1:76 192.168.2.13
static_lease AC:1F:6B:24:1E:FF 192.168.2.4
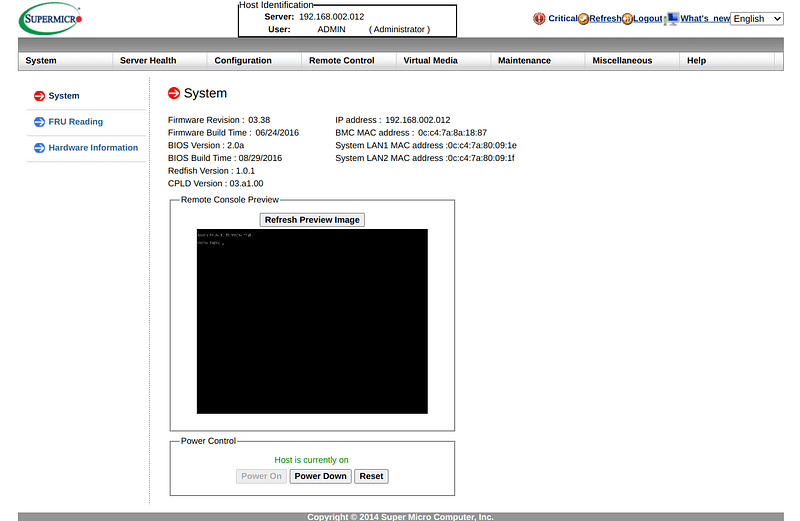
static_lease AC:1F:6B:2F:98:52 192.168.2.14You may notice that there are 6 records for 3 machines. The ones that end with .1x refer to the IPMI — an independent computing unit in each tower to remotely manage the state, for example, to turn on the power or to view the screen. IPMI does not require a special setup: plug in the Ethernet cable and access the web interface by HTTPS.
I opted for a traditional configuration management solution based on Ansible to manage the machines. That’s not as fancy as custom PXE with Terraform, but hey, you don’t need a private helicopter to go downtown on vacation. At its core, Ansible is as simple as the automation of executing SSH commands on the predefined hosts. I populated /etc/ansible/hosts with the GPU tower names:
[cluster]
moscow
madrid
campos
I maintain cluster.yml to describe the configuration and apply it with ansible-playbook -K cluster.yml. Here is a sample to ensure my user exists and can SSH using my private key with a fingerprint on GitHub:
---
- hosts: cluster
  become: yes
  become_user: root
  tasks:
    - name: Group "docker"
      group:
        name: docker
    - name: User "vadim"
      user:
        name: vadim
        shell: /bin/bash
        groups: adm,sudo,cdrom,docker,dip,plugdev,lxd
        append: yes
        uid: 1000
        create_home: yes
    - name: vadim's SSH keys
      authorized_key:
        user: vadim
        state: present
        key: https://github.com/vmarkovtsev.keys
I need to run an SSH server on the machine, of course. Ubuntu installer conveniently allows to set up an SSH server before the first boot.
Ansible is a great incremental solution, too. You are not forced to configure everything on day 0. Instead, you can fight with the configuration debt when there is time.
Installing Kubernetes
I decided to try k0s. There were a few advantages that hooked me:
- Easy bootstrap. Download a big binary without external dependencies, copy it to each node, run
k0s install, and you are done. - Easy initial configuration using the same
k0scommand. - A reasonable set of included batteries, e.g., Calico networking and etcd database with the cluster’s state.
- Vanilla Kubernetes so that I did not have to learn another snowball of DevOps technologies.
Kubernetes is a federation of services running on one or more physical machines. There are two operation modes: the controller and the worker. Controllers manage workers. Both can scale horizontally — that is, increasing the number of instances. If the users do not care about high availability and failovers, it is enough to spawn only one controller.
The official documentation lacks details at the moment, so let me walk through the process of deploying k0s step by step. Run this on the controller:
sudo k0s install controllerThat command will create /etc/systemd/system/k0scontroller.service that packages k0s controller instance as a systemd service which you can conveniently sudo systemctl start|stop|restart. Therefore we start it:
sudo systemctl start k0scontroller.serviceThe next missing ingredient is kubectl — the Kubernetes command-line commander that everybody uses. I prefer to install it with snap:
sudo snap install kubectl --classick0s provides an admin configuration for kubectl, aka KUBECONFIG, which we will use to create the regular user:
sudo cp /var/lib/k0s/pki/admin.conf .
sudo chown $(whoami) admin.conf
export KUBECONFIG=$(pwd)/admin.conf
export clusterUser=$(whoami)
kubectl create clusterrolebinding $clusterUser-admin-binding --clusterrole=admin --user=$clusterUser
export KUBECONFIG=
mkdir -p ~/.kube
sudo k0s kubeconfig create --groups "system:masters" $clusterUser > ~/.kube/config
Finally, we have to join the workers to the cluster’s controller. The documentation nails that procedure, so I don’t repeat it.
I caught two annoying problems after succeeding with the described setup.
kubectl logsandkubectl exectimed out with an 80% chance. The error message was always the same:error dialing backend: dial tcp …: connection timed out.- The system pods in
kube-systemnamespace failed to boot with the status “ImagePullBackOff”.kubectl describe podindicated a DNS resolution timeout of, e.g., registry-1.docker.io — the Docker container registry. However, the images successfully pulled 50% of the time I restarted pods manually withkubectl get pod -n kube-system <whatever> -o yaml | kubectl replace --force -f -.
kubectl logsconnects directly to a Kubernetes worker and requests the logs of the specified pod. If the pod contains more than one container, you have to specify which container to address. The command works similar todocker logs.
kubectl execconnects directly to a Kubernetes worker and executes an arbitrary command in the specified pod. Likewise, you have to specify the container of the pod runs more than one. The command works similar todocker exec.
Those problems did not reproduce in regular docker on the worker machines. The advice in “Debugging DNS Resolution” in the official Kubernetes docs did not help. Having spent a few hours debugging, I found out that:
kubectl logsandkubectl exectimed out because kubelet-s listened on the wrong network interface. Each GPU tower has two physical Ethernet sockets, and the network is connected ateno2whileeno1remains unconfigured. Kubernetes cannot figure out the primary interface and Calico’s routing breaks. I still don’t fully understand why the commands worked sometimes. I fixed the problem by executing:
kubectl set env daemonset/calico-node -n kube-system IP_AUTODETECTION_METHOD=interface=eno22. It was a bad idea to run a (hacky) DNS server on the controller. Although I did not mention it, I initially forwarded DNS to systemd-resolved using the following service configuration:
[Unit]
Description = Forward DNS lookups from 192.168.2.0/24 to 127.0.0.53
After = network.target
[Service]
ExecStart = /usr/bin/socat UDP-LISTEN:53,fork,reuseaddr,bind=192.168.2.1 UDP:127.0.0.53:53[Install]
WantedBy = multi-user.targetsystemd-resolved is the built-in DNS middleware in Ubuntu, so I cut the corner and shot myself in the foot. My hack with socat worked surprisingly well for everything but containerd . I intended to avoid configuring a fully-featured DNS server and hardcoding IPs in /etc/hosts.
Container runtime is the engine to pull and execute container images. Kubernetes used to default to the Docker runtime. It has recently switched to CRI and the lower level containerd runtime that Docker runtime itself grounds on. Most of the GPU integration manuals in the internet assume the Docker runtime and hence no longer apply to the modern Kubernetes.
There is one final thing left to configure: NVIDIA GPU scheduling. What it practically means is that when the pod spec goes like
metadata:
  spec:
    ...
    containers:
    - ...
      limits:
        nvidia.com/gpu: 2
then Kubernetes ensures that /dev/nvidia0 and /dev/nvidia1 exist inside the container.
k0s briefly mentions how to enable GPUs in the docs, but the actual procedure is a bit more complicated. There is a great post about solving the task in k3s by Michael Weibel, and k0s should be adjusted similarly.
First, you install the NVIDIA driver on each of the GPU towers. NVIDIA provides an Ansible role to automate that. Add nvidia-smi to rc.localto create the devices at boot time. Install nvidia-container-runtime by following the NVIDIA docs. Patch the containerd configuration on the worker nodes as described in Joseph Borġ’s blog post, except that you should replace /etc/containerd/config.toml with /etc/k0s/containerd.toml and change the header as follows:
version = 2
root = "/var/lib/k0s/containerd"
state = "/run/k0s/containerd"
...
[grpc]
address = "/run/k0s/containerd.sock"Then you figure out the Kubernetes server version from kubectl version — say, 1.20, and apply a daemonset from Google so that the cluster learns a new resource type nvidia.com/gpu:
kubectl apply -f https://raw.githubusercontent.com/kubernetes/kubernetes/release-1.20/cluster/addons/device-plugins/nvidia-gpu/daemonset.yamlThen you have to mark the worker nodes as NVIDIA-friendly:
kubectl label nodes --all cloud.google.com/gke-accelerator=trueVoila! Check the status with kubectl get daemonset -n kube-system nvidia-gpu-device-plugin. It should output n/n where n is the number of GPU towers:
NAME                       DESIRED   CURRENT   READY   UP-TO-DATE
nvidia-gpu-device-plugin   3         3         3       3
You can access gory containerd internals of k0s by SSH-ing to a worker,
sudo apt install containerd,sudo systemctl disable containerd.service(Kubernetes runs their own), and issuing commands withsudo ctr --address /run/k0s/containerd.sock -n k8s.io. For example, the following command will list all the pulled images:sudo ctr --address /run/k0s/containerd.sock -n k8s.io image list. The interface is similar todocker.
Distributed File System
Kubeflow’s docs cover the installation to an existing Kubernetes cluster in detail. They stress the need for the default StorageClass several times, and for a reason: no shared file system => no ML. StorageClass defines the backend to store and mount persistent volumes inside pods in Kubernetes. The class works uniformly across the cluster so that the file changes in one pod are expected to be visible to the other. We have to return to OS and Kubernetes configuration.
I decided to deploy Rancher’s local path provisioner and a very poor but proud man’s distributed FS based on NFS cross mounts and mergerFS. I’ll begin with the DFS.
NFS stands for Network File System and is natively supported by Linux, macOS, and Windows 10. That’s an ancient protocol older than the blog post’s author. Don’t let its age fool you though: NFS is usually fast and reliable.
I had previously had experience with GlusterFS. While it used to work stable, I was not satisfied with its performance. The elapsed time to write, read, and delete lots of small files of e.g. ImageNet was just unacceptable in a similar cluster configuration. Back then, GlusterFS was deployed by brilliant DevOps engineers Maartje Eyskens and Rafael Porres Molina, so the poor performance should not have resulted from bad configuration.
So I designed a fully-connected graph of NFS mounts between the machines.
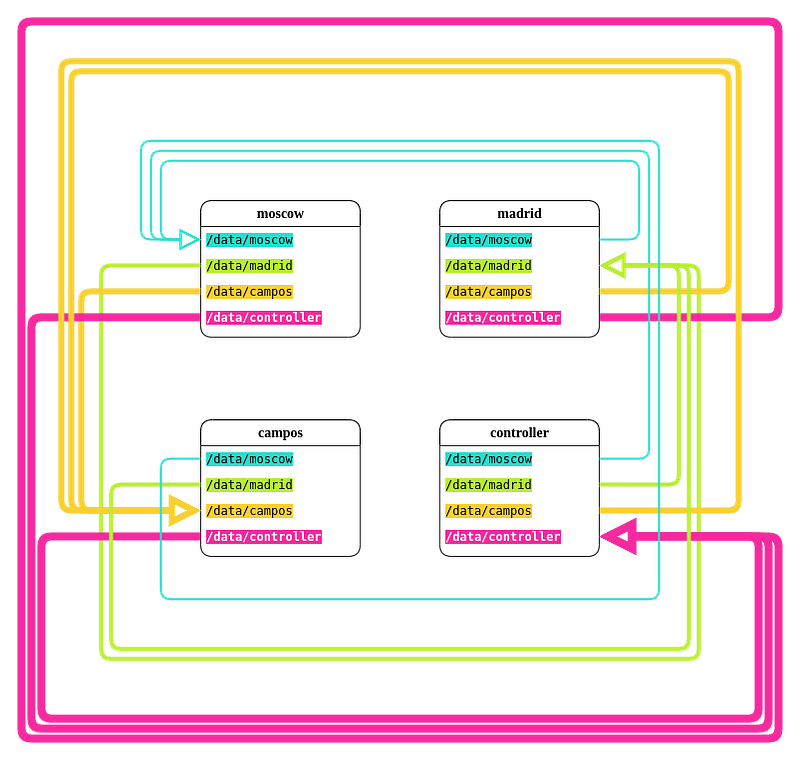
Node X exports /data/X through NFS and mounts the rest of the /data subdirectories by NFS. That’s not a shared FS yet: we need to unite all the subdirectories together. Several file systems exist in Linux that merge directories or images, such as OverlayFS — Docker uses it to stack container layers on top of each other. Our goal is different from Docker’s because we don’t have a hierarchy, all 4 sub-/data-s are equivalent. mergerFS is a nice FUSE (does not require a kernel module) tool to reach that goal. Here is an example from the project’s README:
A         +      B        =       C
/disk1           /disk2           /merged
|                |                |
+-- /dir1        +-- /dir1        +-- /dir1
|   |            |   |            |   |
|   +-- file1    |   +-- file2    |   +-- file1
|                |   +-- file3    |   +-- file2
+-- /dir2        |                |   +-- file3
|   |            +-- /dir3        |
|   +-- file4        |            +-- /dir2
|                     +-- file5   |   |
+-- file6                         |   +-- file4
                                  |
                                  +-- /dir3
                                  |   |
                                  |   +-- file5
                                  |
                                  +-- file6
mergerFS supports various strategies of how to execute file system operations that it calls policies. When the user creates a directory, it can appear in all the merged /data-s or in only one of them; when the user creates a file, it can go to the local /data or the one with the most free space. For example, this is how I configured /etc/fstab on moscow to mount the merged directories at /dfs (tabs replaced with new lines for clarity):
/data/moscow:/data/campos:/data/madrid:/data/controller
/dfs
fuse.mergerfs allow_other,use_ino,cache.files=partial,dropcacheonclose=true,category.create=all
/etc/fstabdefines the local file systems on the host. OS mounts the listed items at startup.
When we write a new file on moscow, we operate on the local /data/moscow and the other machines access it through NFS. On the other hand, the directory structure replicates everywhere.
Let’s consider the pros and cons of such DFS.
Pros:
- Impossible to corrupt. Files are stored on nodes as a whole, not in scattered blocks.
- If we work with local files, our performance matches the native disk IOPS.
- Peer-to-peer NFS reads of external files are performant, too.
- Fast file removals.
Cons:
- If some machine goes down, we lose access to its files. This is not a problem when we have 4 machines, though.
- Reading and writing big files that are not stored locally works slower than on real DFS-s that scatter file chunks across the nodes so that when you read or write them, you aggregate data in parallel. We can mitigate this problem by copying big files locally, and honestly, this is the best approach for typical ML/DL tasks if the disk has enough free space.
NFS mounts were configured with
nofail,soft,retry=1,timeo=10so that the kernel does not infinitely wait for a disconnected share to reappear, blocking the userspace processes and seeding chaos and destruction.
It is left to deploy the local path StorageClass on Kubernetes so that the workers persist data on /dfs:
wget https://raw.githubusercontent.com/rancher/local-path-provisioner/master/deploy/local-path-storage.yaml
sed -i 's/\/opt\/local-path-provisioner/\/dfs/g' local-path-storage.yaml
kubectl apply -f local-path-storage.yaml
kubectl patch storageclass local-path -p '{"metadata": {"annotations":{"storageclass.kubernetes.io/is-default-class":"true"}}}'
You should see something similar upon finishing those manipulations:
$ kubectl get storageclass
NAME                   PROVISIONER             RECLAIMPOLICY   VOLUMEBINDINGMODE      ALLOWVOLUMEEXPANSION   AGE
local-path (default)   rancher.io/local-path   Delete          WaitForFirstConsumer   false                  13d
Installing Kubeflow
In theory, if all the prerequisites are satisifed, deploying Kubeflow is easy:
sudo mkdir /opt/my-kubeflow && cd /opt/my-kubeflow
chown $(whoami) .
export BASE_DIR=/opt
export KF_NAME=my-kubeflow
export KF_DIR=${BASE_DIR}/${KF_NAME}
# Download kfctl from https://github.com/kubeflow/kfctl/releases# Suppose that the version is 1.2
wget https://raw.githubusercontent.com/kubeflow/manifests/v1.2-branch/kfdef/kfctl_istio_dex.v1.2.0.yaml -o kfctl_istio_dex.yaml
kfctl apply -V -f kfctl_istio_dex.yamlWell, the practice was not so smooth, unfortunately. kfctl printed that everything was deployed, except that it wasn’t. I hit a nasty problem with katib. Katib is Google’s AutoML solution for Kubernetes/Kubeflow. It does hyperoptimization, for example.
$ kubectl get pods -n kubeflowNAME READY STATUS RESTARTS
katib-db-manager-... 0/1 CrashLoopBackOff 235
katib-mysql-... 0/1 CrashLoopBackOff 24The log messages were not very informative, so it took me several hours to understand the reason for the failure. I should briefly recap Readiness and Liveness probes in Kubernetes.
Kubernetes understands whether the launched pod is prepared for work by executing a Readiness probe. It runs a shell script periodically and checks the exit code. Kubernetes marks the pod as READY if the exit code is 0.
Kubernetes understands whether the launched pod is functional (“alive”) by executing a Liveness probe. It runs a shell script periodically and checks the exit code. Kubernetes restarts the pod if the exit code is not 0.
katib-mysql initializes a MySQL database at first boot. The configuration delays the Liveness probe by 30 seconds. It happened that 30 seconds was too little, and the pod could not finish the initialization on time. Kubernetes killed it. Unfortunately, the DB initialization is not preemptible, and the restarted pod fails again.
The solution to that problem was to increase initialDelaySeconds of the Liveness probe.
KUBE_EDITOR=nano kubectl edit deployment katib-mysql -n kubeflow
# locate livenessProbe and set initialDelaySeconds to 300
# save and exit
# Important! Delete the old screwed database, e.g.
# pvc-25dc2b81-9873-430f-8bc4-365fe5ff0357_kubeflow_katib-mysqlkubectl delete pod -n kubeflow katib-mysql-...Finally, we have to set up draft port forwarding to access the web interface. I wrote a systemd service:
[Unit]
Description=kubeflow port forwarding
ConditionFileIsExecutable=/snap/bin/kubectlAfter=k0sserver.service
Wants=k0sserver.service[Service]
StartLimitInterval=5
StartLimitBurst=10
Environment="KUBECONFIG=/var/lib/k0s/pki/admin.conf"
ExecStart=/snap/bin/kubectl port-forward svc/istio-ingressgateway -n istio-system 8080:80...Istio is a part of Kubeflow to organize a service mesh and manage the traffic. For example, Kuberflow uses Istio to expose the internal services to the outside in a controlled and unified way so that you don’t have to
kubectl port-forwardindividual pods.
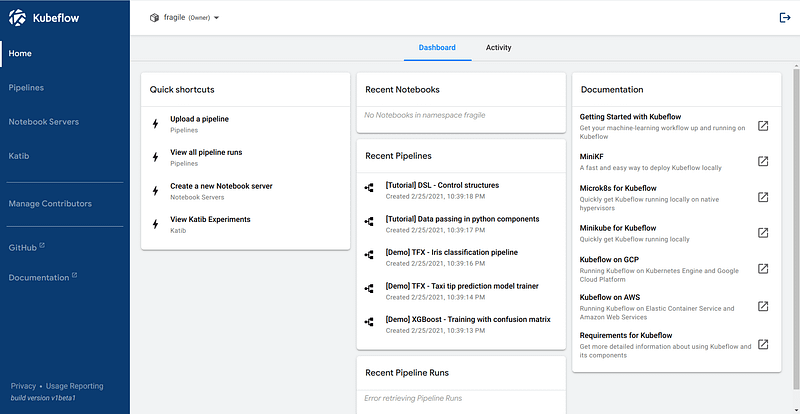
Hello, Kubeflow!
Wrap up
I tried to sketch the process of setting up a bare-metal cluster for doing ML from scratch. It definitely was a pain. I had to solve a multitude of problems, and I could not describe all of them in the post because it would otherwise have blown up. Yet, there was nothing complex for a seasoned DevOps engineer. MLOps in 2021 is certainly easier than a few years ago. Yet if you are not mentally prepared to open Pandora’s box of modern DevOps technologies — because you won’t solve unavoidable problems without understanding what you are doing — I recommend to forget about bare-metal and to keep flying in the clouds.
As some realized, I cut a lot of corners. A dedicated DevOps team would rebuild the cluster to squeeze the most from Kubernetes and the underlying hardware. I estimate my efforts at 2 weeks of full-time work. On the other hand, the more advanced the configuration is, the stronger the dependency from the maintainers and the wider surface of exposure to component misbehavior and breakages.
Please subscribe to @vadimlearning on Twitter so that you don’t miss my next blog post. Big thanks to @Miau_DB for his funding, support and precious advice; @aina_fiol for proofreading. We are consulting, shoot an email to guillem at fragile.tech if interested.


