
Deploying a Web Application on Azure Kubernetes Service (AKS) Using Azure CLI
Deploying a web application typically involves intricate procedures such as server provisioning, network setup, and high-availability planning. Azure Kubernetes Service (AKS) greatly reduces this burden by handling the underlying infrastructure, allowing developers to prioritize building and refining their applications. In this blog post, we will guide you step-by-step through the deployment of a web application onto AKS using the Azure Command-Line Interface (CLI), illustrating how you can leverage the power of cloud computing to streamline your deployment workflows.
Let’s begin by exploring how AKS makes Kubernetes more accessible and how the Azure CLI can be a catalyst for efficiency.
Understanding AKS and Its Advantages
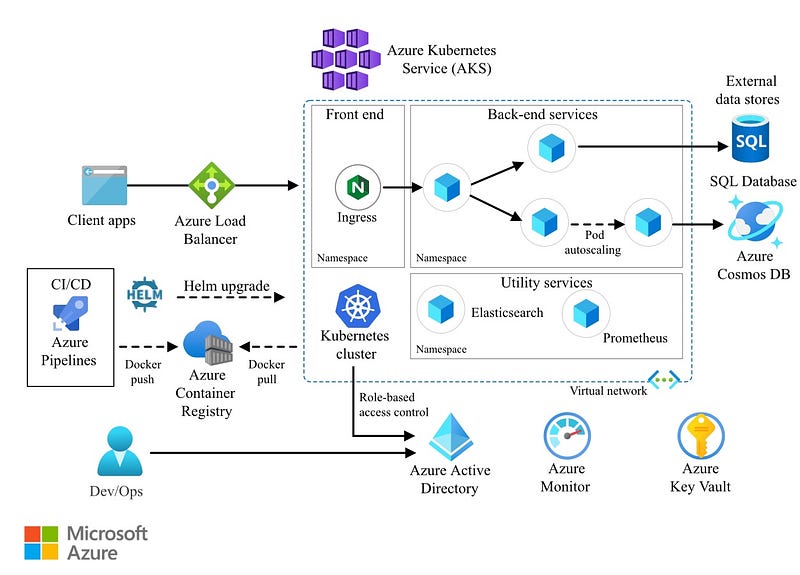
Azure Kubernetes Service integrates deeply with Azure’s core services, such as Azure Active Directory and Azure Monitor, enhancing security and observability. It provides automated version upgrades and patching, making it easier to maintain and secure your environment.
Azure CLI: Your Tool for Automation
The Azure CLI is a powerful tool designed to facilitate the management of Azure services. It allows for automation of repetitive tasks through scripting and supports various operating systems.
Now, we’ll break down the deployment process into manageable steps:
- Initial Setup: We’ll start with setting up the Azure CLI and how to authenticate your Azure account.
- Cluster Creation: Learn to spin up a Kubernetes cluster in AKS, which will serve as the backbone for your application.
- Containerization of the Application: Walkthrough containerizing your application with Docker, creating a container image, and pushing it to Azure Container Registry.
- Deployment and Management: How to deploy your containerized application to AKS and manage it using Kubernetes commands.
By the end of this article, you’ll have a clear roadmap to deploy your web applications with confidence using AKS and Azure CLI. So let’s dive in and simplify the deployment process with Azure’s powerful services.
Prerequisites
Before we begin, ensure you have the following:
- An Azure account.
- Azure CLI installed on your machine.
- Docker installed locally for containerization of the application.
- A web application ready for deployment.
Step 1: Install Azure CLI and Log In
If you haven’t installed the Azure CLI, you can download it from the [official website](https://docs.microsoft.com/en-us/cli/azure/install-azure-cli). After installation, open your terminal and log in to your Azure account using:
az login
A web page will open for you to enter your Azure credentials. Once logged in, set your subscription using:
az account set – subscription “<Your-Subscription-ID>”Step 2: Create an AKS Cluster
To deploy your application, you need a Kubernetes cluster. You can create one with the following commands:
# Create a resource group

az group create  – name MyResourceGroup  – location eastus

# Create the AKS cluster

az aks create  – resource-group MyResourceGroup  – name MyAKSCluster  – node-count 2  – enable-addons monitoring  – generate-ssh-keys
This command sets up a cluster with two nodes and enables monitoring through Azure Monitor. The SSH keys are generated for secure access to the nodes if needed.
Step 3: Configure kubectl to Connect to Your Cluster
After creating your AKS cluster, you need to configure `kubectl` to communicate with it. Run the following command to configure kubectl context:
az aks get-credentials – resource-group MyResourceGroup – name MyAKSCluster
Step 4: Containerize Your Web Application
Create a `Dockerfile` in the root of your application directory and define how your application should be containerized. Then, build the Docker image and push it to Azure Container Registry (ACR) or Docker Hub.
# Log in to the ACR

az acr login  – name MyRegistry

# Tag your image

docker tag myapp:latest myregistry.azurecr.io/myapp:v1

# Push the image to the ACR

docker push myregistry.azurecr.io/myapp:v1
Step 5: Create a Deployment in AKS
You’ll need to create a deployment definition in YAML format. This file defines the desired state for your application.
apiVersion: apps/v1
kind: Deployment
metadata:
  name: myapp-deployment
spec:
  replicas: 3
  selector:
    matchLabels:
      app: myapp
  template:
    metadata:
      labels:
        app: myapp
    spec:
      containers:
      - name: myapp
        image: myregistry.azurecr.io/myapp:v1
        ports:
        - containerPort: 80
Deploy your application using `kubectl`:
kubectl apply -f deployment.yaml
Step 6: Expose Your Application
Create a service to expose your application to the internet:
kubectl expose deployment myapp-deployment – type=LoadBalancer – name=myapp-service – port=80Step 7: Access Your Application
It may take a few minutes for the Azure to assign an IP. Once done, retrieve your application’s IP using:
kubectl get service myapp-service
Look for the `EXTERNAL-IP` assigned to your service. This is the IP address you can use to access your web application.
You’ve now successfully deployed a web application to AKS using Azure CLI. This service abstracts much of the complexity associated with managing a Kubernetes cluster, such as scaling, load balancing, and securing your applications.
As your application grows, you can easily scale your deployment up or down, set up CI/CD pipelines, and leverage advanced networking features offered by AKS. Azure’s integration with Kubernetes makes it a powerful platform for deploying containerized applications at scale.
Remember, this is just the start. AKS offers a breadth of features and integrations that can help you optimize your application for the cloud.
Additional Resources
For more information on AKS and Azure CLI, visit the AKS documentation and Azure CLI documentation.
Happy deploying!


