avatarKavit (zenwraight)

Free AI web copilot to create summaries, insights and extended knowledge, download it at here

2413

Abstract

Python, PHP, and Go.</p><p id="010c">The first thing we need to do is define which libraries our application uses. That way, Heroku knows which ones to provide for us, similar to how we install them locally when developing the app.</p><p id="ace9">To achieve this, we need to create a <code>requirements.txt</code> file with all of the modules:</p><div id="3f36"><pre>pip <span class="hljs-keyword">freeze</span> > requirements.txt</pre></div><p id="aa1a">For Heroku to be able to run our application like it should, we need to define a set of processes/commands that it should run beforehand. These commands are located in the <code>Procfile</code>:</p><div id="53c9"><pre>web: gunicorn <span class="hljs-keyword">app</span>:<span class="hljs-keyword">app</span></pre></div><p id="b649">The <code>web</code> command tells Heroku to start a web server for the application, using <code>gunicorn</code>. Since our application is called <code>app.py</code>, we've set the <code>app</code> name to be <code>app</code> as well.</p><h2 id="0705">Heroku Account</h2><p id="9c5a">Now, we should <a href="https://signup.heroku.com/">create a Heroku account</a>.</p><p id="eebe">Once that is out of the way, on the dashboard, select <b>New</b> -> <b>Create new app.</b></p><p id="0939">Choose a name for the application and choose a region of where you’d like to host it:</p><figure id="ec64"><img src="https://cdn-images-1.readmedium.com/v2/resize:fit:800/0*pFv-mOm8eW4R2vN9.png"><figcaption></figcaption></figure><p id="9118">Once the application is created on Heroku, we’re ready to deploy it online.</p><h2 id="f574">Git</h2><p id="0375">To upload our code, we’ll use <a href="https://stackabuse.com/tag/git/">Git</a>. First, let’s make a git repository:</p><div id="830f"><pre><span class="hljs-variable"> </span>git init .</pre></div><p id="9b86">And now, let's add our files and <code>commit</code>:</p><div id="6983"><pre><span class="hljs-variable"> </span>git add app.py <span class="hljs-title class_">Procfile</span> requirements.txt <span class="hljs-variable">$ </span>git commit -m <span class="hljs-string">"first commit"</span></pre></div><h2 id="4209">Deploying the App to Heroku</h2><p id="1c8b">To finally deploy the application, we’ll need to install the <a href="https://devcenter.heroku.com/articles/heroku-command-line">Heroku CLI</a> with which we’ll run Heroku-related commands. Let’s login

Options

to our account using our credentials by running the command:</p><div id="ac8a"><pre><span class="hljs-variable"> </span>heroku login -i</pre></div><p id="fa57">Alternatively, we can login using the browser if we run the command:</p><div id="834c"><pre><span class="hljs-variable"> </span>heroku login</pre></div><p id="64ba">At this point, while logged in, we should add our repository to the remote one:</p><div id="aa3c"><pre> heroku git:remote -<span class="hljs-keyword">a</span> {your-<span class="hljs-literal">project</span>-<span class="hljs-literal">name</span>}</pre></div><p id="2b18">Be sure to replace <code>{your-project-name}</code> with the actual name of your project you selected in the earlier step.</p><p id="3050">And with that done, let’s upload the project by <a href="https://stackabuse.com/git-push-local-branch-and-track-it/">pushing</a> it to Heroku:</p><div id="a3e5"><pre> git <span class="hljs-built_in">push</span> heroku master</pre></div><p id="2db6">A lengthy progress log should come up on your terminal, ending with:</p><div id="8b3c"><pre><span class="hljs-string">...</span> remote: <span class="hljs-params">-----</span>> Discovering process types remote: Procfile declares types -> web remote: remote: <span class="hljs-params">-----</span>> Compressing.<span class="hljs-string">..</span> remote: Done: 45.1M remote: <span class="hljs-params">-----</span>> Launching.<span class="hljs-string">..</span> remote: Released v4 remote: https:<span class="hljs-string">//</span>{your-project-name}<span class="hljs-string">.herokuapp.com/</span> deployed to Heroku remote: remote: Verifying <span class="hljs-keyword">deploy</span>.<span class="hljs-string">..</span> done. To https:<span class="hljs-string">//git.heroku.com/</span>{your-project-name}<span class="hljs-string">.git</span> ae85864.<span class="hljs-string">.4e63b46</span> master -> master</pre></div><p id="f330">Congratulations, you have successfully uploaded your first web app to Heroku! It’s now time now to test and verify our API.</p><h1 id="4b5a">Testing the API</h1><p id="2be6">In the log that has been shown in the console you will find a link for your application <code>https://{your-project-name}.herokuapp.com/</code>, this link can also be found under the <i>Settings</i> tab, in the <i>Domains and certificates</i> section.</p></article></body>

Deploying a Flask Application to Heroku

Introduction

In this tutorial you will learn how to deploy a Flask application to Heroku. The app can be as simple as a “Hello World” app to a social media monitoring platform.

Building a REST API with Flask

I usually create a local virtual environment before moving forward with python web application development, that’s because I don’t want to cause discrepancies in old packages with new packages that I am going to install.

You can do so by running two commands:-

python -m venv venv/

This will create a folder named venv where you ran the above command. Then in order to start and enter the environment, type:-

source venv/bin/activate

Now that we are inside our virtual environment, let’s install our dependency and type in our sample code inside app.py file

pip install flask
pip install gunicorn
touch app.py

Flask is the framework that we will be using to develop our web app using python and Gunicorn is our server.

Code:-

To test your application locally, let’s hit the http://127.0.0.1:5000/ endpoint. If everything is fine, we should be greeted with a welcome message.

Now that we have our app working, let’s deploy our web app on Heroku.

Heroku

Heroku is one of the first cloud platform as a service (PaaS) and supports several languages — Ruby, Java, Node.js, Scala, Clojure, Python, PHP, and Go.

The first thing we need to do is define which libraries our application uses. That way, Heroku knows which ones to provide for us, similar to how we install them locally when developing the app.

To achieve this, we need to create a requirements.txt file with all of the modules:

pip freeze > requirements.txt

For Heroku to be able to run our application like it should, we need to define a set of processes/commands that it should run beforehand. These commands are located in the Procfile:

web: gunicorn app:app

The web command tells Heroku to start a web server for the application, using gunicorn. Since our application is called app.py, we've set the app name to be app as well.

Heroku Account

Now, we should create a Heroku account.

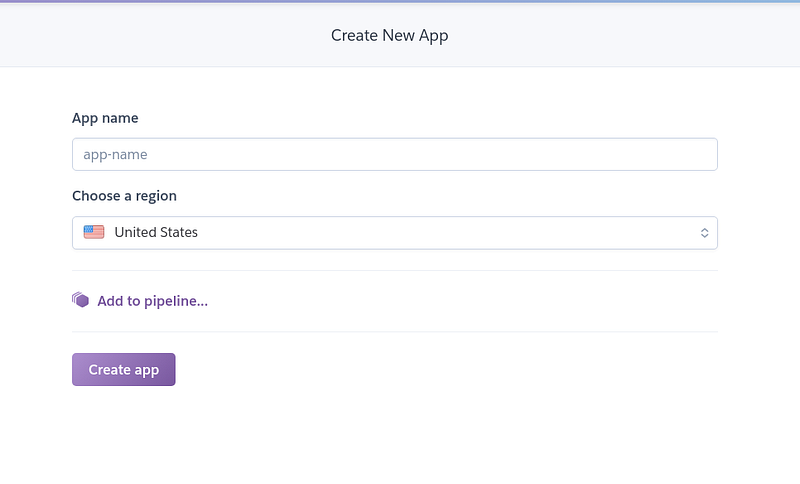
Once that is out of the way, on the dashboard, select New -> Create new app.

Choose a name for the application and choose a region of where you’d like to host it:

Once the application is created on Heroku, we’re ready to deploy it online.

Git

To upload our code, we’ll use Git. First, let’s make a git repository:

$ git init .

And now, let's add our files and commit:

$ git add app.py Procfile requirements.txt
$ git commit -m "first commit"

Deploying the App to Heroku

To finally deploy the application, we’ll need to install the Heroku CLI with which we’ll run Heroku-related commands. Let’s login to our account using our credentials by running the command:

$ heroku login -i

Alternatively, we can login using the browser if we run the command:

$ heroku login

At this point, while logged in, we should add our repository to the remote one:

$ heroku git:remote -a {your-project-name}

Be sure to replace {your-project-name} with the actual name of your project you selected in the earlier step.

And with that done, let’s upload the project by pushing it to Heroku:

$ git push heroku master

A lengthy progress log should come up on your terminal, ending with:

...
remote: -----> Discovering process types
remote:        Procfile declares types -> web
remote:
remote: -----> Compressing...
remote:        Done: 45.1M
remote: -----> Launching...
remote:        Released v4
remote:        https://{your-project-name}.herokuapp.com/ deployed to Heroku
remote:
remote: Verifying deploy... done.
To https://git.heroku.com/{your-project-name}.git
   ae85864..4e63b46  master -> master

Congratulations, you have successfully uploaded your first web app to Heroku! It’s now time now to test and verify our API.

Testing the API

In the log that has been shown in the console you will find a link for your application https://{your-project-name}.herokuapp.com/, this link can also be found under the Settings tab, in the Domains and certificates section.

Flask
Python
Heroku
Herokuapp
Hello World
Recommended from ReadMedium