avatarCaleb

Free AI web copilot to create summaries, insights and extended knowledge, download it at here

13943

Abstract

SH. It’s user-friendly and widely adopted, making it a go-to choice for many who are new to VPS management. But as mentioned earlier, there are plenty of alternatives, and the built-in terminals on macOS and Linux will serve the purpose just as well.</p><h2 id="2339">Downloading and Installing Putty</h2><ul><li><b>Visit the official Putty download page:</b> Navigate to <a href="https://www.putty.org/">the Putty download page</a> and download the latest version suitable for your Windows version (32-bit or 64-bit).</li></ul><div id="4947" class="link-block"> <a href="https://www.putty.org/"> <div> <div> <h2>Download PuTTY - a free SSH and telnet client for Windows</h2> <div><h3>PuTTY is an SSH and telnet client, developed originally by Simon Tatham for the Windows platform. PuTTY is open source…</h3></div> <div><p>www.putty.org</p></div> </div> <div> <div style="background-image: url(https://miro.readmedium.com/v2/resize:fit:320/0*hQ9uwbDLLxKURjDN)"></div> </div> </div> </a> </div><ul><li><b>Install Putty:</b> Once downloaded, run the installer and follow the on-screen instructions. Installation is straightforward and should take just a couple of minutes.</li></ul><h2 id="077e">Connecting to Your VPS</h2><ul><li><b>Launch Putty:</b> After installation, open Putty from your start menu or desktop shortcut.</li><li><b>Enter your VPS details:</b> In the Putty interface, you’ll find a field labeled “Host Name (or IP address).” Here, input your VPS’s IP address provided by OVH upon activation. Ensure the port is set to <code>22</code> (the default SSH port).</li></ul><figure id="92c8"><img src="https://cdn-images-1.readmedium.com/v2/resize:fit:800/1*CS9zodYypu_sO78_8OZ7pQ.png"><figcaption></figcaption></figure><ul><li><b>Click “Open”</b>: After entering your VPS details, click on the “Open” button at the bottom. If this is your first time connecting to your VPS, you might get a security alert. This is normal; click “Yes” to continue.</li><li><b>Login:</b> Once the terminal window pops up, you’ll be prompted for a username and password. The username and the password would have been provided to you by OVH when you set up the VPS.</li></ul><figure id="2c53"><img src="https://cdn-images-1.readmedium.com/v2/resize:fit:800/1*Qy7a5Brx90seP9BbrGALRA.png"><figcaption></figcaption></figure><ul><li><b>Test your connection:</b> After successfully logging in, you’re now directly connected to your VPS! Type <code>ls -larth</code> and hit enter. This command lists files in your current directory, showcasing that you're indeed operating on your remote server.</li></ul><figure id="5fab"><img src="https://cdn-images-1.readmedium.com/v2/resize:fit:800/1*3GAJdJDgyfL1DoxY9tBLeA.png"><figcaption></figcaption></figure><p id="bb22">Establishing a connection to your VPS is a foundational step in server management. Whether you use Putty, another SSH client, or a built-in terminal, the principle remains the same. With this connection established, you’re all set to configure, manage, and deploy applications to your VPS!</p><h1 id="c164">Step 4. Installing Node, NPM, and Git on Your VPS</h1><p id="7c28">Now that you’ve successfully connected to your VPS, the next step is to set up the tools that will allow you to deploy and run your projects. The trifecta for many developers is Node.js (which comes with NPM, its package manager) and Git for version control. In this section, we’ll walk you through the installation process for each of these tools.</p><h2 id="278a">Update Your VPS</h2><p id="756f">Before we dive into the installations, it’s always a good idea to start with an updated server. Run the following commands to update the package lists and upgrade any outdated software:</p><div id="c74b"><pre>sudo apt <span class="hljs-keyword">update</span> sudo apt upgrade <span class="hljs-operator">-</span>y</pre></div><h2 id="0197">Installing Node.js and NPM</h2><div id="96fa"><pre>sudo apt install nodejs npm</pre></div><p id="9cdb"><b>Check the Installation:</b> Confirm that Node.js and NPM were successfully installed:</p><div id="c72c"><pre>node -v npm -v</pre></div><p id="796e">These commands should print the versions of Node.js and NPM, respectively.</p><h2 id="20fc">Installing Git</h2><div id="9542"><pre>sudo apt install git</pre></div><p id="9257"><b>Verify the Installation: </b>To make sure Git has been installed, you can check its version:</p><div id="f141"><pre>git <span class="hljs-attr">--version</span></pre></div><p id="89f0">This should print the version number, confirming a successful installation.</p><p id="750d">With Node.js, NPM, and Git installed, your VPS is now geared up and ready for development! These tools are fundamental for many modern web projects. Whether you’re looking to deploy a Node.js application or manage your projects with Git, you’re all set.</p><p id="fc27">Remember to frequently check for updates for these tools, as the development world moves quickly, and it’s essential to keep your tools up to date to benefit from bug fixes, new features, and performance improvements.</p><h1 id="3910">Step 5. Generating an SSH Key on your VPS and Linking it to Github</h1><p id="bede">SSH keys are a way to identify trusted computers, without involving passwords. By setting up an SSH key, you can create a secure connection between your VPS and GitHub. This allows you to pull and push code without having to enter a password every time. In this section, you’ll be generating an SSH key on your VPS and linking it to your GitHub account.</p><h2 id="9d2f">Generating an SSH Key on Your VPS</h2><p id="ff32"><b>Create the Key:</b> On your VPS, use the <code>ssh-keygen</code> command to start the key generation process:</p><div id="f111"><pre>ssh-keygen</pre></div><p id="85d4"><b>Save the Key: </b>You’ll be prompted to select a location to save the key. The default location (<code>~/.ssh/id_rsa</code>) is usually fine, so you can simply press <code>Enter</code>.</p><p id="1a07"><b>Set a Passphrase (Optional):</b> For added security, you can set a passphrase for your key. If you choose not to use one, simply press <code>Enter</code>.</p><h2 id="d3bf">Copying the Public SSH Key</h2><p id="ade6">Once the key is generated, you’ll need to copy the public key to add it to GitHub. To display and copy your public key, use the following command:</p><div id="363b"><pre><span class="hljs-built_in">cat</span> ~/.ssh/id_rsa.pub</pre></div><p id="bb05">This will display the public key in the terminal. Highlight and copy the entire key.</p><h2 id="3a13">Verifying the authorized_keys File</h2><p id="e181">The <code>authorized_keys</code> file is where the server keeps a list of public keys that are allowed to authenticate. To ensure your newly created key is properly stored:</p><ul><li>Navigate to the <code>.ssh</code> directory:</li></ul><div id="672d"><pre><span class="hljs-built_in">cd</span> ~/.ssh</pre></div><ul><li>Check the content of the <code>authorized_keys</code> file:</li></ul><div id="4d8b"><pre><span class="hljs-built_in">cat</span> authorized_keys</pre></div><p id="f6ff">You should see your public key listed. If not, you can append it:</p><div id="84d4"><pre><span class="hljs-built_in">cat</span> id_rsa.pub >> authorized_keys</pre></div><h2 id="57a9">Adding the SSH Key to Your GitHub Account</h2><ul><li><b>Go to GitHub</b>: Log into your GitHub account.</li><li><b>Access SSH settings</b>: Navigate to the top right corner, click on your profile picture, then click Settings. From the sidebar, choose SSH and GPG keys.</li><li><b>Add a New SSH Key</b>: Click on the New SSH key button.</li><li><b>Paste & Save</b>: In the “Title” field, give your key a descriptive name, like “My VPS.” In the “Key” field, paste the copied public key. Finally, click Add SSH key to save.</li></ul><h2 id="4646">Testing the Connection</h2><p id="6b18">To ensure that everything is set up correctly, you can test the SSH connection to GitHub from your VPS:</p><div id="0367"><pre>ssh -T git<span class="hljs-keyword">@github</span>.com</pre></div><p id="bcf2">You should see a message like:</p><div id="cc9f"><pre>Hi [YourUsername]! You<span class="hljs-symbol">'ve</span> successfully authenticated, but GitHub does <span class="hljs-keyword">not</span> provide shell <span class="hljs-keyword">access</span>.</pre></div><p id="7aa9">This indicates that your VPS can securely communicate with GitHub using SSH.</p><p id="c0da">With your SSH key now generated and linked to GitHub, you’ve established a secure bridge between your VPS and your repository. This will significantly streamline your workflow, eliminating the need for repetitive password inputs during Git operations.</p><h1 id="c2c9">Step 6. Cloning Your Github Repository to the VPS</h1><p id="1538">After setting up an SSH connection between your VPS and GitHub, the next logical step is to clone your repository onto the server. Doing so allows your VPS to have access to the codebase, scripts, and other essential components necessary for running your applications or tasks.</p><h2 id="e701">Navigate to a Suitable Directory</h2><p id="83e7">Before cloning, decide where you want your repository to live on the VPS. For the sake of this tutorial, we'll use the home directory.</p><p id="6fe2">To navigate to your home directory:</p><div id="1f67"><pre><span class="hljs-built_in">cd</span> ~</pre></div><h2 id="2237">Clone the Repository</h2><p id="0e1d">Now, let’s proceed with cloning. Use the following command, replacing <code><username></code> with your GitHub username and <code><repository-name></code> with the name of your repository:</p><div id="4956"><pre>git clone [email protected]:<span class="hljs-tag"><<span class="hljs-name">username</span>></span>/<span class="hljs-tag"><<span class="hljs-name">repository-name</span>></span>.git</pre></div><p id="8fdc">This will create a new directory in your current location with the name of the repository and pull down all the code from GitHub.</p><p id="421f"><i>Note: Ensure you’re using the SSH URL (which starts with <code>[email protected]:</code>) rather than the HTTPS URL.</i></p><h2 id="c27d">Navigate to Your Repository’s Directory</h2><p id="fa77">After cloning, you’ll have a new directory named after your GitHub repository. Navigate into this directory:</p><div id="cffb"><pre><span class="hljs-built_in">cd</span> <repository-name></pre></div><h2 id="6520">Verify the Cloning Process</h2><p id="036d">To ensure everything was cloned correctly:</p><ul><li>List the files in the directory:</li></ul><div id="4577"><pre><span class="hljs-built_in">ls</span> -la</pre></div><p id="9e91">You should see familiar files and directories from your GitHub repository.</p><ul><li>Also, check the current Git status:</li></ul><div id="bf4a"><pre>git <span class="hljs-built_in">status</span></pre></div><p id="7cc1">This should indicate that your branch is up-to-date with the origin.</p><p id="f44b">Your GitHub repository is now successfully cloned onto your VPS! With direct access to your code on the server, you can easily execute, modify, or deploy applications as needed. The SSH link established in the previous steps ensures a secure and efficient communication between your server and your GitHub repository.</p><h1 id="0653">Step 7. Implementing Continuous Deployment with Github Actions</h1><p id="6584">Continuous Deployment is a software development practice where code changes are automatically deployed to a production environment. By combining the power of GitHub Actions and a simple shell script on our VPS, we can automate the deployment process, ensuring that our server always runs the latest code from the <code>main</code> branch.</p><h2 id="e1b2">Create a Deployment Script on the VPS</h2><p id="6b57">Before setting up GitHub Actions, we need a deployment script on our VPS that GitHub Actions can trigger. This script will fetch the latest changes from the repository and apply them to the server.</p><ul><li>SSH into your VPS and navigate to your repository’s directory:</li></ul><div id="ac42"><pre><span class="hljs-built_in">cd</span> <repository-name></pre></div><ul><li>Create a new shell script called <code>deploy.sh</code>:</li></ul><div id="61f2"><pre><span class="hljs-built_in">touch</span> deploy.sh</pre></div><ul><li>Edit the script using a text editor of your choice, e.g., <code>nano</code>:</li></ul><div id="b0ea"><pre>nano deploy.<span class="hljs-property">sh</span></pre></div><ul><li>Add the following lines to <code>deploy.sh</code>:</li></ul><div id="795f"><pre><span class="hljs-meta">#!/bin/sh</span>

<span class="hljs-comment"># Navigate to the directory of your repository</span> <span class="hljs-built_in">cd</span> <path-to-your-repository>

<span class="hljs-comment"># Fetch the latest changes</span> git fetch

<span class="hljs-comment"># Pull the latest code</span> git pull origin main</pre></div><ul><li>Save and exit the text editor, then make the script executable:</li></ul><div id="d5f8"><pre><span class="hljs-built_in">chmod</span> +x deploy.sh</pre></div><h2 id="02df">Set up GitHub Actions for Continuous Deployment</h2><ul><li>In your local project, create a <code>.github/workflows</code> directory:</li></ul><div id="d74d"><pre><span class="hljs-built_in">mkdir</span> -p .github/workflows</pre></div><ul><li>Navigate to the workflows directory:</li></ul><div id="9dbf"><pre><span class="hljs-built_in">cd</span> .github/workflows</pre></div><ul><li>Create a new file <code>deploy.yml</code>:</li></ul><div id="b537"><pre><span class="hljs-built_in">touch</span> deploy.yml</pre></div><p id="e0c8">Edit <code>deploy.yml</code>:</p><div id="c8e3"><pre><span class="hljs-attr">name:</span> <span class="hljs-string">Deploy</span> <sp

Options

an class="hljs-string">to</span> <span class="hljs-string">VPS</span>

<span class="hljs-attr">on:</span> <span class="hljs-attr">push:</span> <span class="hljs-attr">branches:</span> <span class="hljs-bullet">-</span> <span class="hljs-string">main</span>

<span class="hljs-attr">jobs:</span> <span class="hljs-attr">deploy:</span> <span class="hljs-attr">runs-on:</span> <span class="hljs-string">ubuntu-latest</span> <span class="hljs-attr">steps:</span> <span class="hljs-bullet">-</span> <span class="hljs-attr">name:</span> <span class="hljs-string">Deploying</span> <span class="hljs-string">to</span> <span class="hljs-string">VPS</span> <span class="hljs-attr">uses:</span> <span class="hljs-string">appleboy/ssh-action@master</span> <span class="hljs-attr">with:</span> <span class="hljs-attr">host:</span> <span class="hljs-string">{{</span> <span class="hljs-string">secrets.VPS_HOST</span> <span class="hljs-string">}}</span> <span class="hljs-attr">username:</span> <span class="hljs-string">{{</span> <span class="hljs-string">secrets.VPS_USERNAME</span> <span class="hljs-string">}}</span> <span class="hljs-attr">key:</span> <span class="hljs-string">${{</span> <span class="hljs-string">secrets.VPS_SSH_KEY</span> <span class="hljs-string">}}</span> <span class="hljs-attr">script:</span> <span class="hljs-string">/path-to-your-repo-on-vps/deploy.sh</span></pre></div><p id="89de"><i>Note: Ensure you’ve the right path for the script attribute.</i></p><ul><li>Save and exit. Now, commit and push these changes to GitHub:</li></ul><div id="0c76"><pre>git <span class="hljs-keyword">add</span> . git <span class="hljs-keyword">commit</span> <span class="hljs-operator">-</span>m "Added GitHub Actions for continuous deployment" git push origin main</pre></div><h2 id="99e9">Add Secrets to Your GitHub Repository</h2><p id="2a50">For security reasons, you shouldn’t hardcode sensitive information like your VPS address or SSH keys in your code. GitHub provides a feature called “Secrets” to handle this.</p><ol><li>Go to your GitHub repository.</li><li>Click on the “Settings” tab.</li><li>In the left sidebar, click on “Secrets”.</li><li>Click on “New repository secret”.</li><li>Add the following secrets:</li></ol><ul><li><code>VPS_HOST</code>: Your VPS's IP address.</li><li><code>VPS_USERNAME</code>: Your VPS's username (e.g., <code>ubuntu</code>).</li><li><code>VPS_SSH_KEY</code>: Your private SSH key which should be connected to the VPS. (<code>~/.ssh/id_rsa</code> on your VPS).</li></ul><p id="55c0">With these secrets in place, GitHub Actions will be able to SSH into your VPS and execute the <code>deploy.sh</code> script.</p><h2 id="59ea">Test the Continuous Deployment</h2><ol><li>Make a minor change to your codebase, e.g., update the README.</li><li>Commit and push the changes to <code>main</code>.</li><li>Head to the “Actions” tab in your GitHub repository. You should observe the action being triggered.</li><li>After the action finishes running, SSH into your VPS and verify the changes are present.</li></ol><p id="2f51">By following these steps, you’ve created a pipeline that automates the deployment of your code to your VPS each time you push to the <code>main</code> branch. It's a huge efficiency boost, ensuring your server is always running the most recent version of your code.</p><h1 id="a441">Step 8. Testing Your Cron on the VPS and Setting Up a Crontab</h1><p id="3c72">Deploying code is just half the journey. Ensuring that it runs correctly in the deployment environment is equally crucial. Once we’ve got our code on the VPS, we need to run our Node cron job and see if it behaves as expected. After successful tests, we’ll use <code>crontab</code> to automate the job on a schedule.</p><h2 id="f90e">Running Your Cron Job Manually on the VPS</h2><p id="dc68">If you haven’t already connected, SSH into your VPS. Then, navigate to your project’s directory:</p><div id="f6fc"><pre><span class="hljs-built_in">cd</span> path-to-your-repo</pre></div><p id="b92c">Before you run your Node.js app, you’ll want to make sure you have all the required packages:</p><div id="846b"><pre>npm install</pre></div><p id="083b">Based on the setup we discussed in step 1, you can run your cron job using the following:</p><div id="2b1e"><pre>npm run <span class="hljs-keyword">start</span> hello</pre></div><p id="cd40">After executing, you should see the <code>Hello World</code> output, signaling that your cron job script works correctly on the VPS!</p><h2 id="7034">Automating the Cron Job with Crontab</h2><p id="cd38">If everything is working as expected, it’s time to automate the cron job to run at specific intervals using <code>crontab</code>.</p><ul><li><b>Open crontab for editing:</b></li></ul><div id="aa62"><pre>crontab -e</pre></div><p id="b336">If prompted to select an editor, <code>nano</code> is usually the simplest for beginners, but you can choose according to your preference.</p><ul><li><b>Add your cron job:</b></li></ul><p id="33bd">Scroll to the bottom and add a line for your cron job. The line’s format begins with five asterisks (representing minutes, hours, days, months, and days of the week), followed by the command to run.</p><p id="c757">For example, to run your script every day at 3 am, you’d add:</p><div id="a1b2"><pre>0 3 * * * <span class="hljs-built_in">cd</span> /path-to-your-repo && npm run start hello >> /path-to-your-repo/logs.txt 2>&1</pre></div><p id="8d8e">The last part of the instruction is used to save logs in a text file. We can refer to it later to ensure everything is working as expected.</p><p id="a2f0">Adjust the time settings according to your desired schedule. You can use tools like <a href="https://crontab.guru/">crontab.guru</a> to help generate the correct timing syntax.</p><div id="9184" class="link-block"> <a href="https://crontab.guru/"> <div> <div> <h2>Crontab.guru - The cron schedule expression editor</h2> <div><h3>An easy to use editor for crontab schedules.</h3></div> <div><p>crontab.guru</p></div> </div> <div> <div style="background-image: url(https://miro.readmedium.com/v2/resize:fit:320/)"></div> </div> </div> </a> </div><ul><li><b>Save and exit:</b></li></ul><p id="ddac">If using <code>nano</code>, press <code>CTRL + X</code> to save, press <code>Y</code> to confirm changes, and then <code>Enter</code> to exit.</p><ul><li><b>Verify your cron job:</b></li></ul><p id="5d97">You can check your current list of cron jobs with:</p><div id="dc75"><pre>crontab -l</pre></div><p id="850e">This will display all scheduled tasks, including the one you just added. Additionally, after the next execution, you can check the <code>logs.txt</code> to ensure that everything is running properly.</p><h1 id="86d1">Step 9: Installing and Configuring Crontab-ui</h1><p id="1a7a">Crontab-ui is a handy web interface for managing cron jobs without diving into the server’s command line each time. With Crontab-ui, you get a visual representation of all your cron jobs, the ability to edit, delete, or add new ones. For this step, we’ll be installing Crontab-ui on our VPS and configuring it so that you can access and manage your cron jobs from your local machine.</p><h2 id="b677">Installation</h2><p id="a751">Firstly, let’s install Crontab-ui. Ensure you have Node.js and npm installed (as covered in Step 4).</p><div id="26cd"><pre>npm install -g crontab-ui</pre></div><h2 id="48ca">Running Crontab-ui</h2><p id="7c81">Start Crontab-ui using the following command:</p><div id="22e5"><pre>crontab-ui</pre></div><p id="e51d">This will start Crontab-ui and, by default, it will be running at <code>http://127.0.0.1:8000</code>. However, this address is local to the VPS, so we need to make it externally accessible.</p><h2 id="d79e">Accessing Crontab-ui Externally:</h2><p id="ae4c">To access Crontab-ui from your local machine, we must bind it to the public IP address of the VPS. Stop the running Crontab-ui by pressing <code>CTRL+C</code>. Then restart it by binding it to the VPS's public IP:</p><div id="2b59"><pre><span class="hljs-attr">HOST</span>=<span class="hljs-number">0.0</span>.<span class="hljs-number">0.0</span> crontab-ui</pre></div><p id="f6c7"><i>Warning: This makes Crontab-ui accessible to anyone who knows the IP address of your VPS. Later, consider setting up a reverse proxy with Nginx or another web server to secure access, or implement authentication.</i></p><h2 id="b509">Accessing from a Local Machine:</h2><p id="ecf1">Once it’s running and bound to the public IP, open a web browser on your local machine and enter the VPS’s IP address followed by the port number: <a href="http://[Your_VPS_IP]:8000."><code>http://[Your_VPS_IP]:8</code>000.</a></p><p id="406a">Now you should be greeted with the Crontab-ui interface, and you can manage your cron jobs visually!</p><figure id="3d01"><img src="https://cdn-images-1.readmedium.com/v2/resize:fit:800/1*RRBqivPjZysNB6AmoArkZQ.png"><figcaption></figcaption></figure><p id="00e0">Crontab-ui offers a more user-friendly approach to managing cron jobs, especially for those who prefer a GUI over the command line. But ensure you take necessary precautions to secure access, especially if your VPS holds sensitive data or operations.</p><h1 id="3297">Conclusion</h1><p id="135a">Stepping back, you’ll realize how seamlessly you’ve navigated the world of automation. With your cron jobs server efficiently deployed on a VPS, you’re now empowered to automate tasks with greater flexibility and control.</p><p id="03a7">It’s been truly rewarding to walk you through this journey of deploying your own cron jobs server on a VPS. From setting up the foundational elements with GitHub and a sample cron, to the nuanced steps of accessing and managing cron jobs visually with Crontab-ui, I hope this guide serves as a comprehensive roadmap for your projects.</p><p id="fa33">Your progress and success as a developer or DevOps enthusiast are essential to me. If you found this tutorial helpful or think there’s room for improvement, I warmly invite your feedback. Let’s make this space a collaborative one, where knowledge is not just imparted but also fine-tuned with collective insights.</p><p id="a235">Thank you for accompanying me through this process, and here’s to many successful cron job deployments on your end!</p><div id="49a6" class="link-block"> <a href="https://medium.com/@calebpr/subscribe"> <div> <div> <h2>Get an email whenever Caleb publishes.</h2> <div><h3>Get an email whenever Caleb publishes. By signing up, you will create a Medium account if you don’t already have one…</h3></div> <div><p>medium.com</p></div> </div> <div> <div style="background-image: url(https://miro.readmedium.com/v2/resize:fit:320/0*LAO3U0VG-zuctneT)"></div> </div> </div> </a> </div><p id="91bd"><i>Enjoyed the read? For more on Web Development, JavaScript, Next.js, Cybersecurity, and Blockchain, check out my other articles here:</i></p><div id="7e3a" class="link-block"> <a href="https://readmedium.com/a-roadmap-to-my-medium-writings-fd04e14cffd7"> <div> <div> <h2>A Roadmap to My Medium Writings</h2> <div><h3>undefined</h3></div> <div><p>undefined</p></div> </div> <div> <div style="background-image: url(https://miro.readmedium.com/v2/resize:fit:320/1*V5HTjUp5TQVxA2HmmdZ4GQ.png)"></div> </div> </div> </a> </div><p id="8496"><i>If you have questions or feedback, don’t hesitate to reach out at [email protected] or in the comments section.</i></p><p id="c73a"><i>[Disclosure: Every article I pen is a fusion of my ideas and the supportive capabilities of artificial intelligence. While AI assists in refining and elaborating, the core thoughts and concepts stem from my perspective and knowledge. <a href="https://readmedium.com/how-does-ai-help-me-write-my-articles-5df265d16527">To know more about my creative process, read this article.</a>]</i></p><div id="3e1a" class="link-block"> <a href="https://readmedium.com/how-does-ai-help-me-write-my-articles-5df265d16527"> <div> <div> <h2>How Does AI Help Me Write My Articles?</h2> <div><h3>The Medium landscape has seen a transformation, with an increasing number of articles appearing to have the distinct…</h3></div> <div><p>medium.com</p></div> </div> <div> <div style="background-image: url(https://miro.readmedium.com/v2/resize:fit:320/1*sURudlO3SS5ntthELFumcg.jpeg)"></div> </div> </div> </a> </div><h1 id="a128">In Plain English</h1><p id="e18e"><i>Thank you for being a part of our community! Before you go:</i></p><ul><li><i>Be sure to <b>clap</b> and <b>follow</b> the writer! 👏</i></li><li><i>You can find even more content at <a href="https://plainenglish.io/"><b>PlainEnglish.io</b></a><b> 🚀</b></i></li><li><i>Sign up for our <a href="http://newsletter.plainenglish.io/"><b>free weekly newsletter</b></a>. 🗞️</i></li><li><i>Follow us on <a href="https://twitter.com/inPlainEngHQ"><b>Twitter</b></a><b>(X</b></i>), <a href="https://www.linkedin.com/company/inplainenglish/"><b><i>LinkedIn</i></b></a>, <a href="https://www.youtube.com/channel/UCtipWUghju290NWcn8jhyAw"><b><i>YouTube</i></b></a>, and <a href="https://discord.gg/GtDtUAvyhW"><b><i>Discord</i></b></a><b><i>.</i></b></li></ul></article></body>

Deploy Your Own Cron Jobs Server on a VPS in 9 Simple Steps!

In today’s fast-paced development world, automation is the name of the game. Whether you’re scheduling periodic data backups, sending out newsletters, or performing system maintenance tasks, cron jobs are an indispensable tool. But, how do you set up and manage these scheduled tasks efficiently? In this comprehensive guide, I will walk you through a streamlined process to deploy your very own cron jobs server on a VPS. Leveraging the power of OVH’s VPS (or any other provider you prefer), we’ll dive deep, ensuring that by the end, you’ll have a fully functional cron jobs server at your disposal. Let’s get those tasks automated!

Table of Contents

  1. Setting Up a Github Repository with a Sample Cron
  2. Renting a VPS with OVH
  3. Establishing a Connection to Your VPS using Putty
  4. Installing Node, Npm, and Git on Your VPS
  5. Generating an SSH Key on your VPS and Linking it to Github
  6. Cloning Your Github Repository to the VPS
  7. Implementing Continuous Deployment with Github Actions
  8. Testing Your Cron on the VPS and Setting Up a Crontab
  9. Installing and Configuring Crontab-ui

Prerequisites

Before diving into the world of cron jobs and VPS deployments, it’s essential to ensure you’re well-equipped. Here’s a checklist of what you should have and know:

  • Basic Understanding of Cron Jobs: Familiarize yourself with the concept of cron jobs and how they function.
  • Familiarity with Github: Since our project will be hosted on Github, a basic understanding of repositories, commits, and cloning is essential.
  • Command-Line Comfort: A lot of our tasks will involve using the command line, whether it’s on your local machine or the VPS.
  • Knowledge of SSH: Secure Shell (SSH) is a protocol we’ll use extensively, especially when connecting to our VPS and handling Github operations.
  • An Active Github Account: Ensure you have an account set up and ready to host your project.
  • A VPS Provider in Mind: While this guide leans towards OVH, you can choose any provider you’re comfortable with.

Once you’ve ticked off these prerequisites, you’re all set to journey through deploying your own cron jobs server on a VPS. Let’s dive right in!

Step 1. Setting Up a Github Repository with a Sample Cron

In this section, we’ll see how to set up a Node.js project, equipped with a sample cron job. By the end of this guide, you will have a working cron job that greets the world with a friendly “Hello World”.

Setting up a Node.js and npm project

First things first, let’s set up a fresh Node.js project:

  • Initialization: Navigate to the folder where you want your project to reside and run the following command in your terminal:
npm init -y

This command initializes a new Node.js project with default settings. You should see a package.json file in your directory once done.

  • Installing Dependencies: Since our project is using the commander library, let’s get it installed. In your terminal, run:
npm install commander --save

Setting up the Cron Job

  • Setting up the Entry Point (index.js): Create a file named index.js in the root directory. This file will act as the entry point of our application. Here's what you need to put inside:
const commander = require('commander');

commander
  .version('1.0.0', '-v, --version')
  .description('...')
  .option('-c, --cron <type>', 'cron script name');

commander.parse(process.argv);
const options = commander.opts();
const cron = options.cron;

(async () => {
  console.log(`Start`);
  try {
    const cronJob = require(`./crons/${cron}.js`);
    await cronJob.start();
    logger.info(`End`);
    process.exit(0);
  } catch (err) {
    console.error(err);
    process.exit(1);
  }
})();

This code sets up commander to pick up the -c flag and the corresponding script name.

  • The Shell Script (cron.sh): Create a file named cron.sh in your project root and add the following content:
#!/bin/sh
node index.js -c $1

Remember to give the shell script execute permissions:

chmod +x cron.sh
  • Creating the hello cron script: Inside your project directory, create a new folder named crons. Inside this folder, create a new file named hello.js and add:
const start = async () => {
    // This function is asynchronous, should you require that feature
    console.log('Hello World');
}

module.exports = { start }
  • Adding a Start Script: In your package.json, add the following script:
"scripts": {
  "start": "./cron.sh"
}

With this, running npm run start hello will trigger our hello cron job, which will log "Hello World".

Pushing to a Github Repository

Now that our project is all set, let’s get it up on Github:

  • Create a New Repository: Go to Github and create a new repository.
  • Link the Repository to Your Local Project: Navigate back to your project directory in the terminal. Initialize a git repository and add the remote repository:
git init
git remote add origin [YOUR-GITHUB-REPOSITORY-URL]
  • Commit and Push: Add your project files to the staging area, commit, and then push them to Github:
git add .
git commit -m "Initial commit with a sample cron job"
git push -u origin main

And voila! Your Node.js cron job project is now hosted on Github. As we move forward, we’ll leverage this setup to integrate with our VPS and automate tasks efficiently. Onward!

Step 2: Renting a VPS with OVH (or your chosen provider)

In this section, we’ll delve into what a VPS is, why you might need one, and guide you through the process of renting a VPS from OVH, a popular cloud provider.

Understanding a VPS

A Virtual Private Server (VPS) is essentially a virtual machine sold as a service by an Internet hosting provider. It runs its own copy of an operating system (OS), and customers have superuser-level access to that instance, enabling them to install nearly any software that runs on that OS.

In simpler terms, a VPS is like having your own personal server on the internet. Think of it as a dedicated portion of a physical server, isolated from other users. It provides more control and isolation than shared hosting solutions, without the cost and complexity of a dedicated physical server.

Key Terms and Notions

  • Host: This refers to the main server where your VPS is housed. Your VPS is essentially a smaller, virtual server within this host.
  • IP Address: This is a numerical label given to every device connected to a computer network. For your VPS, this address acts as its identity and location on the internet.
  • SSH (Secure Shell): A cryptographic network protocol used to securely access network services over an unsecured network. With your VPS, you’ll use SSH to remotely connect and manage it.
  • Connection: The process of remotely accessing and managing your VPS. Typically, you’d use an SSH client to establish a secure connection to your VPS using its IP address and a set of credentials.

Renting a VPS from OVH

Note: If you already have a VPS, or if you don’t want to use the OVH one, you can proceed to the next step.

OVH is one of the world’s largest and most reputable cloud service providers. Here’s a step-by-step guide on renting a VPS from OVH:

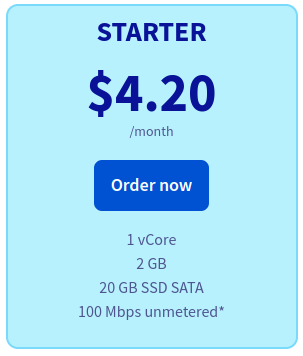
  • Choose Your Package: OVH offers various VPS packages catering to different needs. Review the specifications, and select the one that aligns with your requirements. In my case, I’ve chosen the Starter one.
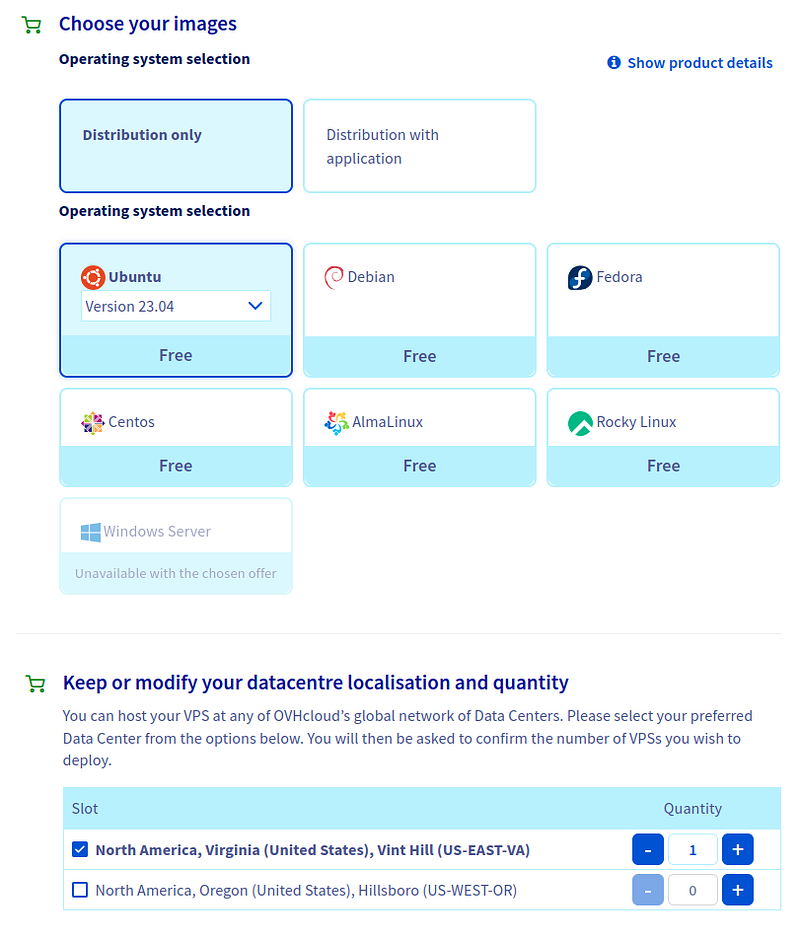
  • Select Additional Features: OVH provides additional features like backup options, monitoring, and more. Depending on your needs, you can opt for these features. You’ll also have to choose an Operating System (OS) and a Datacenter. I recommend choosing the latest version of Ubuntu and the Datacenter nearest to your location.
  • Create an Account: If you don’t have an OVH account already, you’ll need to create one. This account will be crucial for managing your VPS later on.
  • Make a Payment: Once you’ve made your choices, proceed to checkout and make the payment.
  • Wait for Activation: Once the payment is confirmed, OVH will send you an email with details about your VPS, including its IP address, login credentials, and further instructions. This process might take some time, so a bit of patience is needed.
  • Connect to Your VPS: Using the details provided in the email, you can now SSH into your VPS. This process will be covered more thoroughly in the next section.

Step 3. Establishing a Connection to Your VPS using Putty

Once your VPS is set up and running, the very next step is to establish a connection to it. This is essential because it’s how you’ll be managing and operating your server remotely. In this section, we’ll walk through the process using Putty, a popular SSH client for Windows. However, remember that using Putty is just a preference; if you’re comfortable with other tools or if you’re on a different OS with built-in terminal support, you can use those just as easily.

Why Putty?

Putty is a free and open-source terminal emulator that provides an interface for Windows users to connect to remote servers via SSH. It’s user-friendly and widely adopted, making it a go-to choice for many who are new to VPS management. But as mentioned earlier, there are plenty of alternatives, and the built-in terminals on macOS and Linux will serve the purpose just as well.

Downloading and Installing Putty

  • Visit the official Putty download page: Navigate to the Putty download page and download the latest version suitable for your Windows version (32-bit or 64-bit).
  • Install Putty: Once downloaded, run the installer and follow the on-screen instructions. Installation is straightforward and should take just a couple of minutes.

Connecting to Your VPS

  • Launch Putty: After installation, open Putty from your start menu or desktop shortcut.
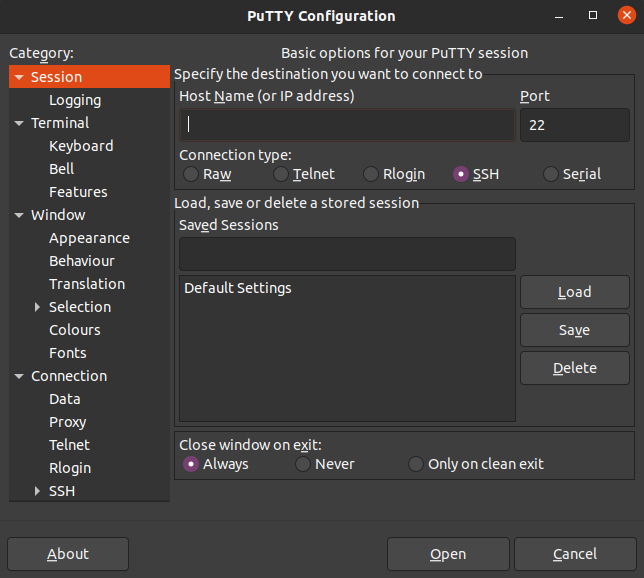
  • Enter your VPS details: In the Putty interface, you’ll find a field labeled “Host Name (or IP address).” Here, input your VPS’s IP address provided by OVH upon activation. Ensure the port is set to 22 (the default SSH port).
  • Click “Open”: After entering your VPS details, click on the “Open” button at the bottom. If this is your first time connecting to your VPS, you might get a security alert. This is normal; click “Yes” to continue.
  • Login: Once the terminal window pops up, you’ll be prompted for a username and password. The username and the password would have been provided to you by OVH when you set up the VPS.

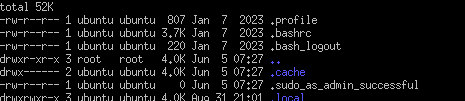
  • Test your connection: After successfully logging in, you’re now directly connected to your VPS! Type ls -larth and hit enter. This command lists files in your current directory, showcasing that you're indeed operating on your remote server.
Establishing a connection to your VPS is a foundational step in server management. Whether you use Putty, another SSH client, or a built-in terminal, the principle remains the same. With this connection established, you’re all set to configure, manage, and deploy applications to your VPS!

Step 4. Installing Node, NPM, and Git on Your VPS

Now that you’ve successfully connected to your VPS, the next step is to set up the tools that will allow you to deploy and run your projects. The trifecta for many developers is Node.js (which comes with NPM, its package manager) and Git for version control. In this section, we’ll walk you through the installation process for each of these tools.

Update Your VPS

Before we dive into the installations, it’s always a good idea to start with an updated server. Run the following commands to update the package lists and upgrade any outdated software:

sudo apt update
sudo apt upgrade -y

Installing Node.js and NPM

sudo apt install nodejs npm

Check the Installation: Confirm that Node.js and NPM were successfully installed:

node -v
npm -v

These commands should print the versions of Node.js and NPM, respectively.

Installing Git

sudo apt install git

Verify the Installation: To make sure Git has been installed, you can check its version:

git --version

This should print the version number, confirming a successful installation.

With Node.js, NPM, and Git installed, your VPS is now geared up and ready for development! These tools are fundamental for many modern web projects. Whether you’re looking to deploy a Node.js application or manage your projects with Git, you’re all set.

Remember to frequently check for updates for these tools, as the development world moves quickly, and it’s essential to keep your tools up to date to benefit from bug fixes, new features, and performance improvements.

Step 5. Generating an SSH Key on your VPS and Linking it to Github

SSH keys are a way to identify trusted computers, without involving passwords. By setting up an SSH key, you can create a secure connection between your VPS and GitHub. This allows you to pull and push code without having to enter a password every time. In this section, you’ll be generating an SSH key on your VPS and linking it to your GitHub account.

Generating an SSH Key on Your VPS

Create the Key: On your VPS, use the ssh-keygen command to start the key generation process:

ssh-keygen

Save the Key: You’ll be prompted to select a location to save the key. The default location (~/.ssh/id_rsa) is usually fine, so you can simply press Enter.

Set a Passphrase (Optional): For added security, you can set a passphrase for your key. If you choose not to use one, simply press Enter.

Copying the Public SSH Key

Once the key is generated, you’ll need to copy the public key to add it to GitHub. To display and copy your public key, use the following command:

cat ~/.ssh/id_rsa.pub

This will display the public key in the terminal. Highlight and copy the entire key.

Verifying the authorized_keys File

The authorized_keys file is where the server keeps a list of public keys that are allowed to authenticate. To ensure your newly created key is properly stored:

  • Navigate to the .ssh directory:
cd ~/.ssh
  • Check the content of the authorized_keys file:
cat authorized_keys

You should see your public key listed. If not, you can append it:

cat id_rsa.pub >> authorized_keys

Adding the SSH Key to Your GitHub Account

  • Go to GitHub: Log into your GitHub account.
  • Access SSH settings: Navigate to the top right corner, click on your profile picture, then click Settings. From the sidebar, choose SSH and GPG keys.
  • Add a New SSH Key: Click on the New SSH key button.
  • Paste & Save: In the “Title” field, give your key a descriptive name, like “My VPS.” In the “Key” field, paste the copied public key. Finally, click Add SSH key to save.

Testing the Connection

To ensure that everything is set up correctly, you can test the SSH connection to GitHub from your VPS:

ssh -T git@github.com

You should see a message like:

Hi [YourUsername]! You've successfully authenticated, but GitHub does not provide shell access.

This indicates that your VPS can securely communicate with GitHub using SSH.

With your SSH key now generated and linked to GitHub, you’ve established a secure bridge between your VPS and your repository. This will significantly streamline your workflow, eliminating the need for repetitive password inputs during Git operations.

Step 6. Cloning Your Github Repository to the VPS

After setting up an SSH connection between your VPS and GitHub, the next logical step is to clone your repository onto the server. Doing so allows your VPS to have access to the codebase, scripts, and other essential components necessary for running your applications or tasks.

Navigate to a Suitable Directory

Before cloning, decide where you want your repository to live on the VPS. For the sake of this tutorial, we'll use the home directory.

To navigate to your home directory:

cd ~

Clone the Repository

Now, let’s proceed with cloning. Use the following command, replacing <username> with your GitHub username and <repository-name> with the name of your repository:

git clone [email protected]:<username>/<repository-name>.git

This will create a new directory in your current location with the name of the repository and pull down all the code from GitHub.

Note: Ensure you’re using the SSH URL (which starts with [email protected]:) rather than the HTTPS URL.

Navigate to Your Repository’s Directory

After cloning, you’ll have a new directory named after your GitHub repository. Navigate into this directory:

cd <repository-name>

Verify the Cloning Process

To ensure everything was cloned correctly:

  • List the files in the directory:
ls -la

You should see familiar files and directories from your GitHub repository.

  • Also, check the current Git status:
git status

This should indicate that your branch is up-to-date with the origin.

Your GitHub repository is now successfully cloned onto your VPS! With direct access to your code on the server, you can easily execute, modify, or deploy applications as needed. The SSH link established in the previous steps ensures a secure and efficient communication between your server and your GitHub repository.

Step 7. Implementing Continuous Deployment with Github Actions

Continuous Deployment is a software development practice where code changes are automatically deployed to a production environment. By combining the power of GitHub Actions and a simple shell script on our VPS, we can automate the deployment process, ensuring that our server always runs the latest code from the main branch.

Create a Deployment Script on the VPS

Before setting up GitHub Actions, we need a deployment script on our VPS that GitHub Actions can trigger. This script will fetch the latest changes from the repository and apply them to the server.

  • SSH into your VPS and navigate to your repository’s directory:
cd <repository-name>
  • Create a new shell script called deploy.sh:
touch deploy.sh
  • Edit the script using a text editor of your choice, e.g., nano:
nano deploy.sh
  • Add the following lines to deploy.sh:
#!/bin/sh

# Navigate to the directory of your repository
cd <path-to-your-repository>

# Fetch the latest changes
git fetch

# Pull the latest code
git pull origin main
  • Save and exit the text editor, then make the script executable:
chmod +x deploy.sh

Set up GitHub Actions for Continuous Deployment

  • In your local project, create a .github/workflows directory:
mkdir -p .github/workflows
  • Navigate to the workflows directory:
cd .github/workflows
  • Create a new file deploy.yml:
touch deploy.yml

Edit deploy.yml:

name: Deploy to VPS

on:
  push:
    branches:
      - main

jobs:
  deploy:
    runs-on: ubuntu-latest
    steps:
    - name: Deploying to VPS
      uses: appleboy/ssh-action@master
      with:
        host: ${{ secrets.VPS_HOST }}
        username: ${{ secrets.VPS_USERNAME }}
        key: ${{ secrets.VPS_SSH_KEY }}
        script: /path-to-your-repo-on-vps/deploy.sh

Note: Ensure you’ve the right path for the script attribute.

  • Save and exit. Now, commit and push these changes to GitHub:
git add .
git commit -m "Added GitHub Actions for continuous deployment"
git push origin main

Add Secrets to Your GitHub Repository

For security reasons, you shouldn’t hardcode sensitive information like your VPS address or SSH keys in your code. GitHub provides a feature called “Secrets” to handle this.

  1. Go to your GitHub repository.
  2. Click on the “Settings” tab.
  3. In the left sidebar, click on “Secrets”.
  4. Click on “New repository secret”.
  5. Add the following secrets:
  • VPS_HOST: Your VPS's IP address.
  • VPS_USERNAME: Your VPS's username (e.g., ubuntu).
  • VPS_SSH_KEY: Your private SSH key which should be connected to the VPS. (~/.ssh/id_rsa on your VPS).

With these secrets in place, GitHub Actions will be able to SSH into your VPS and execute the deploy.sh script.

Test the Continuous Deployment

  1. Make a minor change to your codebase, e.g., update the README.
  2. Commit and push the changes to main.
  3. Head to the “Actions” tab in your GitHub repository. You should observe the action being triggered.
  4. After the action finishes running, SSH into your VPS and verify the changes are present.

By following these steps, you’ve created a pipeline that automates the deployment of your code to your VPS each time you push to the main branch. It's a huge efficiency boost, ensuring your server is always running the most recent version of your code.

Step 8. Testing Your Cron on the VPS and Setting Up a Crontab

Deploying code is just half the journey. Ensuring that it runs correctly in the deployment environment is equally crucial. Once we’ve got our code on the VPS, we need to run our Node cron job and see if it behaves as expected. After successful tests, we’ll use crontab to automate the job on a schedule.

Running Your Cron Job Manually on the VPS

If you haven’t already connected, SSH into your VPS. Then, navigate to your project’s directory:

cd path-to-your-repo

Before you run your Node.js app, you’ll want to make sure you have all the required packages:

npm install

Based on the setup we discussed in step 1, you can run your cron job using the following:

npm run start hello

After executing, you should see the Hello World output, signaling that your cron job script works correctly on the VPS!

Automating the Cron Job with Crontab

If everything is working as expected, it’s time to automate the cron job to run at specific intervals using crontab.

  • Open crontab for editing:
crontab -e

If prompted to select an editor, nano is usually the simplest for beginners, but you can choose according to your preference.

  • Add your cron job:

Scroll to the bottom and add a line for your cron job. The line’s format begins with five asterisks (representing minutes, hours, days, months, and days of the week), followed by the command to run.

For example, to run your script every day at 3 am, you’d add:

0 3 * * * cd /path-to-your-repo && npm run start hello >> /path-to-your-repo/logs.txt 2>&1

The last part of the instruction is used to save logs in a text file. We can refer to it later to ensure everything is working as expected.

Adjust the time settings according to your desired schedule. You can use tools like crontab.guru to help generate the correct timing syntax.

  • Save and exit:

If using nano, press CTRL + X to save, press Y to confirm changes, and then Enter to exit.

  • Verify your cron job:

You can check your current list of cron jobs with:

crontab -l

This will display all scheduled tasks, including the one you just added. Additionally, after the next execution, you can check the logs.txt to ensure that everything is running properly.

Step 9: Installing and Configuring Crontab-ui

Crontab-ui is a handy web interface for managing cron jobs without diving into the server’s command line each time. With Crontab-ui, you get a visual representation of all your cron jobs, the ability to edit, delete, or add new ones. For this step, we’ll be installing Crontab-ui on our VPS and configuring it so that you can access and manage your cron jobs from your local machine.

Installation

Firstly, let’s install Crontab-ui. Ensure you have Node.js and npm installed (as covered in Step 4).

npm install -g crontab-ui

Running Crontab-ui

Start Crontab-ui using the following command:

crontab-ui

This will start Crontab-ui and, by default, it will be running at http://127.0.0.1:8000. However, this address is local to the VPS, so we need to make it externally accessible.

Accessing Crontab-ui Externally:

To access Crontab-ui from your local machine, we must bind it to the public IP address of the VPS. Stop the running Crontab-ui by pressing CTRL+C. Then restart it by binding it to the VPS's public IP:

HOST=0.0.0.0 crontab-ui

Warning: This makes Crontab-ui accessible to anyone who knows the IP address of your VPS. Later, consider setting up a reverse proxy with Nginx or another web server to secure access, or implement authentication.

Accessing from a Local Machine:

Once it’s running and bound to the public IP, open a web browser on your local machine and enter the VPS’s IP address followed by the port number: http://[Your_VPS_IP]:8000.

Now you should be greeted with the Crontab-ui interface, and you can manage your cron jobs visually!
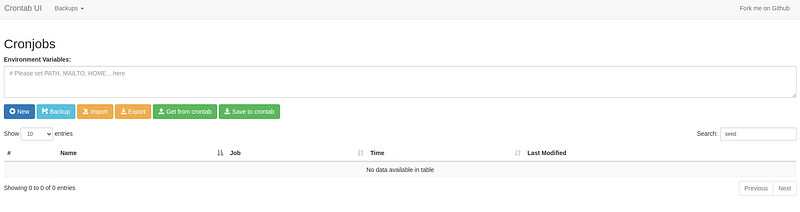
Crontab-ui offers a more user-friendly approach to managing cron jobs, especially for those who prefer a GUI over the command line. But ensure you take necessary precautions to secure access, especially if your VPS holds sensitive data or operations.

Conclusion

Stepping back, you’ll realize how seamlessly you’ve navigated the world of automation. With your cron jobs server efficiently deployed on a VPS, you’re now empowered to automate tasks with greater flexibility and control.

It’s been truly rewarding to walk you through this journey of deploying your own cron jobs server on a VPS. From setting up the foundational elements with GitHub and a sample cron, to the nuanced steps of accessing and managing cron jobs visually with Crontab-ui, I hope this guide serves as a comprehensive roadmap for your projects.

Your progress and success as a developer or DevOps enthusiast are essential to me. If you found this tutorial helpful or think there’s room for improvement, I warmly invite your feedback. Let’s make this space a collaborative one, where knowledge is not just imparted but also fine-tuned with collective insights.

Thank you for accompanying me through this process, and here’s to many successful cron job deployments on your end!

Enjoyed the read? For more on Web Development, JavaScript, Next.js, Cybersecurity, and Blockchain, check out my other articles here:

If you have questions or feedback, don’t hesitate to reach out at [email protected] or in the comments section.

[Disclosure: Every article I pen is a fusion of my ideas and the supportive capabilities of artificial intelligence. While AI assists in refining and elaborating, the core thoughts and concepts stem from my perspective and knowledge. To know more about my creative process, read this article.]

In Plain English

Thank you for being a part of our community! Before you go:

DevOps
JavaScript
Programming
Software Development
System Administration
Recommended from ReadMedium