
Deploy your Node app to AWS Container Service via GitHub Actions & build a pipeline
Deploying your application to a platform is a must, no one can argue that.
Without it, your application is not accessible from the internet and people can’t experience the app you’ve been working on so hard 😢.
However, automating the deployments — when you or your team pushes some fresh new code to source control — is just as equally important, as you don’t want to waste your precious time doing manual, cumbersome deployments.
Setting up a complicated CI/CD pipeline can be tricky but also quite expensive 💸. Sometimes using a complex tool like Jenkins might be worth it (and also necessary), but most of the times you can make your life way easier, by using simpler tools. Like GitHub Actions.
In this article we are going to leverage the power of GitHub Actions and Amazon Elastic Container Service to create an automated flow that automatically builds a Docker image from your app and deploys it to your AWS ECS cluster.
We are going to take an example Node.js application: a server side rendered Next.js app and build the solution around it. However, you could use any Node application that has an exposed port (like 3000, 8080, 4000 or any number) and a Dockerfile. Actually, you can use any application that has a Dockerfile and an exposed port 🎉. You will have to adjust a few things according to your needs, but the general steps are exactly the same and this article should guide you through the process.
So let’s get into it! 🔥
The motivation
Why AWS?
No-one can deny that Amazon Web Services (AWS) is the leading player in the cloud space ☁️. There is a huge demand for developers with AWS skills, as many of the companies are either migrating to the cloud, or already running their apps in it.
AWS Elastic Container Service (ECS) makes running your containerised Docker applications simple. Basically if you have a Docker image, you can deploy it easily in AWS ECS. You don’t need to manage the infrastructure, or any lower-level operations (given that you’re using AWS Fargate — which you will).
In this article we will also use other core AWS components, like an Elastic Lode Balancer, Elastic Container Registry (to store our Docker images), Security Groups, IAM etc.
Why GitHub Actions?
Sometimes teams struggle to set up a complicated and expensive-to-host CI/CD pipeline, like Jenkins. GitHub Actions makes it easy to create a CI/CD pipeline, at least for certain use-cases.
The best thing? GitHub actions is free for public repositories, and you also have 2,000 minutes free for private repositories, which is more than enough if you’re just starting out with an app (it’s also really cheap afterwards, currently 0.008$ per minute).
We’ll set up GitHub Actions to build our Docker image from our code, push it to AWS container registry and then deploy to our AWS Elastic Container Service application.
Why Next.js?
Next.js is getting a lot of hype recently, but for good reasons. Next.js enables server-side rendering in a really simple manner. Server-side rendering can help in many aspects, like potentially speeding up your app’s loading time and boosting your SEO.
However, Next.js is not great only due to aspect. Next is generally a pleasure to develop with, comes with its own nice CSS in JS solution, routing is easy-peasy, it also generates static-sites, has good documentation, and the popularity of it is sky-rocketing. Very promising 🚀.
As stated above, though, you can use any application with a Dockerfile and build a GitHub Actions + AWS ECS around it easily.
What will we accomplish?
We want to have in the end a Next.js application hosted on GitHub, and every time we push a new change to the master branch, the new app version will be automatically built and deployed on AWS ECS, thus live on the internet to be accessed by anyone 🎆.
This article does not serve as a complete introduction to AWS or Next.js. Creating an account for AWS is out of this article’s scope but you’ll sure find a lot of great resources for getting started 💪.
The Next.js app we’ll build is also rudimentary, it will just serve as a proof of concept. However, after you’ve set up the whole CI/CD flow you can make a production ready-app out of it or apply the concept to your existing Node app 😎.
Prerequisites
- First and foremost, you’ll need to have an AWS account and potentially some credit to start with AWS ECS (with Fargate).
- Make sure that AWS CLI is installed and you have the necessary access rights.
- You’ll need to host your project on GitHub. For public projects all the GitHub actions are free for life, as GitHub supports open-source projects. That’s really cool.
Getting started
Creating a new Next.js project and pushing it to GitHub
We will create a simple one-page Next app, that will randomly get a UK postal code from postcodes.io. With this approach, we can test the server-side rendering. Instead of making this request on the client side, we will make it on the server side via server-side-rendering(that will ultimately run on ECS).
I’ve already created the project, which you can find here: https://github.com/adamkss/next-uk-post-codes.
Clone and push it to your GitHub account or fetch it so you also have the project under your own GitHub user.
To run the project locally, execute the following command in the terminal:
npm install && npm run devLet’s quickly go through some of the files from this project.
index.js
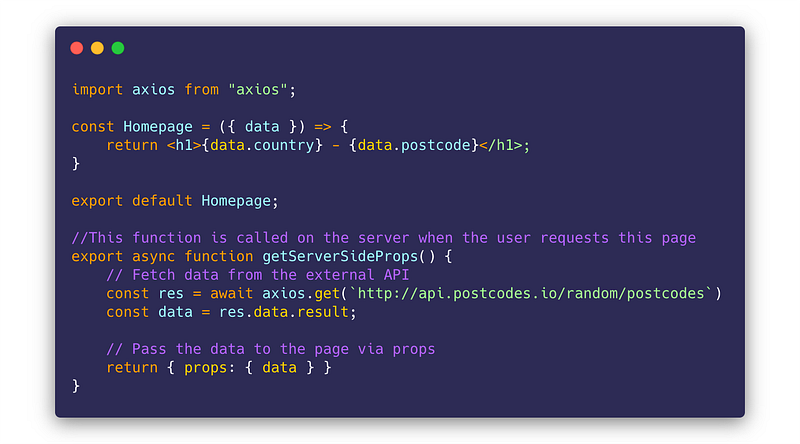
This is the homepage. We are defining a getServerSideProps async function. That is where the server-side-rendering magic happens ⭐️. The function is executed on the server, and certain props are added to the actual React component (Homepage).
In our case, we fetch a random postcode from the public postcodes.io API using axios (an HTTP client library) and pass the result to the component as a prop.
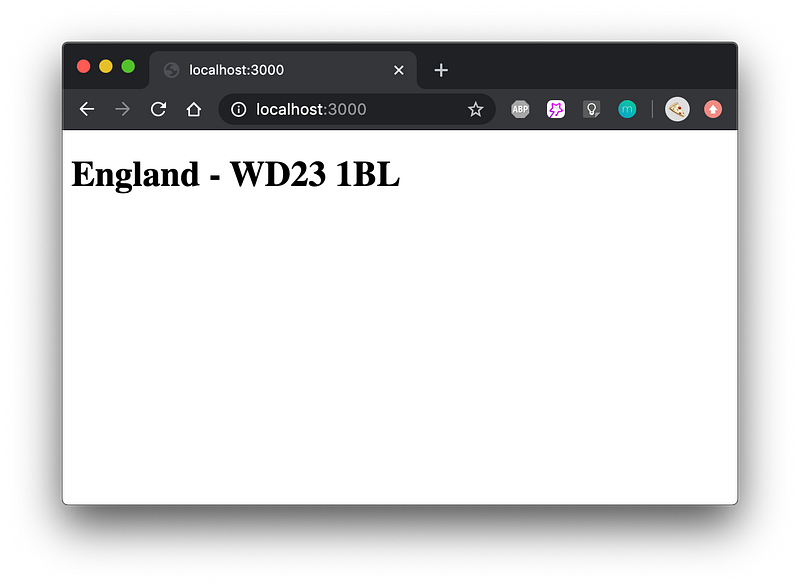
The page looks like this (each page refresh shows a different postal code):
Dockerfile
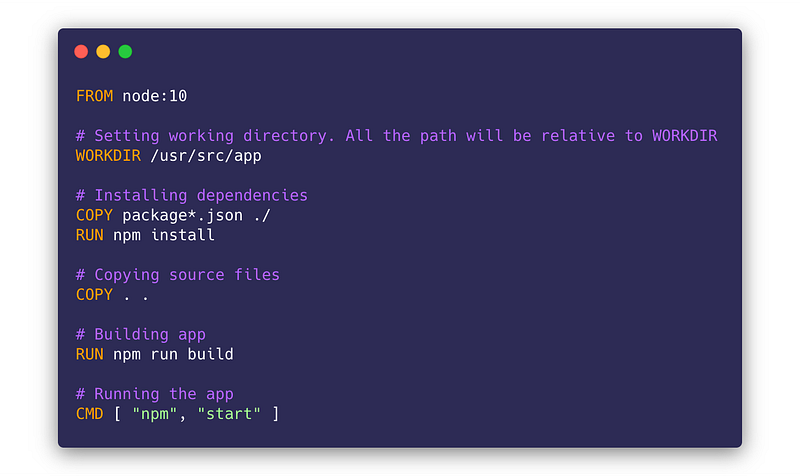
This is a standard Dockerfile that tells Docker how to build our app’s image.
Basically, all the files are copied to the image, npm install is ran and the Next.js app is built by npm run build that in turn calls next build as specified in package.json.
The image’s start-up command is npm start that runs the built and optimised Next.js app 🆒.
ecs-task-definition.json
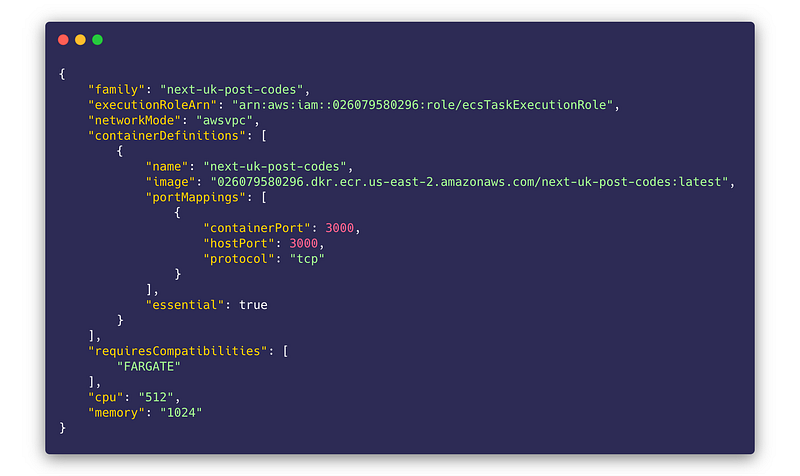
This file is for defining the containers that we’ll run in our ECS Cluster.
Take a look at the containerDefinitionsproperty. You can see the Docker image’s name and tag and the port mapping. We will revisit and update these properties based on your own.
The last two properties from this file are for defining the processing power and memory your task definition needs. Here we are setting 512 for the CPU (that equals 0.5 ECS Virtual CPUs) and 1024 MB of RAM. For a single container, these values should be enough, especially for starting out.
The minimum value for the cpu property is 256 (25% of one ECS virtual CPU), and 512 for memory.
AWS ECS Pricing
Before moving on, we have to talk a little bit about ECS pricing.
ECS has multiple launch types. That means, you can either specify the EC2 machines (virtual machines) manually — that your containers will run on — or you can let Amazon manage that and specify the virtual CPU and memory amounts.
We are going with the second option here as it is easier and seems much more modern. Also, this approach is called Fargate launch type.
Running an ECS task definition (one or more containers/ applications) with 0.5 vCPU and 1GB of RAM would cost you ~18$ per month, at the time of writing this article.
Things we’ll need from AWS
To successfully run a Docker container on ECS, we will need the following components:
- An ECS Cluster
- An ECR (Elastic Container Registry) repository. This is where our Docker images will be stored 📷
- An ECS task definition. This is basically what describes the containers that we will run. We’re going to have a single container, our application: Next UK Post Codes. We already have a task definition in form of a JSON:
ecs-task-definition.json - An ECS Service, which will run our task definition in the ECS Cluster we’ll create
Setting up the AWS ECS Cluster
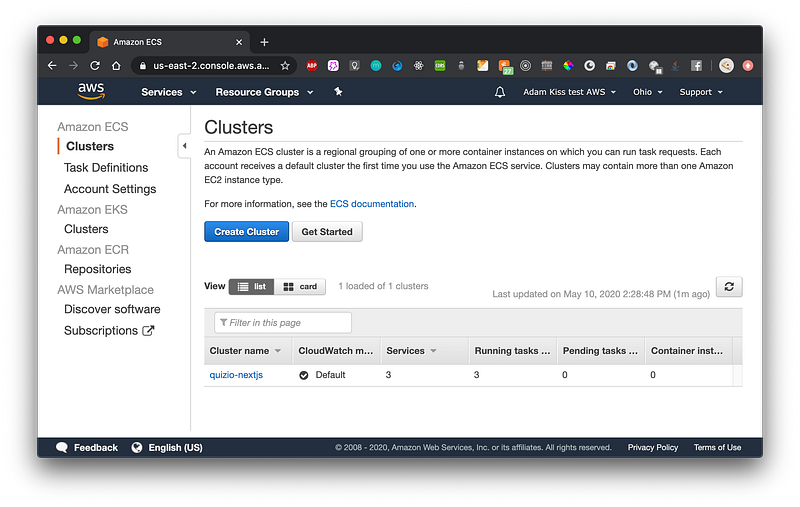
We are going to use the AWS online console for setting up and configuring the ECS Cluster that will hold your app.
Thus, navigate to Elastic Container Service:
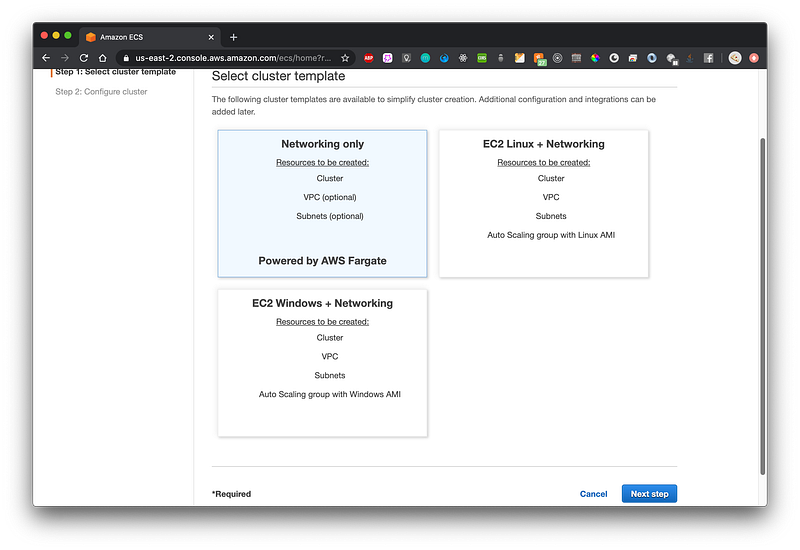
Create a new cluster that will hold your app by clicking Create Cluster. Then select “Networking only” — powered by Fargate.
Fargate is a way of working with containers in ECS. Basically with Fargate you don’t have to manage the underlying infrastructure, like AWS EC2 machines. Just specify the processing power your container needs and everything else is taken care of by Fargate.
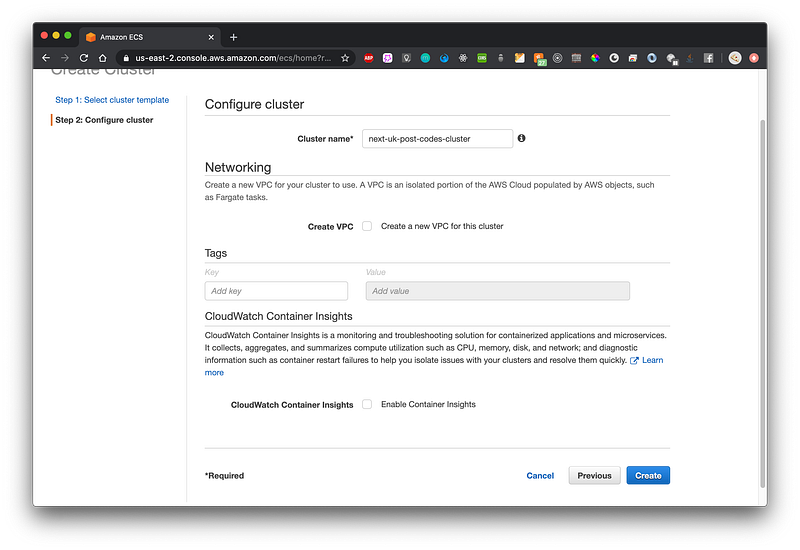
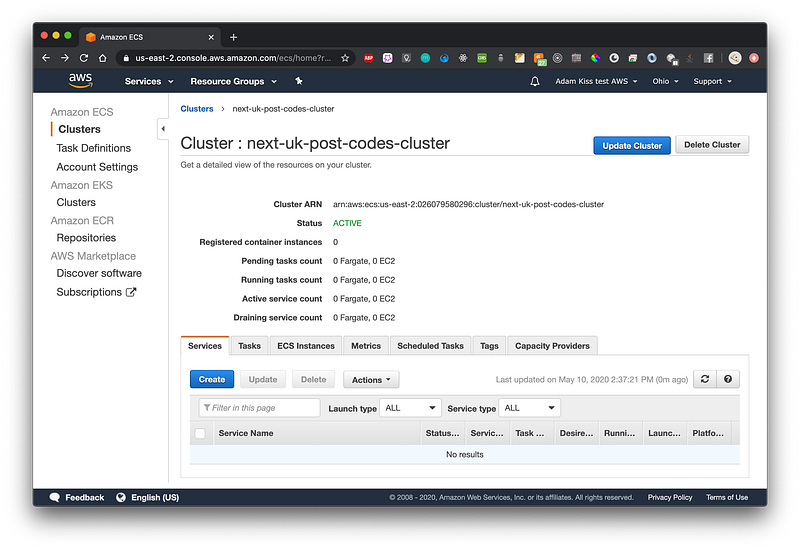
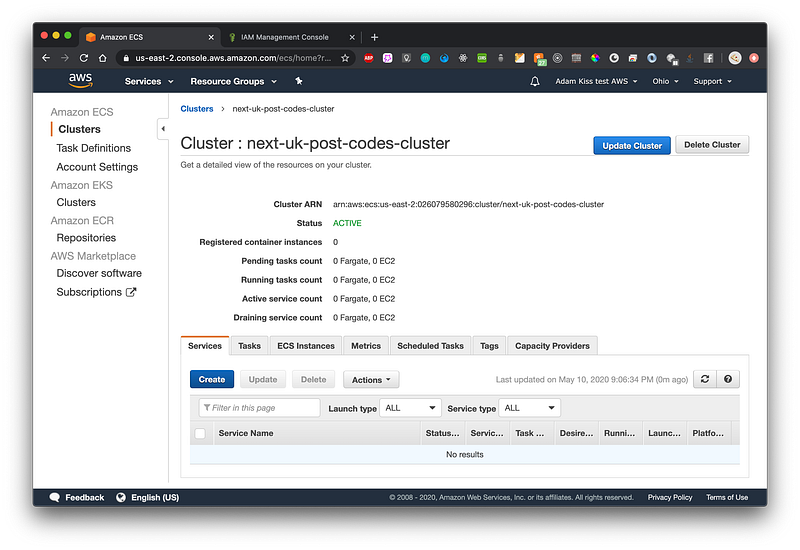
Click Next, give a name to your cluster and and click Create:
Great! Now we have a cluster in which our app will live in:
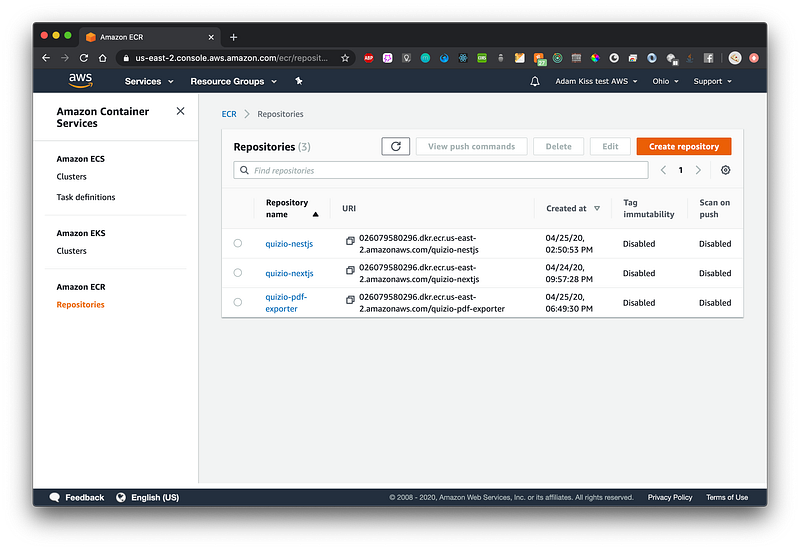
In the next step, we will create an ECR for holding our generated container images. Click Amazon ECR — Repositories in the left navigation bar.
Creating an ECR repository for your app
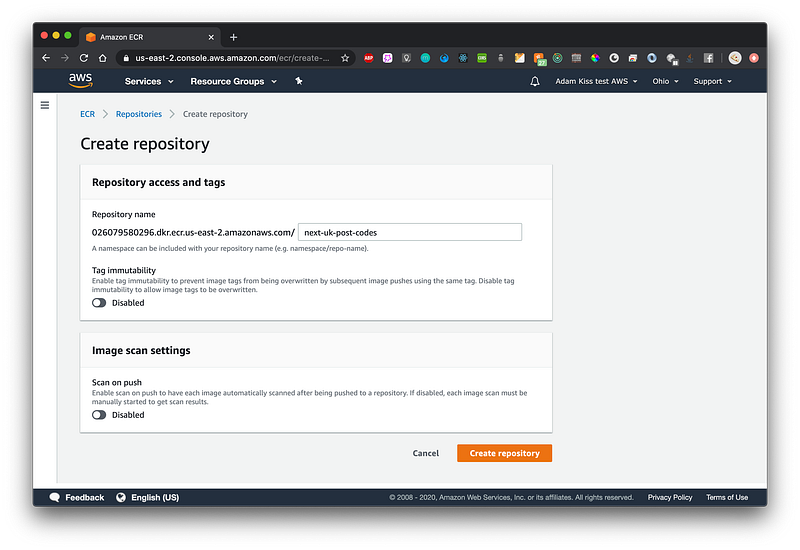
On the ECR Repositories page click Create Repository, give a name to your ECR repository and click Create repository:
Good job! Now you should have a working ECR repository with a specific URI. Copy that URI and put in in your app project’s ecs-task-definition.json, image property:
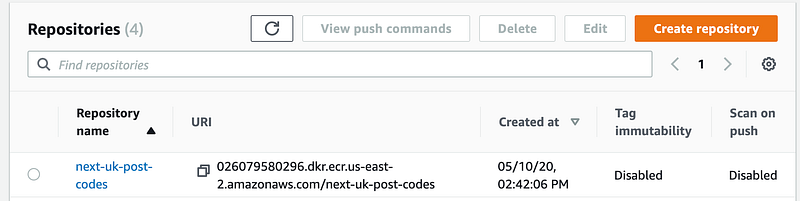
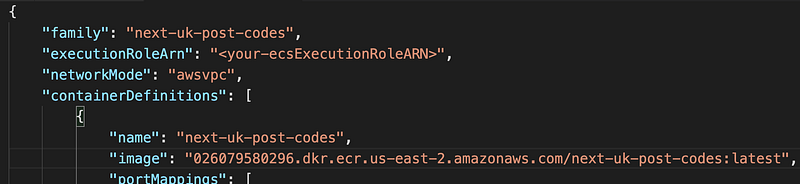
Take extra care when pasting the URI. You must also leave the latest tag in place after it, because the Docker image tagged with latest will be deployed onto ECS.
Configuring the execution role
For each task definition that you have within ECS (our ecs-task-definition.json is our task definition) you must have an execution role in place.
You must put your own execution role’s ARN (Amazon Resource Number) in the ecs-task-definition.json.
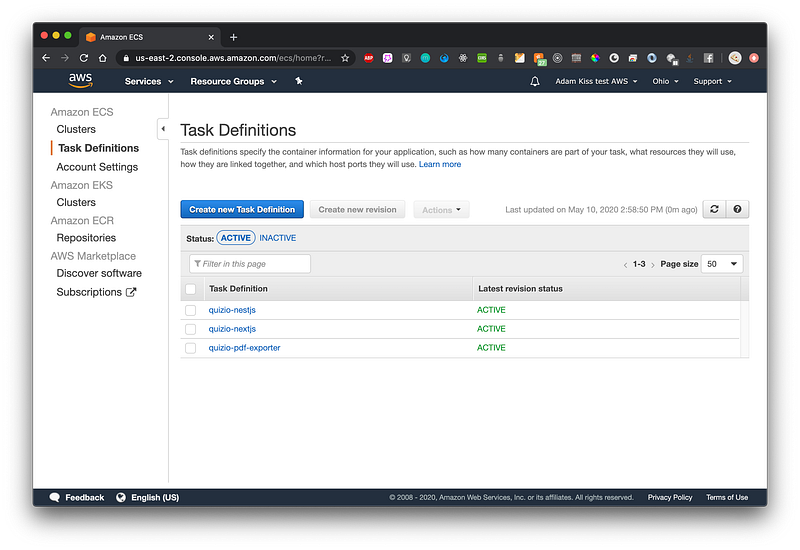
To check whether you have already such a role navigate to ECS -> Task Definitions in the Online Console and click Create new Task Definition.
We won’t actually create a task definition on the online console, but it is the easiest way to make sure that we have an ecsTaskExecution role.
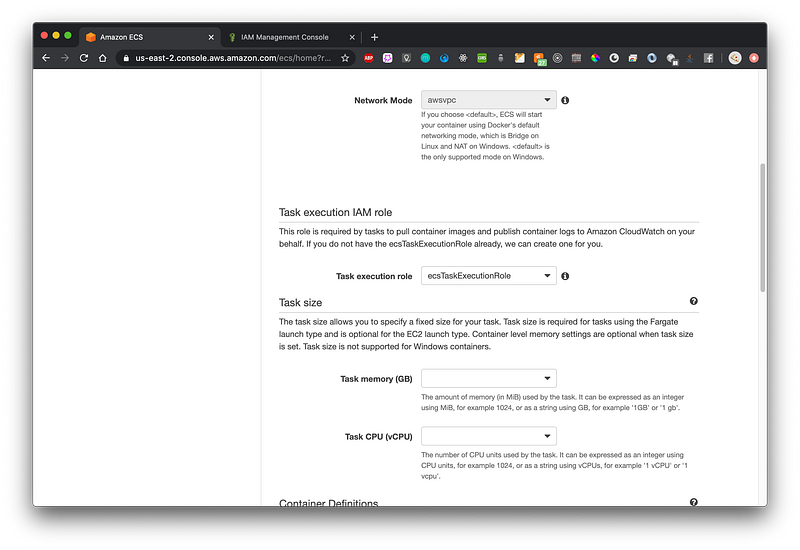
On the Create New Task Definition page you should select Fargate, click Next step and scroll to the Task execution IAM role section.
You should see the role in the dropdown already (ecsTaskExecutionRole):
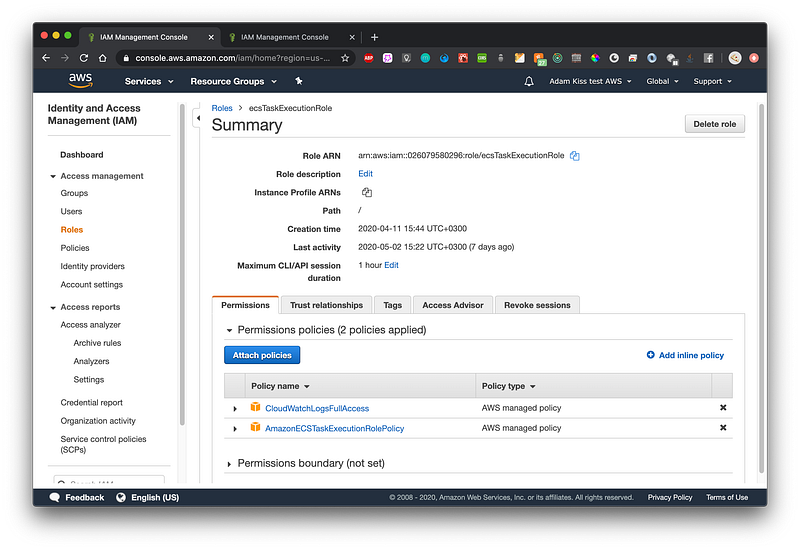
Perfect! Now we should get the ARN of this role.
Navigate to IAM in your AWS console, then to Roles. Select the ecsTaskExecutionRole from the list and copy the Role ARN:
Now paste it into your ecs-task-definition.json, in the executionRoleArn property:

Importing our task definition into AWS
For this step we’ll use the AWS CLI.
We’ll import the task definition described in ecs-task-definition.json through the AWS CLI.
Please make sure that you are logged into the AWS CLI, and execute the following command which creates your ECS task definition based on the ecs-task-definition.json:
aws ecs register-task-definition --region us-east-2 --cli-input-json file://./ecs-task-definition.jsonMake sure to change your region accordingly 🌎.
Configuring the Load Balancer
Having a load balancer is always a good idea.
Using the AWS load balancer of our choice (Application Load Balancer — ALB) can help us horizontally scale our application, have SSL termination (secure with HTTPS for free) and change the internal components of our AWS setup in a way that it won’t effect the clients.
Please note that having a load balancer in place costs money, around 10–20 dollars per month if you run it 24/7 🕐.
In the AWS Online Console navigate to the EC2 page, then to the Load Balancers subsection, and click Create load balancer. Select Application Load Balancer, that will suite our needs.
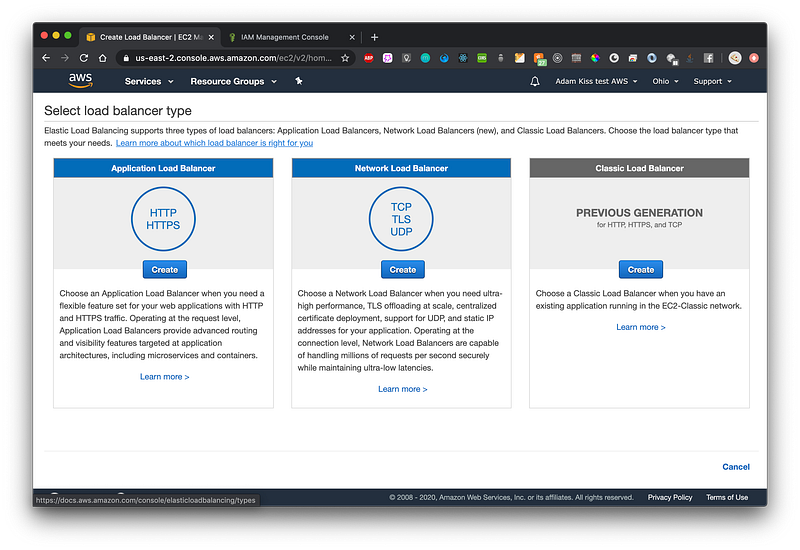
On the configuration page make sure that you give a name to your ALB, select “internet-facing”, ensure that you have an HTTP listener on port 80 and select the VPC and subnets of yours. Click Next.
On the second page it might tell you that you haven’t configured a secure port (that we can use for HTTPS). That’s fine for now. Having TLS through a load balancer is not the scope of this article but it’s really easy to set it up. Click Next.
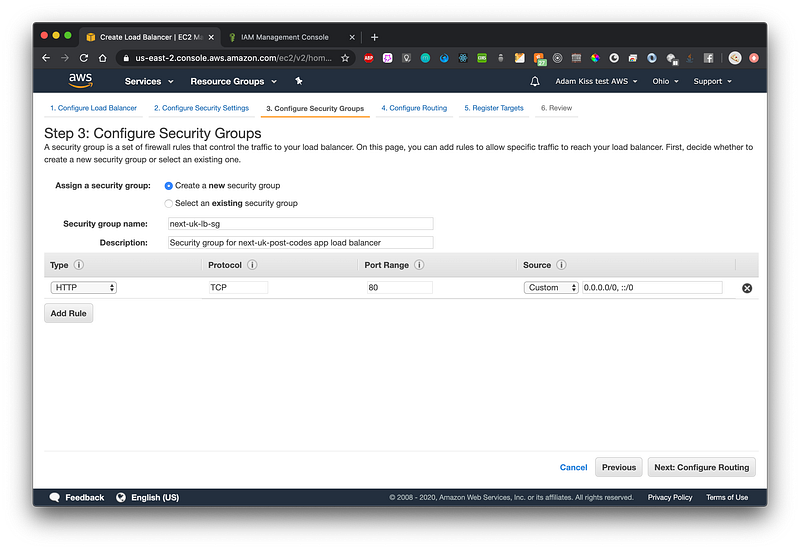
On the Configure Security Groups page make sure to create a new security group, give it a name, and have the port 80 open:
On the next page you will create a target group. Create a new target group and give it a name. Leave the other settings as they are and click Next.
A target group is a set of machines (or containers, in our case ) that the load balancer will route the incoming requests to.
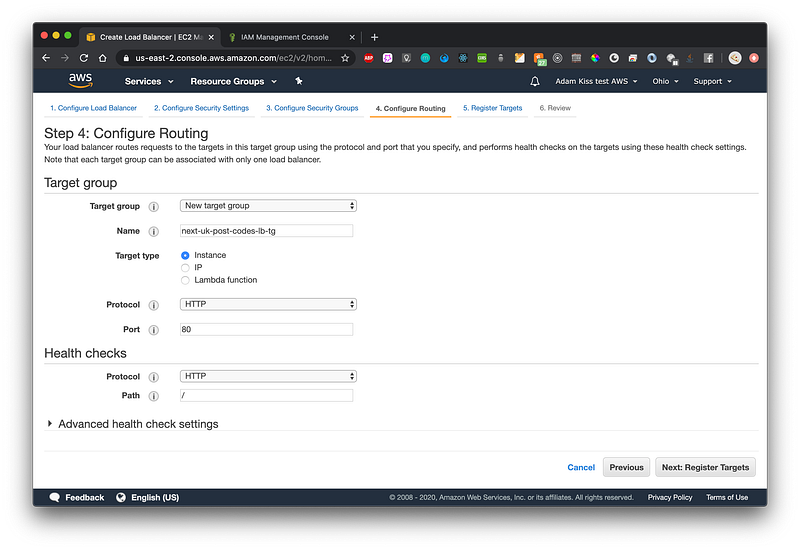
On the next page you could register the targets that will be in the target group. We are not setting any as ECS will set them automatically to our app’s container instances later on. Just click Next and your Application Load Balancer should now be created 🎆.
Creating the ECS Service
Now hat you have a task definition, a cluster in ECS, and also a load balancer, the only thing missing is the ECS Service.
This is the component of our ECS setup that actually runs a specified number of task definitions in our ECS cluster.
Go to AWS ECS in the online console and navigate to Clusters. Select the cluster you created. The default view should be the Services tab. Click Create:
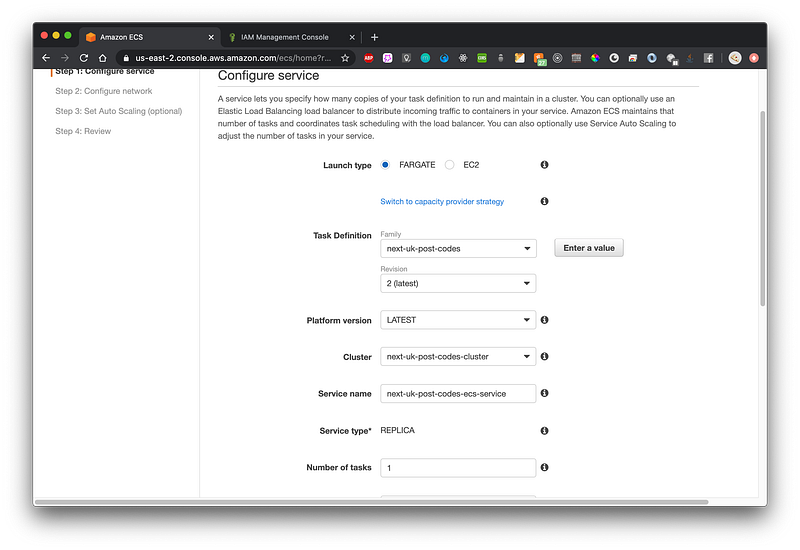
On the Configure service page select Fargate as launch type, make sure that the task definition is the correct one, give the Service a name and specify the number of tasks, which should be one for now.
Under the deployments section leave “Rolling update”. Then click Next step.
On the next page select the VPC and subnets of your choice (the ones you already selected in the creation of the load balancer).
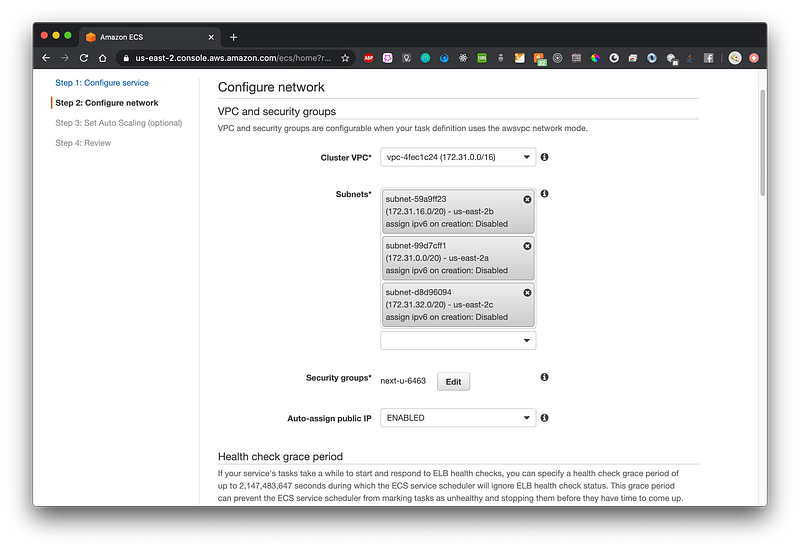
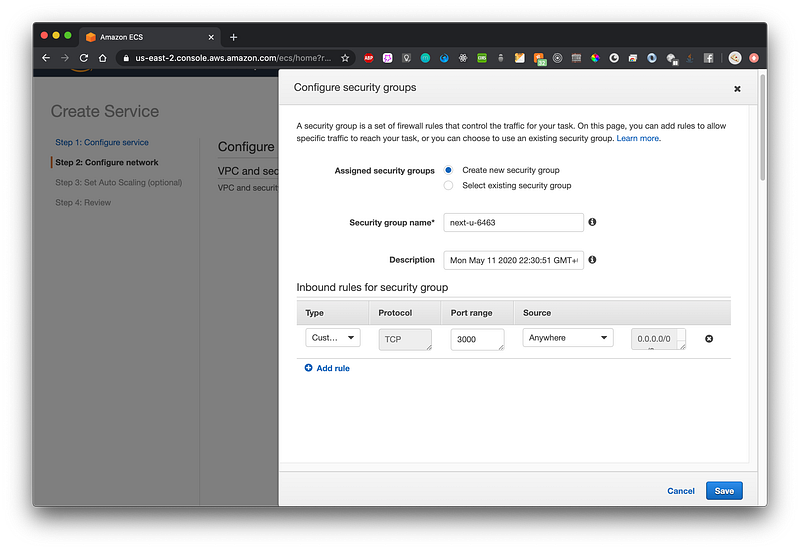
Under the Security groups -> Edit, create a new security group and open only port 3000 (that’s a custom TCP port).
We are using port 3000 because that’s the port our container exposes the Next.js application on. You need to set whatever port your application exposes.
Afterwards, under the Load balancer type section, select Application Load Balancer, and choose your ALB you’ve just created:
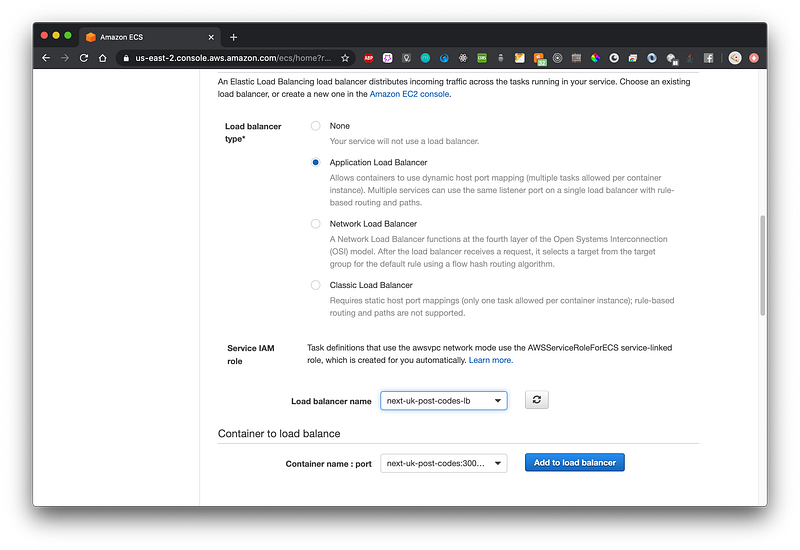
After you’ve selected the ALB, in the section before the Load balancer type you can now specify a Health check grace period. Put 10 in there (as in 10 seconds).
The health check grace period tells ECS how many seconds it should wait until it deems a container unhealthy. As our Next.js application does not boot up instantly, we should set it to a few seconds.
Then, under the Container to load balancer section, make sure that the “next-uk-post-codes” container is selected (you have only this one according to the task definition) and click Add to load balancer:
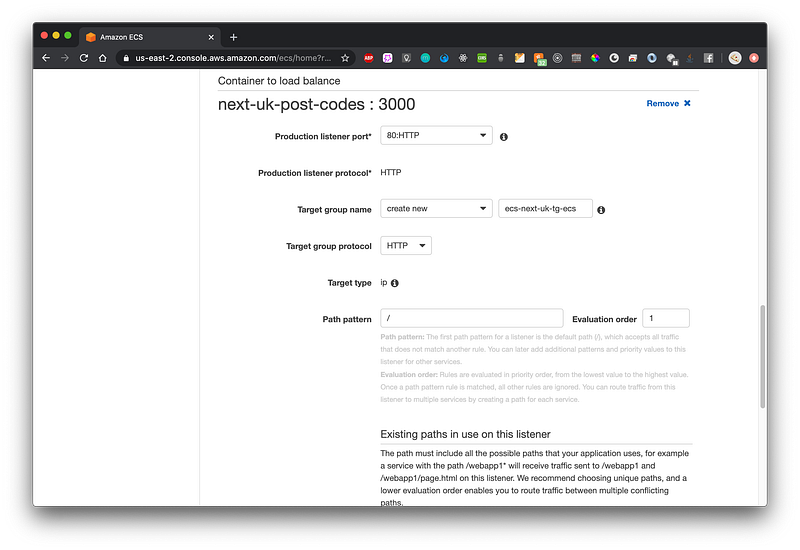
Make the following modifications:
- Select 80:HTTP as the Production listener port
- Create a new target group and give it a name (if you’re wondering, unfortunately it doesn’t seem to be possible to re-use the target group we created with our ALB)
- Select HTTP as target group protocol
- For path pattern put
/, evaluation order 1 (so it gets evaluated first in the ALB) - For the health check path put
/as well (that’s the route to our homepage in Next.js). This can usually be any endpoint that your app exposes that can be used to check the health of it.
Under the Service discovery section, uncheck Enable service discovery integration as we don’t need it.
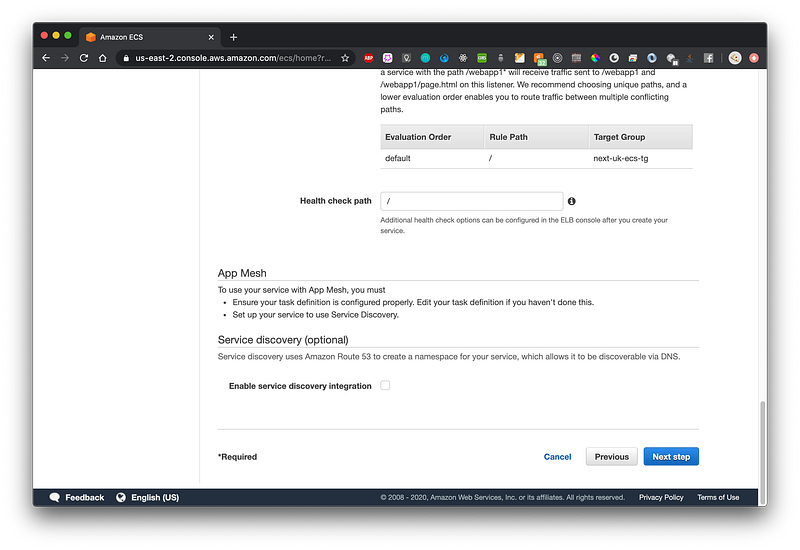
After you click Next step you’ll see the Auto scaling options. Select Do not adjust for now. Click Next step and then Create service on the final page.
Creating an IAM user for GitHub Actions
As GitHub Actions will need to access the following AWS resources:
- Push the the Docker image of your app to your ECR repository
- Deploy the application to ECS
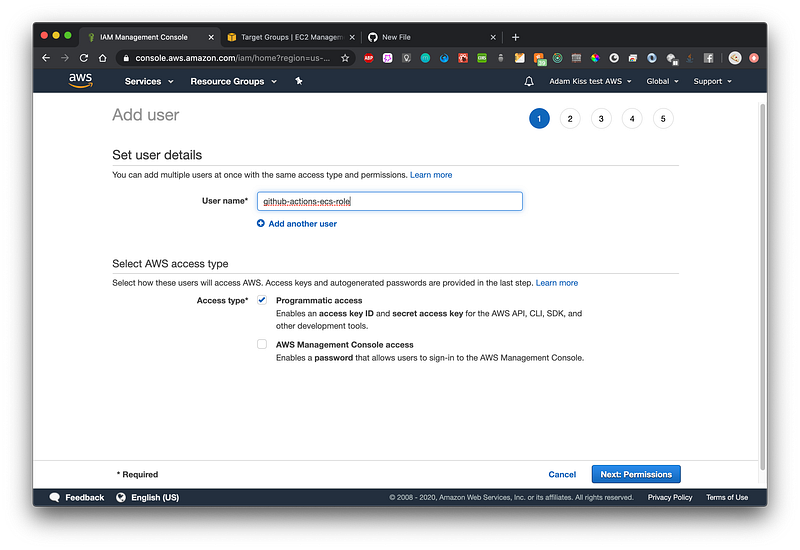
,you need to create a user for it in AWS IAM. For this:
- Navigate to IAM in the AWS Online Console
- Select Users and click Add user. Give the user a name and select Programmatic Access. Click Next
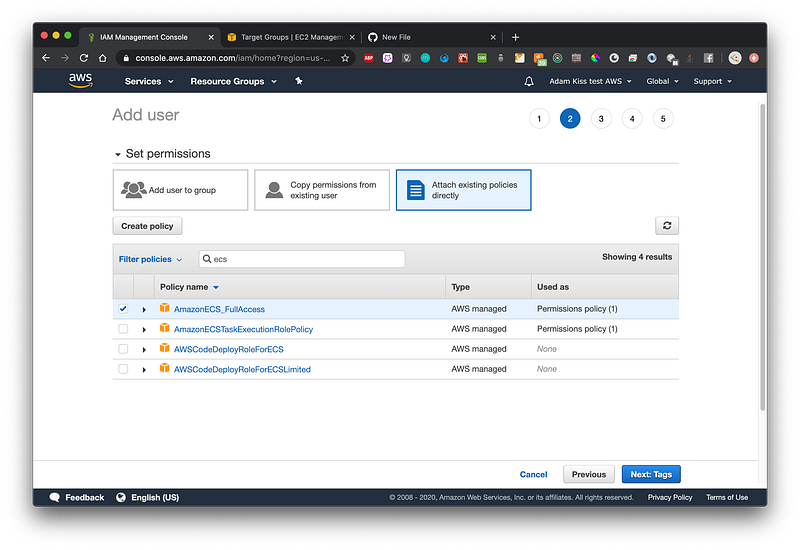
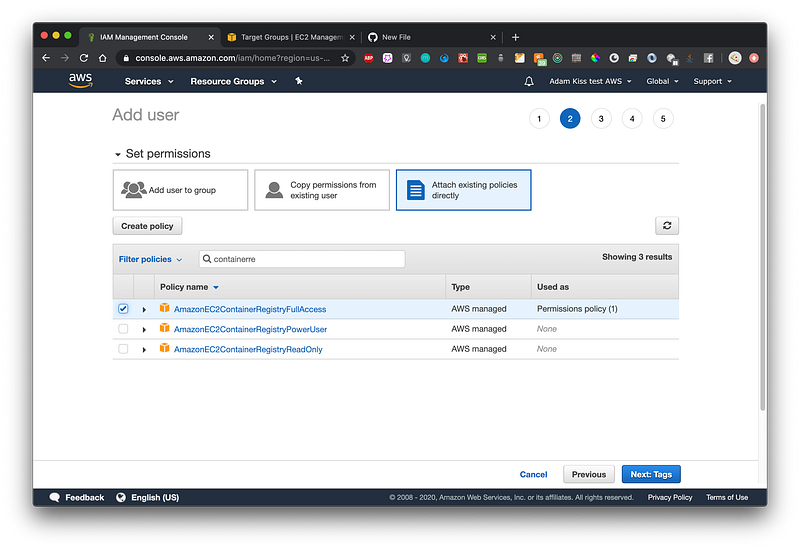
3. On the next page, select Attach existing policies directly, and search for ECS. Select AmazonECS_FullAccess, then search for “Container” and select AmazonEC2ContainerRegistryFullAccess — this will let GitHub Actions to push to your ECR repository. Click Next.
4. On the Tags page, leave it empty and click Next, then on the final page click Create user
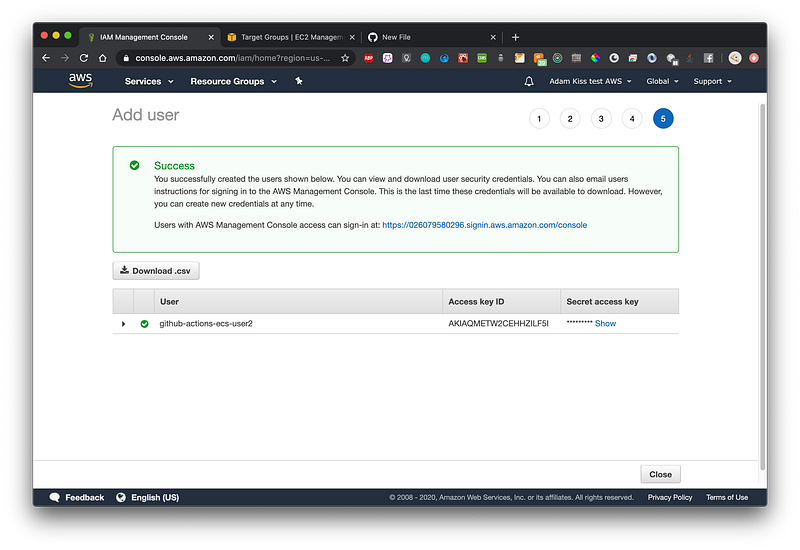
5. On the final page you should now see all the information for your newly created user. Save the Access key ID and Secret access key somewhere safe, or export it as a CSV file
We will add this user’s credentials in just a second to your GitHub project’s secrets.
Setting up GitHub Actions
Before we move on, you should have your own repository on GitHub with your app’s code. If you are using my Next.js example you’ve either forked it, pulled it and and pushed it to your own remote or you’ve made a project from scratch.
First and foremost, we must add the AWS credentials to GitHub Secrets. This way GitHub Actions will be able to read them when executing the workflow.
- Select Settings on your project’s GitHub page and navigate to Secrets

2. Create two secrets, one with the name AWS_ACCESS_KEY_ID and another one named AWS_SECRET_ACCESS_KEY. Populate them with the AWS credentials you’ve just saved from AWS Console.
Cool, now everything is set to configure our GitHub Actions! 🕺
Just to point it out once again, GitHub Actions is free, no matter what, if your repository is public🎆. Go open source!
However, if you have a private repository, you have a generous number of free execution minutes of GitHub Actions per month, which might be more than enough, at least for getting the project off the ground.
Enough talk, let’s get to it!
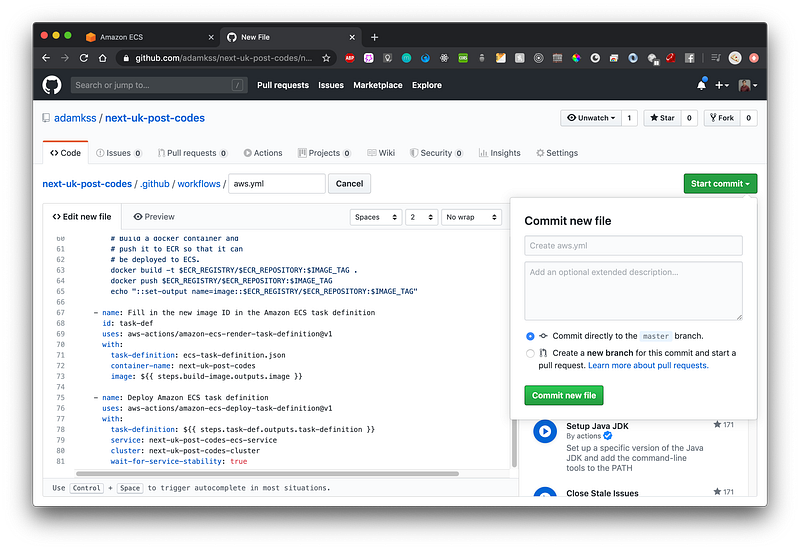
It’s important to note that GitHub Actions will create a file in your GitHub repository, under the .github/workflows folder. If you’ve cloned/forked the example of mine and you already have this directory, please delete it and push the changes to GitHub, as it is better to just start from zero.
Let’s go to our GitHub project in their online editor and click Actions in the toolbar and click Create new workflow:
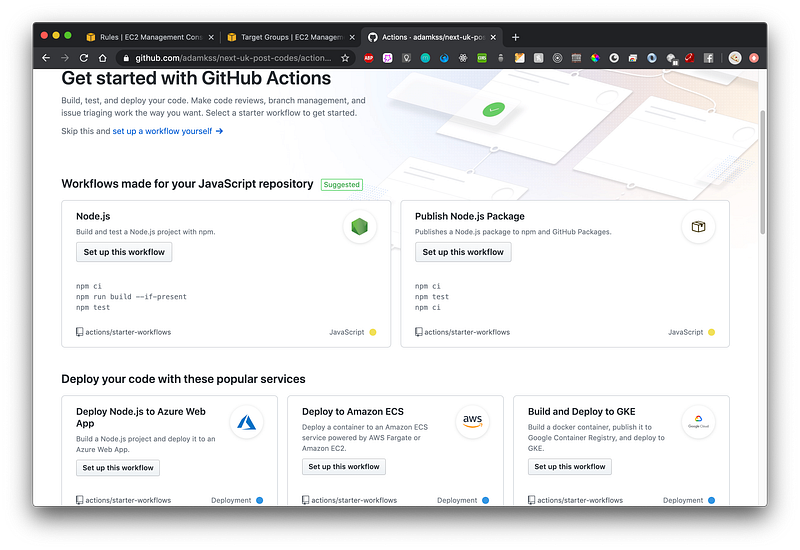
Search for the Deploy to Amazon ECS workflow and click on Set up this workflow.
Now you should see an editor like page:
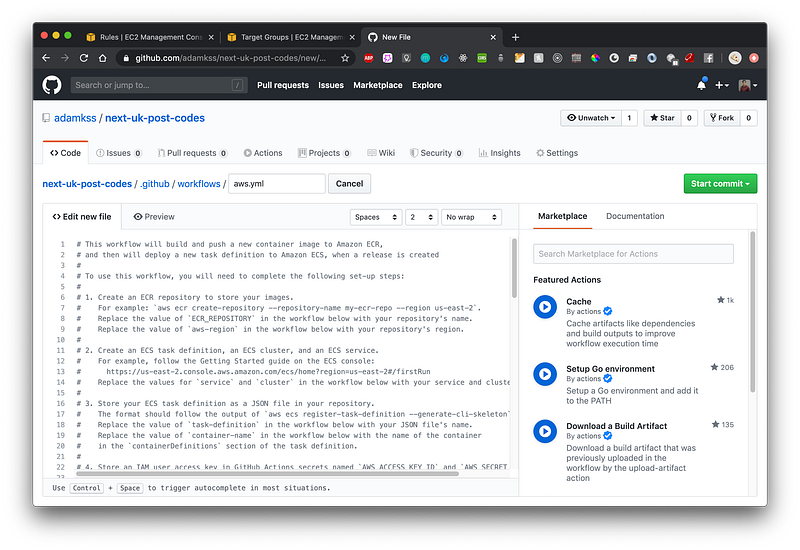
This is where you actually configure your GitHub Actions 🤔. If you take a closer look, this action actually uses multiple other actions, like the one that configures your AWS credentials, one that logs in to Amazon ECR, one that configures and one that deploys the task definition.
Now, make the following changes to the code:
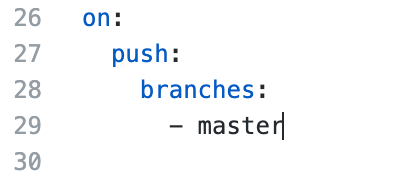
- After the commented out block, you shall see an
on:property. This specifies when this particular workflow should run. There are many options like run on every push, every merge and so on. We’ll set it up so that it runs on every push on themasterbranch:
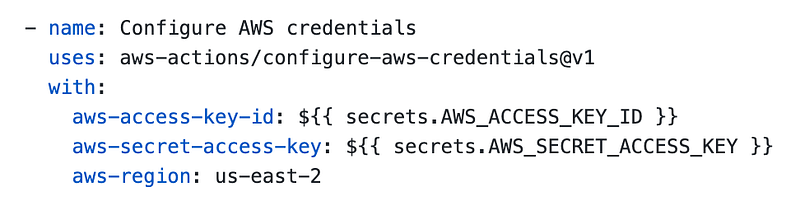
2. Take a look at Configure AWS credentials action. It uses the secrets you’ve just set! Make sure that the secrets’ names match the ones from the code. Also, modify your AWS region if needed
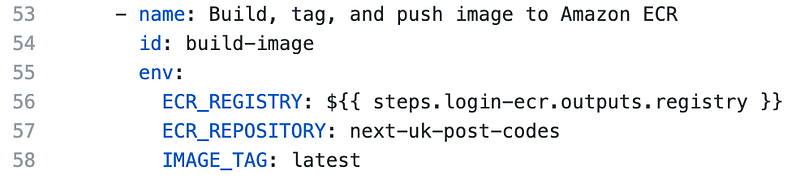
3. Under the build-image step, put the name of your ECR repository and latest as the image tag
In this tutorial we are always using latest as the image’s tag. We are not tagging the images based on the version or commit hash.
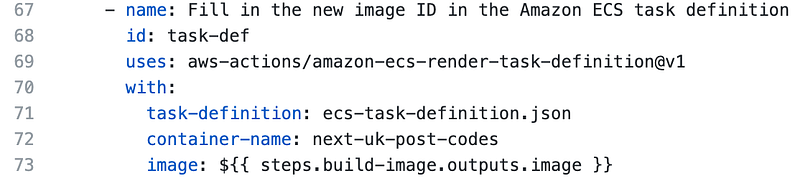
4. In the task-def step make sure to put the correct path to your ecs-task-definition.json(based on your project’s root) and the container name, also set in JSON
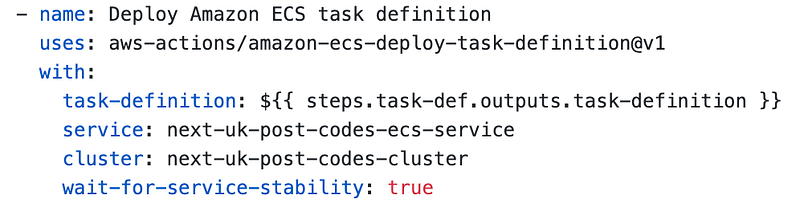
5. In the last step, make sure to put the right ECS Cluster name and ECS Service name you created
Now, click Start commit, and Commit new file:
What should happen now is that GitHub starts executing this action, and actually building a Docker image out of your app, pushing it to ECR, deploying it on ECS based on the task-definition and your app should soon be live!
Testing the outcome
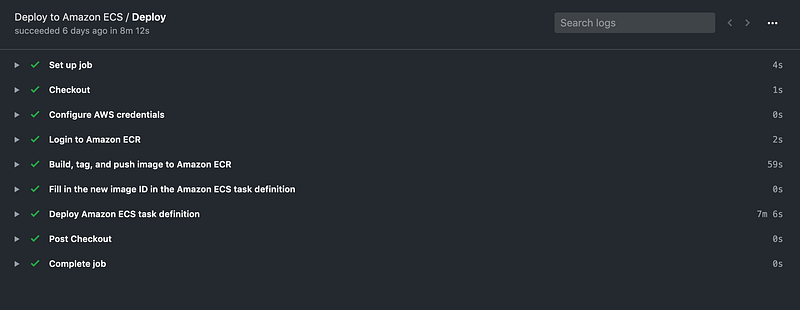
Navigate to Actions in your GitHub project, and click on the newly created workflow. You should see a page similar to this one:
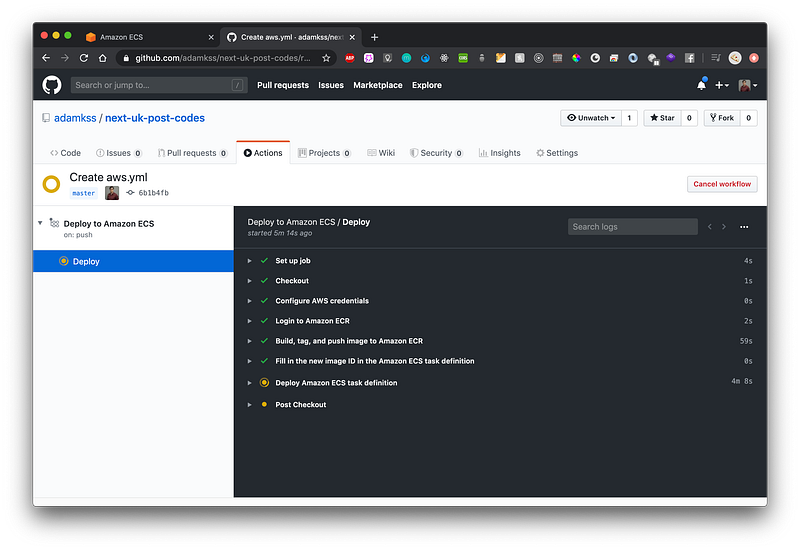
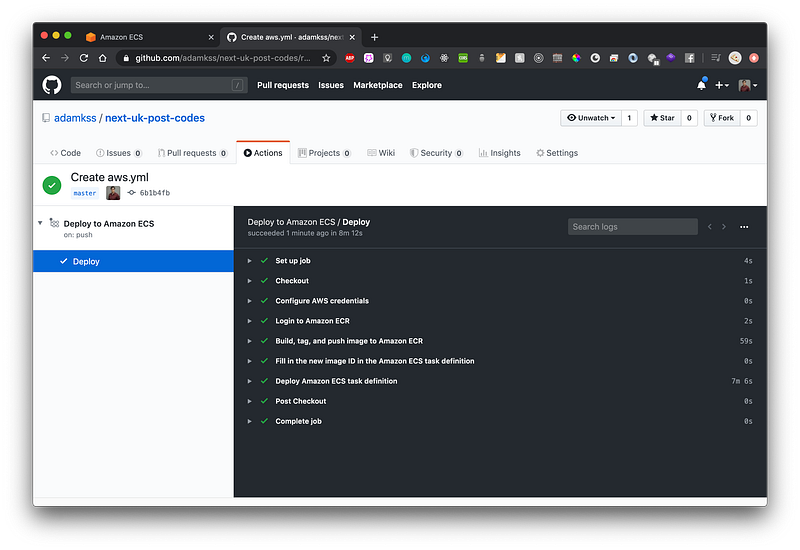
GitHub Actions is executing the workflow! You can see all the steps here as little checkmarks or yellow circles if not yet finished. Deploying on ECS may take some time, as the instance has to pass the health checks.
Be patient and check the result! If there’s something wrong, take a look at the error message. It is usually quite explicit. There have been a lot of steps in this tutorial, and you could have easily made a mistake or two. I personally re-did this quite few times when I started out! No worries 👍.
Running the final smoke tests
Great! Now everything should be in place and working 🍾.
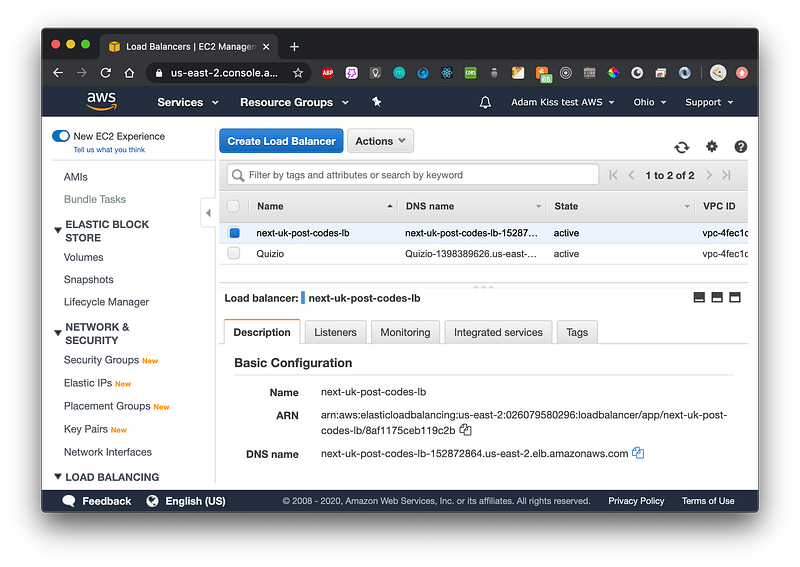
We can navigate to our load balancer and access it through it’s public URL.
- In the AWS Online Console navigate to EC2 then Load Balancers section
- Select your load balancer you’ve created
- Copy the DNS name
Now, access this URL in your browser. You should see your app in action! 💍

Perfect. This has been a tiring journey, but well worth it!
What have we achieved
We’ve successfully set up a GitHub Actions workflow that will be triggered with every push to the master branch of your GitHub project.
In turn, after building the Docker image your automated workflow will deploy it to your ECS cluster by using your ECS task definition. The application will be available through the load balancer, waiting to be accessed by some enthusiastic clients. Hopefully 😉.
Where to go from here
This article serves as an example/ proof of concept. We’ve seen how GitHub Actions integrates with AWS ECS. GitHub Actions is either free or really cheap, which is quite convenient especially if you’re already using GitHub for git hosting.
You can use this knowledge to build up a similar workflow for your application. As stated in the beginning of this article, any kind of application will work with this approach. It just needs to have a Dockerfile for building it and a port to be exposed on. If it’s a web app, of course 🗺.
Thank you for reading this article all the way through, you’re awesome! Cheers!
Resources
- GitHub Repo for the example project — https://github.com/adamkss/next-uk-post-codes
- AWS ECS overview — https://aws.amazon.com/ecs/
- GitHub Actions overview — https://github.com/features/actions
A note In Plain English
Did you know that we have four publications and a YouTube channel? You can find all of this from our homepage at plainenglish.io — show some love by giving our publications a follow and subscribing to our YouTube channel!


