
Deploy a machine learning model with AWS Elastic Beanstalk
A complete guide to serve a sentiment analysis model using AWS Elastic Beanstalk

We present a comprehensive procedure to serve a FastText sentiment analysis model using AWS Elastic Beanstalk. We provide all you need to get your own on-demand sentiment analysis service in 5 languages.
A lot of resources are available on the web to code and train a machine learning model. However, when it comes to deploying and putting it in production, tutorials and procedures become scarce. We try to fill this gap by providing information to:
- Learn how to deploy a basic flask app on AWS Elastic Beanstalk
- Learn how to implement your machine learning model
- Learn how to test your sentiment analysis model
- Understand the difference between Elastic Beanstalk and Amazon SageMaker to serve a machine learning model (pricing/pros & cons).
- Get your own on-demand sentiment analysis service.
Prerequisites Below is the list of what you will need to go through this tutorial:
- An AWS account. Create an AWS account; it’s free.
- Basic knowledge of Python
- Willingness to spend a few cents to use AWS resources. Note that AWS Elastic Beanstalk is free, you pay only for AWS resources (e.g. EC2 instances, S3 buckets, etc).
Overview of what we’ll use to deploy our model
- AWS Elastic Beanstalk, a web application deployment service
- FastText, a Facebook Research library for text classification.
- Python, and in particular Flask, a micro web framework. It is classified as a microframework because it does not require specific tools or libraries.
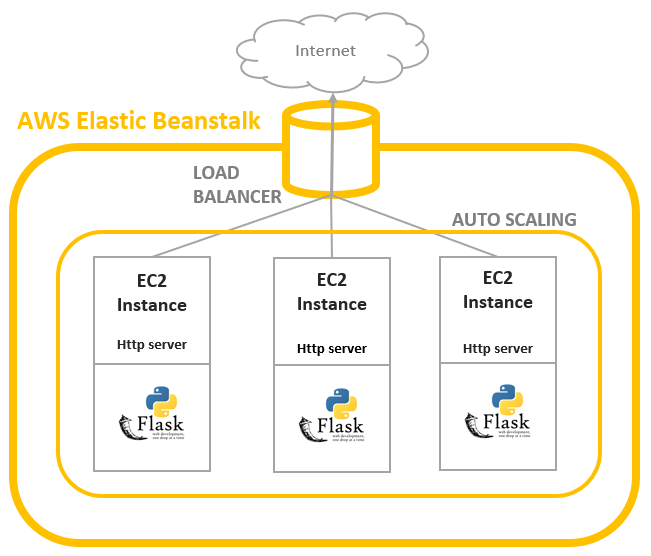
AWS Elastic Beanstalk
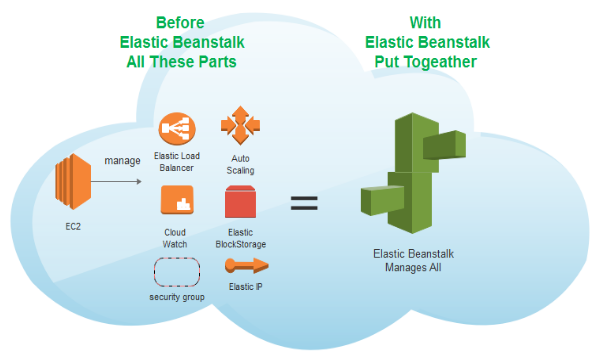
AWS Elastic Beanstalk is an easy-to-use service for deploying and scaling web applications and services developed with Java, .NET, PHP, Node.js, Python, Ruby, Go, and Docker on familiar servers such as Apache, Nginx, Passenger, and IIS.
Upload your code, and Elastic Beanstalk automatically handles the deployment, from capacity provisioning, load balancing, auto-scaling to application health monitoring. At the same time, you retain full control over the AWS resources powering your application and can access the underlying resources at any time.
Load balancer

A load balancer distributes the incoming application or network traffic across multiple targets, such as Amazon EC2 instances, containers, and IP addresses, in multiple Availability Zones.
It uses health checks to detect which instances are healthy and directs traffic only across those instances.
Autoscaling
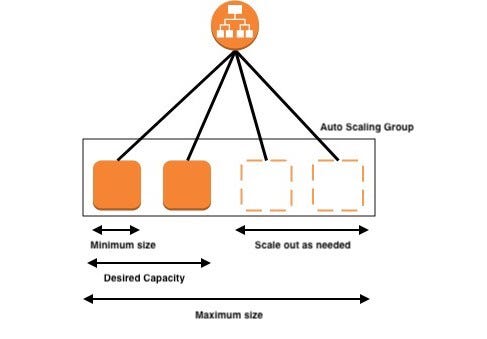
Auto Scaling monitors your applications and automatically adjusts the capacity to maintain steady, predictable performance at the lowest possible cost.
FastText for Sentiment Analysis model
fastText is a library for learning of word embeddings and text classification created by Facebook’s AI Research lab. It is super fast and is on par with more complex, slower algorithms.
We created our sentiment analysis models with the fastText library provided by Facebook Research. We believe it’s great choice for a production-ready model.
The goal of this tutorial is to deploy a model, not train one. Nonetheless, should you want to know more, check my medium article. To download fully trained models in English, French, Spanish, Italian, and German, check my GitHub repository.
Flask — A Python micro web framework
Flask is a micro web framework written in Python. It is classified as a microframework because it does not require particular tools or libraries.
Flask is very simple and perfect for our needs. For example, we only need the following lines of codes to start a “Hello World” web app.
from flask import Flask
app = Flask(__name__)@app.route(“/”)
def hello():
return “Hello World!”if __name__ == “__main__”:
app.run()And it’s simple to install.
pip install FlaskDeploy on AWS Elastic Beanstalk Now is time to use AWS Elastic Beanstalk to serve multiple sentiment analysis models trained with fastText.
https://console.aws.amazon.com/elasticbeanstalk/
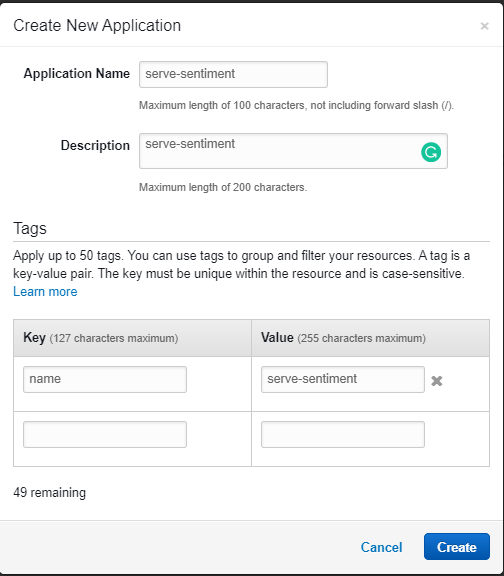
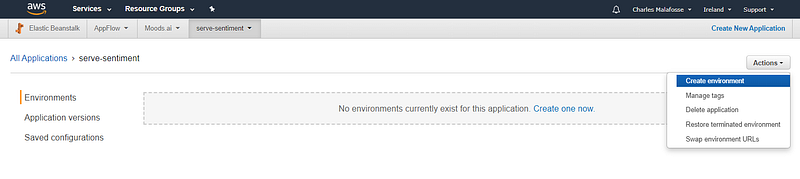
1- Create an App in AWS Elastic Beanstalk
- First, we need to create an App. An Elastic Beanstalk App is a logical collection of Elastic Beanstalk components, including environments, versions, and environment configurations. In Elastic Beanstalk an application is conceptually similar to a folder.

2- Create an Environment
- Now we need to create an environment. An environment is a collection of AWS resources running an application version. Each environment runs only one application version at a time. However, you can run the same application version or different application versions in many environments simultaneously.
When you create an environment, Elastic Beanstalk provisions the resources needed to run the application version you specified.
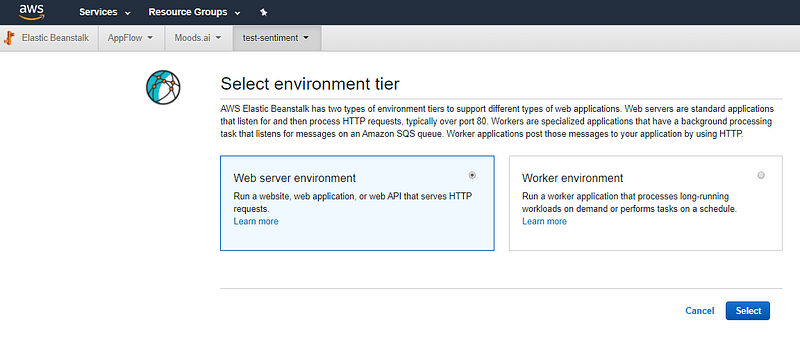
- Select Web Server Environment.
Web Servers Env run web server processes (apache, Nginx, etc), while Worker environment deals with long-running processes and communicates with AWS SQS.
- A platform is a combination of an operating system, programming language runtime, web server, application server, and Elastic Beanstalk components.
For platform select Python.
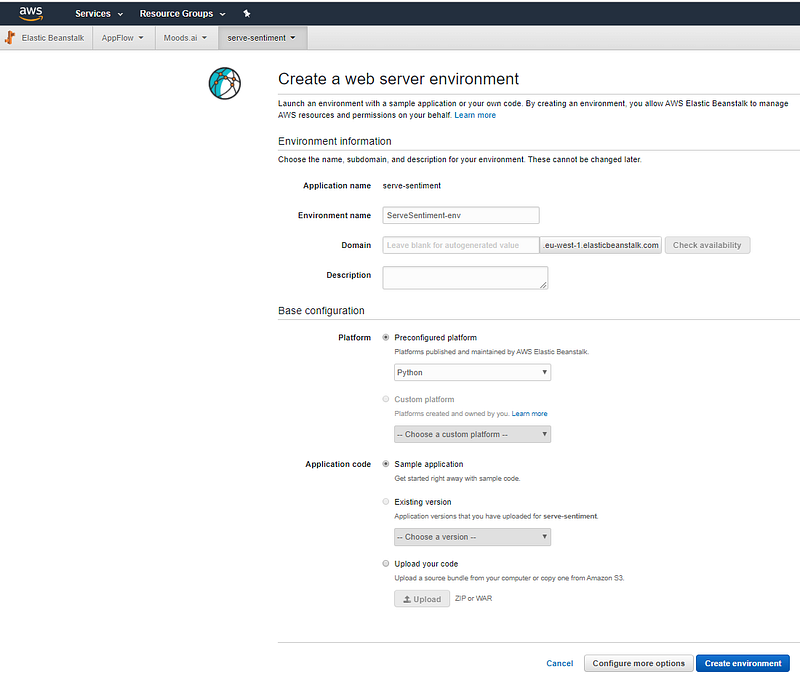
- Configurations screen
The configuration screen is accessible by clicking on “Configure more options” in the previous screen (Create a web server environment).
By default you have three possible predefined configurations:
- Low Cost: Basic setup with only one instance running your app. It means no load balancer and no autoscaling.
- High availability: All you need to start with a load balancer and autoscaling.
- Custom configuration: Anything that does not fit one of the two previous setups is considered custom by Elastic Beanstalk.
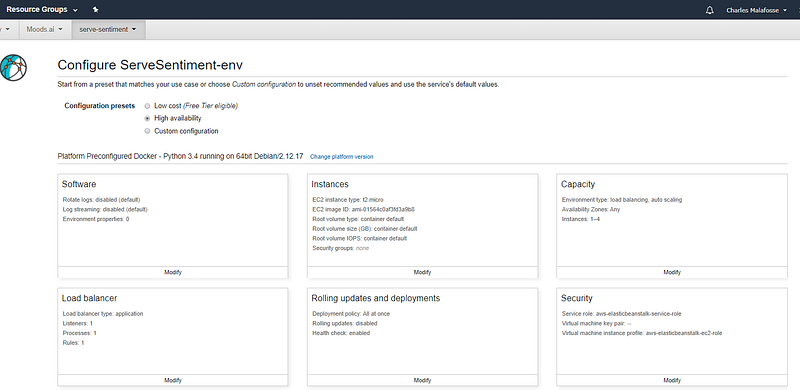
Modify Instance to T3 Micro T3 is a newer and cheaper version than the T2 proposed by default. As you can see on the screenshot below, T3s have more vCPUs but yet are slightly less expensive than T2s. Therefore we will change the instance type.
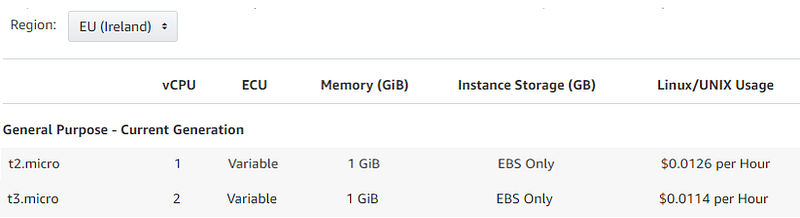
On the “Instances” configuration page, specify the instance type and specify a custom AMI (Amazon Machine Images) if necessary. In our case leave it to the default AMI. Everything we need to run our flask app will be installed through our config files.
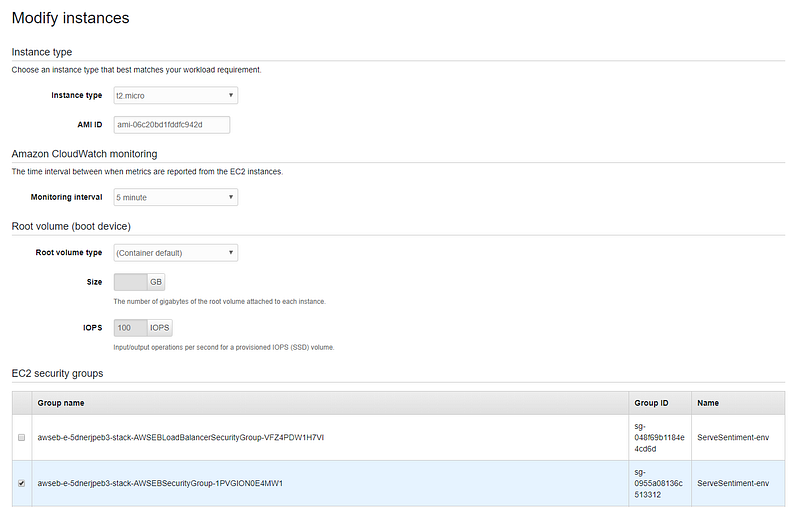
Modify Security (optional) Should you need to connect remotely to your EC2 instances, you might want to specify an EC2 Keypair. These keys are required to be able to connect to your instance. You might also have to check that the security group linked to your instances allows external connections.
More information here:
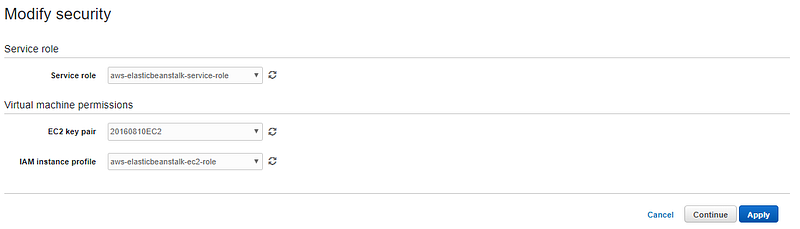
However, note that logs produced by your instances are accessible through the “Logs” section of the Elastic Beanstalk console.
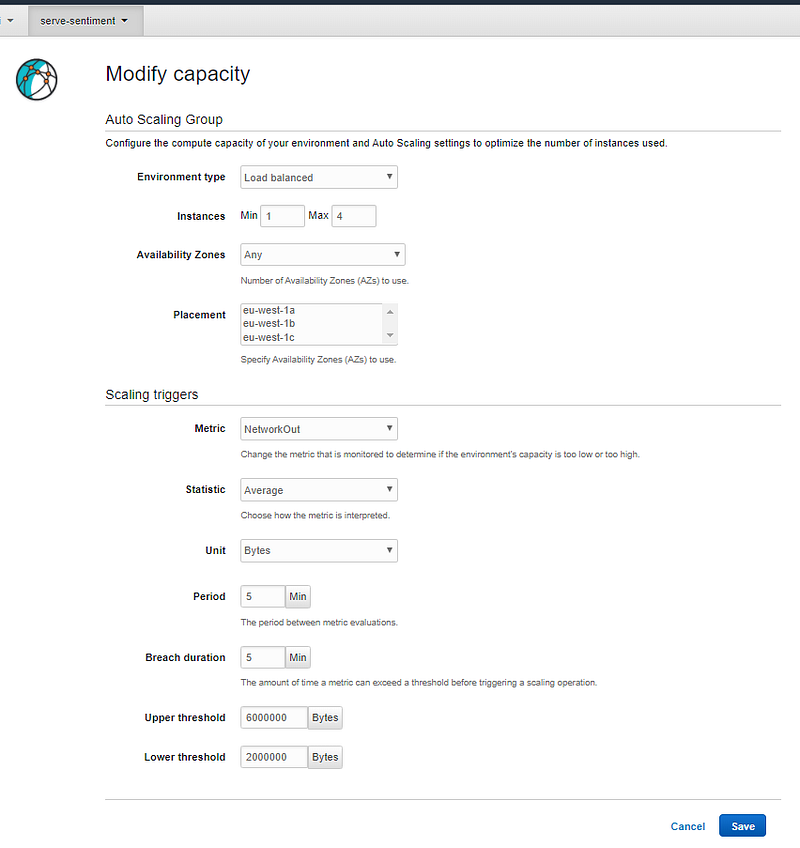
Modify Scalability (optional) We will leave the Scalability configuration unchanged. Our autoscaling will have a min of 1 instance and up to 4. The number of instances depends on a metric that can be modified on this configuration screen.
Instance metrics provide information about the health of instances in your environment. The Elastic Beanstalk health agent runs on each instance. It gathers and relays metrics about instances to Elastic Beanstalk, which analyzes the metrics to determine the health of the instances in your environments.
Create the Environment Click on [Create Environment] to start provisioning the resources necessary:
- An EC2 instance with a running web server and a Flask app.
- An Autoscaling group
- A Load Balancer
These can be seen on the EC2 console: https://eu-west-1.console.aws.amazon.com/ec2/ (use the same region that you used for Elastic Beanstalk).
3- Deploy our ML package
We just deployed an elastic Beanstalk sample app. Now we will replace this package with our packaged machine learning model.
Our package contains:
- a Python file
application.py, this contains our Flask app. - A folder
.ebextensionswith Elastic Beanstalk config files. - A file
00_application.config: It contains command lines that install the required C compiler and other libraries needed to install fastText. - A file
01_pip-install.config: It creates our Python environment; install packages and download fastText trained models from GitHub. Ordinary a simple requirements.txt file containing the list of packages to install is enough. But with fastText, we are required to do a git clone, and for this reason, a config file is necessary. - A file
02_wsgi.config: It creates a custom config for our WSGI that fixes a thread safety issue with libraries such as Pandas or Numpy.
Flask App
Our flask app is contained in the application.py file (on this GitHub repository).
It has the following functions:
- hello(): Root route ‘/’. For test only.
- ping(): Determine if the container is working and healthy. In this sample container, we declare it healthy if we can load the model successfully.
- transformation(): Inference on a single batch of data
- Other functions deal with text cleaning.
The app starts with the following command:
if __name__ == ‘__main__’:
   application.run()
Elastic Beanstalk config files Configuration files present in the .ebextensions folder are necessary to configure your environment and customize the AWS resources. Our folder ‘.ebextensions’ contains these 3 files:
- 00_application.config
commands:
 01_dev_tools:
 command: sudo yum groupinstall -y "Development Tools"
 02_dev_libs:
 command: sudo yum groupinstall -y "Development Libraries"
 03_gcc_alternatives:
command: sudo alternatives - set gcc "/usr/bin/gcc48"- 01_pip-install.config
files:
 “/tmp/pipInstallation.sh”:
 mode: “000777”
 owner: root
 group: root
 content: |
 #! /bin/bash
 source /opt/python/run/venv/bin/activate
 pip install beautifulsoup4==4.7.1
 pip install boto3==1.9.86
… (check github files for complete list)
 pip install Werkzeug==0.14.1
 git clone https://github.com/facebookresearch/fastText.git
 cd fastText
 pip install .
 wget https://raw.github.com/charlesmalafosse/aws-elasticbeanstalk-ml-server/master/model-en.ftz --output-document=/tmp/model-en.ftz
 wget https://raw.github.com/charlesmalafosse/aws-elasticbeanstalk-
… (check github files for complete list)
commands:
01_execute:
command: “/tmp/pipInstallation.sh”- 02_wsgi.config
files:
 "/etc/httpd/conf.d/wsgi_custom.conf":
 mode: "000644"
 owner: root
 group: root
 content: |
 WSGIApplicationGroup %{GLOBAL}
Zip it and upload/deploy! On your app environment dashboard, click on [Update and Deploy], and upload the zip file containing the application.py and the .ebextensions folder. This zip file is available on my GitHub page.
It takes a few minutes to upload and deploy your package on your EC2 instances. After that, your model is deployed.
4- Test if it works
To test if our model is correctly deployed, navigate to the endpoint of the environment. The endpoint address is displayed on the top of your environment dashboard. It is something similar to: nameofyourenv-env.qnmpdqf6re.eu-west-1.elasticbeanstalk.com
If it’s working, you should see the following message: “Welcome to your own Sentiment Analysis Tool”. If you don’t check the logs and check for any error.
Finally, to test our model, we use a POST method on the resource “/invocations” defined in our Flask app. Make sure you pass the following JSON payload to your POST request:
{"text":"This is great!","language":"us"}
I usually use the simple Restlet Chrome extension to test my endpoints. But any API tester will do.
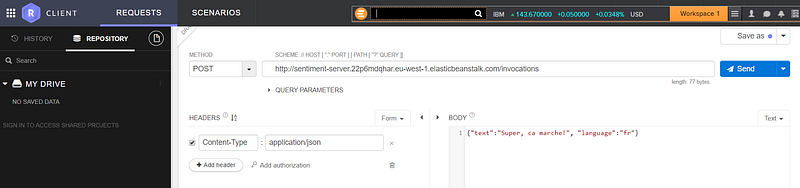
You should get back a result with an HTTP response 200.
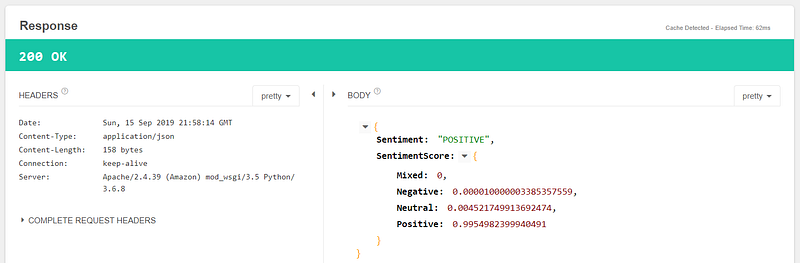
You can test other sentences for sentiment analysis. The model you deployed supports English (“language”:”us”), Spanish (es), French (fr), Italian (it), German (de). Of course, it comes with no guarantee regarding the quality of its predictions but does overall a decent job. Check this Medium article here for more details. Let me know what you think.
Deploying on Elastic Beanstalk Vs. SageMaker
AWS Elastic Beanstalk is not the only way to serve a model within the AWS ecosystem. Another solution is the fully managed service SageMaker. Below I highlight some of the pros and cons of both solutions.
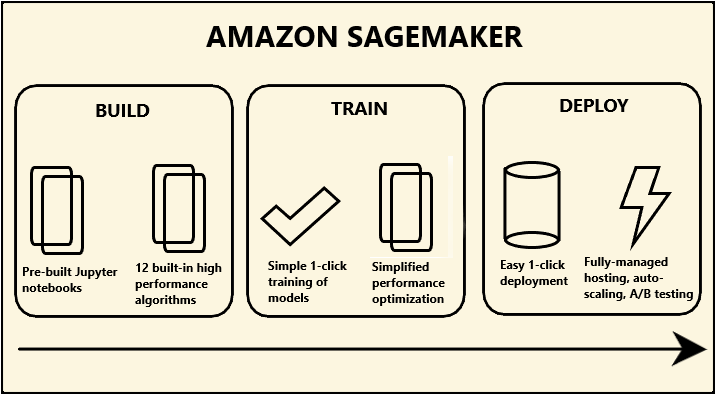
Amazon SageMaker What is SageMaker? Amazon SageMaker is a cloud machine-learning platform that was launched in November 2017. SageMaker enables developers to create, train and deploy machine-learning models in the cloud.
Using AWS Elastic Beanstalk is an excellent way to serve a machine learning model. You get scalability at a very affordable cost and it might worth considering switching from Amazon SageMaker to Elastic Beanstalk to lower the cost of a model hosting.
Here are some of the pros and cons of using Elastic Beanstalk for serving ML models:
Pros:
- 5x cheaper: The smallest instance is around 10$ a month vs. 50$ for SageMaker.
- More customizations vs. SageMaker. You control and have access to all the underlying resources.
- You can use any ML models. Not only the one in Python.
Cons:
- SageMaker is easier to deploy. Fully managed, no need to bother with underlying resources and their configuration.
- Faster deployment time if you trained in SageMaker and used estimators. Just one line of code in Python!
That’s it — Time to delete the resources created!
Do not forget to delete the AWS resources provisioned if you have no plan for them. Delete your AWS Elastic Beanstalk app; it will remove the EC2 instances created, the load balancer and the autoscaling.
Become a Medium member and support me on the platform!
https://medium.com/@charlesmalafosse/membership
References
FastText sentiment analysis for tweets: A straightforward guide — Medium article here.
All source code available on https://github.com/charlesmalafosse/aws-elasticbeanstalk-ml-server
AWS Elastic Beanstalk page — https://aws.amazon.com › elasticbeanstalk
Python Flask Micro web framework- https://en.wikipedia.org/wiki/Flask_(web_framework)


