
Day 13: Working with Remote Repositories: Pushing and Pulling Code
Working with remote repositories is a fundamental aspect of using Git and version control systems in general. It allows multiple developers to collaborate on projects efficiently, enabling code sharing and version tracking. Here’s a detailed explanation of pushing and pulling code to/from remote repositories, along with real-world examples.
What Are Remote Repositories?
A remote repository is a version of your project that is hosted on a server, allowing other developers to collaborate on the same codebase. Popular platforms for hosting remote repositories include:
- GitHub
- GitLab
- Bitbucket
Basic Concepts
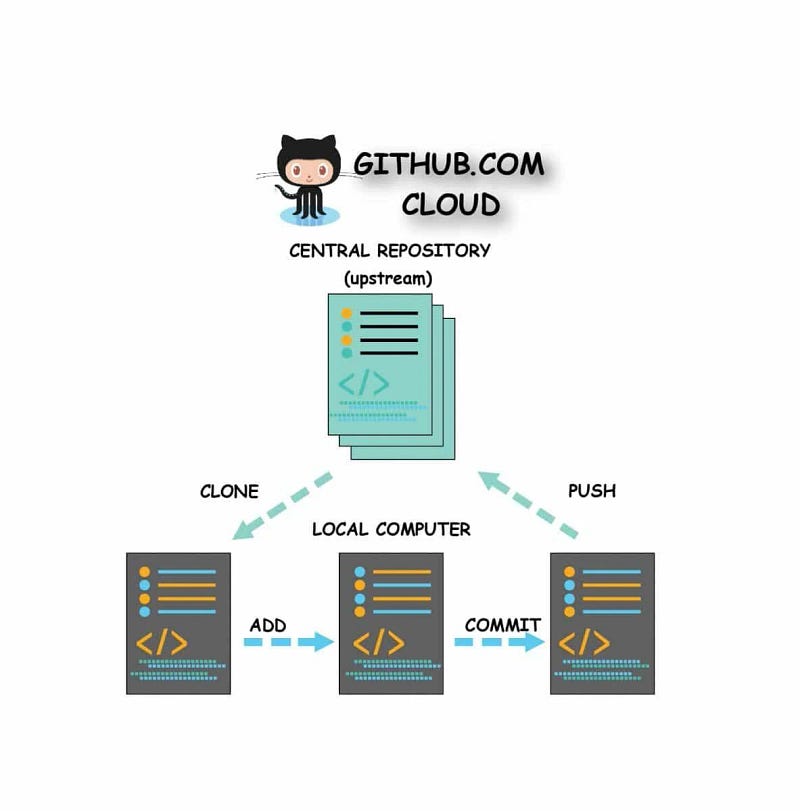
- Local Repository: This is the Git repository on your local machine where you make changes to files.
- Remote Repository: This is the Git repository hosted on a remote server.
- Clone: A command that creates a copy of a remote repository on your local machine.
- Push: The command used to upload local repository changes to a remote repository.
- Pull: The command used to fetch and integrate changes from a remote repository into your local repository.
Why Use Remote Repositories?
- Collaboration: Multiple developers can work on the same project without interfering with each other’s work.
- Backup: Remote repositories serve as a backup of your code.
- Version Control: Changes can be tracked, reviewed, and rolled back if necessary.
How to Work with Remote Repositories
1. Cloning a Repository
To get started with a remote repository, you first need to clone it to your local machine.
git clone https://github.com/username/repo.gitExample: Imagine you’re joining a team project hosted on GitHub. You would clone the repository to start working on it:
git clone https://github.com/devteam/project-x.git2. Making Changes
Once you’ve cloned the repository, you can navigate into the project directory and make changes to the code.
cd project-x
# Make some changes to files
3. Staging and Committing Changes
After making changes, you need to stage and commit them to your local repository.
git add .
git commit -m "Fix issue with user login"
Real-world Scenario: You fixed a bug in the login functionality of the application. After testing your changes locally, you stage and commit your changes with a meaningful commit message.
4. Pushing Changes to the Remote Repository
Once you’ve committed your changes locally, you need to push them to the remote repository.
git push origin mainorigin: This is the default name for your remote repository.main: This is the name of the branch you're pushing to. Replace it with the relevant branch name as needed.
Example: After pushing, your teammates can see the bug fix you’ve implemented.
git push origin main5. Pulling Changes from the Remote Repository
When working in a team, it’s essential to stay updated with changes made by others. To do this, you can pull changes from the remote repository.
git pull origin mainThis command fetches and integrates changes from the remote repository to your local repository.
Real-world Scenario: Suppose your teammate added a new feature while you were working on your bug fix. Before you push your changes, it’s a good idea to pull the latest changes first to avoid conflicts.
git pull origin mainHandling Merge Conflicts
Sometimes, when you try to push or pull, you might run into merge conflicts. This happens when changes in the remote repository conflict with your local changes. Here’s how to handle it:
- Pull the Latest Changes: Attempt to pull the latest changes from the remote repository.
- Resolve Conflicts: Open the conflicted files and manually resolve the conflicts.
- Stage the Resolved Files: Once resolved, stage the files again.
git add conflicted-file.txt4. Commit the Resolved Changes:
git commit -m "Resolve merge conflict in conflicted-file.txt"5. Push Changes: After resolving conflicts and committing, push the changes.
git push origin mainReal-World Examples of Using Pushing and Pulling
- Collaborative Development: Suppose you are part of a team developing a web application. Each team member works on different features. You clone the remote repository, create a branch for your feature, make changes, and push your branch to the remote. Your teammates can then review and merge your branch into the main branch.
- Continuous Integration: In a CI/CD pipeline, your code may be automatically built and tested every time you push to a remote repository. For example, after pushing your code to a shared repository, automated tests can run to ensure that your changes do not break existing functionality.
- Open Source Contributions: If you want to contribute to an open-source project on GitHub, you would typically fork the repository, clone it to your local machine, make changes, push them to your forked repository, and then create a pull request for the original repository.
Summary
Working with remote repositories is a critical skill for developers. By mastering the commands for pushing and pulling code, you can collaborate effectively with your team and contribute to shared projects. Remember to:
- Clone a repository to start working.
- Make changes and commit them to your local repository.
- Push your changes to share them with others.
- Pull changes to stay updated with your team’s work.
- Handle merge conflicts gracefully to ensure smooth collaboration.
By incorporating these practices into your workflow, you’ll ensure that your codebase remains organized, up-to-date, and conducive to teamwork.
✅✅feel free to connect with us.
LinkedIn: https://www.linkedin.com/in/karthick-dkk/
Follow my Medium Account (To get valuable information)
For more updates: subscribe to this medium account.
Follow for more: ✌️


