
Databricks Mount To AWS S3 And Import Data
Mount AWS S3 to Databricks using access key and secret key, read from and write to S3 buckets

Databricks is a company founded by the creators of Apache Spark. The same name also refers to the data analytics platform that the company created.
To create a Databricks account, go to https://databricks.com/try-databricks . You can choose between the free community version and the paid version.
In this tutorial, I will talk about
- How to create an access key and secret key for Databricks in AWS?
- How to mount Databricks to AWS S3 bucket?
- How to read CSV files from the mounted AWS S3 bucket?
- How to write data from Databricks to AWS S3 bucket?
Resources for this post:
- Video tutorial on YouTube
- Click here for Databricks notebook
- More video tutorials on Databricks
- More blog posts on Databricks
Let’s get started!
Step 1: Create AWS Access Key And Secret Key For Databricks
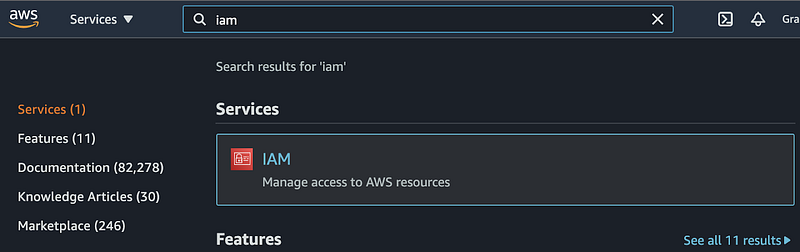
Step 1.1: After uploading the data to an S3 bucket, search IAM in the AWS search bar and click IAM from the search results.
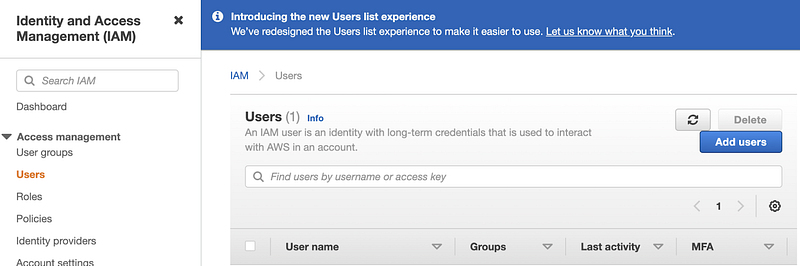
Step 1.2: Click Users under Access management on the left-hand side of the page.

Step 1.3: Click the blue Add users button.
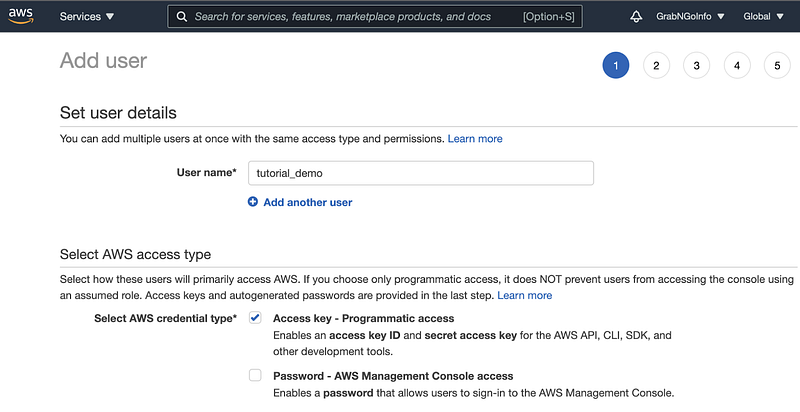
Step 1.4: Enter User name and choose Access key — Programmatic access as the AWS credential type.
Step 1.5: Go to the permissions section and select Attach existing policies directly. Then in the search bar type AmazonS3FullAccess and check the box in the search result.

Step 1.6: We can skip the Tag section and go to the review page.

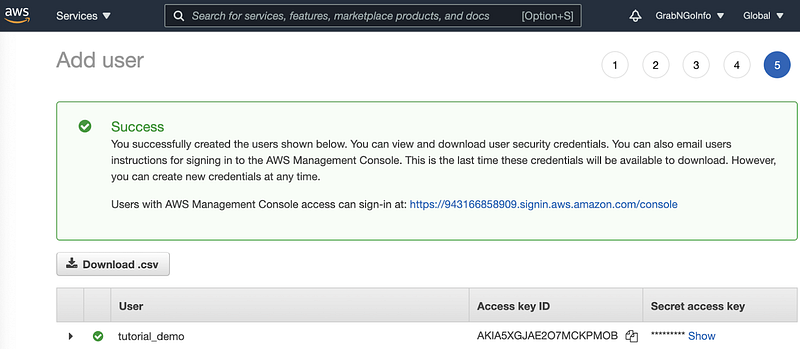
Step 1.7: Click the blue Create user button and you will see this page. Click the Download.csv button to download the credential information.
Step 2: Upload AWS Credential File To Databricks
After downloading the CSV file with the AWS access key and secret access key, in step 2, we will upload this file to Databricks.
Step 2.1: In the Databricks UI, click the Compute icon.

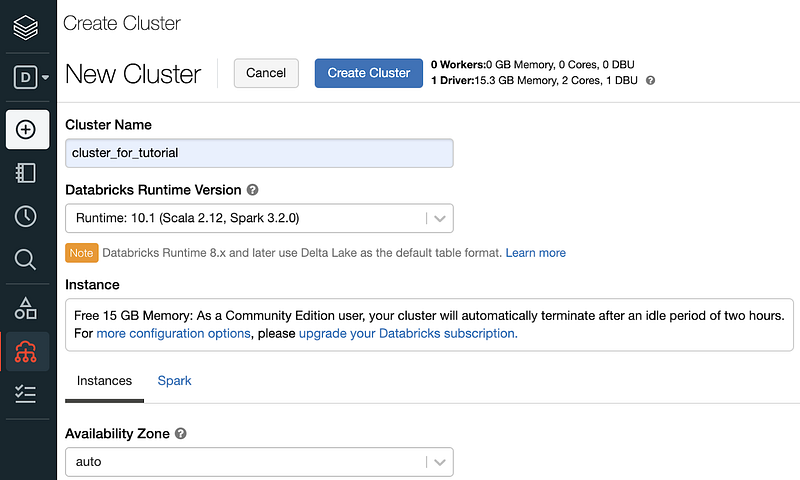
Step 2.2: Click the blue Create Cluster icon and give the new cluster a name under Cluster Name. Choose a Databricks Runtime Version and click Create Cluster. I am using the free Databricks community edition. The paid version has more options.
Step 2.3: It takes a few minutes to spin up the cluster. The cluster is ready when there is a green circle in front of the cluster name.

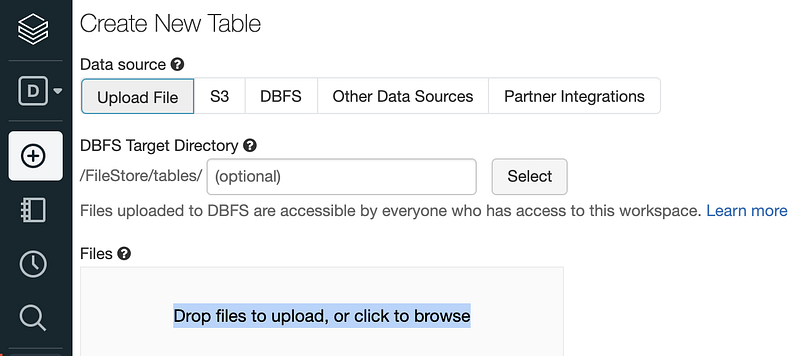
Step 2.4: Click the Data icon and then click the Create Table button. Keep in mind that you need to have a cluster running before creating a table.

Step 2.5: Click Drop files to upload, or click to browse and upload the csv file downloaded from AWS in step 1.
After the file is successfully uploaded, you will see a green checkmark next to the file name.

Step 3: Mount S3 Bucket To Databricks
Step 3.1: Create a new notebook.

Step 3.2: Check the contents in FileStore by running the code below in the notebook.
# Check the contents in tables folderdbutils.fs.ls(“/FileStore/tables”)You will see that the CSV file downloaded from AWS is in the FileStore tables folder.
Step 3.3: Mount S3 bucket.
We first need to import libraries. Pyspark.sql.functions has the functions for pyspark. Urllib is the package for handling urls.
# pyspark functions
from pyspark.sql.functions import *
# URL processing
import urllibNext, let’s read the csv file with AWS keys to Databricks. We specify the file type to be csv, indicate that the file has the first row as the header and the comma as the delimiter. Then the path of the csv file was passed in to load the file.
# Define file type
file_type = “csv”
# Whether the file has a header
first_row_is_header = “true”# Delimiter used in the file
delimiter = “,”# Read the CSV file to spark dataframe
aws_keys_df = spark.read.format(file_type)\
.option(“header”, first_row_is_header)\
.option(“sep”, delimiter)\
.load(“/FileStore/tables/tutorial_demo.csv”)After that, we get the access key and secret key from the spark dataframe. The secret key was encoded using urllib.parse.quote for security purposes. safe="" means every character in the secret key is encoded.
# Get the AWS access key and secret key from the spark dataframe
ACCESS_KEY = aws_keys_df.where(col(‘User name’)==’tutorial_demo’).select(‘Access key ID’).collect()[0][‘Access key ID’]
SECRET_KEY = aws_keys_df.where(col(‘User name’)==’tutorial_demo’).select(‘Secret access key’).collect()[0][‘Secret access key’]# Encode the secrete key
ENCODED_SECRET_KEY = urllib.parse.quote(string=SECRET_KEY, safe=””)After getting the access key and secret key, it’s time to mount the S3 bucket! We can mount the bucket by passing in the S3 url and the desired mount name to dbutils.fs.mount(). It returns Ture if the bucket is mounted successfully.
# AWS S3 bucket name
AWS_S3_BUCKET = “crypto-price-prediction”
# Mount name for the bucket
MOUNT_NAME = “/mnt/crypto-price-prediction”# Source url
SOURCE_URL = “s3n://{0}:{1}@{2}”.format(ACCESS_KEY, ENCODED_SECRET_KEY, AWS_S3_BUCKET)# Mount the drive
dbutils.fs.mount(SOURCE_URL, MOUNT_NAME)Step 4: Read Data From The Mounted S3 Bucket
Step 4.1: Check the contents in the mounted S3 bucket using dbutils.fs.ls
# Check if the AWS S3 bucket was mounted successfully
display(dbutils.fs.ls(“/mnt/crypto-price-prediction/g-research-crypto-forecasting/”))
Step 4.2: Read a dataset in CSV format from S3 to Databricks. We set the delimiter to be a comma, indicate that the first row is the header, and ask spark to infer the schema.
# File location and type
file_location = “/mnt/crypto-price-prediction/g-research-crypto-forecasting/crypto_100k_records.csv”
file_type = “csv”# CSV options
infer_schema = “true”
first_row_is_header = “true”
delimiter = “,”# The applied options are for CSV files. For other file types, these will be ignored.
df = spark.read.format(file_type) \
.option(“inferSchema”, infer_schema) \
.option(“header”, first_row_is_header) \
.option(“sep”, delimiter) \
.load(file_location)display(df)Step 4.3 (optional): We can save data as a table in Parquet format on Databricks for future access. If the table was saved before and we want to overwrite it, the allowCreatingManagedTableUsingNonemptyLocation needs to be set to true.
# Allow creating table using non-emply location
spark.conf.set(“spark.sql.legacy.allowCreatingManagedTableUsingNonemptyLocation”,”true”)
# Save table
df.write.format(“parquet”).saveAsTable(‘crypto_train’)Step 5: Save Spark Dataframe To S3 Bucket
We can use df.write.save to save the spark dataframe directly to the mounted S3 bucket. CSV format is used as an example here, but it can be other formats. If the file was saved before, we can remove it before saving the new version.
# Remove the file if it was saved before
dbutils.fs.rm(‘/mnt/crypto-price-prediction/g-research-crypto-forecasting/demo_example’, True)
# Save to the mounted S3 bucket
df.write.save(f’/mnt/crypto-price-prediction/g-research-crypto-forecasting/demo_example’, format=’csv’)# Check if the file was saved
display(dbutils.fs.ls(“/mnt/crypto-price-prediction/g-research-crypto-forecasting/demo_example”))Step 6: Unmount S3 Bucket (Optional)
To unmount the S3 bucket, use the code below.
# Unmount S3 bucket
dbutils.fs.unmount(“/mnt/crypto-price-prediction”)Recommended tutorials
- GrabNGoInfo Machine Learning Tutorials Inventory
- One-Class SVM For Anomaly Detection
- 3 Ways for Multiple Time Series Forecasting Using Prophet in Python
- Four Oversampling And Under-Sampling Methods For Imbalanced Classification Using Python
- Multivariate Time Series Forecasting with Seasonality and Holiday Effect Using Prophet in Python
- How to detect outliers | Data Science Interview Questions and Answers
- Time Series Anomaly Detection Using Prophet in Python
- How to Use R with Google Colab Notebook
Summary
In this tutorial, we covered
- How to create an access key and secret key for Databricks in AWS?
- How to mount Databricks to AWS S3 bucket?
- How to read CSV files from the mounted AWS S3 bucket?
- How to write data from Databricks to AWS S3 bucket?
I hope you find the contents helpful. See you in the next tutorial!
More tutorials are available on my YouTube Channel and GrabNGoInfo.com


