
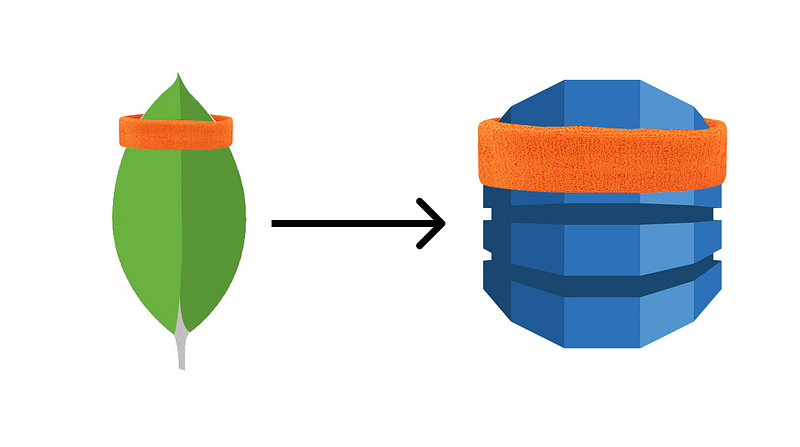
Database migration from MongoDB to Amazon DynamoDB with AWS DMS
If you are reading this article, it means you already know something about MongoDB and DynamoDB, but I must say, this article is not about which database is better between MongoDB and DynamoDB or why you should drop MongoDB and pick up DynamoDB based on their specific database features.
I personally was in this situation of migrating from MongoDB to DynamoDB because of the AWS cost effectiveness I was trying to attain. The beautiful thing about AWS is the fact that several individuals/companies can use AWS on various cost margins depending on the DevOps architecture being used.
The beautiful thing about AWS is the fact that several individuals/companies can use AWS on various cost margins depending on the DevOps architecture being used.
AWS Database Migration Service (DMS) is an Amazon service that can used to migrate data from one database (which may be on-premises, on an Amazon Relational Database Service — Amazon RDS — DB instance or in a database on an Amazon Elastic Compute Cloud — Amazon EC2 — instance) to a database on an AWS service with virtually no downtime.
Since MongoDB is more popular than Amazon DynamoDB, let’s do a brief introduction to Amazon DynamoDB, shall we?
Amazon DynamoDB is a non-relational database that delivers reliable performance at any scale. It’s a fully managed, multi-region, multi-master database that provides consistent single-digit millisecond latency, and offers built-in security, backup and restore, and in-memory caching. — AWS DynamoDB documentation.
In this article, our focus would be MongoDB as the source database and Amazon DynamoDB as the target database. Before we start, I’ll assume that you already have your data in MongoDB and you are ready to move this data to Amazon DynamoDB.
Let’s get our hands dirty…
MongoDB migration modes
AWS DMS supports two modes in migrating from MongoDB:
- Document mode: in this mode, AWS DMS migrates all documents in each MongoDB collection into a single column named “
_doc” in the target DynamoDB table. - Table mode: in this mode, AWS DMS scans a specified number of documents and generates a sample schema with the keys and types and automatically makes them the fields name in the target DynamoDB table.
In this article, we would be focusing on the table mode.
Migrating a database
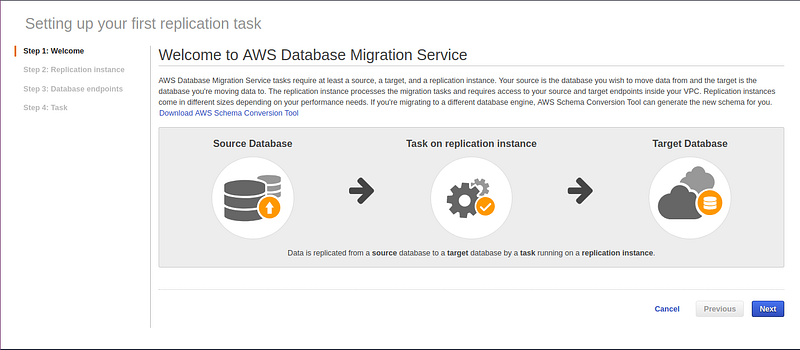
Login to your AWS dashboard and navigate to the AWS Database Migration Service console (in the Database section of the AWS Management Console), click on “Create migration” and you will be welcomed with an overview of the migration process:
Create a replication server
AWS DMS creates a replication instance in a Virtual Private Cloud (VPC). In most cases, the selected VPC would be the same as that of the Source DB. You can select the instance class that has the adequate storage and compute power to execute the migration task. Based on the migration task to be performed, you can also either decide to opt-in for Multiple Availability Zone or not.
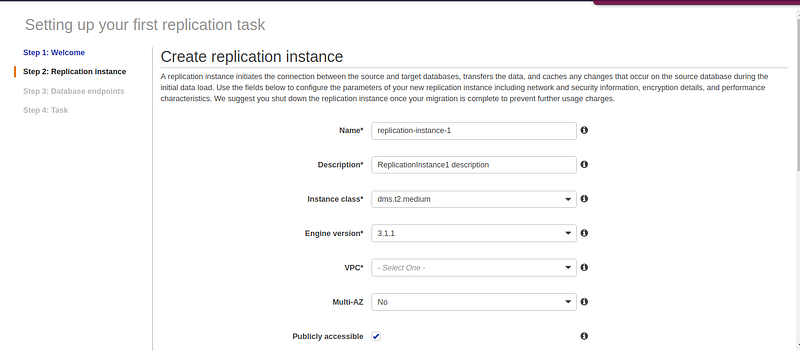
As a side note, to further reduce cost, If you have your MongoDB in an EC2 instance, navigate to the “Advanced” section and make sure the replication instance is in the same availability zone as the EC2 instance. You can checkout AWS Database Migration Service pricing to understand other ways to cut down cost for AWS DMS.
Create Database endpoints
This is the stage we specify the connection details of the source and target databases.
Source database connection details:
- Endpoint Identifier: A label for the endpoint to help you identify it. It should be unique for all replication instances owned by your AWS account in the current region. It can be any random string that makes sense to you.
- Source Engine: From the drop-down, select the type of database the source database is. We are picking “mongodb” in this case.
- Server Name: This is the IP of the source database server.
- Authentication Source: Name of the database where users are managed.
Target database connection details:
The Service Access Role ARN must be a role that can access the target database.
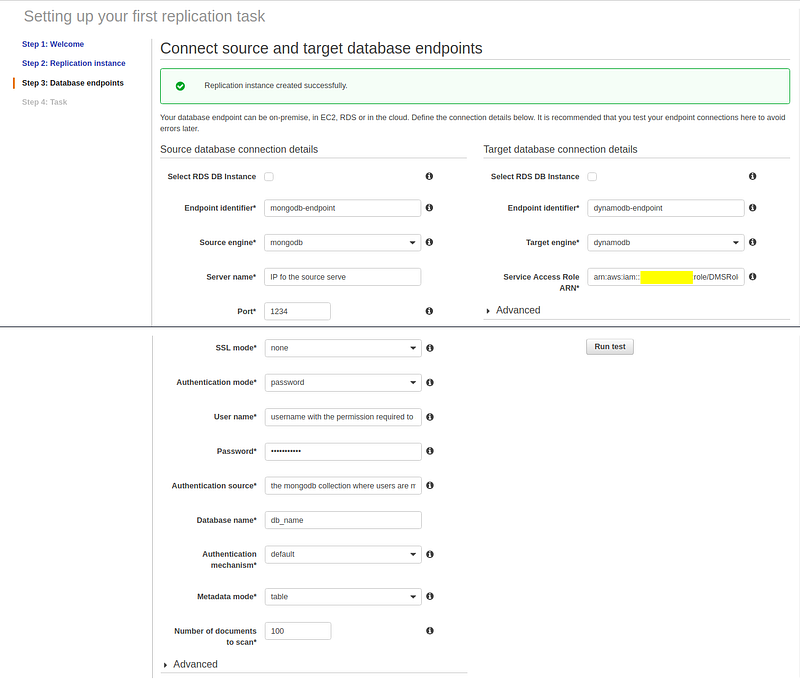
After you have verified the connection details, click on the “Run Test” button, if the connection details are fine you should see a “connection test successful” message.
Create a task
- the task name can be a unique identifier that makes you easily identify your task. it can be any random string that makes sense to you.
- Choose the Replication Instance that you want to link the task to (The replication instance you created earlier should be selected automatically). source endpoint and target endpoint are chosen automatically as specified earlier.
- for the migration type choose “Migrate existing data and replicate ongoing changes” so that the data changes that occur during migration are also captured.
- check “Start task on create” to start the task immediately the task is created.
- Choose Enable logging to track and debug the migration task. logs would be on Cloudwatch.
- In the Table mapping section, choose “Enable JSON editing”.
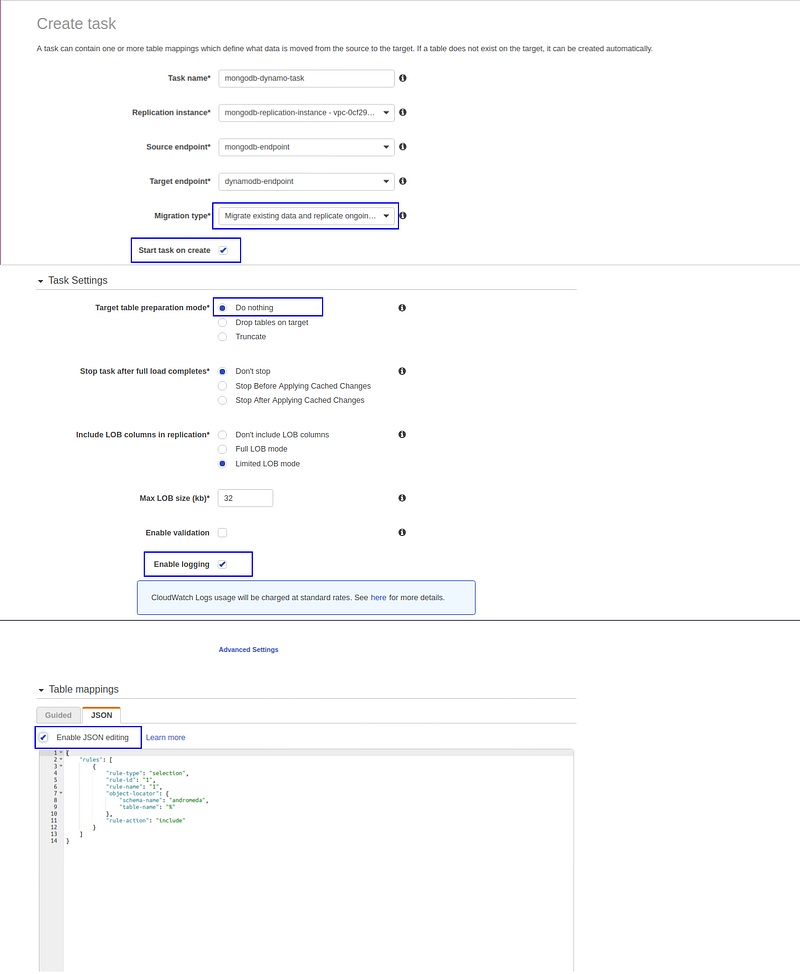
Specifying the rules your task should work with can get complex, but for starters, we are going to use something simple (check the rule below). You can check out Using Table Mapping to Specify Task Settings to fully understand how this task mapping rules are generated.
{
 "rules": [
  {
   "rule-type": "selection",
   "rule-id": "1",
   "rule-name": "1",
   "object-locator": {
    "schema-name": "SOURCE_DB_NAME",
    "table-name": "%"
   },
   "rule-action": "include"
  }
 ]
}
The AWS DMS task should start immediately and the “complete %” column should be 100% in no time.
Whew! And we are done…
Before You Go —
Did you know that you can give up to 50 👏’s by pressing down on the 👏 button? Give it a try if you liked this article!

Join our community Slack and read our weekly Faun topics ⬇


