
Data Persistence with MySQL & phpMyAdmin using Docker in 3 steps
In a previous post (here) we discussed about the benefits derived from using container based technologies like docker to set up a relational database with a web based management tool. Namely we demonstrate how to get up and running a fully functional data management platform using MySQL and PhpMyAdmin using docker containers. Nevertheless, the presented approach has a problem caused by the nature itself of container technologies like docker: Data will not persist when the container no longer exist. That means, that all your work will be gone if you restart the container you have been working on… which can be a big problem if we want to replace our locally installed database management system by a docker based solution. Fortunately docker allows us to overcome this limitation by using Volumes, so let’s see how to update our containers to make our data persisting regardless if our containers are restarted or not.
Environment
This step by step tutorial is written based on the following requirements:
- Operating System: Mac OS Sierra 10.12.6
- Docker Community: v.20.10.7 for Mac (how to install docker)
- MySQL & phpMyAdmin docker based platform (how to run MySQL & phpMyAdmin locally in 3 steps using Docker)
Objectives
This tutorial aims to describe the changes to perform on our docker configuration in order to make our MySQL + phpMyAdmin platform working with persistent data.
All components used in this post (MySQL, Docker, phpMyAdmin, Docker Hub…) are discussed and explained in detail in the first part of this tutorial, and it’s assumed that you are familiar with them, so please have a look in case of any doubt, it can be found here.
First we need to be aware of how docker containers deals with data. By default all files created inside a container are stored on a writable container layer. It means that all data stored in the container will be gone whether the container no longer exist so we need to find a way to store and restore the data on our host machine.
According to Docker official documentation:
Docker has two options for containers to store files in the host machine, so that the files are persisted even after the container stops:
Volumes are stored in a part of the host filesystem which is managed by Docker (
/var/lib/docker/volumes/on Linux). Non-Docker processes should not modify this part of the filesystem. Volumes are the best way to persist data in Docker.
Bind mounts may be stored anywhere on the host system. They may even be important system files or directories. Non-Docker processes on the Docker host or a Docker container can modify them at any time.
Because of the constraints and limitations derived from using Bind mounts, for this tutorial we will take a Volumes based approach.
Volumes are abstractions created and managed by Docker. They can be created explicitly using the docker volume create command, or Docker can create a volume during container or service creation (by using parameter -v)
The created volume is linked to a directory on the Docker host. When you mount the volume into a container, this directory is what is mounted into the container. A given volume can be mounted into multiple containers at the same time and they don’t require to have any running container using it, so the volume will persist on the host even when all containers are stopped/removed.
You can remove unused volumes using docker volume prune.
Step 1: Create a folder on your system to work as docker volume
Once we have explained basic concepts about Volumes in docker it’s time to actually make the changes to persist data on our MySQL + PhpMyAdmin containers.
First, let’s check that docker is working by open a terminal and run the command below
$ docker version
Client:
 Cloud integration: 1.0.17
 Version:           20.10.7
 API version:       1.41
 Go version:        go1.16.4
 Git commit:        f0df350
 Built:             Wed Jun  2 11:56:22 2021
 OS/Arch:           darwin/amd64
 Context:           default
Experimental: trueServer: Docker Engine - Community
Engine:
Version: 20.10.7
API version: 1.41 (minimum version 1.12)
Go version: go1.13.15
Git commit: b0f5bc3
Built: Wed Jun 2 11:54:58 2021
OS/Arch: linux/amd64
Experimental: falseIf you get a message like the one displayed above, it means your docker installation is ok. Then assuming you have followed the previous tutorial when running the command below you should get the output displayed in the image.
$ docker ps -a
Perfect, you have everything in place. Now let’s create a folder to host our volume (if you are on linux you might want create the folder on the path /var/lib/docker/volumes/, but you could use any other path you feel like).
For our case we create the following folder:
$ mkdir /Users/mdoctor/Documents/dockerVolumes/mysql-dataStep 2: Update docker configuration to enable the volume
Now we need to add the just created folder to the docker configuration file settings.json in order to allow docker to use it as volume. So you need to edit the file using vim or any other text editor you want to use.
$ vim ~/Library/Group\ Containers/group.com.docker/settings.jsonNavigate to the property “filesharingDirectories” and add the just created folder into the property value (Important: This property is an array of strings so new entries must be comma separated and enclosed with “ ”).
“dockerAppLaunchPath”: “/Applications/Docker.app”,
“filesharingDirectories”: [
“/Users”,
“/Volumes”,
“/private”,
“/tmp”,
“/var/folders”,
“/Users/mdoctor/Documents/dockerVolumes/mysql-data”
],
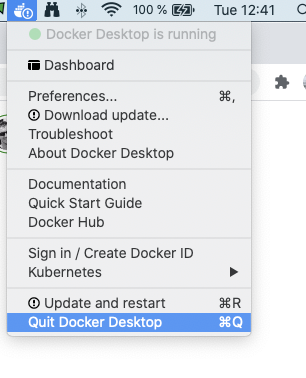
“kubernetesEnabled”: false,Save the changes and close the editor. Then restart your docker installation to make the changes to take effect. This can be easily done by restarting docker desktop as indicated in the picture:
Step 3: Restart docker containers with -v option
Finally you just need to run your mysql container as indicated in the previous post but adding the option -v followed by the path where the volume was created.
So, let’s open a terminal and type the following to get mysql working with the volume:
$ docker run --name my-own-mysql -v /Users/mdoctor/Documents/dockerVolumes/mysql-data:/var/lib/mysql -e MYSQL_ROOT_PASSWORD=mypass123 -d mysql:8.0.1Let’s explain the option -v for the command docker run (the other options of the docker run command are explained in the previous post)
- The option -v allows us to map a folder located on the host (/Users/mdoctor/Documents/dockerVolumes/mysql-data) as volume to a specific path within the container (/var/lib/mysql). Both paths must be separated by colon (:) symbol.
The docker run command to start up the phpMyAdmin container has no changes with respect the one used in the previous post, so just type:
$ docker run --name my-own-phpmyadmin -d --link my-own-mysql:db -p 8081:80 phpmyadmin/phpmyadminThe last thing to do is crosschecking that both containers are running and the mysql container is making use of the volume. In order to so, just type the following command which output is a list with the containers running on the system with a list of volumes mounted per container.
$ docker ps -q | xargs docker container inspect -f '{{ .Name }} {{ .HostConfig.Binds }}'/my-own-phpmyadmin [] /my-own-mysql[/Users/mdoctor/Documents/dockerVolumes/mysql-data:/var/lib/mysql]
That’s all! you can now start working with your data platform in the certainty that your data will persist regardless the containers are stop or restarted. So access phpMyAdmin (http://localhost:8081/) update data and have fun!
Conclusion
In this post we have improved the MySql + phpMyAdmin platform based on docker created in a previous post by adding data persistence capabilities. We have discussed some options available in docker and we have implemented a volume based approach that works just fine. As usual, please let me know any insight, comment or detected error, I would really appreciate your feedback.
Otherwise, I hope this second part of the tutorial helped you in getting started with docker.


