
Data Engineering — How to Build an ETL Pipeline Using SSIS
Discussing how to build an ETL pipeline for database migration using SQL Server Integration Services (SSIS) in Visual Studio 2019.

SQL Server Integration Service (SSIS) provides an convenient and unified way to read data from different sources (extract), perform aggregations and transformation (transform), and then integrate data (load) for data warehousing and analytics purpose. When you need to process large amount of data (GBs or TBs), SSIS becomes the ideal approach for such workload.
One example usage is to migrate one database to another database with different schema on a different server. There are many other ways to do it, such as:
- Console Application
- PowerShell
- SQL Server command line tool — SqlPackage.exe
- SQL Server Management Studio (SSMS)— Generate Scripts with data
The downside of the above approaches can be error prone in terms of error handling, user friendly, or not being able to handle large amount of data. For example, Generate Scripts in SSMS will not work when the database size is larger than a few Gigabytes.
In this article, I will discuss how this can be done using Visual Studio 2019. You can also just clone the GitHub project and use it as your SSIS starter project. Here is the GitHub link.
Prerequisites
- Visual Studio 2019 already installed. Note Visual Studio 2017 works slightly different regarding SSIS and this article may not work exactly for Visual Studio 2017.
- SQL Server already installed
Preparation Part 1 — Install SQL Server Data Tools in Visual Studio
Microsoft has documentation on the installation process as well, but all you need is to launch Visual Studio Installer and install “Data storage and processing” toolsets in the Other Toolsets section.


Preparation Part 2 — Install the SSIS Visual Studio Extension
Download the extension from Visual Studio Marketplace and follow the intuitive instruction to install.
Now we get to start building a SSIS ETL pipeline!
Our example ETL pipeline requirements
- Extract data from table Customer in database AdventureWorksLT2016 on DB server#1
- Manipulate and uppercase Customer.CompanyName
- Load data to table Customer in database CustomerSampling on DB server#2 (I am using localhost for both server#1 and server#2, but they can be entirely different servers)
If you want to test run the project, please have two databases on your server or servers. You can have them on the same server, or different servers.
- Microsoft sample database: AdventureWorksLT2016. See link here.
- Any database with a Customer table. See table creation script below. This Customer table has similar schema as the Customer table in AdventureWorksLT2016.
Here are how the Customer tables look like in both databases:


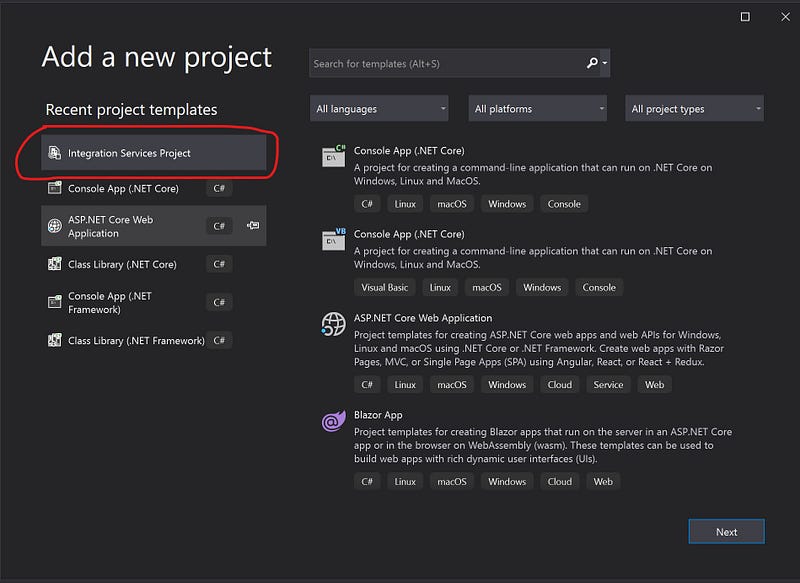
Step 1 — Create a new SSIS project in Visual Studio
Choose Integration Services Project as your template. If you do not see it in your search result, please make sure SSIS extension is installed as mentioned in the preparation section above.
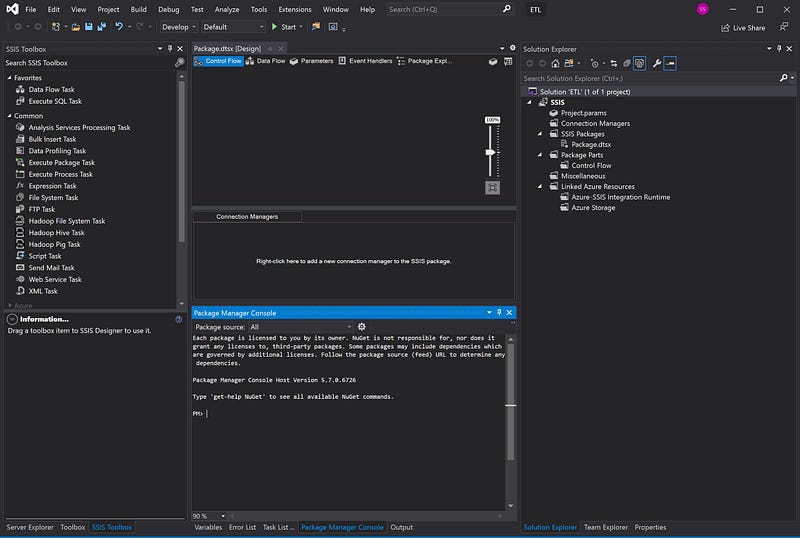
Once the project is created, you should be greeted with this empty Design panel. A couple of notes:
- Left sidebar: SSIS specific tools
- Middle section: Design panel + Connection Manager + Consoles
- Right sidebar: regular things you see in VS
Step 2 — Drag-n-Drop “Data Flow Task” into the Design panel
I renamed it as Customer Import for proper naming.

Step 3— Configure data source and data destination
A few quick notes for the following screenshots:
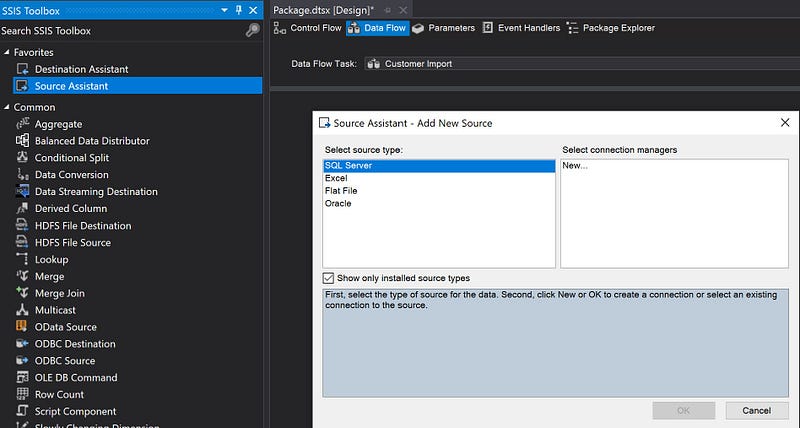
- Double click “Customer Import” component to enter the Data Flow panel
- Drag-n-Drop “Source Assistant” to the panel, which should prompt you to add a new source.
- Click on “SQL Server” and “New…” buttons
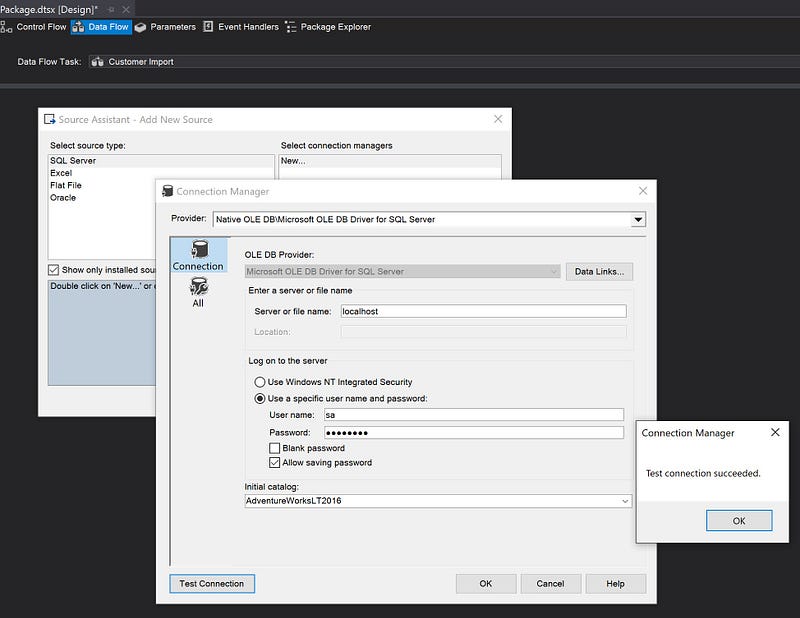
- Enter the server name and login credentials
- Enter Initial Catalog, which is the database name
- Test Connection, which should prompt “Test connection succeed.”
- Click “OK” to save.
- Once saved, you should notice a connection is added to the “Connection Managers” section.
- Repeat for “Destination Assistant”. Note destination should connect to the target database.

Step 4 — Configure data source
I renamed the source to “Source Customer”. Double click the “Source Customer” component and choose “SalesLT.Customer”.

Step 5 — Data Transformation
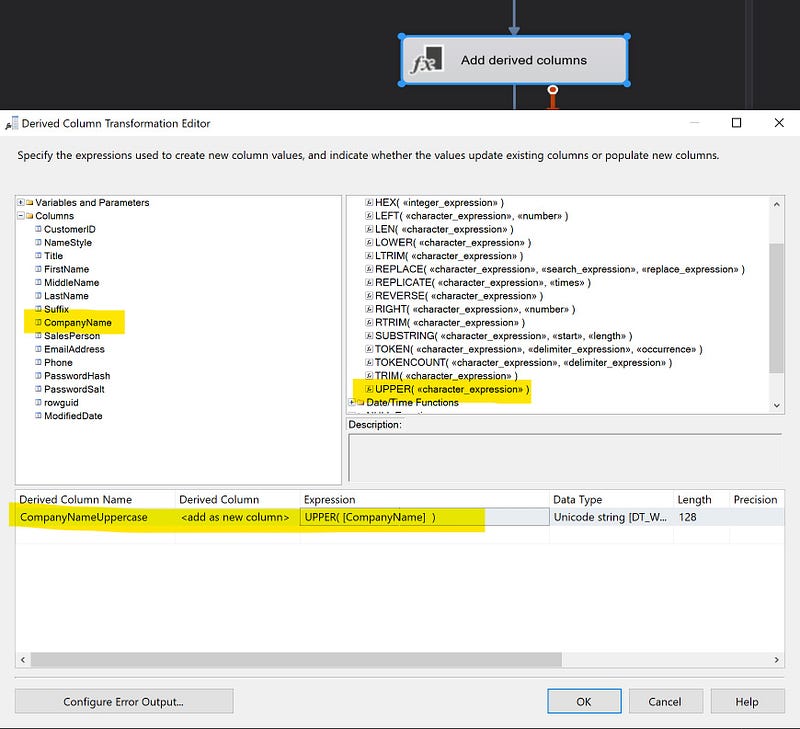
I will use a “Derived Column” component to discuss how to manipulate and transform data. Quick notes:
- Drag-n-drop “Derived Column” from the Common section in the left sidebar, rename it as “Add derived columns”
- Connect the blue output arrow from “Source Customer” to “Add derived columns”, which configures the “Source Customer” component output as the input for component “Add derived columns”
- Connect the blue output arrow from “Add derived columns” to component “Destination Customer” (or the default name if you haven’t renamed it)
- Double click “Add derived columns” and configure a new column as CompanyNameUppercase, by dragging string function UPPER() into the Expression cell and then dragging the CompanyName into the function input.

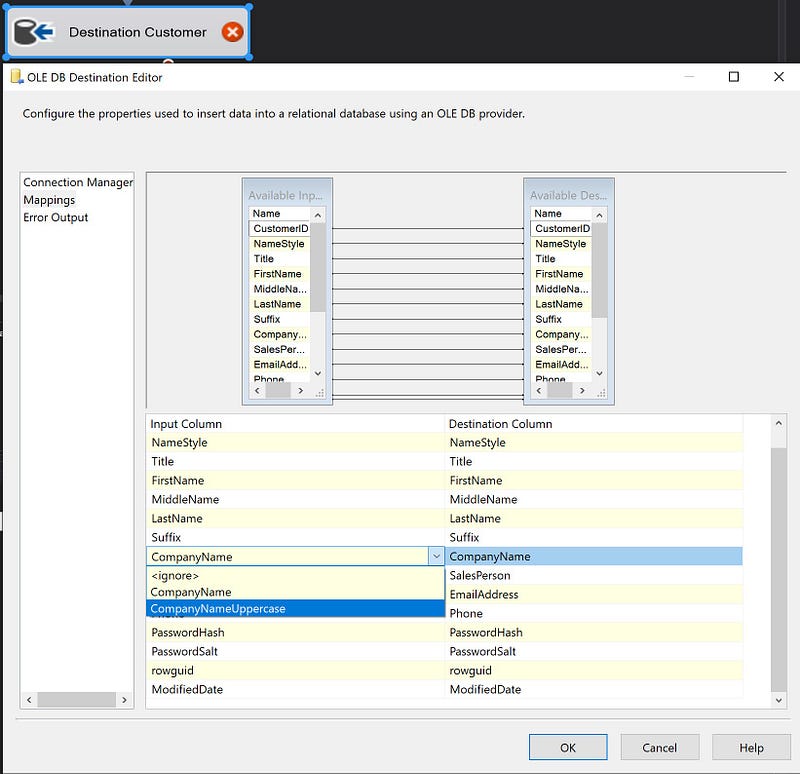
Step 6 — Configure data destination
The combined output from the “Source Customer” and “Add derived columns” components will become the input for the destination component. Quick notes:
- Double click “Destination Customer”
- Choose dbo.Customer as our destination table
- Check “Keep Identity” because we are going to specify the primary key values. This is similar to doing SET IDENTITY_INSERT ON in SQL.
- In Mappings, map input column “CompanyNameUppercase” to output column “CompanyName”.

Step 7 — Run the package by clicking “Start”!
You should now be able to see data in Customer table on server#2 to verify to ETL pipeline is properly running end to end.

Conclusions
It takes just a couple of hours to set up a prototype ETL pipeline using SQL Server Integration Services (SSIS). Next time you need to run ETL on large amount of data, SSIS can be a great option to look at!
Feel free to clone the project from GitHub and use it as your SSIS starter project! Here is the GitHub link.


