
Creating an iPhone App-Like Only With Your Data Science Skills: One-Tap Life Logger Linked to Google Sheets
All you use are Python and GCP Cloud Functions or Heroku.
I haven’t trained myself as a mobile app developer, therefore having my own app on my iPhone is beyond my fair dream. But, some simple functionalities like the one I will demonstrate in this post can be equipped without any software development skills and processes, like Swift programming and app store review.
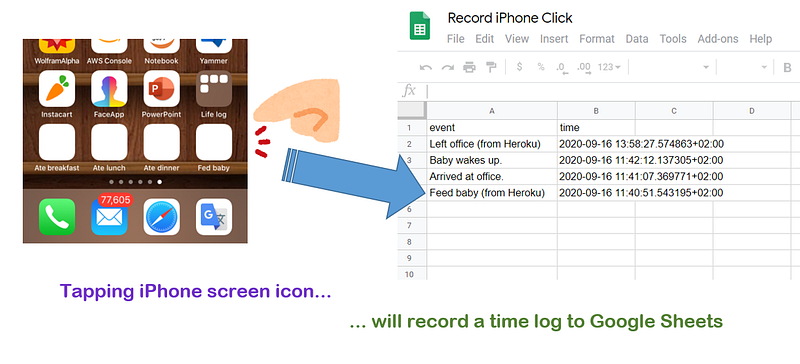
Here, I thought about creating something with a simple function like when you clicked on an icon and it noted the time you clicked on it.
How about the following life logs that you click on, none of which you feel like setting up a spreadsheet just for that purpose?
- When arriving at the office: as soon as you get to the office, you check your email, so you forget to write down the time you got there, right? (not the case for remote-workers)
- When leaving office: you’re usually running, so you forget to write down the time, right? (not the case for remote-workers)
- When feeding baby: you forget to write it down because you’re usually cleaning up a mess, right? (it’s the case of everyone)
- When Baby wakes up: the war is on! I don’t have time to take notes! (it’s the case of everyone)
And let’s quit storing it locally on the device and put it in the cloud. That’s how we do everything now.

That’s how I came up with the idea: when you tap the icon on your iPhone (or any other smartphone), it automatically remembers the time and records it in Google Sheets.
In this post, I will to write about how I made this happen, without really building the mobile app, even only with data science skill sets!
Table of Contents
- Plan the Solution
- Demo 1 for API Solution — Google Cloud Functions
- Demo 2 for API Solution — Heroku
- Ending Note
Plan the Solution
Now here’s how I planed the background architecture.
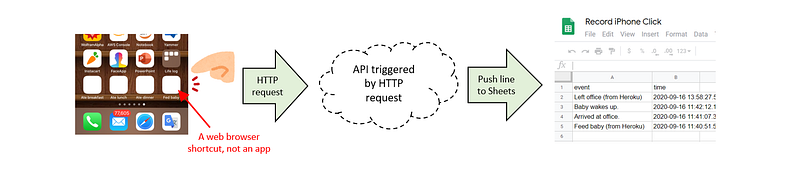
What we want is the icons on iPhone home screen. Tapping one of the icons triggers something and logs records in Google Sheets somehow. Without the use of special programming skills, how can we do it??
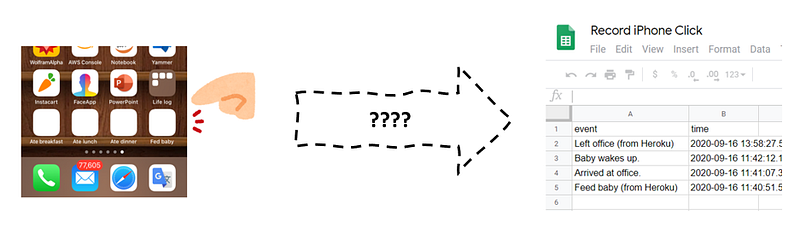
Here’s how I cheated: the icon is not an app, it is a Safari shortcut to a specific HTTP request. In the middle, an API appears, which receives HTTP call and pushes records to Google Sheets in the end.
This trick has solved most of the technical problems but there still remains one question: who and how to host the API.

There are many possibles API solutions, but each them can have pros and cons.
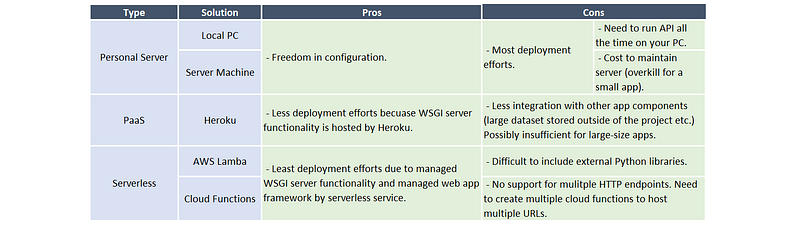
By use of personal server, you have to prepare many but have more freedom in configuration in return. Maintenance cost is high to keep the machine running all the time to wait for HTTP requests, therefore it is an overkill for a small app like ours this time.
PaaS (like Heroku) is a viable option to keep your app hosted and served all the time. It is rather easy to set up as we will see later. Actually, I think this one is the most fair solution among all; the only note is that the Heroku free account has monthly limitation of use — 1000 hours per month for all apps combined. This is equivalent to 41.7 days, thus enough for one app but may matter when you already have another app running on Heroku.
Serverless service on cloud like Lambda on AWS or Cloud Functions on GCP is another possible option. Although it is the easiest for deployment because almost every infra is hosted and only you need is the Python code to run, each serverless service has its unchangeable limitation in configuration: Lambda is not easy when you use external library (including Pandas!); and Cloud Functions receives HTTP request from only one URL per function, which means we have to copy the Python code and edit a few lines again and again when having multiple life events we want to log.
In this article, I demonstrate the cases when we use Cloud Functions and Heroku. Local server case is pretty much the same as the Heroku one in a sense of the code.
Demo 1 for API Solution — Google Cloud Functions
To have Google Cloud Functions receive the HTTP request and push record to Google Sheets, the followings are the steps:
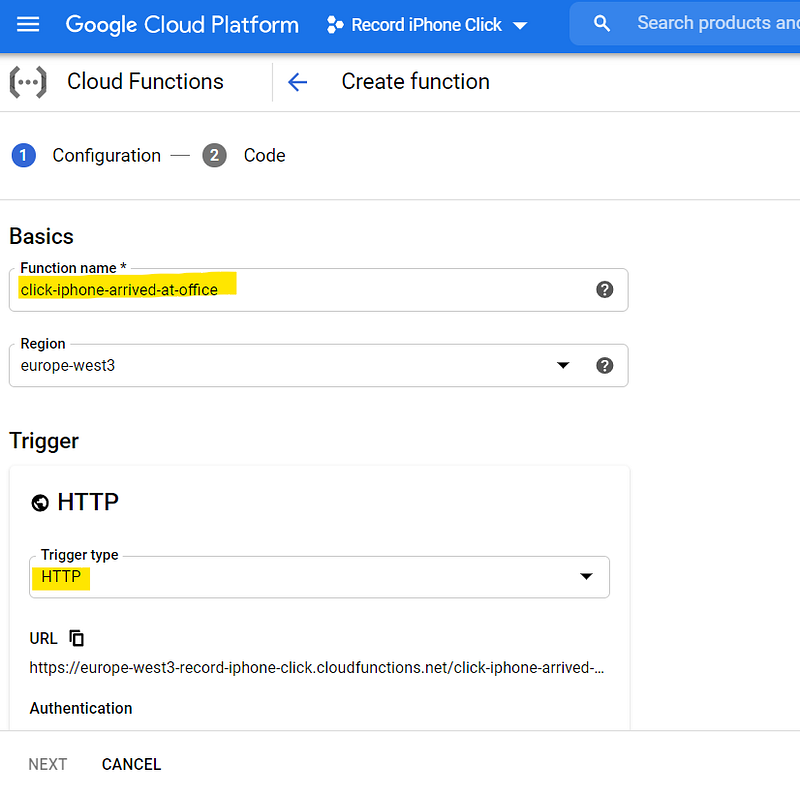
Step 1 — Create a new GCP project
It is better to create a new one for isolation from other projects you already have. I created a new one with the name “Record iPhone Click”.
Step 2 — Configure Google Sheets first to receive the data push from Cloud Functions
Set up the Google Sheets side first because we need the authentication info for the Cloud Functions code.
Following the description in this page,
- Enable “Google Drive API”.
- Enable “Google Sheets API”.
- Go to “APIs & Services > Credentials” and choose “Create credentials > Service account key”.
- Fill out the form
- Click “Create key”
- Select “JSON” and click “Create”. Download of a JSON file automatically takes place.
- Note the address from “client_email” in the JSON file.
- Save the JSON file to somewhere the Cloud Functions can access to.
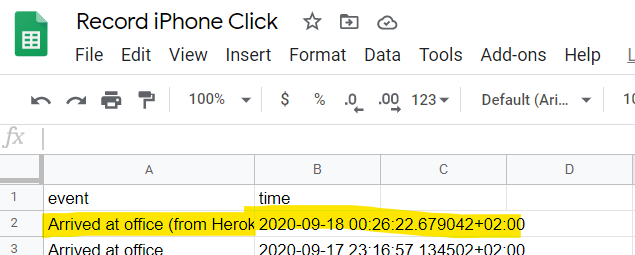
- Create a spread sheet in Google Sheets. Write “event” in cell A1 and “time” in cell B1, as a header for the final log record.
- In the sheet file, pressing the “Share” button on the top right, add client_email you get from step 7 above as an authorized user.
This is all!
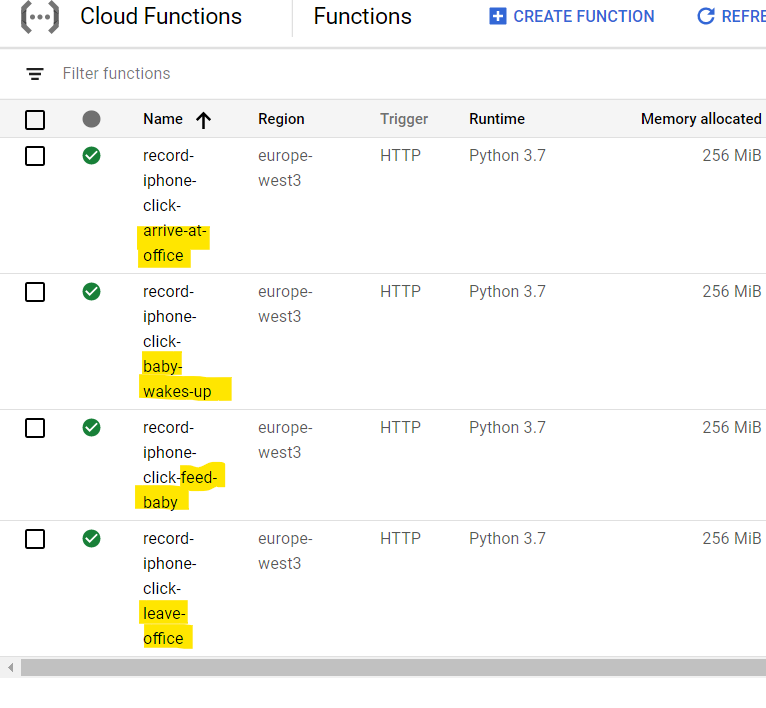
Step 3— Configure a new function in Cloud Functions
Go to “Cloud Functions” and CREATE FUNCTION. Use Trigger type as “HTTP”.
Step 4— Input code to main.py and requirements.txt
Press Next on the bottom left, and go to the code input page.
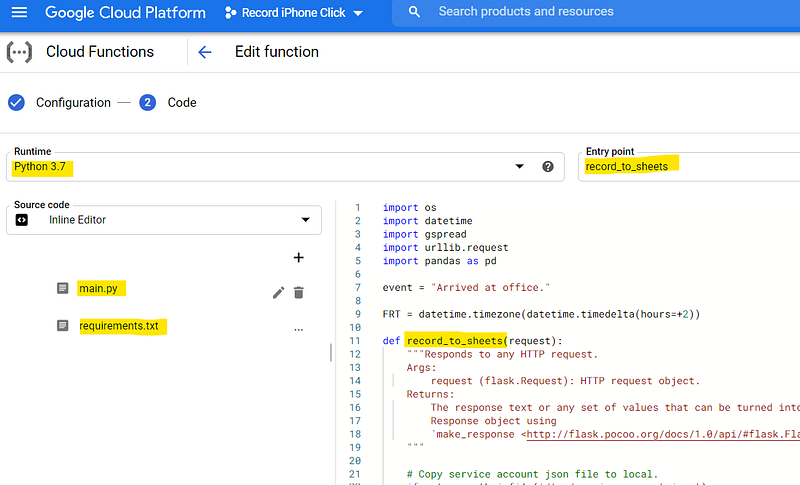
Here’re the code I actually used.
Just remember that the service account JSON file is required to be downloaded into local folder and when you want to do it in Cloud Functions, you have to save the file in /tmp/ sub-folder. Otherwise, Cloud Functions refuses to build your app.
Step 5 — Deploy the function
Click “Deploy” button and wait for the successful deployment. It can take a few minutes.
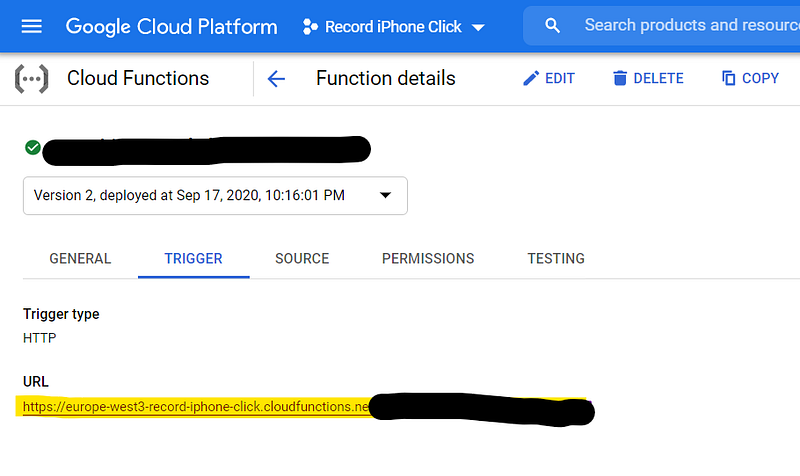
Step 6 — Find the URL and check if it’s working
URL can be found in the details of the function.
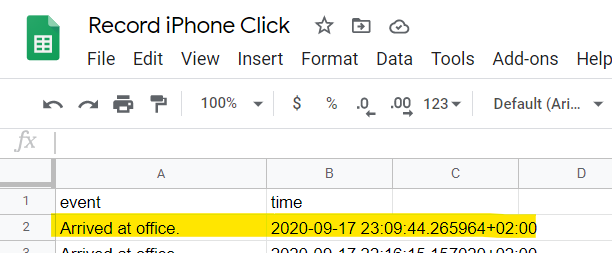
If you test-click it, you will see the following-like message, which means the code is successfully deployed. If you see internal error, server error, or any other errors, something is wrong.

Here you should also see a new record in the sheet you created.
Step 7 — Send the URL to your iPhone and make a Safari link on your home screen
Open your URL on your iPhone and add the shortcut to Home Screen.
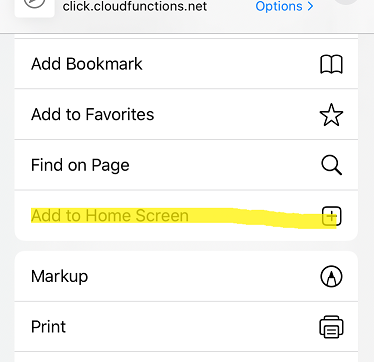
Then, you can see the new icon on your iPhone home screen.
Done!
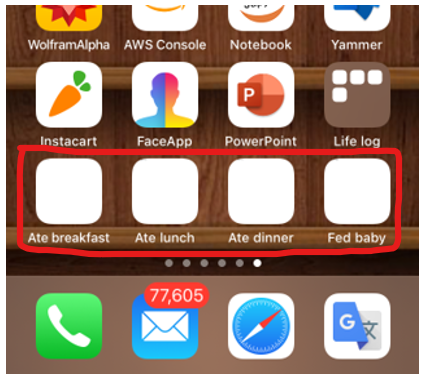
Step 8 — To make the URL links for your other life logs, copy the function again and again, set up the event name, and add each shortcut to your home screen.
This is the most inconvenient part of this option: Cloud Function’s code can be only linked to one HTTP request URL. Therefore, if you need more than one life logs (like “feed baby”, “baby wakes up”, “arrived at office”, etc.), only you can do is to create the functions again and again.
This process can be significantly reduced when you have more control in API set up like the next option using Heroku!
Demo 2 for API Solution — Heroku
In my another post, I have discussed a lot what is the benefit of Heroku and how to set up. Thus, I will only talk about the code to be committed to GitHub repository synced with Heroku. Once set up, Heroku can pull your app from GitHub automatically and deploy it.
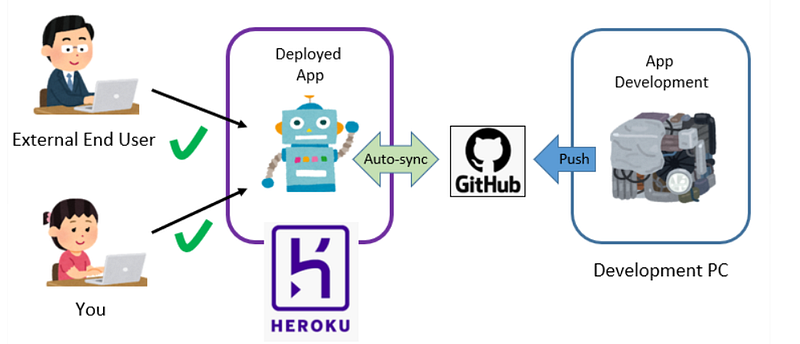
Step 1 — Prepare GitHub repository to be synced with Heroku
Here’s my GitHub repository:
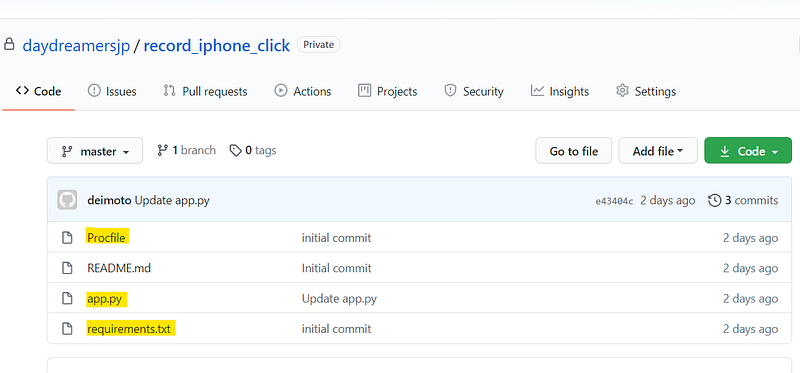
The requirements.txt is exactly the same as the one in Demo 1 with Cloud Functions above.
Here’re the contents in other two files:
As you can see in the code, in Heroku code, you need to code some additional lines to set up app through Flask. On the other hand, we can set up multiple URLs with sub-directories linked to each life log you want to set up (like main domain/feed-baby) , without preparing multiple apps for them, unlike Cloud Functions case above.
Step 2 — Configure Heroku to sync with GitHub repository
This step owes a lot my another post here to tell you how. Nothing is different as long as you choose the right GitHub repository we just set up.
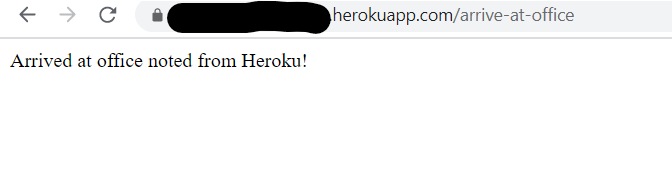
Step 3— Find the URL and check if it’s working
Find the root URL from Heroku set up and add sub-directory for the life log, such as https://arrive-at-office/ . Check on your browser and your sheet if the API is working properly.
Step 4— Send the URL to your iPhone and make a Safari link on your home screen
This step is exactly the same as in the case of Cloud Functions above.
Ending Note
In this post, I demonstrated an example that combining the skills which data scientists already know can reach further applications than we usually expect.
The iPhone (or any smart phone) can make an HTTP request and when we can set up the work flow properly, initiated by HTTP request > kick off the code > give results, anything can be done. This post demonstrated a very simple example to note the life log to Google Sheets with one tap of iPhone icon, but any further advanced application can be produced and it is up to your imagination!