
Creating an ArcGIS Toolbox for Python Scripts
This tutorial will guide you through the process of transforming a standalone Python script into a script tool within ArcGIS Pro.

A script tool serves as a geoprocessing tool and allows you to set the required parameters before executing it. The results and messages are conveniently displayed within ArcGIS Pro, unlike regular Python scripts that typically run from an editor with output shown in a terminal or separate files. By converting your Python script into a script tool, it becomes an integral part of ArcGIS Pro, simplifying access and usage for others who may not be familiar with Python or prefer working within the Pro environment.
Creating a script tool involves the following steps:
- Writing a Python script.
- Modifying the script so that Pro can recognize and convert it into a script tool format.
- Utilizing the script tool wizard to create the tool.
- Testing and running the newly created tool.
Step 1: Creating the Python Script
For this step, we’ll develop a straightforward Python script that provides details about a shapefile feature class, including various properties. Additionally, it will display all table field names along with their corresponding data types. Below is the script we’ll be using:
import arcpy
desc = arcy.Describer("C: \Projects\Natural_Earth_quick_start\10m_cultural\ne_10m_admin_0_disputed_areas.shp")
if desc.hasOID:
  print ("%-22s %s %s" % ("OIDFieldName", ":", str(desc.OIDFieldName)))
print()
for field in desc.fields:
  print ("%-22s %s %s" % (field.name, ":", field.type))
As observed, the script utilizes a shapefile feature class as input, which is part of the downloadable Natural Earth quickstart kit. However, you have the option to test the code and follow along with your own data if preferred. This code can be executed either directly from a Python notebook or as an independent Python file. To enable the execution of this code as a script tool, certain modifications are necessary. We’ll proceed with making these adjustments in the upcoming steps.
Step 2: Modify the Code
When using geoprocessing tools like Buffer in ArcGIS, you are accustomed to specifying input and output dataset locations before executing the tool. Similarly, for a script tool, it is essential to set input/output datasets and file locations as parameters using arcpy.GetParameterAsText(). This allows you to flexibly choose your desired input and output file locations before running the script tool. Moreover, standard print statements from a Python script must be substituted with arcpy.AddMessage() to ensure they are displayed as custom messages within the script tool.
After applying these adjustments to our script, the updated version will appear as follows:
import arcpy
feature_class = arcy.GetParameterAsText (0)
desc = arcy. Describe (feature_class)
arcpy.AddMessage ("%-225 %5 %s" % ("Feature Type", ":", str(desc. featureType)))
if desc.hasOID:
  arcpy.AddMessage ("%-225 %s %s" % ("OIDFieldName", ":", str(desc.OIDFieldName)))
  arcy .AddMessage ()
for field in desc.fields:
  arcpy .AddMessage ("%-225 %5 %s" % (field.name, ":", field. type))
Save the revised code as a Python script file, giving it a .py extension. This file will serve as the foundation for creating the script tool.
Step 3: Generating the Script Tool
Begin by launching ArcGIS Pro and creating a new project. Within the Catalog pane, select “Toolboxes,” then click on “New Toolbox.atbx.” Provide a suitable name for the toolbox, and you will observe it appearing in the Catalog pane. This newly created toolbox will house the script tool we are about to generate.
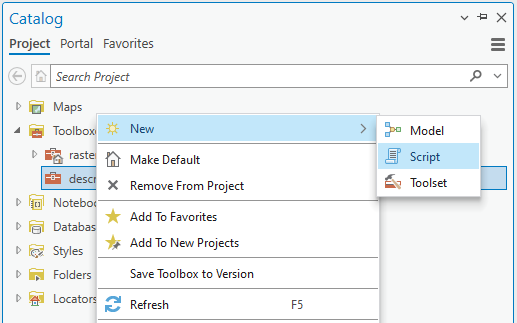
Next, right-click the new toolbox and select “New” and “Script”:
Step 3: Creating the Script Tool
To start, set the “Name” field as “DescribeFCdata” and the “Label” field as “Describe properties of a shapefile feature class and table field names.”
Next, navigate to the Execution tab and click on the folder icon located to the right of the Script File field. This action will prompt you to browse for an external script. Include the Python file (.py) that you generated in Step 2, ensuring that the code gets updated with your customized Python script.
After adding the script file, you should be able to visualize your Python code on the screen. However, do not click “OK” at this point. Instead, select “Parameters” from the left tab to set the desired input file before running the script tool.
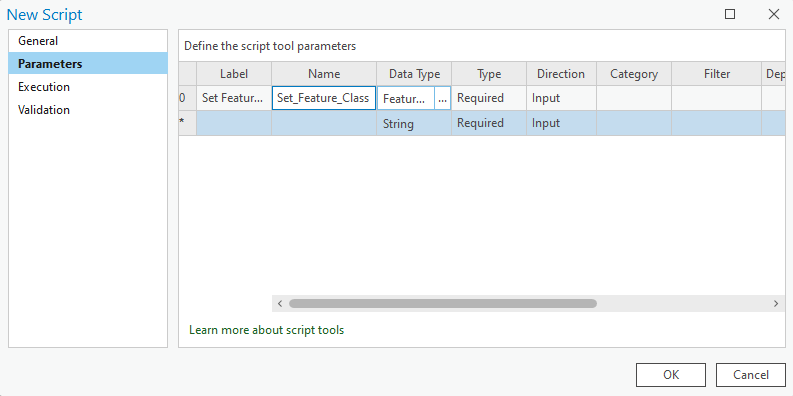
Under “Parameters,” choose “Label,” type “Set Feature Class,” and click on the field under “Name.” Accept the default option and select “Feature Class” under Data Type. Set the “Table of Values” accordingly. The parameter tool should resemble the following configuration: [provide a visual representation of the parameter tool configuration].
Click “OK”. The script tool should now be added in the Catalog pane.

Double-click the script tool you just created in the toolbox. You will be prompted to set a feature class of your choice as input. Once the feature class is specified, proceed to run the script tool.
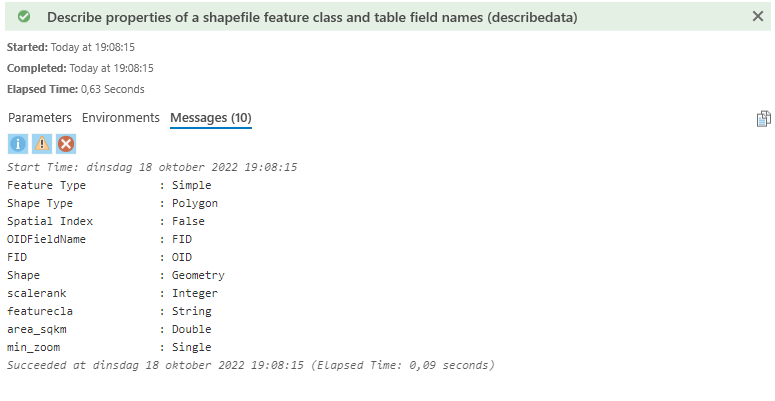
As the script tool executes, you can observe the print statements from the Python script in the “Open History” section of ArcGIS Pro. Additionally, navigate to the “Messages” tab to review any additional messages or outputs generated by the script during its execution. This will provide you with valuable information about the script’s processing and any potential errors or messages logged during the operation.
Stay Connected
If you enjoyed this article, we invite you to become a Medium member and gain access to thousands of similar articles.
Thanks for reading.
In Plain English
Thank you for being a part of our community! Before you go:
- Be sure to clap and follow the writer! 👏
- You can find even more content at PlainEnglish.io 🚀
- Sign up for our free weekly newsletter. 🗞️
- Follow us on Twitter(X), LinkedIn, YouTube, and Discord.


