
Creating A Timer Prank Using Arduino Uno & Pink Panther
A minimalistic IoT project to tinker and have fun while building it.

The Internet of Things(IoT) is indeed helpful in building many things. It powers our home as well as everything from smart locks, to wearable devices. But IoT can be used to create pranks as well.
Whether it’s spooking a friend, or just trying to pull a prank on someone. There can be many ideas that do come in mind when building an IoT project. If you’ve ever wanted to build an IoT project, but don’t have any ideas for it. Here is one way, you can use your imagination to build a project.
One such is a Timer Prank, that can end with rather a humorous bang. The essentials to creating something is fairly easy to follow along. But first, you would have to acquire the following items.
- Arduino UNO
- Jumper wires
- Speaker
- LCD module (any work 16*2 or other module work)
- 10K resistor
- Mini Button(Though for this project it isn’t needed)
- Gusto (for high performance and enjoyment)
Installation:
Firstly, you have to download Arduino UNO ide download it from the following link:
Install and then open up your IDE.
Check whether you are connected to the right “com port” that might be COM 3 or COM 5 or whatever is available for Arduino from tools and then dropdown menu and com port.
Schematic:
Make sure you connect your design is according to its schematic to LCD and diagram as shown below.
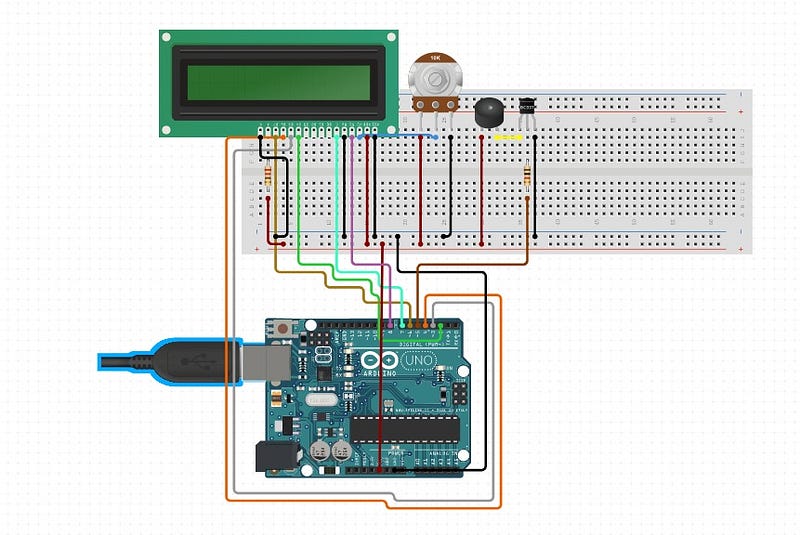
Connect the following pins using jumper wires as follows by following the instructions below. Use the schematic as a reference.
⦁ LCD Enable pin to digital pin 11
⦁ LCD D4 pin to digital pin 5
⦁ LCD D5 pin to digital pin 4
⦁ LCD D6 pin to digital pin 3
⦁ LCD D7 pin to digital pin 2
⦁ LCD R/W pin to ground
⦁ LCD VSS pin to ground
⦁ LCD VCC pin to 5V
⦁ 10K resistor:
⦁ ends to +5V and ground
⦁ wiper to LCD VO pin (pin 3)
⦁ Speaker output from pin 13 to ground
After that is said, and done. The next part details how we will encode our functionality.
Code:
This section represents the coding process of both files we need to complete our Arduino Project.
Countdown Timer:
Firstly we will code the countdown timer for the prank. This part includes the code content for the timer.
The countdown timer code is implemented in the following snippet. Copy and paste it into the Arduino IDE, and play around with it. Now in the next snippet, we will create the code for Pink Panther Melody, that will be the climax of our project.
Pink Panther Melody:
The following code is where we have defined the melody of Pink Panther using notes pre-built in Arduino, to create a tempo like an effect when the timer ends.
Conclusion
When all is said and done, Run your code from your Arduino IDE and see the magic happen. If you have followed everything to the letter — The end result will be as follows, as displayed in the video.
I hope you have fun tinkering with the code provided, as well as the project. For future references, you can add a mini-buttons and control your project using a laser sensor. You could add this to your smart door, to spook someone at your house, or just to prank on someone.
You could also change the intensity of the beat of the timer, to give it a more realistic feel. You could connect it with your phone, via a mobile receiver and then use it as your discretion when you feel like playing a dumb prank on anyone knocking on your door.
The possibilities of improving this little trinket are limitless. As long as you’re willing to imagine a more humorous approach at building tech does jokes as well. You will be fine.
Happy learning and tinkering with it. Take care, and Stay Safe!
Re: This project was created in collaboration with IoTNoob. You can check their work using this link.


