
Creating a Discord Bot in Python
Discord is an ideal platform for communicating and creating communities. A platform that also allows the use of bots, offering a simple interface between software and users.
I recently created a Discord bot to be notified when new articles that might interest me are published on the Vinted platform, and I realized that it’s actually very simple to do (the Discord part anyway). Today, I’m going to explain how to simply create a Discord bot.
Creating the bot in Discord
Before considering developing your bot in Python, you need to create it in Discord. To do this, first create a Discord account if you don’t already have one, and then go to the Developer Portal.
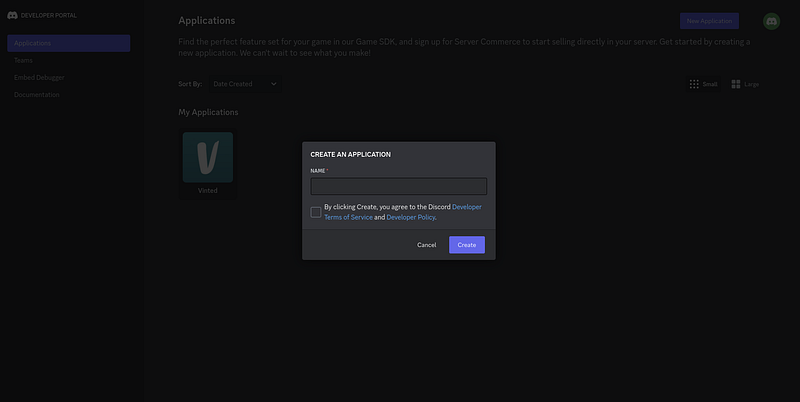
Here you can create a new application.
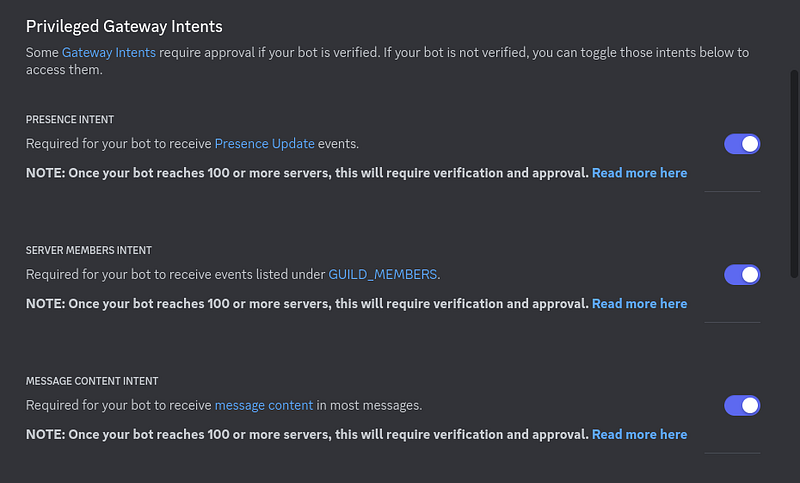
Once you’ve created your application, go to the “Bot” tab. If you wish, you can modify the various parameters available, change your bot’s avatar, etc… For my part, I’m going to modify the intents to allow everything.
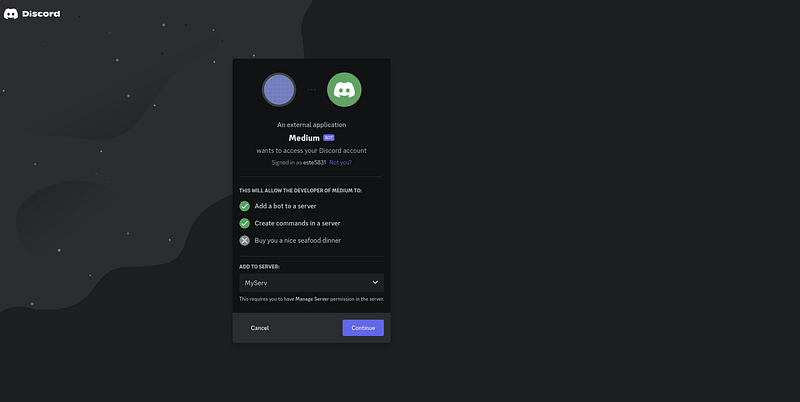
Next, go to the “OAuth2” tab, in “URL Generator”. In “Scopes”, you select “bot”, and you can then select the different permissions you wish to assign to your bot. I chose “Administrator”.
You get a URL that you simply copy into your browser and invite the bot to the server of your choice.
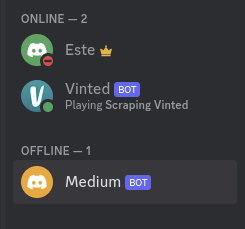
If your bot has been added, it should appear in the list of users.
Now return to the Developer Portal page, in the “Bot” tab, and click on “Reset Token”. You’ll then get a token: make a note of this, as we’re going to need it in our Python code.
That’s all for the Discord part!
Connecting to the bot in Python
To begin, we install the package we’ll need: discord.py .
pip install discord.pyNext, we need to store our bot token somewhere in our project. I recommend using a configuration or environment file, but here I’ll simply store it in a variable:
my_token = "MTE1NzM4MTgzNzIzNzI2NDQ1NA.Go7ZHb.DNe42Qk5yfO1oycYST675vlzEmvTMe9pnk7Ho4"Then we import the necessary packages, and create our code. Here’s the minimum code needed to get your bot up and running:
import discord
from discord.ext import commands


my_token = "MTE1NzM4MTgzNzIzNzI2NDQ1NA.Go7ZHb.DNe42Qk5yfO1oycYST675vlzEmvTMe9pnk7Ho4"


bot = commands.Bot(command_prefix='$', intents=discord.Intents.all())


@bot.event
async def on_ready():
    print("Bot is ready")


if __name__ == "__main__":
    bot.run(my_token)
The command_prefixparameter defines the character to be typed in front of your commands. You can modify the intents to suit your needs, but I’ve chosen to enable all of them.
Next, you can use on_readywith bot.eventto perform an action when the bot starts up. Note that we’re using async, so we’re programming asynchronously.
If everything works, you should get something like this when you launch the bot:
[2023-09-30 11:46:02] [INFO    ] discord.client: logging in using static token
[2023-09-30 11:46:04] [INFO    ] discord.gateway: Shard ID None has connected to Gateway (Session ID: 95d8378d02f1abcc1fad38d6b8d91225).
Bot is ready
Events
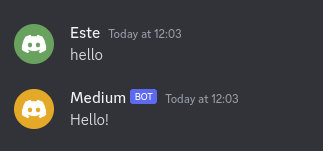
You’ve already discovered the on_readyevent, but there are many others. The most commonly used are on_messageand on_member_join :
@bot.event
async def on_message(message):
    if message.content == "hello":
        await message.channel.send("Hello!")
    await bot.process_commands(message)


@bot.event
async def on_member_join(member):
    for channel in member.guild.channels:
        if str(channel) == "general":
            await channel.send(f"""Welcome to the server {member.mention}""")
As you can see, these events take parameters that enable direct interaction with the Discord API, for example, to send messages.
Let’s move on to the test:
Commands
To create a command, simply use the commanddecorator:
@bot.command()
async def ping(ctx):
    await ctx.send("pong")
Let’s test this command in Discord (don’t forget to launch the bot first).

Perfect!
If you now wish to pass arguments, simply add them to your command definition:
@bot.command()
async def hello(ctx, arg):
    await ctx.send(f"Hello {arg}")


@bot.command()
async def sum(ctx, num1: int, num2: int):
    await ctx.send(num1 + num2)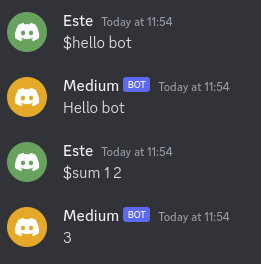
Embeds
Something I really like about Discord bots is the embeds. They allow you to communicate information in an extremely clear way.
They’re pretty easy to configure with discord.py , here’s an example:
@bot.command()
async def info(ctx):
    embed = discord.Embed(title=f"{ctx.guild.name}", description="Lorem Ipsum asdasd", timestamp=ctx.message.created_at, color=discord.Color.blue())
    embed.add_field(name="Server created at", value=f"{ctx.guild.created_at}")
    embed.add_field(name="Server Owner", value=f"{ctx.guild.owner}")
    await ctx.send(embed=embed)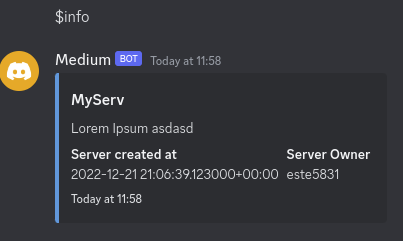
Buttons
Buttons are used to redirect to links. I haven’t yet figured out how to use them to perform actions, but here’s a simple example of a button that redirects to a web page:
@bot.command()
async def button(ctx):
    my_button = discord.ui.Button(label="Click me", url="https://google.com")
    my_view = discord.ui.View()
    my_view.add_item(my_button)
    await ctx.send("Click the button", view=my_view)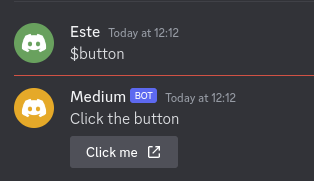
Waiting for user input
Very useful for requesting something from the user, like confirming the use of a command, we can make our bot wait for an answer:
@bot.command()
async def ask(ctx):
    await ctx.send("Type something")
    msg = await bot.wait_for("message")
    await ctx.send(f"You said {msg.content}")
Webhooks
Webhooks are very powerful, they allow you to send data from Python to Discord by sending requests.
They’re not quite linked to a Discord bot, but I’ll mention them anyway, as they’re widely used in conjunction with bots.
To create a webhook, go to “Integrations” in your server settings. You can then create a webhook and assign it a channel.
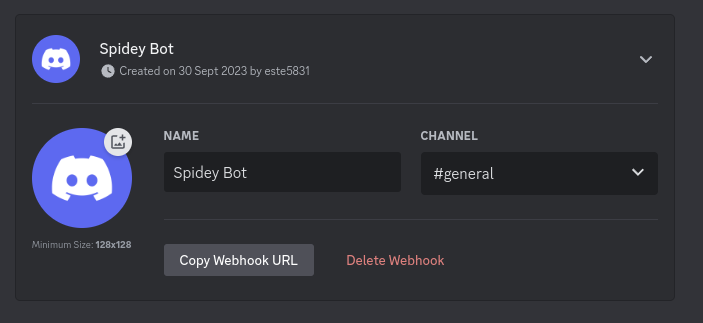
Copy its URL, and then you can send data to your channel from Python this way:
    webhook = "https://discord.com/api/webhooks/1157621856753418322/npBgx9RNRQRHoJN5Whvf0SmzbegYGmKG4g1ALVFAs_sKNOXnXVN8FWmwdGtBaqHhlKXU"
    data = {
        "content": "Hello",
        "username": "My Webhook Name",
    }
    result = requests.post(webhook, json=data)
Of course, it’s possible to make things more complex:
    webhook = "https://discord.com/api/webhooks/1157621856753418322/npBgx9RNRQRHoJN5Whvf0SmzbegYGmKG4g1ALVFAs_sKNOXnXVN8FWmwdGtBaqHhlKXU"
    data = {
        "content": "Test webhook",
        "embeds": [
            {
                "title": "Hello world",
                "description": "Hello",
                "color": 16711680,
                "fields": [
                    {"name": "Field 1", "value": "Field 1", "inline": True},
                    {"name": "Field 2", "value": "Field 2", "inline": True},
                    {"name": "Field 3", "value": "Field 3", "inline": True},
                ],
            },
        ],
    }

    requests.post(webhook, json=data)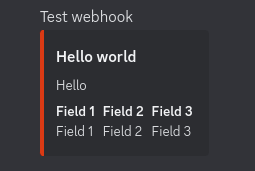
Final Note
So now you’ve got the basics for combining the Discord API and Python. If you’d like to find out more, take a look at the discord.py documentation, where you’ll find everything you need. You can also take a look at a more complex bot example I’ve made, specifically the Discord part: https://github.com/estebanthi/vinted-bot/tree/master/src/bot.
Thanks for reading! Here are some links that may interest you:


