
Create Your First Chrome Extension in No Time: A Step-by-Step Base64 Encoder & Decoder Tutorial
Today, we will dive into the wonderful world of Chrome Extensions, a fascinating area that takes your browsing experience to the next level.
Let’s roll up our sleeves and delve into a simple, yet immensely useful project: a Chrome Extension to encode and decode base64 strings.
Why base64, you ask?
Let’s just say, it’s an old pal from my previous projects that has been tremendously helpful! So why not start our journey here?
Buckle up and let’s begin!

Prerequisite
For this journey, you’ll need some knowledge of HTML, CSS, and JavaScript.
Step 1: Setting Up the Project
First, let’s set up our project folder. Call it “base64-extension”. Within this folder, we need three files:
manifest.json: This is the heart of the extension. It tells Chrome everything it needs to know about your extension.popup.html: This is the HTML document that will be displayed when you click on the extension icon in the Chrome menu.popup.js: Our JavaScript file where the magic happens!styles.css: For styling your extension.
Go ahead, create these files in your project directory.
Step 2: Creating Our Manifest
Next, we’re going to fill out our manifest.json file. This is how Chrome knows what to do with our extension. Here's what you'll need:
{
  "manifest_version": 3,
  "name": "Base64 Converter",
  "version": "1.0",
  "action": {
    "default_popup": "popup.html",
    "default_icon": {
      "16": "images/icon16.png",
      "48": "images/icon48.png",
      "128": "images/icon128.png"
    }
  }
}
Note: You’ll need to provide your own icons, or feel free to use a placeholder.
Step 3: Crafting the UI
Let’s design our popup window. It’ll be simple: two textareas (one for input, one for output), two buttons (to encode and decode), and some catchy styling.
Below is the content for popup.html:
<!DOCTYPE html>
<html>
  <head>
    <link href="https://fonts.googleapis.com/css2?family=Open+Sans:wght@400;600&display=swap" rel="stylesheet">
    <link rel="stylesheet" type="text/css" href="styles.css">
  </head>
  <body>
    <h1>Base64 Converter</h1>
    <textarea id="input"></textarea>
    <div id="flexButton">
        <button id="encodeButton">Encode</button>
        <button id="decodeButton">Decode</button>
    </div>
    <textarea id="output"></textarea>
    <script src="popup.js"></script>
  </body>
</html>
And the content for styles.css:
body {
  font-family: 'Open Sans', sans-serif;
  padding: 15px;
  background-color: #f5f5f5;
  width: 500px;
}

h1 {
  color: #3c4f76;
}

textarea {
  width: 90%;
  height: 120px;
  margin: 10px 0;
  padding: 10px;
  font-size: 16px;
  border-radius: 5px;
  border: 1px solid #ddd;
  box-shadow: 0 0 10px 0 rgba(0,0,0,0.1);
}

button {
  margin-right: 10px;
  padding: 10px 20px;
  border: none;
  border-radius: 5px;
  background-color: #3c4f76;
  color: #ffffff;
  font-size: 16px;
  cursor: pointer;
  transition: background-color 0.3s ease;
}

button:hover {
  background-color: #5a6f9c;
}

#flexButton {
    display: flex;
    justify-content: start;
}
This looks quite neat, but feel free to add your personal touch to it!
Step 4: The Magical JavaScript
Here comes the fun part: writing our JavaScript logic! We’ll handle button clicks, grab the input, process it, and display the output. Pretty straightforward!
In popup.js:
document.getElementById("encodeButton").addEventListener("click", function () {
  let input = document.getElementById("input").value;
  let output = btoa(input);
  document.getElementById("output").value = output;
});

document.getElementById("decodeButton").addEventListener("click", function () {
  let input = document.getElementById("input").value;
  let output = atob(input);
  document.getElementById("output").value = output;
});
Step 5: Load and Test the Extension
Time to put our extension to the test! Open Chrome and navigate to chrome://extensions. Turn on Developer Mode (top right corner). Click Load Unpacked and select your project directory. Voila! Your extension is now in the browser!
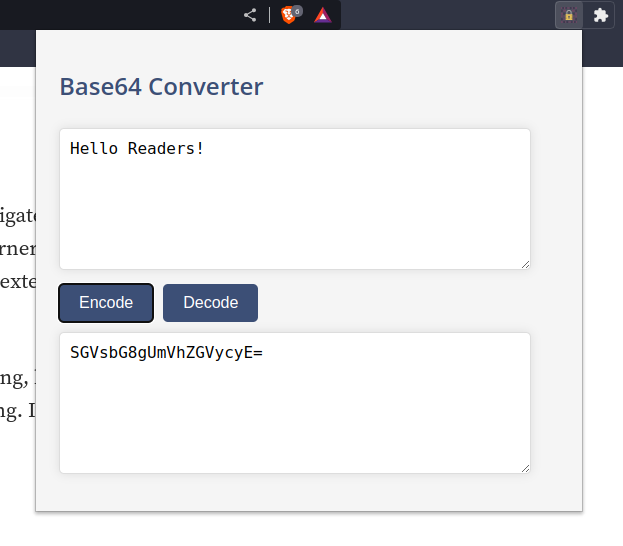
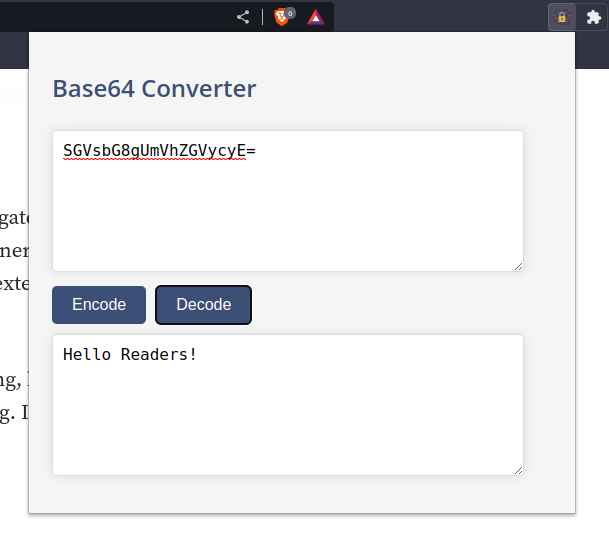
Click on the new icon in your Chrome menu bar, paste a string, hit ‘Encode’, then ‘Decode’, and see if it returns the original string. If so, congratulations!
Step 6: Publishing Your Extension to the Chrome Web Store
Once you’re satisfied with your extension, you might want to share it with the world. This step is for you! Google provides a simple process to submit your extensions to the Chrome Web Store.
1. Package your extension: Create a .zip file of your project folder. The manifest.json file should be at the top level of this .zip file.
2. Create a Developer Account: Visit the Chrome Web Store Developer Dashboard and sign in with your Google account. If you haven’t already, you’ll need to register as a developer. There’s a one-time developer registration fee of $5.
3. Upload your extension: In the Developer Dashboard, click “New Item”, then “Upload” to upload your .zip file. Fill out the form with details about your extension. Make sure to use clear, concise language to describe its functionality.
4. Add Images and Screenshots: Upload an icon for your extension (at least 128x128 pixels), as well as a few screenshots showcasing its features. This helps potential users understand what your extension does and how it looks before they download it.
5. Pay the Developer Signup Fee: If you haven’t already, you’ll be prompted to pay the developer registration fee.
6. Publish your extension: Once you’ve completed all the above steps and are satisfied with your listing, click “Publish Changes”. Google will review your extension, and if it meets all their guidelines, it will be available in the Chrome Web Store for others to download and use!
Wrapping Up
We’ve just taken a fantastic voyage, my friends. From setting up our project to testing our Chrome extension in the browser.
This tutorial is more than just about writing code; it’s about the journey of a developer, the joy of creating something out of nothing but logic and imagination, the beauty of transforming problems into solutions, just like our base64 converter.
- Chrome Extension Developer’s Guide: The official Google Chrome Extensions documentation. This is your go-to guide for everything related to Chrome extensions.
- Base64 Encoding and Decoding: A detailed explanation of Base64 from MDN web docs. It provides good context to understand why and how Base64 is used.
- Publishing Extensions: Google’s guide to publishing your own extension. This guide walks you through the entire publishing process step by step.
Enjoyed the read? For more on Web Development, JavaScript, Next.js, Cybersecurity, and Blockchain, check out my other articles here:
If you have questions or feedback, don’t hesitate to reach out at [email protected] or in the comments section.
[Disclosure: Every article I pen is a fusion of my ideas and the supportive capabilities of artificial intelligence. While AI assists in refining and elaborating, the core thoughts and concepts stem from my perspective and knowledge. To know more about my creative process, read this article.]
More content at PlainEnglish.io.
Sign up for our free weekly newsletter. Follow us on Twitter, LinkedIn, YouTube, and Discord.


