

How to create an RSA key pair on Android to protect data
In this post I will explain how to create a RSA key pair on Android and use that key pair for sign and verify data. This RSA key pair will be stored in the Android KeyStore.
What is RSA?
RSA is a public-key or asymmetric crypto system. It uses a public key for encryption and a private key for decryption. Anyone can use the public key to encrypt a message but it can be decrypted only by the private key owner.
Android KeyStore
The Android KeyStore is a storage facility for cryptographic keys and certificates. The keys stored in the KeyStore can be used for cryptographic operations but the key material will not be extracted, that means that an attacker might use a stored key but will not be able to export it outside the device. When a key is created from an app and stored in the KeyStore, the access to the key will be restricted to the app itself.
Why to use RSA?
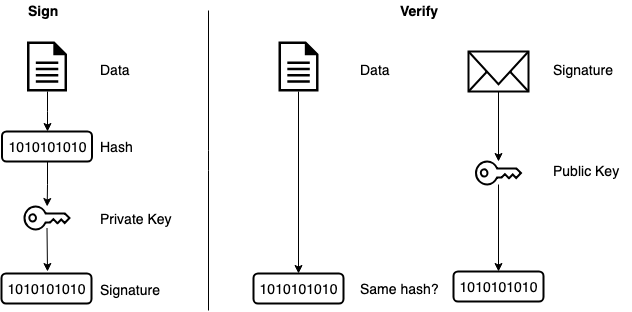
We can use RSA to sign and verify data, for example when we transfer some data to a server. Because RSA is a public-key system, we can use the private key to sign data in our app and send the public key to the server, so the server can verify that the data sent is genuine and has not been tampered. If any malicious users know the public key, the only thing they can do is to verify the integrity of the data but they cannot change the data because they need the private key to do so.
Generate the key
To generate a new key, we have to create a KeyPairGenerator object. We have to specify the algorithm of the key we are creating, in this case RSA, and the KeyStore where the key will be stored, in this case AndroidKeyStore.
Then we create a KeyGenParameterSpec object to set all the parameters for our key (note that this class is available for Marshmallow and later versions, see KeyPairGeneratorSpec for older versions support). It is mandatory to set the key alias (name of the key) and the purpose for the key. If the purpose is sign and we try to use the key to verify it will throw an exception, so we have to know what we are going to do with the keys, in this case sign and verify. Another mandatory parameters are the digest and the signature padding (because we are going to use the key to sign).
Then we can set some optional parameters such the self-signed certificate serial number, the certificate subject (common name), the starting and expiry dates and whether the key requires user authentication to be used.
Use the private key to sign data
To sign data we have to retrieve the key from the KeyStore. First we have to request a KeyStore object and provide the type, AndroidKeyStore in this sample. We have to load an empty KeyStore, so we pass null as the InputStream argument in the load method.
Once the KeyStore has been loaded, we have to retrieve the private key passing the alias (name) of the key we have created earlier. Now we are able to use the key to sign the data. It is very important to set the algorithm when creating the Signature class instance. Because we are using a RSA key with SHA256 message digest, we have to get this Signature object, otherwise it will throw an exception. The last step is to sign the data with our private key. We can encode and store the signature in a variable as we need it for the verifying process.
Note that if the key requires authentication to be used, it will throw UserNotAuthenticatedException, so we have to ask the user to authenticate in this case.
Use the certificate to verify the signature
To verify the signature, we have to load again the KeyStore. Once the KeyStore is loaded we have to retrieve our key certificate from there, using our key alias. Finally we create a Signature class instance passing the used algorithm as argument and we verify that the signature matches our certificate.
If you have any suggestion or questions, please drop a message🙂


