
Crafting a Real-Time Chat App using WebSockets and Node.js!
By the end of this, you’ll have mastered the foundational skills to create your own real-time applications

Real-time communication has become an integral part of today’s web. Thanks to the WebSocket protocol, creating such experiences has never been easier.
In this tutorial, we will deep dive into the art of building a real-time chat application using WebSockets and Node.js.
By the end of this, you’ll have mastered the foundational skills to create your own real-time applications.
Pre-requisites:
- Familiarity with JavaScript
- Basic knowledge of Node.js
- A pinch of passion for creating cool stuff!
Outline:
- Introduction to WebSockets
- Setting up the server
- Crafting the client
- Bringing it all together
- Future enhancements
1. Introduction to WebSockets
What is WebSocket?
WebSocket is a protocol that allows two-way communication between the client and server over a single, long-lived connection.
Unlike traditional HTTP requests that are stateless and disconnected, WebSocket provides a persistent connection, enabling real-time interactions.
Why WebSocket?
- Low Latency: Perfect for applications that require instantaneous data transfer.
- Reduced Overheads: After the initial handshake, data can be sent back and forth without the overhead of re-establishing a connection.
- Bi-Directional: Both client and server can initiate sending messages.
2. Setting up the server
Initialization
We’ll use the ws library alongside Express. Let's set it up in a server.js file:
const express = require('express');
const http = require('http');
const WebSocket = require('ws');

const app = express();
const server = http.createServer(app);
const wss = new WebSocket.Server({ server });
Handling Connections
Listen for connections to the WebSocket server:
wss.on('connection', (ws) => {
    console.log('Client connected');

    // Message received
    ws.on('message', (message) => {
        console.log(`Received message => ${message}`);
        // Broadcast the message to all clients
        wss.clients.forEach(client => {
            if (client !== ws && client.readyState === WebSocket.OPEN) {
                client.send(message);
            }
        });
    });
});
3. Crafting the client
Here’s how you can set up a WebSocket connection on the client side in a client.js:
const socket = new WebSocket('ws://localhost:3000');

socket.addEventListener('open', (event) => {
    console.log('Connected to the WebSocket server');
});

socket.addEventListener("message", (event) => {
  if (event.data instanceof Blob) {
    const reader = new FileReader();

    reader.onload = function () {
      console.log(`Message from server: ${reader.result}`);
      document.querySelector("#messages").innerHTML += `<li>${reader.result}</li>`;
    };

    reader.readAsText(event.data);
  } else {
    console.log(`Message from server: ${event.data}`);
  }
});
4. Bringing it all together
In server.js, add logic to serve static files, like your HTML and client.js:
app.use(express.static('public')); // Assuming your HTML and client.js are in a folder named "public"Start the WebSocket and Express server:
server.listen(3000, () => {
    console.log('Server started on http://localhost:3000');
});
On the client side, create a simple UI with an input field and button to send messages in a HTML file:
<html>
    <body>
        <input type="text" id="messageInput"/>
        <button id="sendButton">Send</button>
        <div id="messages"></div>
        <script src="./client.js"></script>
    </body>
</html>
On clicking the button, send the message through the WebSocket:
document.getElementById('sendButton').addEventListener('click', () => {
    const message = document.getElementById('messageInput').value;
    socket.send(message);
});
5. Run
Run the server:
node server.jsOpen your HTML file in two distinct browsers:

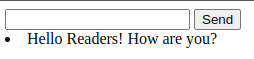
Enter a message and click “Send”, the result will be displayed on the second browser:
6. Future enhancements
- Message History: Store chat messages in a database and retrieve the history when a client connects.
- User Authentication: Integrate an authentication mechanism to identify users.
- Private Chats: Allow users to send private messages to specific users.
Conclusion
Creating a real-time chat application using WebSockets and Node.js is an exciting journey.
While the WebSocket protocol powers the real-time capabilities, Node.js facilitates easy server-side setup.
With this foundation, you’re now poised to explore further and craft more complex, interactive applications.
- Socket.io: The official website of Socket.io. It contains documentation, getting started guides, and various resources for developers. Socket.io is one of the most popular libraries for building real-time web applications in Node.js, offering an abstraction over WebSockets and other communication methods.
- Socket.io on npm: This is the official npm (Node Package Manager) page for Socket.io. It provides installation instructions, version details, and a brief overview of the library.
- MDN WebSockets API: The Mozilla Developer Network (MDN) provides a comprehensive guide on the WebSockets API, detailing its capabilities, how it works, and how to use it in web applications.
Enjoyed the read? For more on Web Development, JavaScript, Next.js, Cybersecurity, and Blockchain, check out my other articles here:
If you have questions or feedback, don’t hesitate to reach out at [email protected] or in the comments section.
[Disclosure: Every article I pen is a fusion of my ideas and the supportive capabilities of artificial intelligence. While AI assists in refining and elaborating, the core thoughts and concepts stem from my perspective and knowledge. To know more about my creative process, read this article.]
In Plain English 🚀
Thank you for being a part of the In Plain English community! Before you go:
- Be sure to clap and follow the writer ️👏️️
- Follow us: X | LinkedIn | YouTube | Discord | Newsletter
- Visit our other platforms: Stackademic | CoFeed | Venture | Cubed
- More content at PlainEnglish.io


