
Connecting Storage Account in a Databricks using a Service Principal within a Virtual Networks.
Several times, data engineers and cloud experts encounter problems when trying to set up a Data Lakehouse in a secure and best-practice-compliant manner. This article demonstrates how to create a configuration between an Azure Storage account and Databricks within Virtual Networks (V-Nets) without using the public internet. The configuration uses two V-Nets with private endpoints to ensure the connection between the systems. In this particular case, the V-Nets are divided to maintain one subnet exclusively for the compute resources needed by Databricks, while the other subnet is dedicated to the other services of the Data Lakehouse.

Step 1: Create and Configure the Storage Account
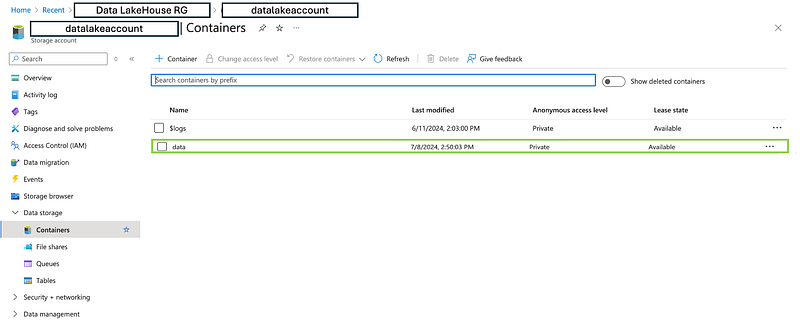
Before starting, it is necessary to have a Storage Account created. In this case, the Storage Account is called datalakeaccount, within the resource group where all the Data Lake applications will be implemented, and in the Data Lake House V-Net. The Storage Account should be configured with the following conditions:
- ADLS Gen2 Storage Account
- Containers: In this particular case, we have a main container named
data, and inside it, we have three containers namedbronze,silver, andgold, following the medallion architecture.
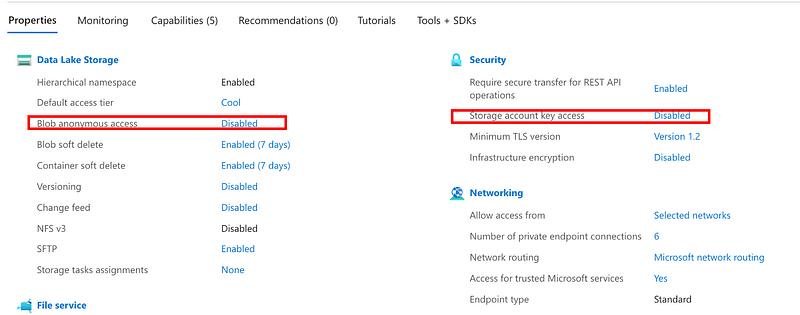
For security and accessibility, it is important to configure the Storage Account with Blob anonymous access disabled, ensuring that unauthorized access is always blocked. In some cases, it might be necessary to disable access by key, depending on the connection requirements. For this solution, using a service principal, key access will be disabled.
Note: Please note that these settings can be configured in the existing container or set when the container is created.
Step 2: Create a Service Principal and Secrets
To create a Service Principal, you need to register an application and configure it by assigning the necessary permissions. Follow these steps:
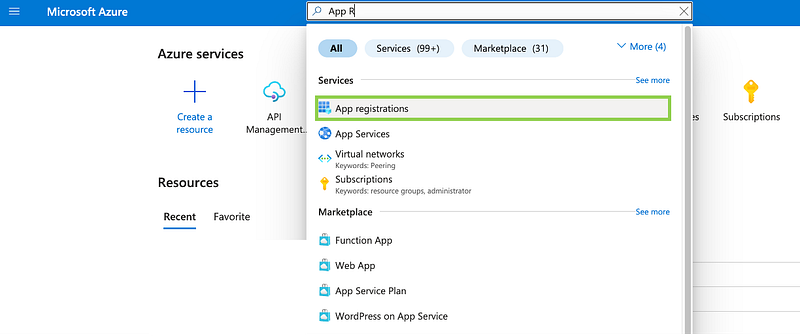
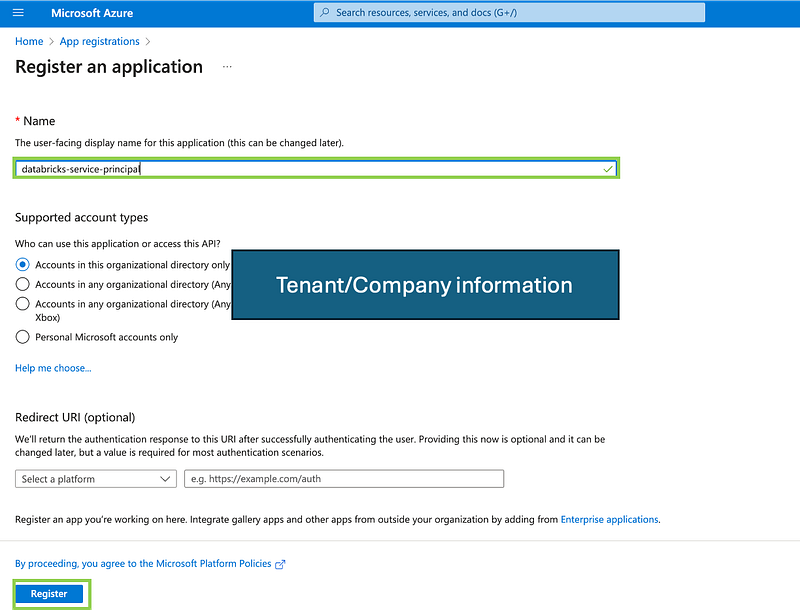
1. Create an App Registration:
- Go to the Azure portal.
- Navigate to “Azure Active Directory” > “App registrations” or type in the broser “App Registration”.
- Click “New registration”.
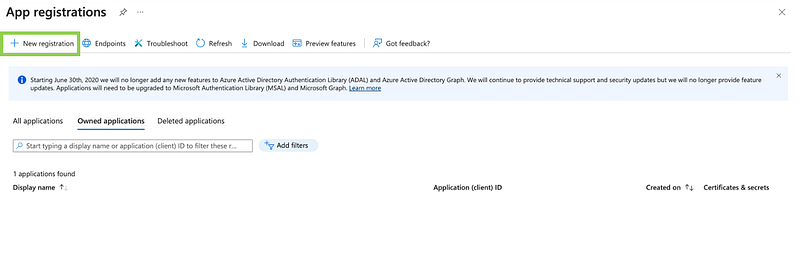
- Provide a name for the application (e.g.,
databricks-service-principal). - Click “Register”.
Application registration has been created, some information needs to be obtained in the application to connect with databricks.

2. Configure the Service Principal:
- Identify the Application (Client) ID and the Directory (tenant) ID, these will be used to identify the service that it gonna be allowed to connect to the storage through databricks.
- Click “New client secret” to create a client secret. Make sure to copy the secret value, as you will need it later.

Note: You will include the expiration date, this is very important because you must take into account when you should update this so as not to lose the connection.
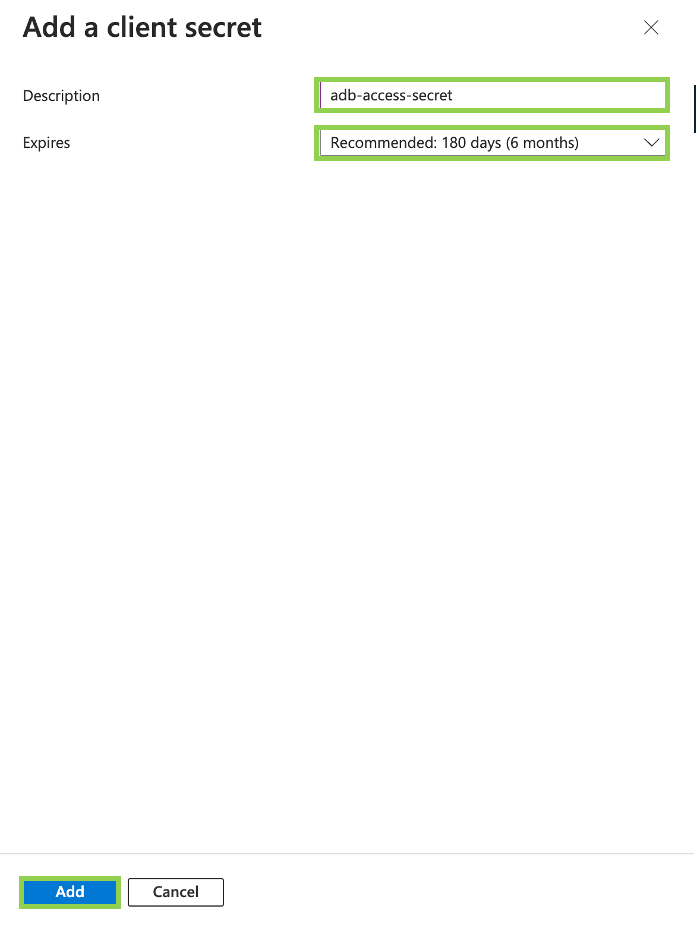
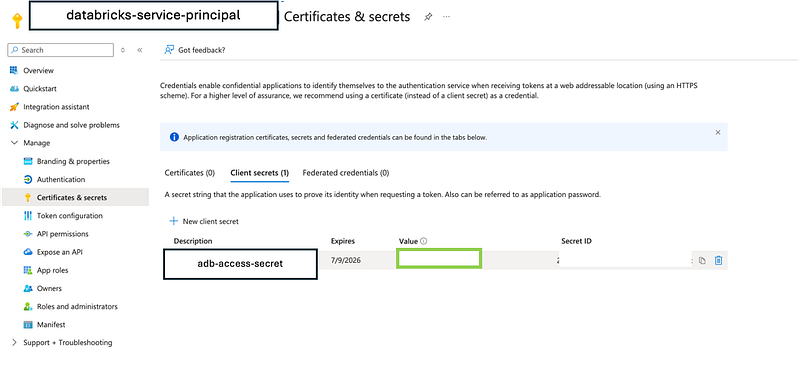
Note: It is necessary to copy the generated value because that secret will be needed to connect the databricks to the storage and will be lost when copying it and will no longer be accessible.
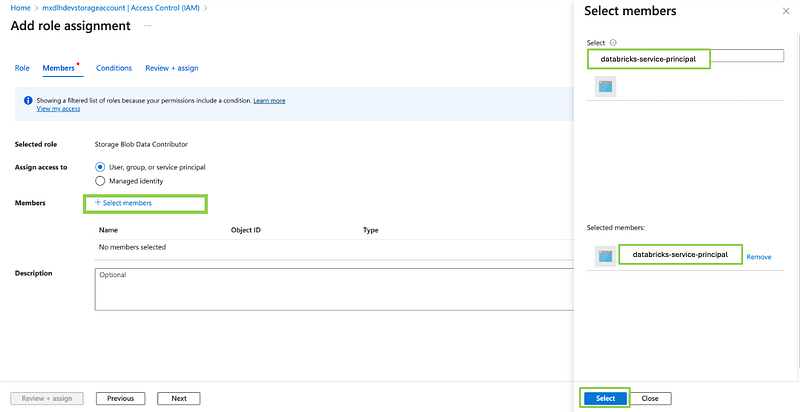
3. Assign the Service Principal to the Storage Account:
- Go to the Storage Account (
datalakeaccount). - Navigate to the “Access control (IAM)” section.
- Click “Add role assignment”.
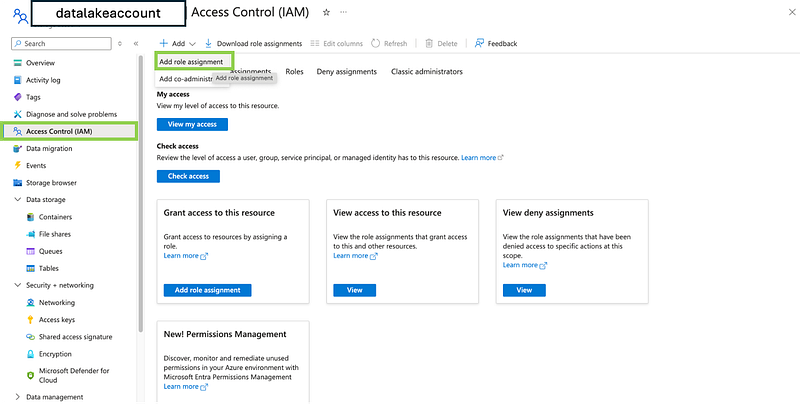
- Choose the appropriate role (e.g., “Storage Blob Data Contributor”).

- Select the service principal created in the previous steps and assign the role
databricks-service-principal.
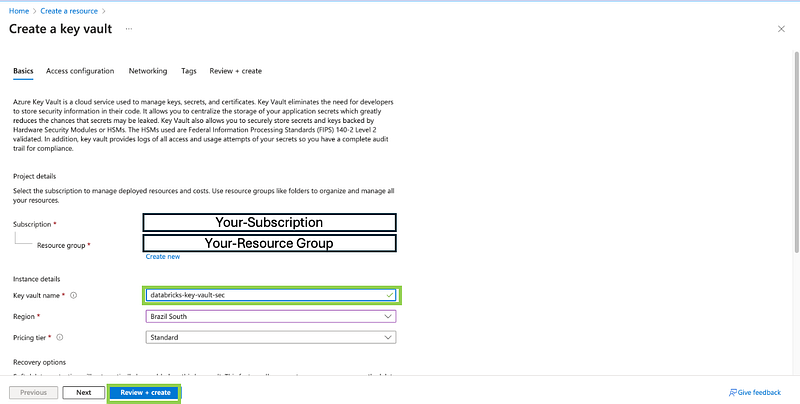
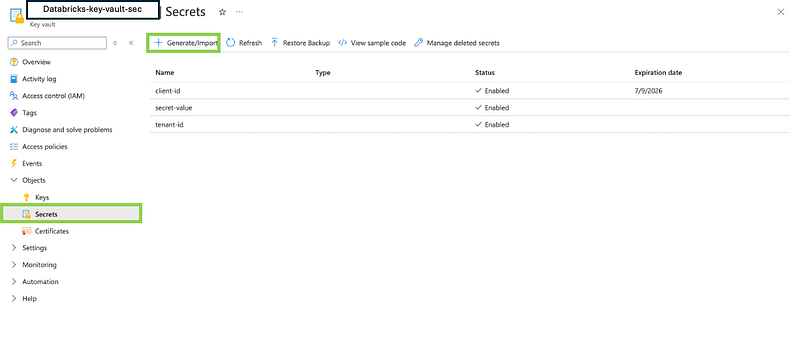
4. Store Service Principal Values in Azure Key Vault
After creating the Service Principal, you need to store its values in Azure Key Vault. Specifically, you will store the Application (Client) ID, the Directory (Tenant) ID, and the Secret value generated earlier. Follow these steps:
- Create or Navigate to the Key Vault:
- Go to the Azure portal.
- Navigate to “Key Vaults” and select your Key Vault or create a new one if you don’t have one already.
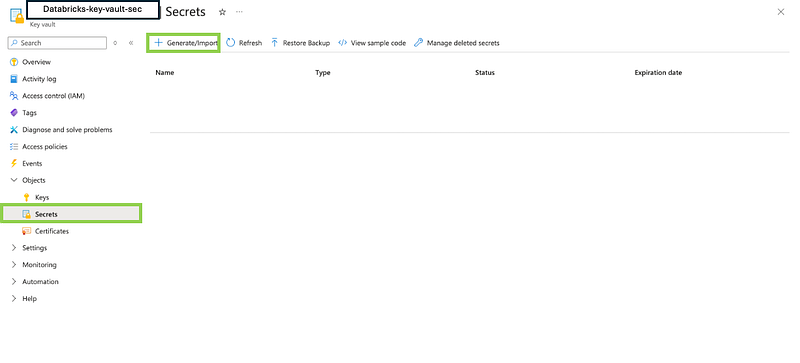
- Add Secrets to the Key Vault:
- In the Key Vault, go to the “Secrets” section.
- Click “Generate/Import” to add a new secret.
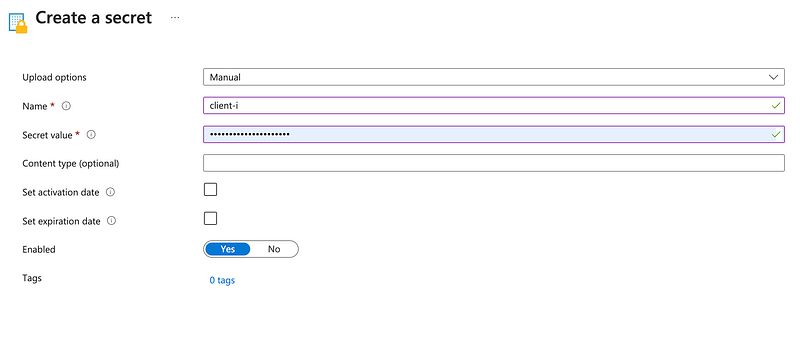
- Add the Application (Client) ID:
- Set the “Name” to something descriptive like
client-id. - Paste the Application (Client) ID value into the “Value” field.
- Click “Create”.
- Repeat the process for the Directory (Tenant) ID:
- Set the “Name” to
tenant-id. - Paste the Directory (Tenant) ID value into the “Value” field.
- Click “Create”.
- Finally, add the Secret value:
- Set the “Name” to
secret-value. - Paste the Secret value generated earlier into the “Value” field.
- Click “Create”.
Note: By now, you have successfully created an App Registration, set up an Azure Key Vault, stored the necessary secrets in the Key Vault, and provided access to the App Registration for your ADLS Gen2 Storage Account. This setup ensures that Databricks can securely access the Storage Account using the Key Vault and the stored secrets, adhering to best practices for security and compliance.
Step 3: Create Secret Scope in Azure Databricks
Now, it’s time to configure Azure Databricks to securely access data from your ADLS Gen2 account. (Assuming you’re already familiar with creating an Azure Databricks service.)
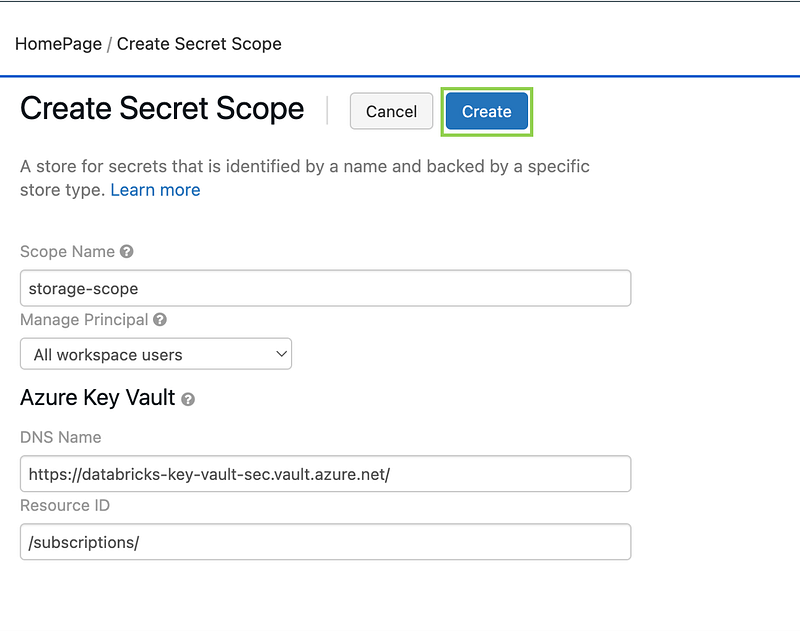
1. Create Secrets in Databricks
- On the Azure Databricks home page, modify the URL by appending
/secrets/createScopeto the end, then press Enter. - In the form that appears, enter a Scope Name for the secret scope.

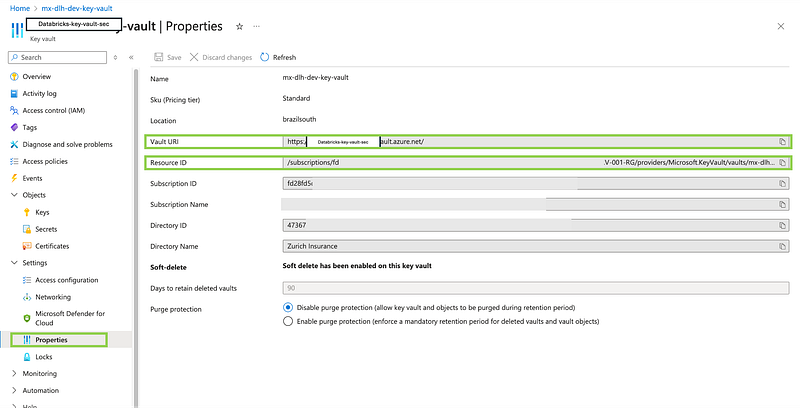
3. Provide the DNS Name and Resource ID of your Azure Key Vault, which you can retrieve from the Azure portal.
4. Set the Manage Principal option to All Users. When setting the Manage Principal option to creator, only the user who created the secret scope will have access to it. If you want to allow other Databricks users to access the secret scope, consider setting the Manage Principal option to all users.
2. Configure Spark to Use the Service Principal for Authentication
It is also essential to add specific lines to the Spark configuration in the cluster’s startup script. This configuration enables Spark to authenticate securely with the Azure Data Lake Storage (ADLS) Gen2 using the Service Principal created earlier. By configuring these settings, you ensure that Spark can access the storage account without requiring manual intervention or exposing sensitive credentials.
Add the following lines to the Spark config:
spark.hadoop.fs.azure.account.auth.type.<STORAGE_ACCOUNT_NAME>.dfs.core.windows.net OAuth
spark.hadoop.fs.azure.account.oauth.provider.type.<STORAGE_ACCOUNT_NAME>.dfs.core.windows.net org.apache.hadoop.fs.azurebfs.oauth2.ClientCredsTokenProvider
spark.hadoop.fs.azure.account.oauth2.client.id.<STORAGE_ACCOUNT_NAME>.dfs.core.windows.net <APPLICATION_ID>
spark.hadoop.fs.azure.account.oauth2.client.secret.<STORAGE_ACCOUNT_NAME>.dfs.core.windows.net <CLIENT_SECRET>
spark.hadoop.fs.azure.account.oauth2.client.endpoint.<STORAGE_ACCOUNT_NAME>.dfs.core.windows.net https://login.microsoftonline.com/<DIRECTORY_ID>/oauth2/tokenspark.hadoop.fs.azure.account.auth.type: Specifies the authentication type, which is set to OAuth to use the Service Principal.spark.hadoop.fs.azure.account.oauth.provider.type: Defines the OAuth provider type, which should be set toClientCredsTokenProviderto use client credentials for token generation.spark.hadoop.fs.azure.account.oauth2.client.id: Your application's client ID, used to authenticate the Service Principal.spark.hadoop.fs.azure.account.oauth2.client.secret: The client secret associated with the Service Principal, which should be securely stored.spark.hadoop.fs.azure.account.oauth2.client.endpoint: The OAuth2 token endpoint for your Azure Active Directory tenant, which is responsible for issuing the access token.
It is essential to add specific lines to the Spark configuration in the cluster’s startup script. This configuration enables Spark to authenticate securely with the Azure Data Lake Storage (ADLS) Gen2 using the Service Principal created earlier. By configuring these settings, you ensure that Spark can access the storage account without requiring manual intervention or exposing sensitive credentials.
Instead of hardcoding sensitive values like APPLICATION_ID, CLIENT_SECRET, or DIRECTORY_ID directly in the Spark config, it's a best practice to use Azure Databricks Secret Scopes. This approach allows you to store these sensitive values securely and reference them in the configuration.
Here’s how to do it:
- Store Secrets in Azure Databricks: If you haven’t done so already, store the
APPLICATION_ID,CLIENT_SECRET, andDIRECTORY_IDin a Secret Scope within Azure Databricks. - Reference Secrets in the Spark Configuration: Replace the direct values with secret references in the Spark configuration script. For example:
spark.hadoop.fs.azure.account.auth.type.<STORAGE_ACCOUNT_NAME>.dfs.core.windows.net OAuth
spark.hadoop.fs.azure.account.oauth.provider.type.<STORAGE_ACCOUNT_NAME>.dfs.core.windows.net org.apache.hadoop.fs.azurebfs.oauth2.ClientCredsTokenProvider
spark.hadoop.fs.azure.account.oauth2.client.id.<STORAGE_ACCOUNT_NAME>.dfs.core.windows.net {{secrets/<SCOPE_NAME>/<APPLICATION_ID_SECRET>}}
spark.hadoop.fs.azure.account.oauth2.client.secret.<STORAGE_ACCOUNT_NAME>.dfs.core.windows.net {{secrets/<SCOPE_NAME>/<CLIENT_SECRET_SECRET>}}
spark.hadoop.fs.azure.account.oauth2.client.endpoint.<STORAGE_ACCOUNT_NAME>.dfs.core.windows.net https://login.microsoftonline.com/{{secrets/<SCOPE_NAME>/<DIRECTORY_ID_SECRET>}}/oauth2/token
In this example:
{{secrets/<SCOPE_NAME>/<SECRET_NAME>}}: This is the syntax used to access secrets stored in a Secret Scope within Azure Databricks.- Replace
<SCOPE_NAME>with the name of the Secret Scope you created, and<SECRET_NAME>with the respective secret names (APPLICATION_ID,CLIENT_SECRET,DIRECTORY_ID).
Advantages of Using Databricks Secrets:
- Security: Secrets are encrypted and are not exposed directly in the scripts or configurations.
- Centralized Management: You can manage and rotate credentials easily without modifying configuration scripts.
- Best Practice: Avoiding direct exposure of credentials is a key best practice in cloud security.

By adding these configurations, Spark will automatically use the Service Principal credentials to access the ADLS Gen2 storage account, ensuring secure and seamless data access.
3. Create a Private Endpoint for the Storage Account
To further secure the connection between Azure Databricks and your ADLS Gen2 Storage Account, it’s necessary to create a Private Endpoint. A Private Endpoint ensures that the traffic between your Databricks environment and the Storage Account flows entirely within your virtual network (VNet), avoiding exposure to the public internet.
- Navigate to the Storage Account:
- Go to the Azure portal.
- Select the Storage Account (
datalakeaccount) where you want to create the Private Endpoint.
2. Create the Private Endpoint:
- In the Storage Account’s menu, navigate to Networking.
- Under the Private endpoint connections tab, click on + Private endpoint.
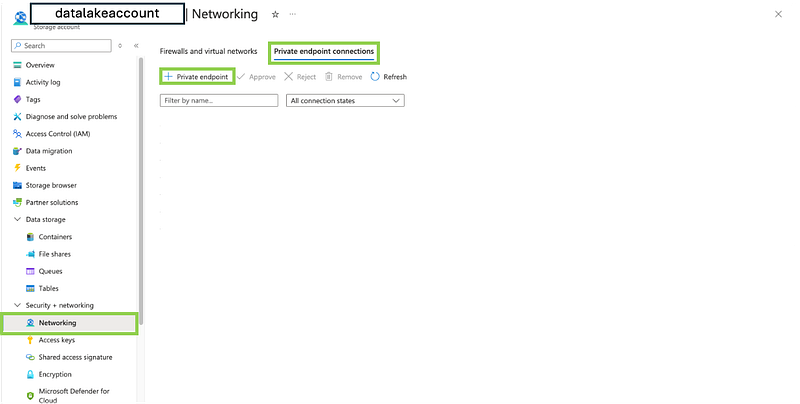
3. Configure the Private Endpoint:
- Provide a name for the Private Endpoint.
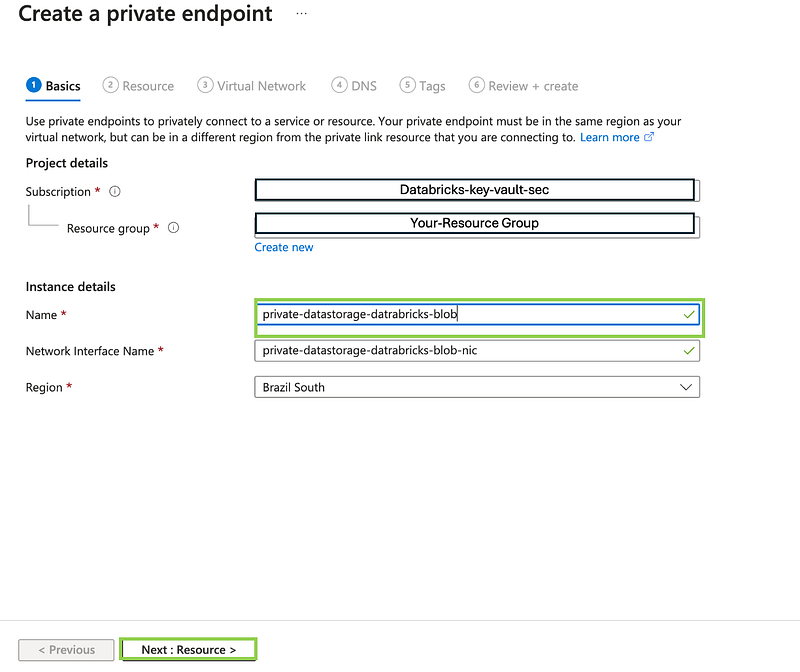
- For the Target resource type, select Microsoft.Storage/storageAccounts.
- Choose the specific Storage Account (
datalakeaccount) you wish to connect privately.
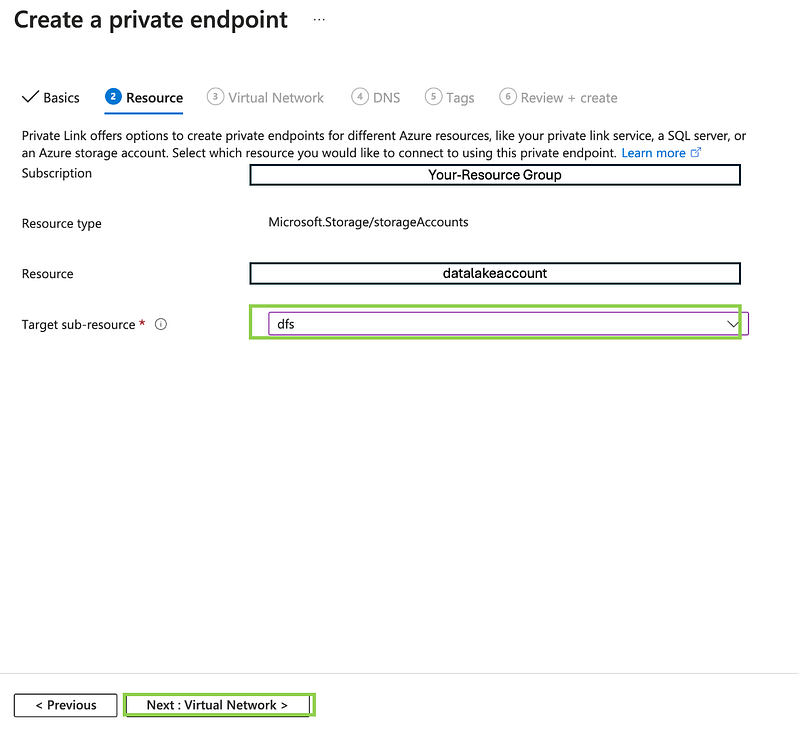
Note: When selecting the Target sub-resource, you can choose between blob and dfs. The choice between blob and dfs is crucial depending on how you plan to access your data:
Blob: Select this if your use case primarily involves standard Blob Storage operations or if you’re interacting with the storage via Azure Blob Storage APIs.
DFS: Choose this if you’re utilizing the hierarchical namespace provided by ADLS Gen2 and need to work with Azure Data Lake Storage APIs.
- Select the Virtual Network (VNet) where Databricks is deployed.
- Choose the Subnet that is designated for the Private Endpoint. Ensure this subnet does not have a network security group (NSG) that blocks the required traffic.
4. Integrate with DNS:
- Ensure that the Private Endpoint is integrated with your DNS. Azure will provide the private IP address associated with your Storage Account through the Private Endpoint. You can either manually configure your DNS settings or use Azure’s private DNS zones to automate this process.
- Review and Create:
- Review the configuration details and click Create to set up the Private Endpoint.
It is crucial to ensure that both Databricks and the Storage Account are within the same Virtual Network (VNet) or are connected via VNet Peering. This configuration allows them to communicate securely and effectively. If they reside in different VNets, you must set up VNet Peering to enable network traffic between them. Without this, the Private Endpoint configuration may not function as intended, and the services won’t be able to communicate with each other.
Creating a Private Endpoint ensures that your Storage Account is securely accessible from within your VNet, providing an additional layer of security by restricting access to the public internet.
4. Grant Access to Azure Key Vault for Azure Databricks Service
In addition to setting up the Service Principal, it is necessary to grant access to Azure Key Vault for the Azure Databricks service itself. This step ensures that Azure Databricks can retrieve secrets stored in the Key Vault, such as the Application ID, Client Secret, and Directory ID, necessary for secure authentication.
- Navigate to Azure Key Vault:
- Go to the Azure portal.
- Select the Key Vault where you have stored your secrets.
2. Grant Access:
- In the Key Vault, go to the Add role assignment section.
- Click on + Add role assignment to add role.
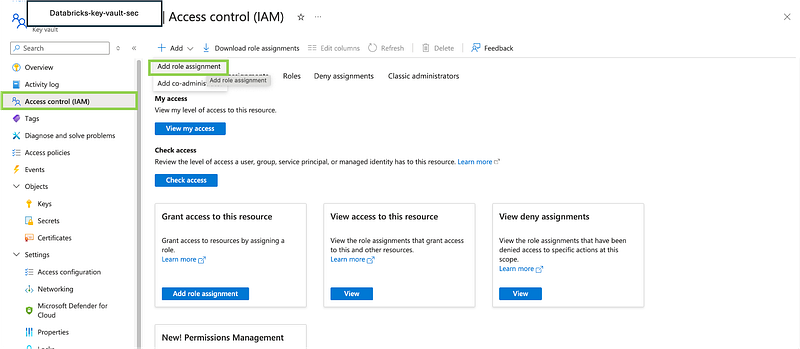
3. Configure the Role:
- Add the Permissions to the role
Key Vault Secrets Users.

- For the Principal, search for and select the Azure Databricks service using its Application ID:
2ff814a6-3304-4ab8-85cb-cd0e6f879c1d.

By granting access to the Azure Databricks service, you ensure that it can securely access the secrets stored in Azure Key Vault, which is essential for authenticating to the ADLS Gen2 Storage Account and other services.
Note:
This access is for the Azure Databricks service itself, not the Service Principal you created earlier. The Application ID 2ff814a6-3304-4ab8-85cb-cd0e6f879c1d specifically corresponds to the Azure Databricks service, ensuring that it can interact with the Key Vault as needed.

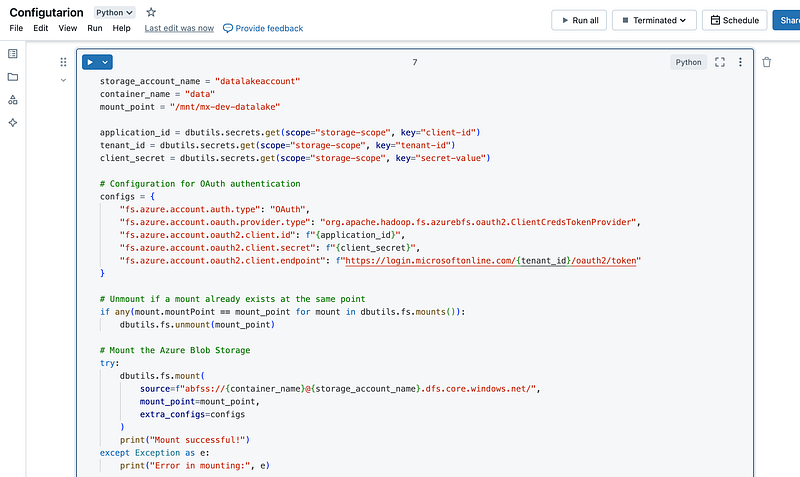
4. Mount the Azure Storage Account in Databricks
To securely mount an Azure Data Lake Storage (ADLS) Gen2 container in Azure Databricks, you’ll need to run the following Python script within a Databricks notebook. This script uses OAuth authentication with a Service Principal to access the storage account, ensuring that sensitive credentials like Application ID and Client Secret are securely managed through Azure Key Vault.
Make sure you have already set up your Databricks environment, created the necessary secrets in Azure Key Vault, and configured the service principal as described in the previous steps. Once ready, you can proceed with the steps below directly in a Databricks notebook.
- Define Configuration Variables:
Start by defining the necessary variables for mounting the storage. These include the storage account name, container name, and mount point within Databricks.
# Define the configuration variables for the mount
# storage_account_name: Name of your Azure Storage Account
# container_name: Name of the container within the Storage Account
# mount_point: The directory in Databricks where the container will be mounted

storage_account_name = "yourstorageaccount" # The path that you need
container_name = "data"
mount_point = "/mnt/mx-dev-datalake" # The path that you want

# Retrieve the Application ID, Tenant ID, and Client Secret from Azure Key Vault
# These secrets are stored in a scope called "Config-Scope-Storage-Account"

application_id = dbutils.secrets.get(scope="Config-Scope-Storage-Account", key="client-id")
tenant_id = dbutils.secrets.get(scope="Config-Scope-Storage-Account", key="tenant-id")
client_secret = dbutils.secrets.get(scope="Config-Scope-Storage-Account", key="secret-value")
2. Set Up OAuth Authentication:
Use OAuth for secure authentication by configuring the necessary settings for Azure Blob File System (ABFS). These configurations ensure that Databricks can authenticate using the Service Principal credentials stored in Azure Key Vault.
# Configuration for OAuth authentication
# This setup enables Databricks to authenticate using the Service Principal credentials.
# The configuration dictionary contains the necessary settings for the ABFS driver to connect to ADLS Gen2.

configs = {
    "fs.azure.account.auth.type": "OAuth",  # Specifies OAuth as the authentication method
    "fs.azure.account.oauth.provider.type": "org.apache.hadoop.fs.azurebfs.oauth2.ClientCredsTokenProvider",  # Uses Client Credentials for OAuth
    "fs.azure.account.oauth2.client.id": f"{application_id}",  # The Application (Client) ID retrieved from Key Vault
    "fs.azure.account.oauth2.client.secret": f"{client_secret}",  # The Client Secret retrieved from Key Vault
    "fs.azure.account.oauth2.client.endpoint": f"https://login.microsoftonline.com/{tenant_id}/oauth2/token"  # OAuth2 endpoint for the Tenant ID
}
3. Unmount Previous Mount Point (If Exists):
Before mounting the storage, check if the specified mount point is already in use. If it is, unmount it to avoid conflicts.
# Unmount if a mount already exists at the same point
# This step ensures that the mount point is available for a new mount, avoiding conflicts.

if any(mount.mountPoint == mount_point for mount in dbutils.fs.mounts()):
dbutils.fs.unmount(mount_point)4.Mount the Storage Account:
Attempt to mount the ADLS Gen2 container using the configuration settings. If successful, a confirmation message will be displayed.
# Mount the Azure Blob Storage
# This block of code attempts to mount the ADLS Gen2 container to the specified mount point in Databricks.
# The 'extra_configs' parameter is used to pass the OAuth authentication settings.

try:
    dbutils.fs.mount(
        source=f"abfss://{container_name}@{storage_account_name}.dfs.core.windows.net/",  # Source path for the ADLS Gen2 container
        mount_point=mount_point,  # Destination path in Databricks
        extra_configs=configs  # Authentication configurations
    )
    print("Mount successful!")  # Confirmation message if the mount is successful
except Exception as e:
    print("Error in mounting:", e)  # Error message if the mount fails
5. List Files in the Mounted Container:
After the mount operation, you can list the files in the container to verify that the mount was successful.
# List the files in the mounted container
# This block of code lists the files in the mounted directory to verify that the mount was successful.

try:
    display(dbutils.fs.ls(mount_point))  # Display the list of files in the mounted container
except Exception as e:
    print("Error trying to list mount path:", e)  # Error message if listing the files fails
By following these steps, you can securely mount your Azure Storage Account in Databricks, enabling direct interaction with the data stored in ADLS Gen2. This method leverages Azure Key Vault to securely manage and retrieve the necessary credentials, ensuring that sensitive information like Application ID and Client Secret is not hard-coded.

This note clarifies that the command is used to list the files within the specified container (data) of the storage account.

Conclusion
By following the steps outlined in this guide, you can set up a secure and efficient connection between your Azure Storage Account and Databricks using a Service Principal within Virtual Networks. This configuration ensures that your data is protected and adheres to best practices for cloud security.
If you have any questions or need further clarification, please don’t hesitate to reach out. I’m here to help! I apologize if some details were not covered in exhaustive depth, but rest assured that all the fundamental aspects have been addressed.
Associated articles:
What’s up with Big Data layers?: Delta Lake structure 🌊🏠🥇🥈🥉💎


