
Clone & Migrate data Between Kubernetes Clusters with Velero
Now a days Kubernetes popular type to host scalable applications & databases. Databases like Redis, Elasticsearch, MySQL & Postgres.
For above mention databases Helm charts are already available, These charts let you deploy database services on Kubernetes in a secure and reliable manner ensuring compliance with current best practices.
there might be situations where you need to migrate the data stored in database deployments to other clusters. For example, you might want to transfer a copy of your data to a separate cluster.
Assumptions and prerequisites
Making the following assumptions:
- You have two Kubernetes(K8s) clusters — a source cluster and a destination cluster — running on the same cloud provider. For this scenario using the Google Kubernetes Engine (GKE) service from Google Cloud Platform (GKE) but you can use any cloud provider supported by Velero.
- Learn about the platform velero supports.
- Kubectl CLI and the Helm package manager installed and configured to work with your both Kubernetes clusters.
If you already running DB server ElasticSearch & Redis you can directly skip to step:3.
Step 1: Deploy Redis on the source cluster and add data to it
Follow the steps below:
- Add the Bitnami chart repository to Helm:
helm repo add bitnami https://charts.bitnami.com/bitnami- Deploy Redis on the source cluster.
helm install my-release bitnami/redis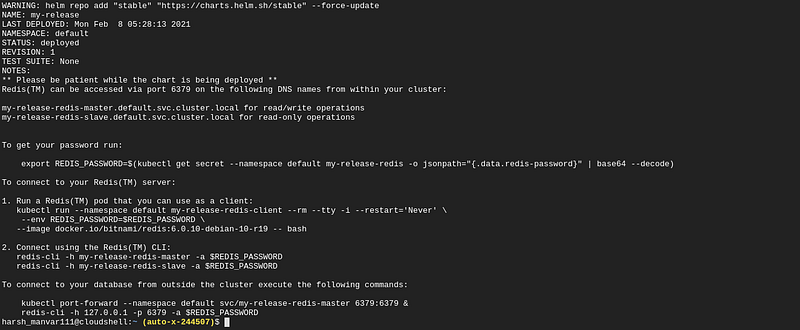
- Get the Redis database password by running the command
export REDIS_PASSWORD=$(kubectl get secret --namespace default my-release-redis -o jsonpath="{.data.redis-password}" | base64 --decode)- Create a redis client(cli) POD to connect with the Redis master
kubectl run --namespace default my-release-redis-client --rm --tty -i --restart='Never' \
>     --env REDIS_PASSWORD=$REDIS_PASSWORD \
>    --image docker.io/bitnami/redis:6.0.10-debian-10-r19 -- bash
- once authenticated into redis database add the test data into redis using redis-cli
redis> SET mykey “Hello”
"OK"redis> GET mykey
"Hello"redis> BGSAVE
Note: BGSAVE will take the snapshot of data and save it in PVC.
Step 2: Install Velero on the source cluster
To install Velero on the source cluster using the appropriate plugin for your cloud provider:
- Follow the plugin setup instructions for your cloud provider. For example, if you are using Google Cloud Platform, follow the GCP plugin setup instructions to create a service account and storage bucket and obtain a credentials file.
- Then, install Velero by executing the command below, remembering to replace the BUCKET-NAME placeholder with the name of your storage bucket and the SECRET-FILENAME placeholder with the path to your credentials file:
velero install --provider gcp --plugins velero/velero-plugin-for-gcp:v1.0.0 --bucket BUCKET-NAME --secret-file SECRET-FILENAME- You should see output similar to the screenshot below as Velero is installed:
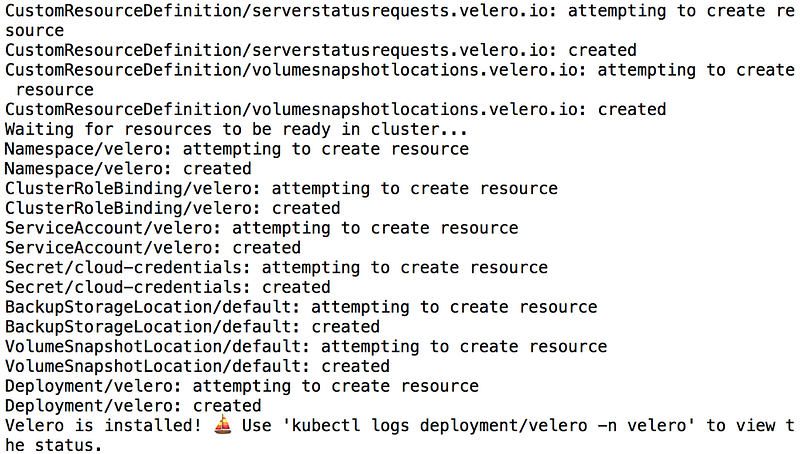
- Confirm that the Velero deployment is successful by checking for a running pod using the command below:
kubectl get pods -n velero
Step 3: Backup the persistent Redis volumes on the source cluster
Once Velero is running in a namespace, create a backup of the PVCs from the Redis deployment:
velero backup create redisbackup --include-resources pvc,pv --selector release=my-releaseIf you are also looking forward to take whole Backup restore of Redis you can run
velero backup create redisbackup --selector release=my-release
The above command will take a full backup of stateful sets configuration YAML.
Execute the command below to view the contents of the backup and confirm that it contains all the required resources:
velero backup describe redisbackup --detailsnow, our data is ready for migration (PVC, PV or full backup).
Step 4: Use the Redis volumes with a new deployment on the destination cluster
Once data backup is ready, we can now focus on migrating it to another cluster.
- Modify your context to the destination cluster (kubectl config get-contexts).
- Install Velero on the destination cluster same did previously. Remember to use the same values for the BUCKET-NAME and SECRET-FILENAME placeholders as you did, so that Velero is able to access the previously-saved backups from that BUCKET.
velero install --provider gcp --plugins velero/velero-plugin-for-gcp:v1.0.0 --bucket BUCKET-NAME --secret-file SECRET-FILENAME- Confirm that the Velero deployment is successful on destination c:
kubectl get pods -n velero- To avoid the backup data being overwritten, change the bucket to read-only mode:
kubectl patch backupstoragelocation default -n velero --type merge --patch '{"spec":{"accessMode":"ReadOnly"}}'- Confirm Velero is able to access the backup from BUCKET:
velero backup describe redisbackup --details- Restore the backed-up volumes.
velero restore create --from-backup redisbackup- Confirm that the persistent volumes have been restored on the destination cluster and note the PVC name:
kubectl get pvc


👋 Join FAUN today and receive similar stories each week in your inbox! ️ Get your weekly dose of the must-read tech stories, news, and tutorials.
Follow us on Twitter 🐦 and Facebook 👥 and Instagram 📷 and join our Facebook and Linkedin Groups 💬


