
Class conditioned diffusion models using Keras and TensorFlow
This is a followup from my previous story: Image generation with diffusion models using Keras and TensorFlow.
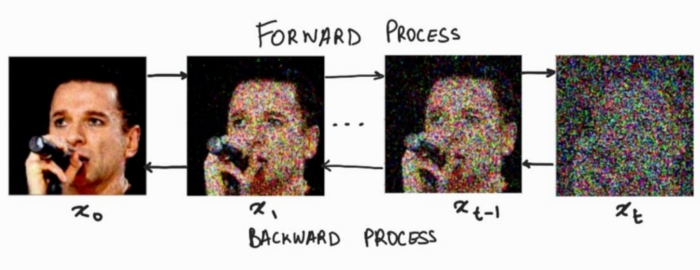
The problem with the model discussed in my story mentioned above is that using the model, we can only generate random images. Basically, images which are generated are… out of our control. So as an example, in my previous story, I used the MNIST digits dataset to train the model and every time I had the model generate an image, it just made whatever it felt like making… Lets change that.
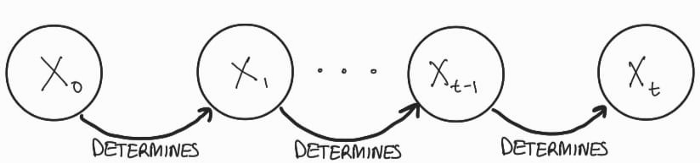
As a summary, lets quickly recap the concept of diffusion. In diffusion models, we have two phases: forward noising process q and backward denoising process p.
For the forward noising process q, we define a Markov Chain for a predefined amounts of steps, say T. Which takes an image and adds small amounts of Gaussian Noise to the image according to a variance schedule: β0, β1, … βt. Where β0 < β1< … < βt.
A Markov chain is a chain of events in which an event is only determined by the previous event.
At every step in the forward process, we add small amounts of noise to the image sampled from the Gaussian distribution ’N’. The forward noising process can be summarized in these formulae:
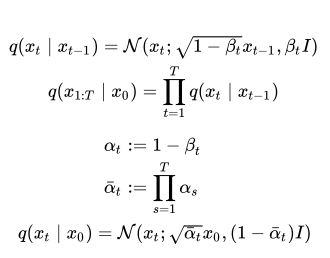
During the backward denoising process, we use a auto-encoder like model(in our case a modified version of U-Net) to predict what noise was added at what time step to the image. The backward denoising process can be summarized in this formula:

Also, one thing to note is that, we will only be focusing on using the DDPM approach to training and inference in this story.
A lot of the code in this story is the same from my previous story, so feel free to skip to the important bit here.
Lets start with the setup of our code. Here are the dependencies and imports
!pip install tensorflow
!pip install tensorflow_datasets
!pip install tensorflow_addons
!pip install einopsLets load our dataset, we will use the same MNIST digist dataset.
As per the description of the forward diffusion process, we need to create a fixed beta schedule. Along with that let us also setup the forward noising process and timestamp generation.
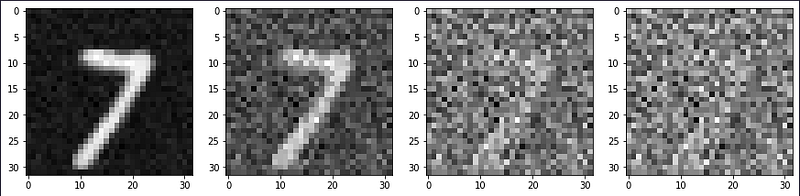
now lets visualize the forward noising process.
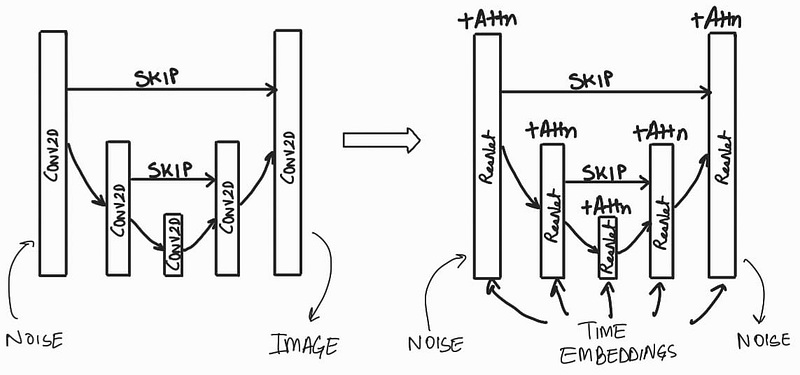
Class conditioning the U-Net model:
As discussed in my previous story, we use a modified version of U-Net that used ResNet layers, time embeddings, and Attention Layers. Here’s a visual summary:
The thing that we have to figure out is how to encode the information from the class label in the model. Think about it for a second….
Well… we can use an approach used in Conditional GAN where we basically encode the class label via an embedding layers. Once we have the class label as class embedding, we can pass it through a dense layer followed by a reshaping step.
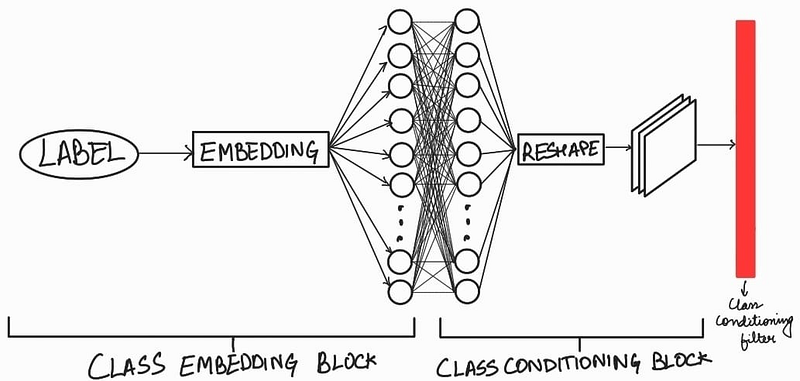
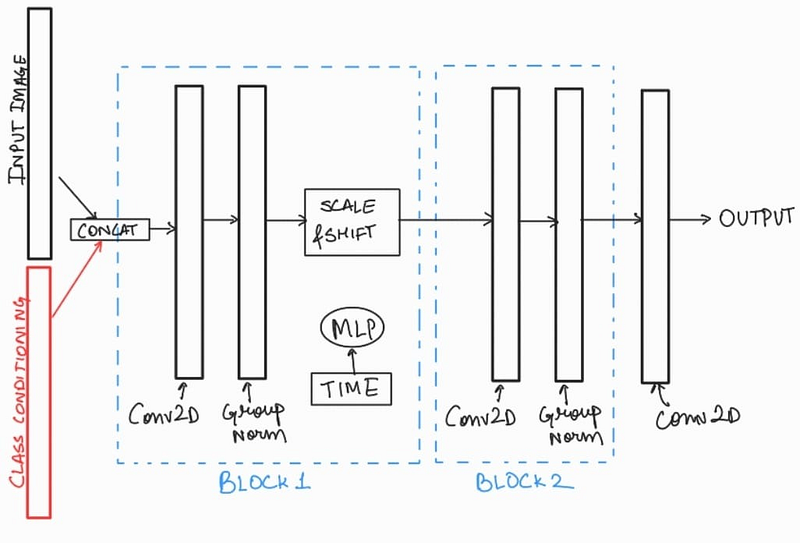
Note that there is only one ‘Class Embedding Block’, while there are multiple ‘Class Conditioning Blocks’. Let’s see how we can incorporate the ‘class conditioning filter’ within the model. For this, we have to zoom in to see what is in the ResNet layer.

We can include the class conditioning filter with the input image in the beginning of the block along with the input image, like:
Well now that we have a way to include class labels with the input image, lets write the code for this
- Helper modules:
2. Building Blocks of the U-Net model: Just like in my previous story, we will use the same mechanism to incorporate time embeddings with the ResNet layer. Apart from that, we also need a new layer that will help us with creating Class Conditioning.
3. Class Conditioned U-Net model:
Once, we have defined our U-Net model, we can now create an instance of it along with a checkpoint manager to save checkpoints during training. While we are at it, lets also create our optimizer. We will use the Adam optimizer with a learning rate of 1e-4.
Just like last time, the loss function is defined as:

Which is basically Mean Squared Error.
For the training process, we will use the algorithm from my previous story: 1) Generate a random number for the generation of timestamps and noise. 2) Create a list of random timestamps according to the batch size 3) Run the input images through the forward noising process along with the timestamps. 4) Get the predictions from the U-Net model using the noised image, the timestamps and the class labels. 5) Calculate the loss between the predicted noise and real noise. 6) Update the trainable variables in the U-Net model. 7) Repeat for all training batches.
Once we train our model, we will use the same inference algorithm discussed in my previous story:

Here xt is a random sample, which we pass through our U-Net model and obtain Є_θ, then we calculate xt-1according to the formula:

As last time, lets create a helper function that will create and safe a gif.
Now lets make our backward denoising algorithm using the DDPM approach.
Now for inference, lets create a random image using the function defined above along with a class label.
And here’s the output (Note that we passed the class label as ‘3’):
Here’s another sample output from class label of ‘4’:

With that we are done with conditional diffusion models.
*edit: update the unet instantiation section where there was a bug. Changed “in_res=64” to “in_res=32”*
What next now???
I am currently working on implementing a model similar to that of GLIDE, of course using TensorFlow… I will update this story once that is done.
What to connect? Please write to me at [email protected]


