
CI/CD for Docker Fargate Deployment with AWS Services 🚀 — Part 4
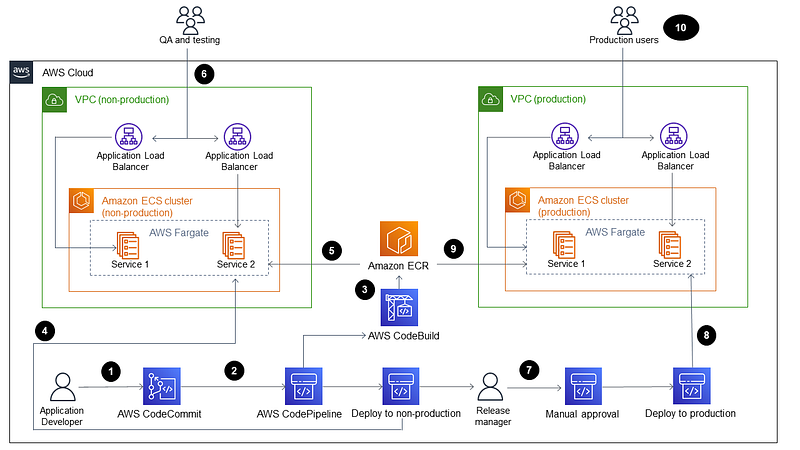
In this tutorial, we’ll walk through the process of setting up a Continuous Integration and Continuous Deployment (CI/CD) pipeline for deploying Spring Boot microservices using AWS services. This pipeline will automatically build and deploy your code whenever you push changes to your AWS CodeCommit repository.
Understanding CI/CD:
- Continuous Integration (CI): Developers merge their code changes into a central repository regularly. Automated builds and tests are then run to ensure code quality.
- Continuous Delivery (CD): Code changes are automatically prepared for release to production.
- Continuous Deployment: Code changes are automatically deployed to production without manual intervention.
1. Setting up AWS CodeCommit:
1.1 Creating a New Repository:
- Navigate to the AWS CodeCommit console.
- Click on “Create repository”.
- Name your repository
product-springboot-microservices. - (Optional) Add a description and tags for better organization.
- Confirm by clicking “Create repository”.
Once you have created a new code repository in AWS CodeCommit and installed Git on your computer, you can start uploading the code to the repository.
1.2 Granting User Permissions:
- Go to the IAM console.
- Under the “Users” tab, select the user you wish to grant permissions to.
- Navigate to the “Permissions” tab and click “Add permissions”.
- Search for the
AWSCodeCommitPowerUserpolicy and select it. - Review and confirm the permissions.
1.3 Generating Git Credentials:
- In the IAM console, under the “Users” tab, select the user.
- Navigate to the “Security credentials” tab and click “Create access key”.
- Download the access key file for future reference.
1.4 Pushing Code to CodeCommit:
- Install Git (if not already installed).
- Open a terminal and navigate to your code directory.
- Clone the CodeCommit repository:
git clone https://git-codecommit.ap-southeast-1.amazonaws.com/v1/repos/product-springboot-microservices4. Make and commit the code changes:
git add . git commit -m "Your commit message"5. Push the changes:
git push
2. Setting up AWS CodeBuild:
The build project will use the CodeCommit repository to get the source code, build a Docker image, and push the Docker image to the Elastic Container Registry service.
2.1 Creating the Build Project:
- Navigate to the CodeBuild console and click “Get started”.
- Name the build project and select the source provider and repository.
- Choose the build environment and enable the privilege checkbox.
- Create a service role for CodeBuild and skip additional configurations.
- Use a build spec file for build instructions and define environment variables.
2.2 Build Spec Configuration:
Your build spec file (buildspec.yml) should look like this:
version: 0.2

phases:
  pre_build:
    commands:
      - echo Logging in to Amazon ECR...
      - aws --version
      - aws ecr get-login-password --region $AWS_DEFAULT_REGION | docker login --username AWS --password-stdin $AWS_ACCOUNT_ID.dkr.ecr.$AWS_DEFAULT_REGION.amazonaws.com
      - COMMIT_HASH=$(echo $CODEBUILD_RESOLVED_SOURCE_VERSION | cut -c 1-7)
      - IMAGE_TAG=${COMMIT_HASH:=latest}
  build:
    commands:
      - echo Build started on `date`
      - mvn clean package
      - echo Building the Docker image...
      - docker build -t $REPOSITORY_URI:latest .
      - docker tag $REPOSITORY_URI:latest $REPOSITORY_URI:$IMAGE_TAG
  post_build:
    commands:
      - echo Build completed on `date`
      - echo Pushing the Docker images...
      - docker push $REPOSITORY_URI:latest
      - docker push $REPOSITORY_URI:$IMAGE_TAG
      - echo Writing image definitions file...
      - printf '[{"name":"%s","imageUri":"%s"}]' $CONTAINER_NAME $REPOSITORY_URI:$IMAGE_TAG > imagedefinitions.json
artifacts:
    files: imagedefinitions.json
In the pre-build phase, log into Amazon Elastic Container Registry (ECR), and initialize some environment variables.
In the build phase, we use Maven commands to build and package the product service application, and Docker commands to build and tag a Docker image.
In the post-build phase, we push the Docker image to Amazon ECR and create a special file called imagedefinitions.json. This file will contain the name of your application container and the repository URI of your Docker image.
2.3 Granting Permissions to Service Role:
- In the CodeBuild console, open your build project.
- Navigate to the “Build Details” tab and scroll to the “Environment” section.
- Click on the “Service role” link and attach the
AmazonElasticContainerRegistryPowerUserpolicy.
A service role is a role that CodeBuild assumes to perform actions on your behalf. In this case, you granted the service role permission to access the Amazon Elastic Container Registry (ECR). This permission is necessary for CodeBuild to push Docker images to ECR.
3. Setting up AWS CodePipeline:
3.1 Creating the Pipeline:
- Navigate to the CodePipeline console and click “Create Pipeline”.
- Name your pipeline, select a service role, and configure the artifact store.
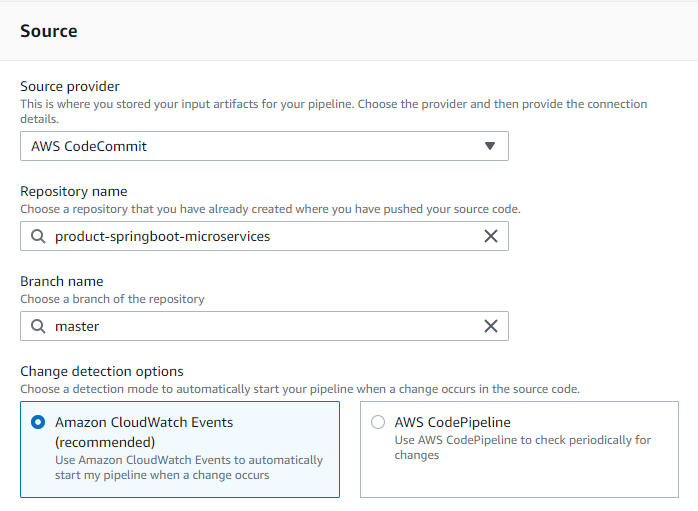
- Configure the source stage by selecting your CodeCommit repository and branch.
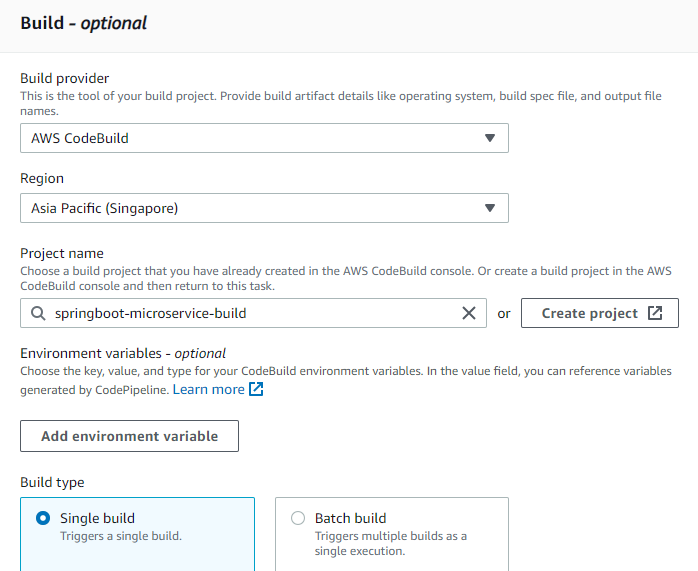
4. Configure the build stage by selecting CodeBuild and your build project.
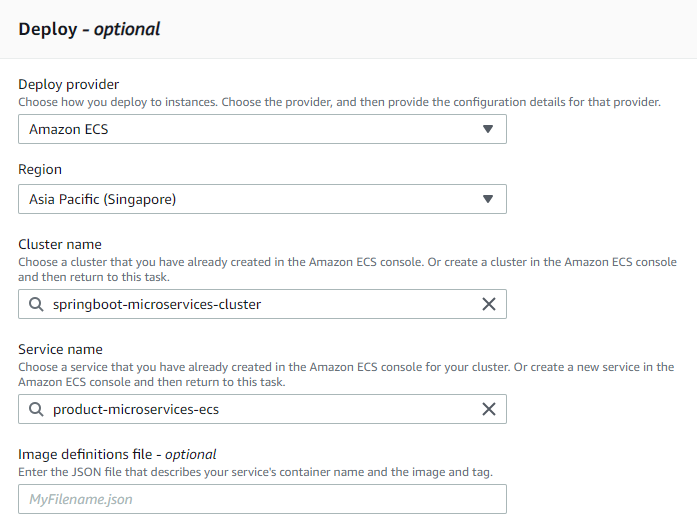
5. Configure the deploy stage by selecting Amazon ECS and specifying the cluster and service details.
6. Review and create the pipeline.
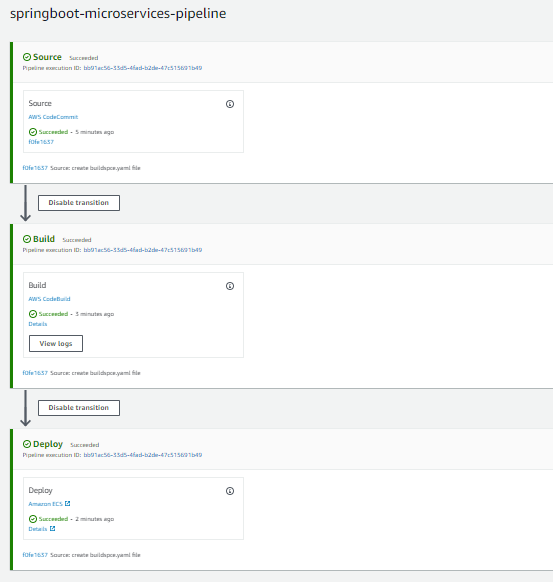
Once the pipeline is created, it will automatically start when you push a new commit to the source code repository. The pipeline will then build and deploy the code to the ECS cluster.
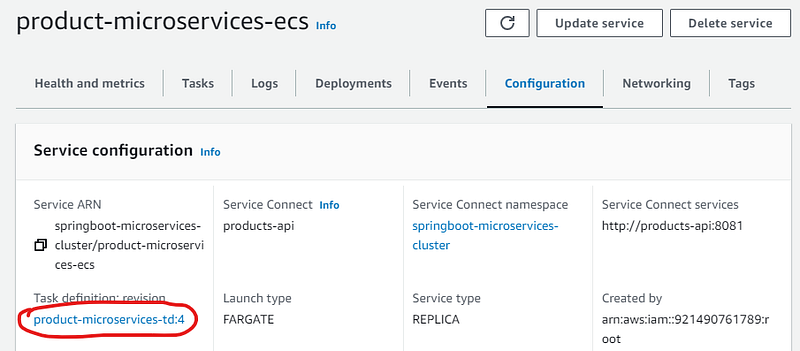
When you navigate to the ECS (Elastic Container Service) dashboard, you’ll observe that the revision number for the task definition has been updated. This indicates that our CI/CD pipeline has successfully executed and deployed the changes.
4. Handling Multiple Environments (Dev, UAT, Prod):
- Branching Strategy: Use separate branches for each environment in your CodeCommit repository.
- Pipeline Strategy: Create separate pipelines for each environment in CodePipeline.
- Environment Variables: Use environment-specific variables in your buildspec and deployment configurations.
- Approval Stages: For
uatandprodenvironments, add manual approval stages in CodePipeline to ensure quality control.
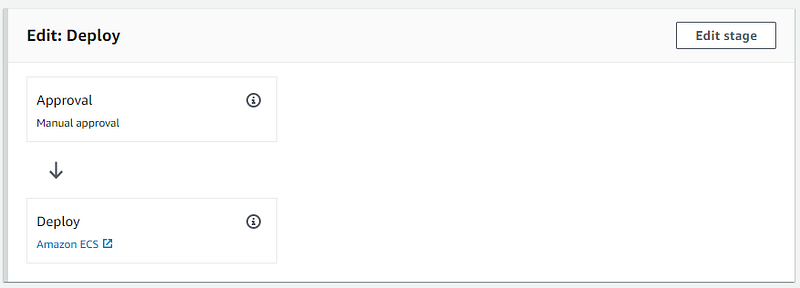
To create a manual approval action in the deploy stage of a CodePipeline pipeline:
2. Add an Approval Action:
- Inside the
Deploystage, click on the “+” icon to add an action group. - For “Action name”, you can enter something descriptive like “ReviewChanges”.
- For “Action provider”, select
Manual approvalfrom the dropdown list. - (Optional) You can add any additional details or custom URLs for reviewers in the
URL for reviewfield. This can be a link to documentation, testing guidelines, etc. - (Optional) In the
Commentfield, you can provide additional instructions for the approvers.
2. Notification Settings:
- If you want to be notified when approval is pending, you can set up Amazon SNS notifications.
- Click on the “Edit” button in the “Notification” section.
- Choose an SNS topic or create a new one.
- Once set up, you’ll receive notifications when an approval action is pending.

When the pipeline runs and reaches the Deploy stage, it will pause. You (or the designated approver) will need to manually click on the “Review” button in the pipeline. You can then choose to “Approve” or “Reject” the changes. If approved, the pipeline will continue to the next stage. If rejected, the pipeline will stop.
Happy coding! 🎉
- Leave a comment if you have any questions.
- Clap if you find this tutorial helpful.
- Follow me to get notified when I publish new tutorials.
- Buy me a coffee to support me.
In Plain English
Thank you for being a part of our community! Before you go:
- Be sure to clap and follow the writer! 👏
- You can find even more content at PlainEnglish.io 🚀
- Sign up for our free weekly newsletter. 🗞️
- Follow us on Twitter(X), LinkedIn, YouTube, and Discord.


