
Caching in the Android Build Process

Table of Contents
- What is Gradle?
- The build directory and incremental builds
- Gradle build cache
- Android Studio system cache
- Android Gradle Plugin build cache
- Additional resources
So what is Gradle?
Android Studio includes a powerful code editor and developer tools but rather than reinventing the wheel and managing a project’s build process as well, it delegates to an existing build automation tool: Gradle. At a high level, Grade’s build process includes compiling your source code into Dalvik bytecode (.dex files) and compiled resources, then combining the compiled files into an APK, and finally signing the APK. Each step is configurable, and all the Gradle-related files you see in an Android project — build.gradle, gradle.properties, etc — are used to customize and configure the project’s build.
Gradle is flexible enough to build almost any type of software, and can be used for specific project types by adding a layer of conventions and prebuilt functionality through plugins. Android Studio uses the Android Gradle plugin, which adds features specific to the app build process. For example, you probably have a buildTypes block in your project’s build.gradle file, which doesn’t exist in the base Gradle API but is used by the Android Gradle plugin to support building different versions (debug, release, etc) of your app from a single project.
You can see which version of Gradle you’re using by looking at the dependencies block in your root-level build.gradle:
dependencies {
    classpath ‘com.android.tools.build:gradle:<GRADLE_VERSION>’
}
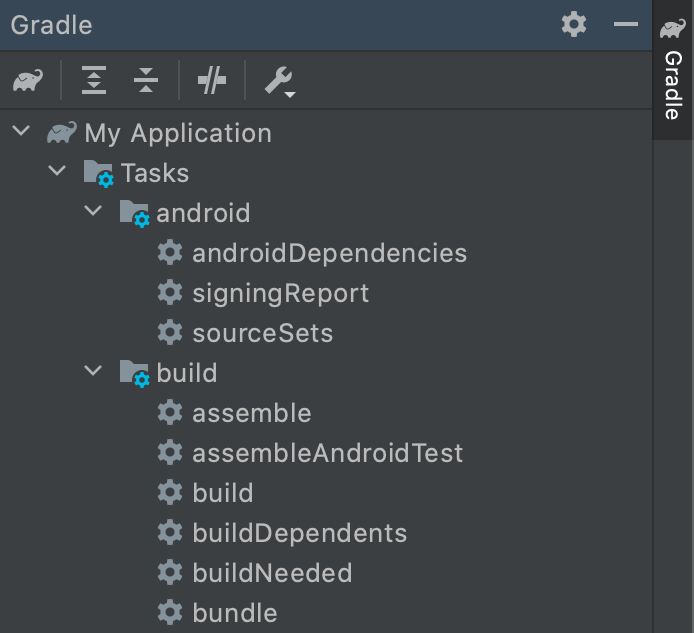
Since Gradle and the Android plugin run independently of Android Studio, you can build and run your app from the command line as well, by using various ./gradlew <TASK> command-line commands. In Gradle, a task represents one piece of work you may do on a project, for example running tests (./gradlew test) or generating Javadoc (./gradlew javadoc). They can have dependencies on other tasks. You can see all the tasks available for your project by opening the Gradle panel located on Android Studio’s top right:
The interplay of code editing happening in Android Studio and app building being delegated to Gradle means there are three caching mechanisms used during the build process — the build directory, the Gradle cache, and the Android Studio system cache. This article will go over each mechanism, how they may cause build errors, and how to fix the errors.
The build directory and incremental builds
What it does
You’re probably already familiar with the build directory, which is generated whenever you build your app. The file in this directory that you will usually be most interested in is the APK file (or AAR or JAR if it’s a library module) inside the “outputs” folder, but other files created during the build process will also appear here, including any code files generated by annotation processors such as Dagger or Room, or the results of any linters you use.
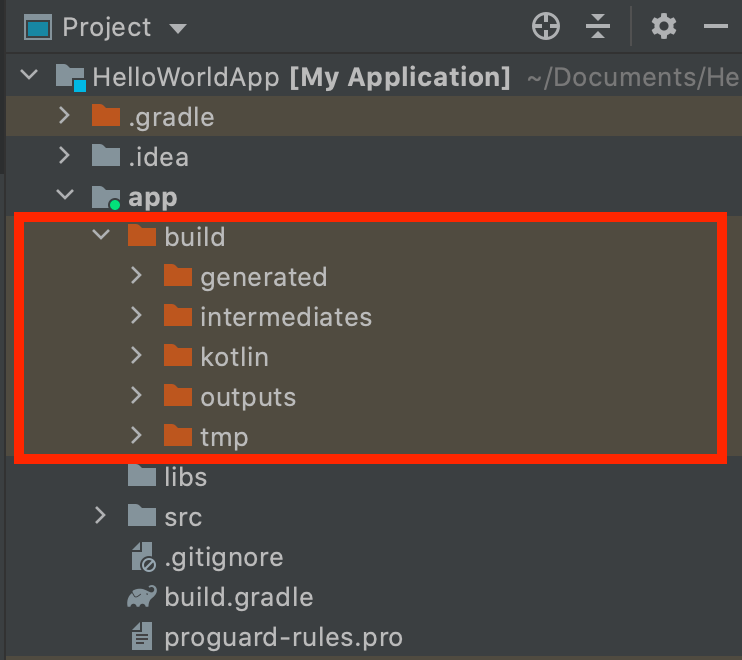
The build directory usually appears at the root level of your project, although you can change where it shows up by configuring the buildDir in your root build.gradle file:
allprojects {
    buildDir = “/path/to/build/${rootProject.name}/${project.name}”
}
There are multiple Android Studio menu options that generate the build directory, including “Run ‘app’”, “Rebuild Project”, and “Build APK(s)”. You can also use ./gradlew assembleDebug to generate it from the command line, which runs Gradle’s assembleDebug task.
By default, Gradle uses the incremental build feature when building an Android project. This means that, before running a task, Gradle will check whether the input files have changed from the previous build. If they haven’t, it’ll reuse the output from the previous build rather than rerun the task to generate new output. In other words, Gradle uses the generated build directory as a cache, cutting down build times significantly. You can get the full benefits of this by using incremental annotation processors whenever possible. For example, if you use Room as your database library, it’s recommended that you enable its incremental annotation processing, which you can do by adding the following to your app-level build.gradle:
android {
    ...
    defaultConfig {
        ...
        javaCompileOptions {
            annotationProcessorOptions {
                arguments = [“room.incremental”:”true”]
            }
        }
    }
}
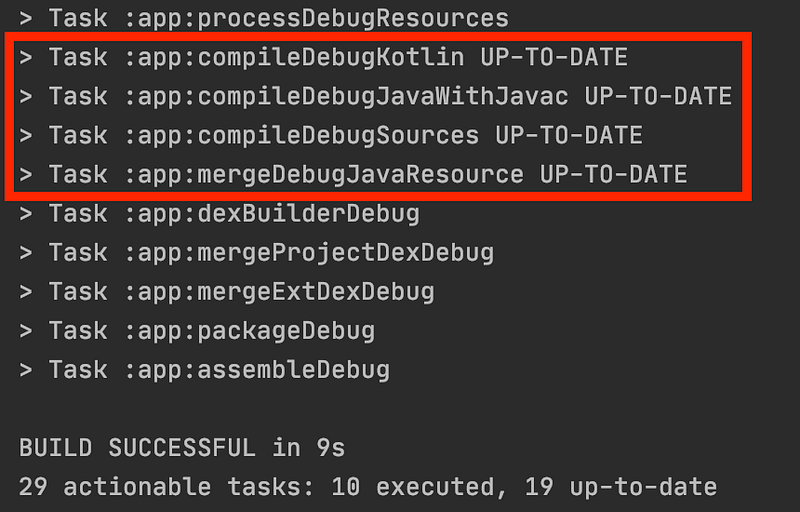
When you see “UP-TO-DATE” beside a task name, it means Gradle is reusing the existing build outputs rather than rerunning the task.
When and how to clear it
Unfortunately, Gradle sometimes misses code changes in input source files. For instance, you can run into problems where you updated Dagger code or a resource file but Gradle didn’t notice, and tries to reuse invalid output files from a previous build, causing the build to fail. Two common errors are “Error converting byte to dex” and “R.layout.main Cannot Be Found/Cannot Resolve Symbol R”, meaning Android Studio is having trouble generating the R.java file for resources.
When you see a build failure that mentions a generated file from the build directory, doing a clean build is a good first step. You’ll have to run Gradle’s “clean” task, which deletes the entire build directory. This is what Android Studio’s “Build” -> “Clean Project” menu option does. The command-line equivalent is running ./gradlew clean.
The Gradle build cache
What it does
The Gradle build cache was introduced in 2017 in Gradle 4.0 and is a separate mechanism from the build directory. Since the build directory lives inside your project’s workspace, it can only be used as a cache for your current project, on your local machine. The build cache, on the other hand, stores task outputs in a local or remote build cache rather than the project workspace. By default, it’s located at ~/.gradle/caches. It’s shared between any Gradle projects you work on, allowing Gradle to reuse task outputs from any earlier build of any other projects. An example where this is useful is if you have multiple projects that depend on the same external library — once Gradle downloads it while building one project, it’ll be available when Gradle builds the other project as well.
Even if you’re only working with a single Android project, the build cache can improve build times. For example, when you are switching branches back and forth, the task outputs get rebuilt over and over again, since their inputs are slightly different between different branches. Incremental builds aren’t too helpful in this case since they only cache the outputs from the most recent build. The build cache remembers the earlier build outputs, and greatly reduces the need to rebuild things when they have already been built locally several builds prior.
If you’re working on a project with a team, you can also share a remote build cache using Gradle Enterprise. This means your build may use your teammates’ build outputs instead if they’re more up-to-date than yours. A remote cache can speed up your continuous integration builds, too.
The Gradle build cache can be enabled or disabled by adding the org.gradle.caching=true/false to your gradle.properties.
When and how to clear it
The downside of using the build cache is that since it can use cached files outside of the build directory inside your project, cleaning the project no longer guarantees it’s being built from scratch; even with the build directory deleted, you can still encounter build errors caused by stale cached files.
To bypass the build cache, you can use the --no-build-cache flag. If a clean wasn’t enough to fix your build errors, try running ./gradlew clean assembleDebug --no-build-cache from the command line to both delete the local build folder and skip the Gradle cache.
Unfortunately, there’s no Android Studio menu option for bypassing the build cache on a build.
You can also delete the cache by running rm -rf $HOME/.gradle/caches/.
Android Studio system cache
What it does
The Android Studio system cache is what gets invalidated when you click “Invalidate Caches / Restart”.
Android Studio uses it to store information about the project structure, and it’s unrelated to Gradle and the build process. Other Jetbrains IDEs use a similar cache. Generally, the Android Studio cache improves IDE performance, but over time, more and more files get cached and the cache may become overloaded. It may also store things that you never need again, for example information about a short-term project that you’re no longer working on. Note that the cache files don’t actually get deleted until Android Studio restarts.
When and how to clear it
Since the Android Studio cache stores project structure information, it can get confused if you move files around or create new XML files. You may run into errors in the code editor as a result; common ones are “Unresolved reference” and “Cannot resolve symbol”.
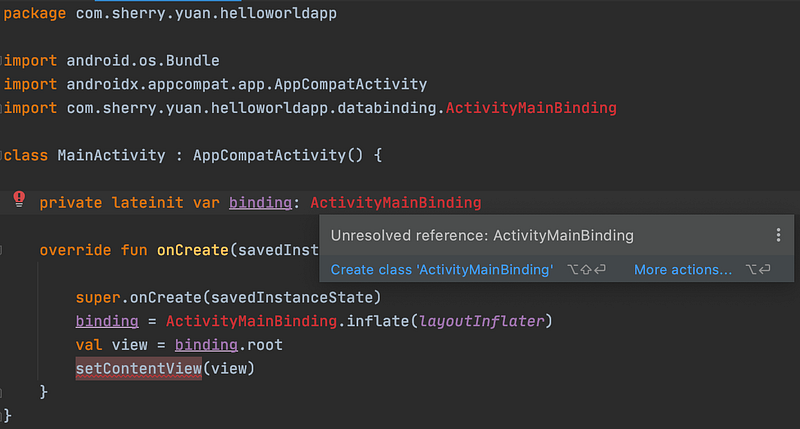
I’d recommend trying to rebuild the project first, since sometimes that will resolves the error and is much faster than clearing any caches. But if a rebuild doesn’t help, an “Invalidate Caches / Restart” is the way to go. I encounter these errors a lot when using ViewBindings; Android Studio sometimes misses changes in the dynamically generated bindings files.
Similarly, if you encounter a build failure after you’ve moved files around, the root cause may be stale information in the Android Studio cache rather than the Gradle caches.
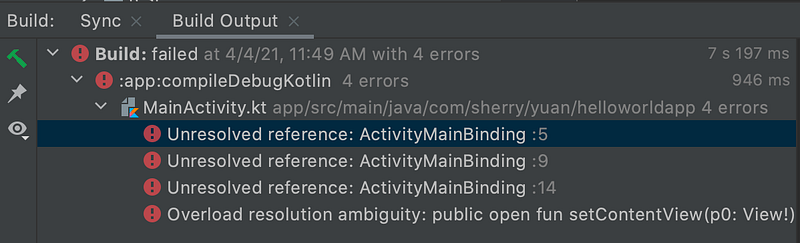
Another example of this that you may have seen before is “R.layout.main Cannot Be Found / Cannot resolve symbol R”.
What about the AGP build cache?
While doing research for this article, I came across many mentions of the Android Gradle plugin (AGP) build cache. Many of them linked to this lovely 404 page. I did some digging around and learned that it was introduced in AGP 2.3, but removed in AGP 4.1 in August 2020 because the AGP build cache was superseded by the Gradle build cache. You may see mentions of the Gradle cleanBuildCache task and the android.enableBuildCache Gradle property, but both are considered deprecated. In fact, android.enableBuildCache=true/false has no effect anymore, and the --no-build-cache flag and org.gradle.caching=true/false property should be used instead.
Additional resources
- Gradle for Android and Java is a free Udacity course that covers how the Gradle build tool compiles and packages apps and how to write tasks to customize the build process
- Understanding Different Gradle Caches for Android Projects does a deep dive into the Gradle caches and examines their performance benefits