
A Simple Guide to The (New) ChatGPT API with Python
ChatGPT API was just released. Explore everything you can do with the ChatGPT API in Python.
OpenAI just released ChatGPT API. This is an API that calls gpt-3.5-turbo, which is the same model used in the ChatGPT product.
For those already familiar with the OpenAI API in Python, learning how to use the ChatGPT API should be simple, but there are still some concepts that are exclusive to this API that we’ll learn in this guide.
Let’s explore the ChatGPT API in Python.
Note: The API is priced at $0.002 per 1K tokens. You have free credit to use, though. It seems now I have another reason to cancel my ChatGPT Plus subscription.
Generate Your API Key
Before we start working with the ChatGPT API, we need to login into our OpenAI account and generate our API keys.
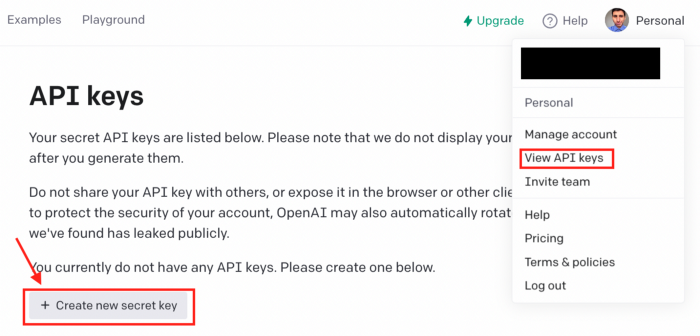
Remember that OpenAI won’t display your secret API key again after you generate it, so copy your API key and save it. I’ll create an environment variable named OPENAI_API_KEY that will contain my API key for this tutorial.
Installing the library
To work with the ChatGPT API, first, we have to install the openai library by running the following command.
pip install openaiThere are a lot of things you can do with the OpenAI library, but today we’re going to focus on the Completion endpoint. To be more precise, we’ll use “ChatCompletion” gpt-3.5-turbo, which is the same model used by ChatGPT.
Let’s get started! In case you don’t feel like reading, you can also watch my tutorial below.
Getting started with the ChatGPT API with Python
To get started, we’re going to use the code snippet below that I got from the official documentation.
import os
import openai
openai.api_key = os.getenv("OPENAI_API_KEY")
completion = openai.ChatCompletion.create(
model="gpt-3.5-turbo",
messages=[
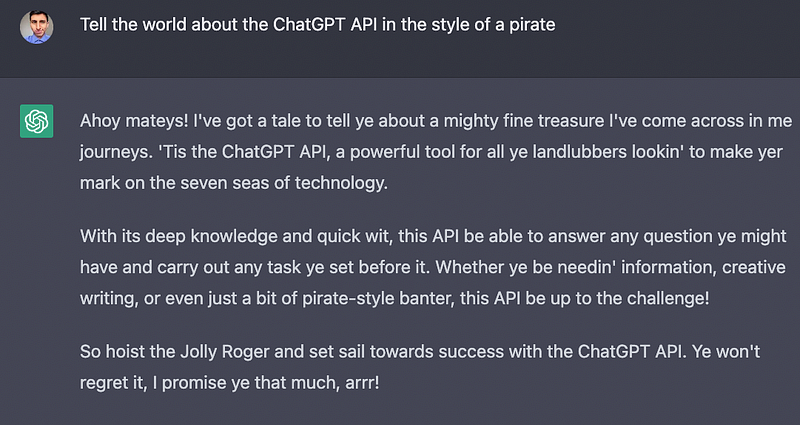
{"role": "user", "content": "Tell the world about the ChatGPT API in the style of a pirate."}
]
)
print(completion.choices[0].message.content)This is a very simple way to interact with the API. The main thing to know is that the messages list has a dictionary with 2 keys: roles and content.
The content is simply the content of the message, while there are three main roles : “system”, “user”, or “assistant”. The “user” is the one who gives the instructions and is being used in the code above.
If we run the code above, we’ll get the following.
Ahoy matey, ye be lookin' for a chat API that'll blow ye away? Look no further than ChatGPT API ye ol' sea dog!
With ChatGPT API, …
This is the same as asking ChatGPT “Tell the world about the ChatGPT API in the style of a pirate.”
Now, the code snippet we took from the docs is very basic, we can add more code to interact with the API as if we were chatting with ChatGPT. Also, we should add the system role to set the behavior of the assistant and the assistant role to store prior responses.
System Role
Let’s add a system role to set the behavior of the assistant. You can tell the assistant to be a “helpful assistant that translates English to French” or anything you want.
To make it simple, I’ll set the system role to be a “kind helpful assistant” through the messages list (on my YouTube video, I made ChatGPT behave as a recruiter in a job interview)
messages = [
 {"role": "system", "content" : "You’re a kind helpful assistant"}
]
Now I’m going to append the users role to the previous list and add the input function in order to interact with the API as if we’re working with ChatGPT.
import openai
content = input("User: ")
messages.append({"role": "user", "content": content})
completion = openai.ChatCompletion.create(
model="gpt-3.5-turbo",
messages=messages
)
chat_response = completion.choices[0].message.content
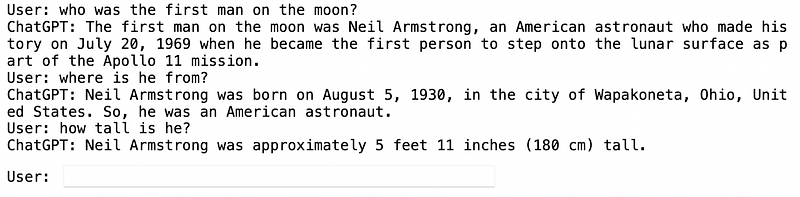
print(f'ChatGPT: {chat_response}')Now if we ask “who was the first man on the moon?” the system will behave as a “helpful assistant and tells us the answer”

There’s only one little detail, though. The assistant isn’t storing the previous responses, so the system might not remember our previous responses and give us a proper response.
Let’s now ask “where is he from?” and then “how tall is he?” I will now add a while loop to ask multiple questions.
As you can see, now the system is answering each new question, but it’s accumulating the information from the previous replies.
We can solve this issue with the assistant role.
Assistant Role
We use the assistant role to store prior responses. By storing previous responses, we can build a conversation history that will come in handy when user instructions refer to prior messages.
With the code below, we add the assistant role to our messages list.
messages.append({"role": "assistant", "content": chat_response})Note that in the content we have to add the chat_response in order to store the responses.
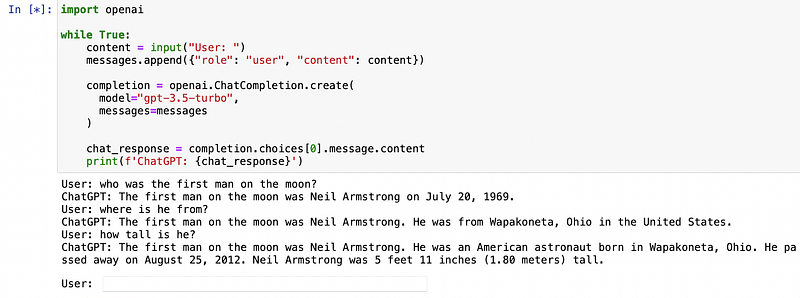
Now we add the previous line of code to our while loop.
import openai

while True:
    content = input("User: ")
    messages.append({"role": "user", "content": content})

    completion = openai.ChatCompletion.create(
      model="gpt-3.5-turbo",
      messages=messages
    )

    chat_response = completion.choices[0].message.content
    print(f'ChatGPT: {chat_response}')
    messages.append({"role": "assistant", "content": chat_response})
Now if we ask the same question we asked before, we’ll get better responses.
And that’s it! Now you know how to work with the 3 roles, you can use the API as you want. Besides the model and messages in the request body, you can also add other parameters to customize your request.
Here are some extra parameters:
max_token: The maximum number of tokens to generate in the completion (here you can see the tokenizer that OpenAI uses)temperature: The sampling temperature to use. Values close to 1 will give the model more risk/creativity, while values close to 0 will generate well-defined answers.n: The number of chat completion choices to generate for each input message.
To see all the parameters available, go to the official documentation.
Join my newsletter with 20K+ people to get my free ChatGPT cheat sheet.
If you enjoy reading stories like these and want to support me as a writer, consider signing up to become a Medium member. It’s $5 a month, giving you unlimited access to thousands of Python guides and Data science articles. If you sign up using my link, I’ll earn a small commission with no extra cost to you.


