
Building RAG-Based Chatbots Part 3: Semantic Search
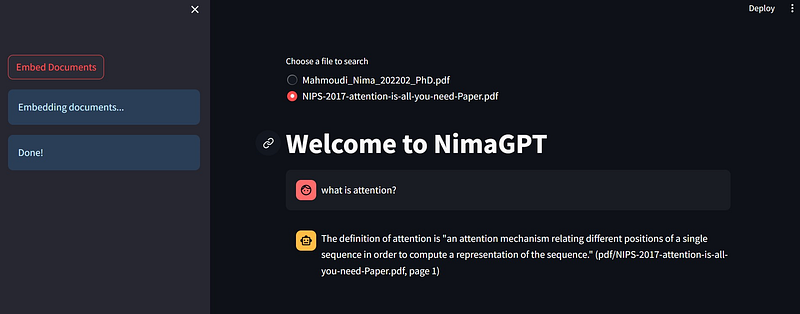
In this tutorial, we’ll be building a simple chatbot that helps you interact with the contents of a given file. This is part 3 of a multi-part tutorial where I explain the concept of Retrieval-Augmented Generation (RAG), the state of LLMs, and how to build and deploy applications with them. In part 1, I explained the main concepts around RAG-base chatbots and shared the code template for this tutorial with you. In part 2, we discussed how to create the index used when generating the responses so that you can replace the content with your own and some concepts around it. In this part, I wanted to expand a bit more on semantic search and how it works.
A Quick Recap
In the previous article in this tutorial series, we explained how to create a vector index from your own content and use it in our code template. But to recap, one issue we run into when augmenting LLM’s knowledge with our content is the limited space we have in the context window. To get around this limitation, we’ll need to find the most relevant pieces of content to the query we’re trying to answer. Semantic search is the default method of choice for retrieving the most relevant pieces of content in RAG applications. The following diagram shows what the overall process looks like.

Now that we re-iterated the importance of semantic search, let’s talk about what it is and how it works.
What is Semantic Search?
Semantic search is a searching capability that includes understanding the meaning of the query searched by the user or the intent behind it. This is in contrast with keyword search where we try to look for how many times exact words in the query appear in the content. This helps alleviate a lot of pain points when searching the content. The user might misspell words, write them in different accents (e.g., behavior vs behaviour), or use different words with similar meanings. We want our search to still surface the content that is most relevant to the user’s intent and semantic search helps with that.
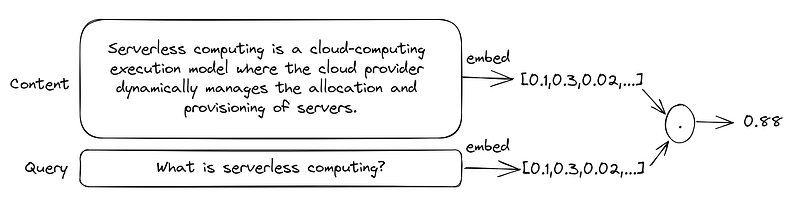
From a high-level view, you can use OpenAI’s embedding API to convert a given text to a normalized 1536-dimensional vector that acts as a numerical representation of the meaning of the text. You can then use this vector to compare it to vectors extracted from other text chunks, and the text chunks that are more similar in meaning will hopefully end up having embedding vectors that are closer to each other.
How do we measure how close two vector embeddings are?
So far, we have extracted embedding vectors from pieces of content as well as the user’s question. The next step is to find the closest vectors to find the most relevant content to inject into our prompt. There are a few ways to do that, but the most well-known methods are inner product, cosine similarity, and L2 distance. Let’s quickly go over their definition and then compare them.
The inner product of two vectors is defined as the following:

Cosine similarity is a measure of the angle between two vectors.

And L2 distance (or Euclidean distance) is defined as follows:

Among these three methods, cosine similarity is the one most used in the literature, however, OpenAI’s embeddings have a special property that becomes important here: they are normalized, meaning they have a length of 1:

This means that cosine similarity reduces to the inner product of the two vectors (which is faster to calculate), so there is no need to do the extra computations needed for cosine similarity.
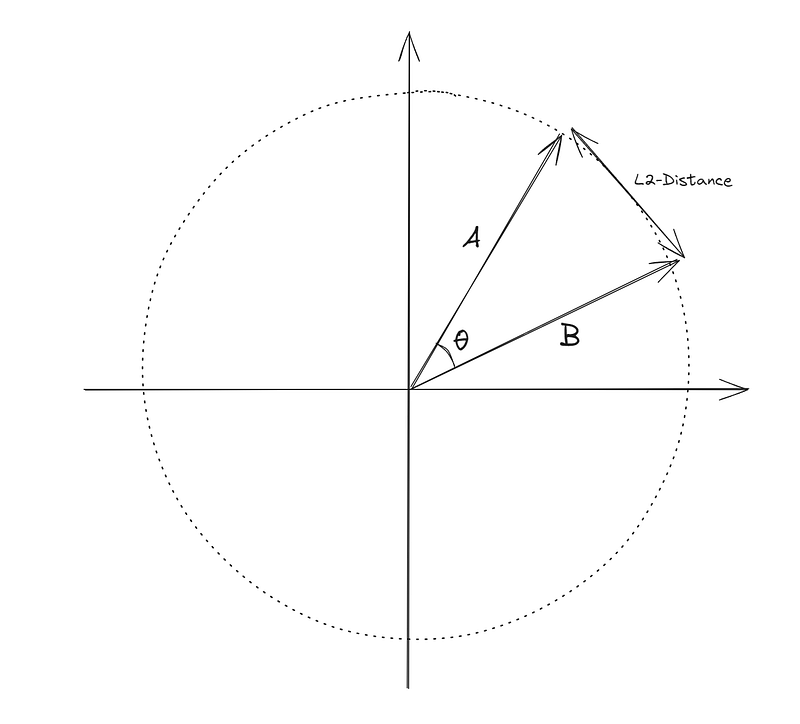
Another important point is that ranking content based on L2 distance will give you the same results as cosine similarity. This one is a bit harder to prove, so I suggest googling it if you are curious (or just ask ChatGPT to give you the proof), but intuitively it makes sense when you imagine a 2-D space. If you imagine all possible L2-normalized vectors in 2 dimensions, they form a circle. Now if you imagine any two vectors that go from the origin to a point on this circle, the closer they are (L2 distance), the smaller the angle between them (θ) and thus they have a larger cosine similarity. The following diagram might help you visualize this:
So basically in the specific case of OpenAI’s embeddings, all three methods yield the same ranking results, so I suggest just going with the inner product since it is the fastest and most efficient one to calculate.
How does OpenAI extract embeddings?
OpenAI uses transformer architecture for their LLMs and their model is trained on a diverse range of internet text. During training, the model learns to predict the next word in a sequence of words. This process enables the model to develop a rich understanding of the context and relationships between words. The internal representations learned by the model are the embeddings that we talked about in this tutorial.
The following diagram shows where in the architecture the embeddings of the input content can be found. Note that input/output embedding boxes in the diagram are word-by-word embeddings, but the full content embedding is the output of the encoder module.
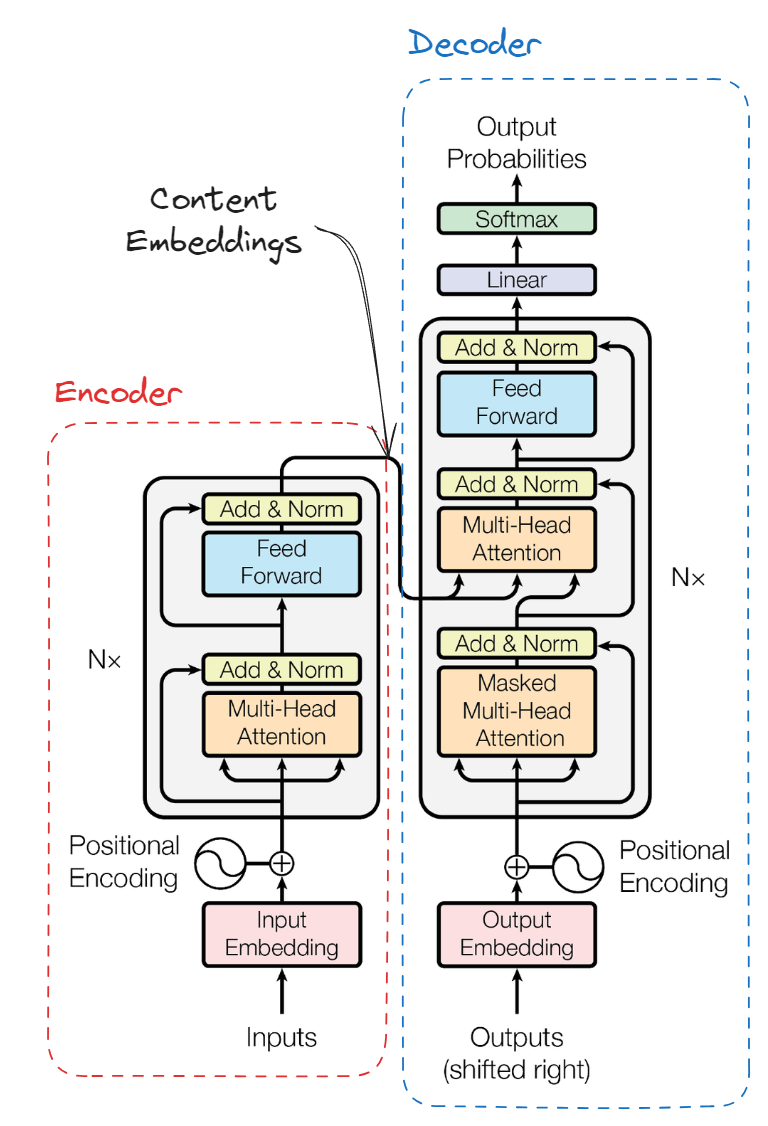
If you want to know more about the transformer architecture, a friend of mine has recently written a very good article about the transformer architecture that you can read here. You can also read the paper “Attention is All You Need” from Google which first explained this architecture.
What are some of the other applications of embeddings?
Here are some of the most important applications of using embeddings:
- Search (where results are ranked by relevance to a query string)
- Clustering (where text strings are grouped by similarity)
- Recommendations (where items with related text strings are recommended)
- Anomaly detection (where outliers with little relatedness are identified)
- Diversity measurement (where similarity distributions are analyzed)
- Classification (where text strings are classified by their most similar label)
You can read more about these applications in OpenAI’s documentation.
Why use FAISS?
FAISS (Facebook AI Similarity Search) is an open-source library developed by Facebook’s AI research team designed for efficient similarity search and clustering of dense vectors. It is used for applications that involve finding items in a dataset that are similar to a query item, particularly when dealing with very large datasets. As we talked about in part 1, we are using Langchain and FAISS to perform the semantic search on our content. As you saw, calculating the inner product is rather simple, so why do we need a library for that? Here are some of the reasons:
- Speed and Efficiency: FAISS utilizes optimized indexing structures and algorithms to perform similarity searches remarkably quickly, even when dealing with extremely large datasets.
- Scalability: FAISS is built to scale with the size of the dataset and the dimensionality of the vectors, capable of handling billions of vectors with ease.
- Support for Different Metrics: It supports various distance metrics such as L2 (Euclidean), inner product (cosine similarity), and others, allowing for flexibility depending on the specific requirements of the task.
- GPU Acceleration: FAISS is compatible with GPU acceleration, which can further speed up the search process dramatically.
- Quantization: FAISS implements several techniques for reducing the memory footprint of vectors using quantization, which can help in reducing infrastructure costs.
- Support for Batch and Incremental Indexing: FAISS allows adding items to the index in batches or incrementally, making it suitable for dynamic datasets where new data is continuously being added.
- Versatility and Customization: Users can customize the type of index used (e.g., flat, IVF, PQ, HNSW) and parameters for their specific use case, thus optimizing performance.
However, you may find a lot of value in implementing a search using inner products yourself.
Conclusion
In this article, we discussed the importance of semantic search and some of the concepts surrounding it like embeddings, vector similarity calculation methods, and their applications. I hope that by reading about the main concepts and leveraging the template code I shared in part 1 you can start building something yourself that can be used to showcase your skills in creating chatbots, put something together for your personal use, or test out fine-tuned LLMs for specific applications. My goal was to make this a rather short tutorial with just the basics to give you a quick start, but I’ll be adding more details to the series in the future.
About Me
I’m currently a Machine Learning Engineer at Meta, working on ways to improve the users’ experience on our ads products. Before that, I was a Machine Learning Engineer at TELUS and a Ph.D. graduate from the University of Alberta. What I wrote here is a result of my personal interest in this space and a way to organize my thoughts and findings.
In case you want to know more about me, check out my website. The views expressed on this account are mine alone and do not necessarily reflect the views of my employer.


