
Building Progressive Web Apps (PWAs): A Step-by-Step Guide for Developers
Hello, fellow coders! It’s no longer enough for our websites to just be responsive. We’re now pushing towards an era of seamless user experiences across devices and poor network conditions.
That’s right. We’re talking about Progressive Web Apps (PWAs).

PWAs are a blend of the best parts of web and mobile applications. They can be accessed online, installed on a device like a native app, work offline, and push notifications, all while maintaining an incredibly light footprint.
Here is a step-by-step guide on how to build your very own PWA.
Step 1: Set Up the Basic Website Structure
Begin by setting up a basic web application using HTML, CSS, and JavaScript.
You can use any frontend JavaScript framework or library, such as React, Vue.js, or Angular.
Let’s keep it simple and old school. Here’s a basic setup:
<!DOCTYPE html>
<html>
<head>
    <title>My PWA</title>
    <link rel="stylesheet" type="text/css" href="./main.css">
</head>
<body>
    <h1>Welcome to my PWA!</h1>
    <script src="./main.js"></script>
</body>
</html>
In this example, main.css is the stylesheet and main.js is the JavaScript file that will hold the app logic.
Note: The files main.css and main.js are supposed to be located in the same directory as the HTML file for this setup to work.
Step 2: Implement a Service Worker
The Service Worker is the backbone of a PWA.
It acts as a proxy between the web app, the browser, and the network (when available). It’s what enables your PWA to work offline and deliver a native-app-like experience.
We create a service worker in a separate JavaScript file. Let’s call it service-worker.js:
self.addEventListener('install', function(event) {
    // Perform install steps
});

self.addEventListener('fetch', function(event) {
    event.respondWith(caches.match(event.request)
      .then(function(response) {
          // Cache hit - return response
          if (response) {
              return response;
          }
          return fetch(event.request);
      })
    );
});
This code snippet sets up the service worker to cache and return requests, making the app available offline.
To register this service worker, add the following code to your main.js:
if ('serviceWorker' in navigator) {
    window.addEventListener('load', function() {
        navigator.serviceWorker.register('/service-worker.js')
        .then(function(registration) {
            // Registration was successful
            console.log('ServiceWorker registration successful with scope: ', registration.scope);
        }, function(err) {
            // registration failed :(
            console.log('ServiceWorker registration failed: ', err);
        });
    });
}
Step 3: Implement the Web App Manifest
A Web App Manifest is a simple JSON file that controls how your app appears to the user and ensures that it can be added to the home screen exactly like a native app.
Create a file called manifest.json:
{
    "short_name": "My PWA",
    "name": "My Progressive Web App",
    "icons": [
        {
            "src": "/images/icons-192.png",
            "type": "image/png",
            "sizes": "192x192"
        },
        {
            "src": "/images/icons-512.png",
            "type": "image/png",
            "sizes": "512x512"
        }
    ],
    "start_url": "/",
    "background_color": "#3367D6",
    "display": "standalone",
    "scope": "/",
    "theme_color": "#3367D6"
}
Remember to add the link to the manifest.json in your index.html:
<head>
    ...
    <link rel="manifest" href="/manifest.json">
</head>
Step 4: Make the App Installable
To make your PWA installable, listen for the beforeinstallprompt event in your main.js:
window.addEventListener('beforeinstallprompt', (event) => {
    event.preventDefault();
    // Stash the event so it can be triggered later.
    let deferredPrompt = event;
    // Show a button to prompt install
    const addBtn = document.createElement('button');
    addBtn.textContent = "Install";
    document.body.appendChild(addBtn);
    addBtn.addEventListener('click', () => {
        deferredPrompt.prompt();
        // Wait for the user to respond to the prompt
        deferredPrompt.userChoice
        .then((choiceResult) => {
            if (choiceResult.outcome === 'accepted') {
                console.log('User accepted the install prompt');
            } else {
                console.log('User dismissed the install prompt');
            }
        });
    });
});
Step 5: Test Your PWA
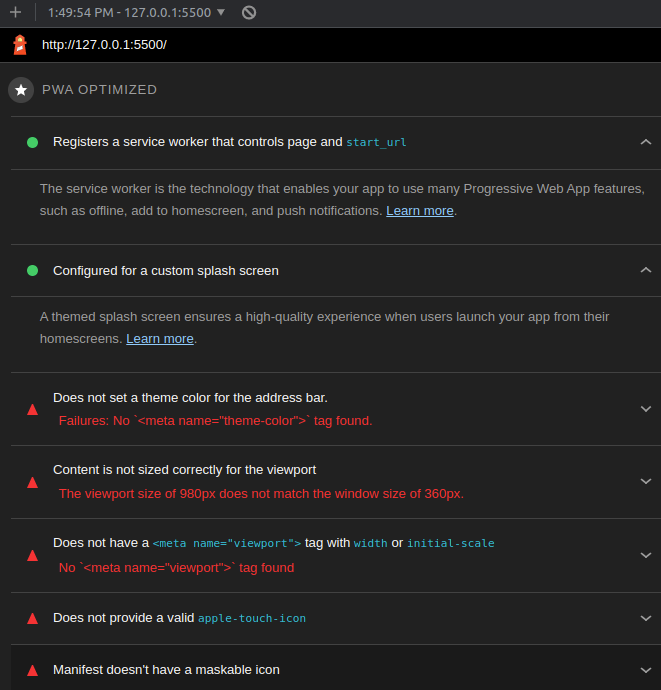
There are various tools you can use to test your PWA, such as Lighthouse in Google Chrome DevTools.
Lighthouse provides an audit of your app and gives it a score between 0 and 100. It’s a great tool to use throughout the development of your PWA to ensure you’re on the right track.
Building a PWA is not just about ticking boxes and meeting the technical criteria, though.
It’s about creating an app that delivers a top-tier, seamless experience for your users.
I remember working on one of my first PWAs and feeling overwhelmed by all the complexities. But as I continued to work and experiment, I began to see the beauty and potential in them. They offer a unique blend of the best features of the web and native apps, creating endless possibilities for us developers.
Wrapping It Up
PWAs are a transformative development in the web development world, setting a new standard for user experience.
This step-by-step guide is an entry point into the world of PWAs.
As with any skill, mastery comes with time, patience, and lots of practice. Don’t get disheartened if you struggle at first; it’s a part of the learning process.
Keep on coding, keep on creating, and you might just build the next PWA that revolutionizes the web.
- Google’s PWA Guide: This guide by Google covers all aspects of PWAs and is a great place to start.
- MDN Web Docs on Service Workers: This is a comprehensive guide on service workers by Mozilla Developer Network.
- Web App Manifest | MDN: This resource provides detailed information about the Web App Manifest.
- Workbox | Google Developers: Workbox is a set of libraries and Node.js modules that make it easy to cache assets and take full advantage of features used to build PWAs.
- Building PWAs with React: If you’re interested in building PWAs using React, this guide is a great place to start.
- Lighthouse | Google Developers: Lighthouse is an open-source, automated tool for improving the quality of web pages. It has audits for performance, accessibility, progressive web apps, SEO and more.
- PWA Builder: This is a great tool that helps you transform your existing websites into PWAs.
- PWA Checklist: This checklist provided by Google contains every criterion that your PWA should meet to ensure it provides a top-notch user experience.
Enjoyed the read? For more on Web Development, JavaScript, Next.js, Cybersecurity, and Blockchain, check out my other articles here:
If you have questions or feedback, don’t hesitate to reach out at [email protected] or in the comments section.
[Disclosure: Every article I pen is a fusion of my ideas and the supportive capabilities of artificial intelligence. While AI assists in refining and elaborating, the core thoughts and concepts stem from my perspective and knowledge. To know more about my creative process, read this article.]
Stackademic
Thank you for reading until the end. Before you go:
- Please consider clapping and following the writer! 👏
- Follow us on Twitter(X), LinkedIn, and YouTube.
- Visit Stackademic.com to find out more about how we are democratizing free programming education around the world.