Building and Deploying a GAN Streamlit Web App on Heroku [Part 1]
Generative Adversarial Networks (GANs) are a type of deep learning architecture that has become increasingly popular for generating new and realistic data, such as images, videos, and audio.
Building a GAN model is one thing, but deploying it as a user-friendly web application is another challenge altogether. In this two-part article, we will explore how to build and deploy a GAN Streamlit web application on the Heroku platform.
In part 1 we will cover the background and problem statement, set up the working environment, load a pre-trained GAN model and images, and build the Streamlit web application. Part 2 will focus on deploying the application to the Heroku platform and making it accessible to users.

Table of Content:
- Background & Problem Statment
- Setting Up Working Environment
- Loading Pretrained GAN Model & Images
- Building Streamlit Web Application
- Running the Web Application
If you want to study Data Science and Machine Learning for free, check out these resources:
- Free interactive roadmaps to learn Data Science and Machine Learning by yourself. Start here: https://aigents.co/learn/roadmaps/intro
- The search engine for Data Science learning resources (FREE). Bookmark your favorite resources, mark articles as complete, and add study notes. https://aigents.co/learn
- Want to learn Data Science from scratch with the support of a mentor and a learning community? Join this Study Circle for free: https://community.aigents.co/spaces/9010170/
Looking to start a career in data science and AI and do not know how. I offer data science mentoring sessions and long-term career mentoring:
- Mentoring sessions: https://lnkd.in/dXeg3KPW
- Long-term mentoring: https://lnkd.in/dtdUYBrM
Join the Medium membership program for only 5$ to continue learning without limits. I’ll receive a small portion of your membership fee if you use the following link at no extra cost.
1. Background & Problem Statment
GAN stands for Generative Adversarial Network, which is a type of artificial neural network architecture used for generating new data, typically images, videos, or audio. GANs are composed of two deep neural networks: a generator network and a discriminator network.
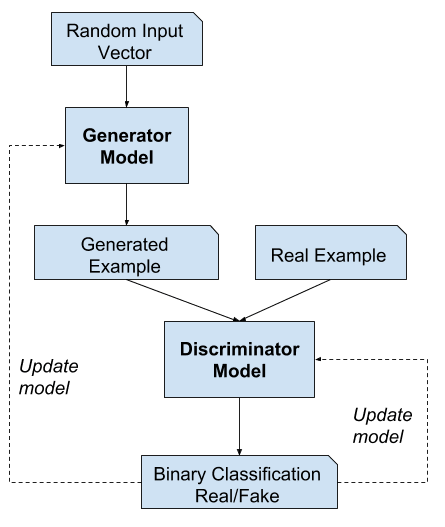
The generator network takes a random noise vector as input and generates new samples that mimic the distribution of the training data. The discriminator network, on the other hand, takes input samples and tries to distinguish between real and generated data. During training, the generator tries to create samples that the discriminator cannot distinguish from real samples, while the discriminator tries to correctly classify the samples as real or fake.
GANs have many applications in computer vision, such as image synthesis, image-to-image translation, style transfer, and super-resolution. Some popular GAN models include DCGAN (Deep Convolutional GAN), CycleGAN (Cycle-Consistent Adversarial Networks), and StyleGAN (Style-Based GAN).
In this project, we will use pre-trained GAN models to generate horse images given zebra images and the opposite.
2. Setting Up Working Environment
First, we will create a virtual environment called a gan_application using the following code and running it in the command line:
python -m venv gan_application
After that, you can activate the environment using the code below:
.\gan_application\scripts\activate
After that, we will start to download the packages and libraries we will use in this project:
pip install -r requirements.txt
After we have installed the libraries now it is time to import them:
import streamlit as st
from PIL import Image
from tensorflow.keras.models import load_model
from keras_contrib.layers.normalization.instancenormalization import InstanceNormalization
import numpy as np
from numpy import  vstack
Now we are ready to start building the project.
3. Loading Pretrained GAN Model & Images
Let's first start by loading two GAN models the first one will generate zebra images from horse images and the second will do the opposite. The code of this is shown below:
#loading pretrained GAN models
cust = {'InstanceNormalization':InstanceNormalization}
model_horse2zebra = load_model('./g_model_AtoB_023740.h5',cust)
model_zebra2horse = load_model('./g_model_BtoA_023740.h5',cust)
We first define a dict called cast which is used as an instance normalization layer. InstanceNormalization is a normalization layer that performs channel-wise normalization of the input tensor, similar to batch normalization. However, unlike batch normalization, which normalizes the input based on the statistics of a batch, instance normalization normalizes each input instance based on its own mean and variance.
This prevents instance-specific mean and covariance shifts which simplifies the learning process. Intuitively, the normalization process allows removing of instance-specific contrast information from the content image in a task like an image stylization, which simplifies generation.
After that, the two models are loaded using the load_model function from the Keras package.
The next step is to create a function to load the image by giving it the image path. The function is shown below:
def load_image(image_path):
    """
    Function to load image given image path
    :param image_path: image path
    :return: loaded image
    """
    image = Image.open(image_path)
    newsize = (256, 256)
    image = image.resize(newsize)
    image = np.array(image)
    image = image[np.newaxis, ...]  # convert the array into 3D array
    return image
Finally, we will create a function called generate_image that will take the GAN model and the image we want to use and return the generated image.
def generate_image(model, image):
    """
    Function to load image given image path
    :param model: The GAN model
    :param image: The image to apply the GAN model on
    :return: generated images
    """
    generated_image = model.predict(image)
    images = vstack(generated_image)
    images = (images+1)/2.0
    return images
Now it is time to build the streamlit web application so let’s get started.
4. Building Streamlit Web Application
Before starting to build the Streamlit web application, let's first explore what is Streamlit and why it is used. Streamlit is an open-source Python library that enables data scientists and developers to create and deploy interactive web applications for data analysis and machine learning projects quickly and easily.
With Streamlit, users can build custom web applications that allow for real-time data exploration, visualization, and interaction, without requiring significant web development knowledge. Streamlit simplifies the development process by providing a Python-based framework that allows users to create interactive dashboards, plots, charts, and other data visualizations with a few lines of code.
It also includes features such as automatic widget generation, data caching, and hot reloading, which enables users to see their changes immediately without having to restart the application. Streamlit also supports the deployment of web applications with just a few commands, making it easy to share applications with others via a public URL or a private network. This makes Streamlit an ideal tool for building data-driven applications, sharing insights, and collaborating with others.
Let's start by setting the title and the featured image of the web application using the code below:
# Building the streamlit application

st.title("Horse Zebra GAN Web APP") # Set the title
st.image('./horses_zebras.png') # set the featured image of the web application
Then we will create a dropdown menu widget, allowing users to select a Generative Adversarial Network (GAN) model to use.
pick = st.selectbox("Please select a GAN model to use:", ["Horse 2 Zebra GAN", "Zebra 2 Horse GAN"])The code creates a variable named “pick” and assigns it the value returned by the “selectbox” function from the Streamlit library. The “selectbox” function takes two arguments: a label string to display next to the dropdown menu, and a list of options for the user to select from.
When the user selects an option from the dropdown menu, the value of the “pick” variable will be updated to the selected option, which can then be used in the rest of the application code to determine which GAN model to use.
Next, we will use a condition statement to select the appropriate model and also to select whether the user would like to upload a new image or use the default one:
if pick == "Horse 2 Zebra GAN": # if the selected case is to convert from horse to zebra
st.write("This is a GAN model for Generating Zebra images from Horses")
st.write("Try out the GAN model with a default images of a horse or simply upload an image")
if st.button("Try with Default Image"): # if the user selected to use the default image
image = load_image('./horse.jpg')
st.subheader("Horse Image")
st.image(image)
st.subheader("Generated Zebra Image")
st.image(generate_image(model_horse2zebra, image))
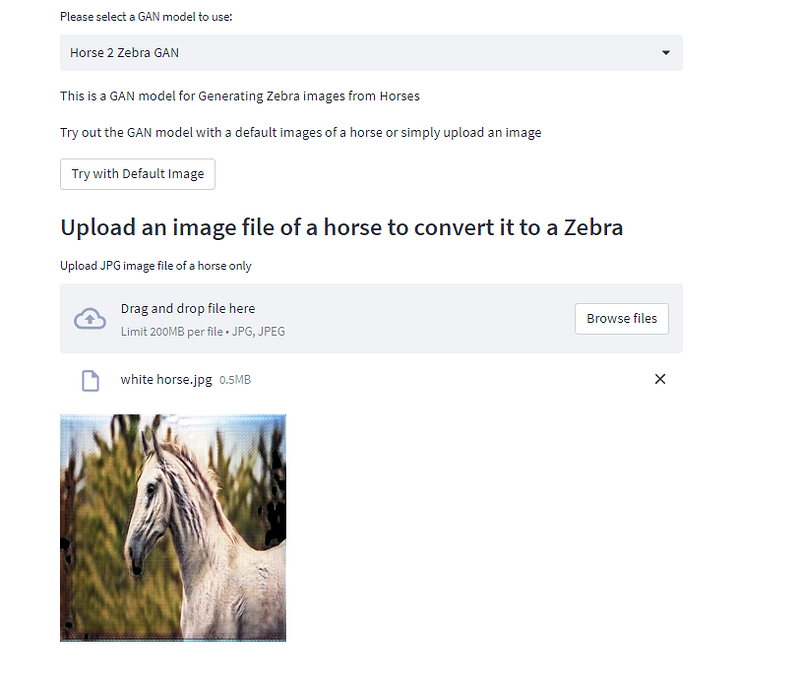
st.subheader("Upload an image file of a horse to convert it to a Zebra") # if the user selected to upload an image
uploaded_file = st.file_uploader("Upload JPG image file of a horse only", type=["jpg","jpeg"]) # only "jpg" and "jpeg" is allaowed.
if uploaded_file:
image = load_image(uploaded_file)
st.image(generate_image(model_horse2zebra, image)) # generate the new image
else: # if the second case was selected
st.write("This is a GAN model for Generating Horse images from Zebras")
st.write("Try out the GAN model with a default images of a zebra or simply upload an image")
if st.button("Try with Default Image"):
image = load_image('./zebra.jpg')
st.subheader("Horse Image")
st.image(image)
st.subheader("Generated Horse Image")
st.image(generate_image(model_zebra2horse, image))
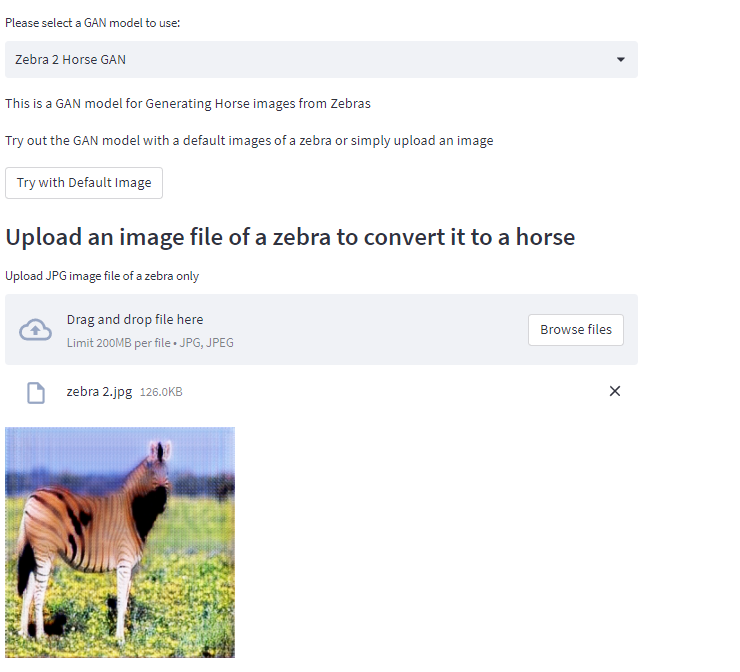
st.subheader("Upload an image file of a zebra to convert it to a horse")
uploaded_file = st.file_uploader("Upload JPG image file of a zebra only", type=["jpg","jpeg"])
if uploaded_file:
image = load_image(uploaded_file)
st.image(generate_image(model_zebra2horse, image))This code uses the previously selected GAN model (either “Horse 2 Zebra GAN” or “Zebra 2 Horse GAN”) to generate images. If “Horse 2 Zebra GAN” is selected, the code loads an image of a horse, generates a corresponding zebra image using the selected GAN model, and displays the original and generated images. If “Zebra 2 Horse GAN” is selected, the code loads an image of a zebra, generates a corresponding horse image using the selected GAN model, and displays the original and generated images.
The code includes buttons for users to try the GAN models with default images, as well as an option for users to upload their own images to be converted. The uploaded image must be in JPG format, and only “jpg” and “jpeg” file types are allowed.
5. Running the Web Application
To run the Streamlit web application you can do this easily by running the command below in the command line but make sure to be in the project directory:
streamlit run app.py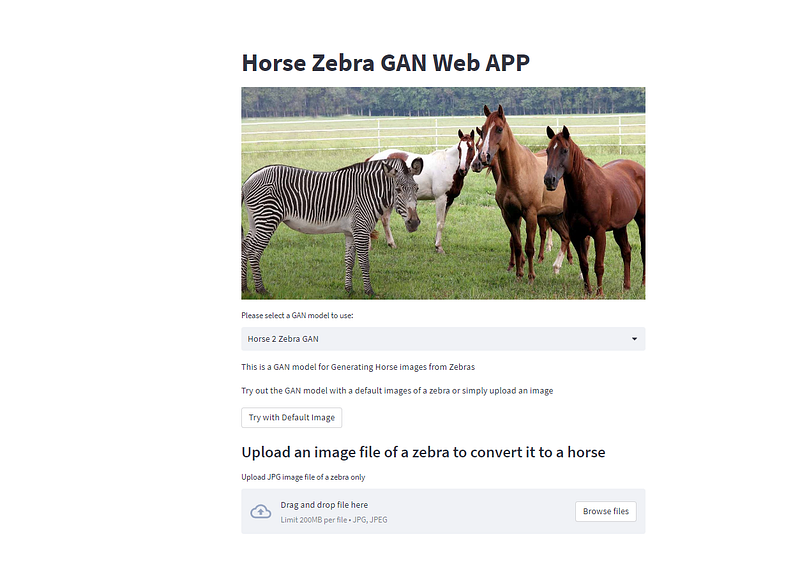
First, let's start with using the default horse image and convert it into zebra. This is shown in the figure below:
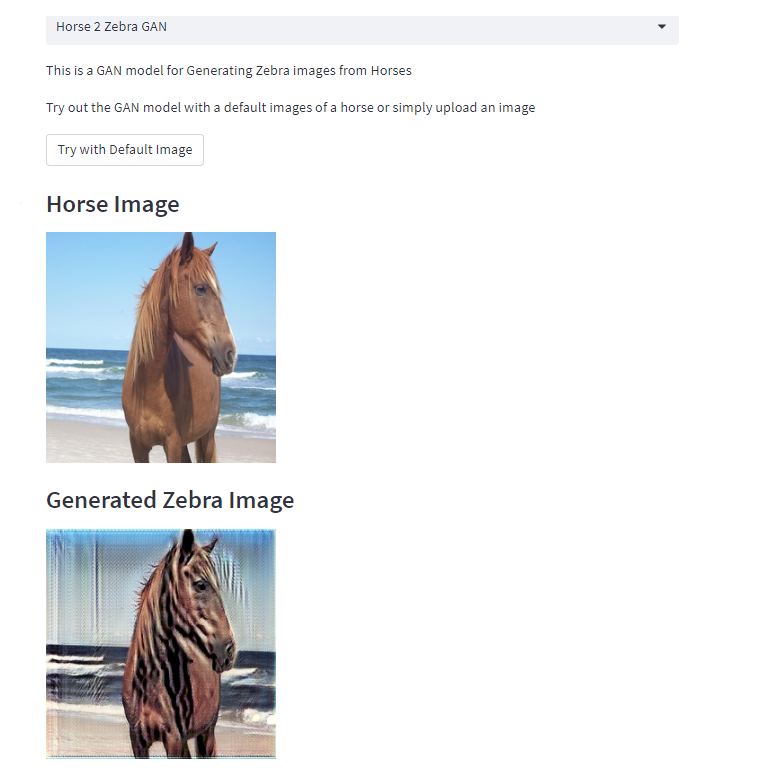
Next, let's change it to Zebra 2 Horse GAN and use also the default image as shown in the figure below:

We can also try uploading a horse image and generating a zebra image using it and vice versa. Let's first start with loading the horse image and generating a zebra image as shown in the figure below:
Next, we will do the same but we will load a zebra image and convert it into a horse image:
Now the application is working it is time to deploy it in Heroku. This will be done in part 2 so stay tuned.
If you like the article and would like to support me, make sure to:
- 👏 Clap for the story (50 claps) to help this article be featured
- Follow me on Medium
- 📰 View more content on my medium profile
- 🔔 Follow Me: LinkedIn |Youtube | GitHub | Twitter
Join the Medium membership program for only 5$ to continue learning without limits. I’ll receive a small portion of your membership fee if you use the following link at no extra cost.
Looking to start a career in data science and AI and do not know how. I offer data science mentoring sessions and long-term career mentoring:
- Mentoring sessions: https://lnkd.in/dXeg3KPW
- Long-term mentoring: https://lnkd.in/dtdUYBrM