
Building an AI-Powered Language Learning App: Learning From Two AI Chatting
A step-by-step tutorial on creating a dual-chatbot language learning app with Langchain, OpenAI, gTTS, and Streamlit
When I first began learning a new language, I like to buy those “conversational dialogues” books. I find those books very useful as they help me understand how the language worked — not just the grammar and vocabulary, but also how people really used it in day-to-day life.
Now with the rise of large language models (LLMs), a thought occurred to me: could I replicate these language-learning books in a more interactive, dynamic, and scalable format? Could I utilize LLM to create a tool that generates fresh, on-demand conversations for language learners?
This thought inspired the project I would like to share with you today — an AI-powered language learning app, where learners can observe and learn from two AI chatbots engaged in either a user-defined conversation or a debate.
Regarding the employed tech stack, I have used Langchain, OpenAI API, gTTS, and Streamlit to create the application where users can define the roles, scenarios, or debate topics, and let the AI generate the content.
If you’re curious about how it all works, then join me as I walk you through the journey of building this interactive dual-chatbot system, step by step 🗺️📍🚶♀️.
You can find the complete source code here💻. In this blog, we will also go through the key code snippets to explain the ideas.
With that in mind, let’s get started!
Table of Content · 1. Project Overview · 2. Prerequisites ∘ 2.1 LangChain ∘ 2.2 ConversationChain · 3. Project Design ∘ 3.1 Developing a single chatbot ∘ 3.2 Developing a dual-chatbot system · 4. App Interface Design with Streamlit · 5. Learnings and Future Extensions · 6. Conclusion
1. Project Overview
As mentioned earlier, our goal is to create a unique language-learning app powered by two conversational AI or chatbots. The innovative aspect of this app lies in having these chatbots interact with each other, creating realistic dialogues in the target language. Users can observe these AI-driven conversations, use them as language-learning resources, and understand the practical usage of their chosen language.
In our app, users should have the flexibility to customize their learning experience according to their needs. They can adjust several settings including target language, learning mode, session length, and proficiency level.
Target Language 🔤
Users can choose the language they wish to learn. This choice guides the language used by the chatbots during their interactions. For the moment, I have included support for English — ‘en’, German — ‘de’, Spanish — ‘es’, and French — ‘fr’, but it is trivial to add more languages as long as the GPT model has sufficient knowledge about them.
Learning mode 📖
This setting lets users select the style of conversation between the chatbots. In the “conversation” mode, users can define the roles (e.g., customer and waitstaff) and actions (ordering food and taking an order) for each bot and specify a scenario (at a restaurant), upon which the bots will simulate a realistic conversation. In the “debate” mode, users are prompted to input a debate topic (Should we adopt nuclear energy?). The bots then engage in a lively debate on the provided topic.
The app’s interface should be responsive and dynamically adjusts based on the learning mode selected by the user, providing a seamless user experience.
Session Length ⏰
The session length setting gives users control over the duration of each chatbot conversation or debate. This means they can have short, quick dialogues or longer, more in-depth discussions, depending on their preference.
Proficiency Level 🏆
This setting tailors the complexity of the chatbot conversation to the user’s language skill level. Beginners might prefer simpler conversations, while more advanced learners can handle intricate debates or discussions.
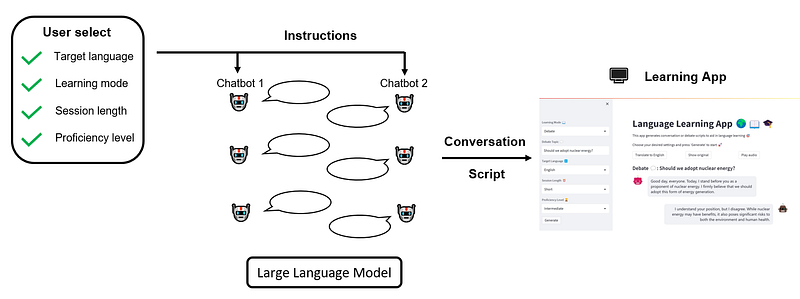
Once the users specify those settings, they can initiate the session and watch as the AI chatbots spring into action, carrying out dynamic and interactive dialogues in accordance with the user’s preferences. Our overall workflow can be illustrated as follows:
2. Prerequisites
Before we dive into the development of our app, let’s familiarize ourselves with the tools that we will be using. In this section, we’ll briefly introduce the LangChain library, specifically the ConversationChain module, which serves as the backbone of our app.
2.1 LangChain
Building an application powered by Large Language Models (LLMs) involves many complexities. You need to interface with language model providers through API calls, connect these models to various data sources, handle the history of user interactions, and design pipelines for executing complex tasks. This is where the LangChain library comes into play.
LangChain is a framework dedicated to streamlining the development of LLM-powered applications. It offers a wide array of components that address the common pain points listed above. Whether it’s managing interactions with the language model providers, orchestrating data connections, maintaining memory for historical interactions, or defining intricate task pipelines, LangChain has it covered.
A key concept introduced by LangChain is the “Chain”. In essence, chains allow us to combine multiple components together to create a single, coherent application. For example, a fundamental chain type in LangChain is the LLMChain. It creates a pipeline that first formats the prompt template using the user-provided input key values, then passes the formatted instructions to LLM, and finally returns the LLM output.
LangChain hosts a variety of chain types, including RetrievalQAChain, for question-answering over documents, SummarizationChain, for summarizing multiple documents, and of course, our focus for today, the ConversationChain.
2.2 ConversationChain
ConversationChainis used to facilitate interactive conversations by providing a framework for exchanging messages and storing conversation history. Here’s a sample code snippet to illustrate its usage:
from langchain.chains import ConversationChain

# Create conversation chain
conversation = ConversationChain(memory, prompt, llm)

# Run conversation chain
conversation.predict(input="Hi there!")

# Obtain the LLM response: "Hello! How can I assist you today?"

# We can keep calling conversation chain
conversation.predict(input="I'm doing well! Just having a conversation with an AI.")
# Obtain the LLM response: "That sounds like fun! I'm happy to chat with you. Is there anything specific you'd like to talk about?"
In this example, the ConversationChain takes three inputs, memory, a LangChain component that holds the interaction history; prompt, the input to the LLM; and llm, the core large language model (e.g., GPT-3.5-Turbo, etc.).
Once theConversationChain object is instantiated, we can simply call conversation.predict() with the user input to get LLM’s response. The convenience with ConversationChain is that we can actually call conversation.predict() multiple times, and it automatically records the message history under the hood.
In the next section, we’ll harness the power of ConversationChainto create our chatbots and delve into how the memory, prompt template, and LLM are defined and utilized.
If you would like to learn more about LangChain, take a look at their official documentation. In addition, this YouTube playlist also offers a comprehensive, hands-on introduction.
3. Project Design
Now that we have a clear understanding of what we want to build and the tools to build it, it’s time to roll up our sleeves and dive into the code! In this section, we’re going to focus on the nuts and bolts of creating our dual-chatbot interaction. First, we’ll explore the class definition for a single chatbot and then expand on this to create a dual-chatbot class, enabling our two chatbots to interact. We’ll save the design of the app interface using Streamlit for Section 4.
3.1 Developing a single chatbot
In this subsection, we will develop a single chatbot together, which will later be integrated into the dual-chatbot system. Let’s start with the overall class design, then shift our attention to prompt engineering.
🏗️ Class Design
Our chatbot class should enable the management of an individual chatbot. This involves instantiating a chatbot with a user-specified LLM as its backbone, providing instructions based on the user’s intent, and facilitating interactive multi-round conversations. With that in mind, let’s start coding.
First, import the necessary libraries:
import os
import openai
from langchain.prompts import (
    ChatPromptTemplate,
    MessagesPlaceholder,
    SystemMessagePromptTemplate,
    HumanMessagePromptTemplate
)
from langchain.prompts import PromptTemplate
from langchain.chains import LLMChain
from langchain.chains import ConversationChain
from langchain.chat_models import ChatOpenAI
from langchain.memory import ConversationBufferMemory
Next, we define the class constructor:
class Chatbot:
    """Class definition for a single chatbot with memory, created with LangChain."""

    def __init__(self, engine):
        """Select backbone large language model, as well as instantiate
        the memory for creating language chain in LangChain.
        """

        # Instantiate llm
        if engine == 'OpenAI':
            # Reminder: need to set up openAI API key
            # (e.g., via environment variable OPENAI_API_KEY)
            self.llm = ChatOpenAI(
                model_name="gpt-3.5-turbo",
                temperature=0.7
            )

        else:
            raise KeyError("Currently unsupported chat model type!")

        # Instantiate memory
        self.memory = ConversationBufferMemory(return_messages=True)
Currently, you can only choose to use the native OpenAI API. Nevertheless, adding more backend LLMs is straightforward since LangChain supports various types (e.g., Azure OpenAI endpoint, Anthropic chat models, PaLM API on Google Vertex AI, etc.).
Besides LLM, another important component we need to instantiate is memory, which tracks the conversation history. Here, we use ConversationBufferMemory for this purpose, which simply prepends the last few inputs/outputs to the current input of the chatbot. This is the simplest memory type offered in LangChain and it’s sufficient for our current purpose.
For a complete overview of other types of memory, please refer to the official docs.
Moving on, we need to have a class method that allows us to give instructions to the chatbot and make conversations with it. This is what self.instruct() for:
def instruct(self, role, oppo_role, language, scenario,
             session_length, proficiency_level,
             learning_mode, starter=False):
    """Determine the context of chatbot interaction.
    """

    # Define language settings
    self.role = role
    self.oppo_role = oppo_role
    self.language = language
    self.scenario = scenario
    self.session_length = session_length
    self.proficiency_level = proficiency_level
    self.learning_mode = learning_mode
    self.starter = starter

    # Define prompt template
    prompt = ChatPromptTemplate.from_messages([
        SystemMessagePromptTemplate.from_template(self._specify_system_message()),
        MessagesPlaceholder(variable_name="history"),
        HumanMessagePromptTemplate.from_template("{input}")
    ])

    # Create conversation chain
    self.conversation = ConversationChain(memory=self.memory, prompt=prompt,
llm=self.llm, verbose=False)- We define a couple of settings to allow users to customize their learning experience.
In addition to what has been mentioned in “Section 1 Project Overview”, we have four new attributes:
self.role/self.oppo_role: this attribute takes the form of a dictionary that records the role name and corresponding actions. For instance:
self.role = {'name': 'Customer', 'action': 'ordering food'}self.oppo_role represents the role taken by the other chatbot engaged in the conversation with the current chatbot. It’s essential because the current chatbot needs to understand who it is communicating with, providing necessary contextual information.
self.scenario sets the stage for the conversation. For “conversation” learning mode, self.scenariorepresents the place where the conversation
is happening; for “debate” mode, self.scenariorepresents the debating topic.
Finally, self.starter is just a boolean flag to indicate if the current chatbot will initiate the conversation.
- We structure the prompt for the chatbot.
In OpenAI, a chat model generally takes a list of messages as input and returns a model-generated message as output. LangChain supports SystemMessage,AIMessage, HumanMessage: SystemMessage helps set the behavior of the chatbot, AIMessage stores previous chatbot responses, and HumanMessage provides requests or comments for the chatbot to respond to.
LangChain conveniently offers PromptTemplate to streamline prompt generation and ingestion. For a chatbot application, we need to specify the PromptTemplate for all three message types. The most critical piece is setting the SystemMessage, which controls the chatbot’s behavior. We have a separate method, self._specify_system_message(), to handle this, which we’ll discuss in detail later.
- Finally, we bring all the pieces together and construct a
ConversationChain.
🖋️ Prompt Design
Our focus now turns to guiding the chatbot in participating in the conversation as desired by the user. To this end, we have the self._specify_system_message() method. The signature of this method is shown below:
def _specify_system_message(self):
    """Specify the behavior of the chatbot, which consists of the following
       aspects:

    - general context: conducting conversation/debate under given scenario
    - the language spoken
    - purpose of the simulated conversation/debate
    - language complexity requirement
    - exchange length requirement
    - other nuance constraints

    Outputs:
    --------
    prompt: instructions for the chatbot.
    """
Essentially, this method compiles a string, which will then be fed into the SystemMessagePromptTemplate.from_template() to instruct the chatbot, as demonstrated in the definition of the self.instruct() method above. We’ll dissect this “long string” in the following to understand how each language learning requirement is incorporated into the prompt.
1️⃣ Session length
The session length is controlled by directly specifying the maximum number of exchanges that can happen within one session. Those numbers are hard-coded for the time being.
# Determine the number of exchanges between two bots
exchange_counts_dict = {
    'Short': {'Conversation': 8, 'Debate': 4},
    'Long': {'Conversation': 16, 'Debate': 8}
}
exchange_counts = exchange_counts_dict[self.session_length][self.learning_mode]
2️⃣ Number of sentences the chatbot can say in one exchange
Apart from limiting the total number of allowed exchanges, it’s also beneficial to restrict how much a chatbot can say within one exchange, or equivalently, the number of sentences.
In my experiments, there is usually no need to constrain this in “conversation” mode, as the chatbot mimics a real-life dialogue and tends to speak at a reasonable length. However, in “debate” mode, it’s necessary to impose a limit. Otherwise, the chatbot may continue speaking, eventually generating an “essay” 😆.
Similar to limiting the session length, the numbers that restrict the speech length are also hard-coded and correspond with the user’s proficiency level in the target language:
# Determine number of sentences in one debate round
argument_num_dict = {
    'Beginner': 4,
    'Intermediate': 6,
    'Advanced': 8
}
3️⃣ Determine speech complexity
Here, we regulate the complexity level of the language the chatbot can use:
if self.proficiency_level == 'Beginner':
    lang_requirement = """use as basic and simple vocabulary and
    sentence structures as possible. Must avoid idioms, slang,
    and complex grammatical constructs."""

elif self.proficiency_level == 'Intermediate':
    lang_requirement = """use a wider range of vocabulary and a variety of sentence structures.
    You can include some idioms and colloquial expressions,
    but avoid highly technical language or complex literary expressions."""

elif self.proficiency_level == 'Advanced':
    lang_requirement = """use sophisticated vocabulary, complex sentence structures, idioms,
    colloquial expressions, and technical language where appropriate."""

else:
    raise KeyError('Currently unsupported proficiency level!')
4️⃣ Put everything together!
Here’s what the instruction looks like for different learning modes:
# Compile bot instructions
if self.learning_mode == 'Conversation':
    prompt = f"""You are an AI that is good at role-playing.
    You are simulating a typical conversation happened {self.scenario}.
    In this scenario, you are playing as a {self.role['name']} {self.role['action']}, speaking to a
    {self.oppo_role['name']} {self.oppo_role['action']}.
    Your conversation should only be conducted in {self.language}. Do not translate.
    This simulated {self.learning_mode} is designed for {self.language} language learners to learn real-life
    conversations in {self.language}. You should assume the learners' proficiency level in
    {self.language} is {self.proficiency_level}. Therefore, you should {lang_requirement}.
    You should finish the conversation within {exchange_counts} exchanges with the {self.oppo_role['name']}.
    Make your conversation with {self.oppo_role['name']} natural and typical in the considered scenario in
    {self.language} cultural."""

elif self.learning_mode == 'Debate':
    prompt = f"""You are an AI that is good at debating.
    You are now engaged in a debate with the following topic: {self.scenario}.
    In this debate, you are taking on the role of a {self.role['name']}.
    Always remember your stances in the debate.
    Your debate should only be conducted in {self.language}. Do not translate.
    This simulated debate is designed for {self.language} language learners to
    learn {self.language}. You should assume the learners' proficiency level in {self.language}
    is {self.proficiency_level}. Therefore, you should {lang_requirement}.
    You will exchange opinions with another AI (who plays the {self.oppo_role['name']} role)
    {exchange_counts} times.
    Everytime you speak, you can only speak no more than
    {argument_num_dict[self.proficiency_level]} sentences."""

else:
    raise KeyError('Currently unsupported learning mode!')
5️⃣ Who speaks first?
Finally, we instruct the chatbot whether it should speak first or wait for the response from the opponent AI:
# Give bot instructions
if self.starter:
# In case the current bot is the first one to speak
prompt += f"You are leading the {self.learning_mode}. \n"
else:
# In case the current bot is the second one to speak
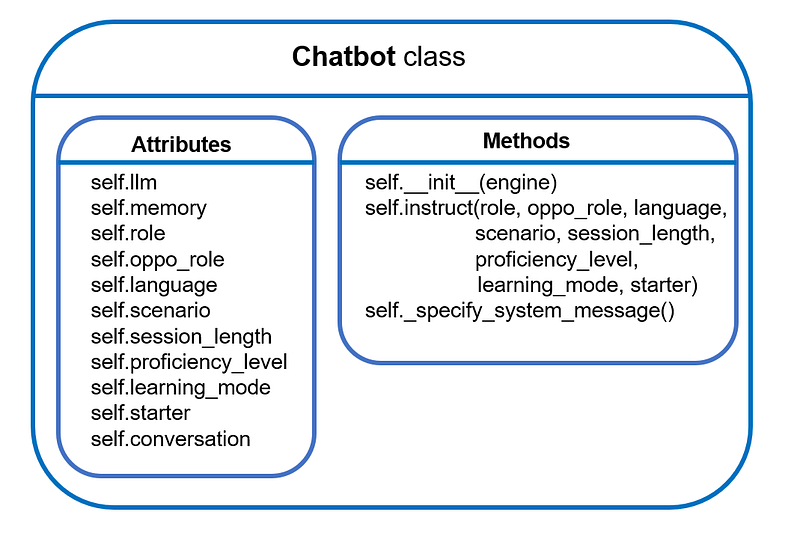
prompt += f"Wait for the {self.oppo_role['name']}'s statement."Now we have completed the prompt design 🎉 As a quick summary, this is what we have developed so far:
3.2 Developing a dual-chatbot system
Now we arrive at the exciting part! In this subsection, we will develop a dual-chatbot class to let two chatbots interact with each other 💬💬
🏗️ Class Design
Thanks to the previously developed single Chatbot class, we can effortlessly instantiate two chatbots in the class constructor:
class DualChatbot:
    """Class definition for dual-chatbots interaction system,
      created with LangChain."""


    def __init__(self, engine, role_dict, language, scenario, proficiency_level,
                 learning_mode, session_length):


        # Instantiate two chatbots
        self.engine = engine
        self.proficiency_level = proficiency_level
        self.language = language
        self.chatbots = role_dict
        for k in role_dict.keys():
            self.chatbots[k].update({'chatbot': Chatbot(engine)})

        # Assigning roles for two chatbots
        self.chatbots['role1']['chatbot'].instruct(role=self.chatbots['role1'],
                                                   oppo_role=self.chatbots['role2'],
                                                   language=language, scenario=scenario,
                                                   session_length=session_length,
                                                   proficiency_level=proficiency_level,
                                                   learning_mode=learning_mode, starter=True)

        self.chatbots['role2']['chatbot'].instruct(role=self.chatbots['role2'],
                                                   oppo_role=self.chatbots['role1'],
                                                   language=language, scenario=scenario,
                                                   session_length=session_length,
                                                   proficiency_level=proficiency_level,
                                                   learning_mode=learning_mode, starter=False)


        # Add session length
        self.session_length = session_length

        # Prepare conversation
        self._reset_conversation_history()
The self.chatbots is a dictionary designed to store information related to both bots:
# For "conversation" mode
self.chatbots= {
                'role1': {'name': 'Customer',
                          'action': 'ordering food',
                          'chatbot': Chatbot()},
                'role2': {'name': 'Waitstaff',
                          'action': 'taking the order',
                          'chatbot': Chatbot()}
              }

# For "debate" mode
self.chatbots= {
                'role1': {'name': 'Proponent',
                          'chatbot': Chatbot()},
                'role2': {'name': 'Opponent',
                          'chatbot': Chatbot()}
              }
The self._reset_conversation_history serves to initiate a fresh conversation history and provide the initial instructions to the chatbots:
def _reset_conversation_history(self):
    """Reset the conversation history.
    """
    # Placeholder for conversation history
    self.conversation_history = []

    # Inputs for two chatbots
    self.input1 = "Start the conversation."
    self.input2 = ""
To facilitate interaction between the two chatbots, we employ self.step() method. This method allows for one round of interaction between the two bots:
def step(self):
    """Make one exchange round between two chatbots.
    """

    # Chatbot1 speaks
    output1 = self.chatbots['role1']['chatbot'].conversation.predict(input=self.input1)
    self.conversation_history.append({"bot": self.chatbots['role1']['name'], "text": output1})

    # Pass output of chatbot1 as input to chatbot2
    self.input2 = output1

    # Chatbot2 speaks
    output2 = self.chatbots['role2']['chatbot'].conversation.predict(input=self.input2)
    self.conversation_history.append({"bot": self.chatbots['role2']['name'], "text": output2})

    # Pass output of chatbot2 as input to chatbot1
    self.input1 = output2

    # Translate responses
    translate1 = self.translate(output1)
    translate2 = self.translate(output2)

    return output1, output2, translate1, translate2
Notice that we have embedded a method called self.translate(). The purpose of this method is to translate the script into English. This functionality could be useful for language learners as they can understand the meaning of the conversation generated in the target language.
To achieve the translation functionality, we can employ the basic LLMChain, which requires a backend LLM model and a prompt for instruction:
  def translate(self, message):
      """Translate the generated script into English.
      """

      if self.language == 'English':
          # No translation performed
          translation = 'Translation: ' + message

      else:
          # Instantiate translator
          if self.engine == 'OpenAI':
              # Reminder: need to set up openAI API key
              # (e.g., via environment variable OPENAI_API_KEY)
              self.translator = ChatOpenAI(
                  model_name="gpt-3.5-turbo",
                  temperature=0.7
              )

          else:
              raise KeyError("Currently unsupported translation model type!")

          # Specify instruction
          instruction = """Translate the following sentence from {src_lang}
          (source language) to {trg_lang} (target language).
          Here is the sentence in source language: \n
          {src_input}."""

          prompt = PromptTemplate(
              input_variables=["src_lang", "trg_lang", "src_input"],
              template=instruction,
          )

          # Create a language chain
          translator_chain = LLMChain(llm=self.translator, prompt=prompt)
          translation = translator_chain.predict(src_lang=self.language,
                                              trg_lang="English",
                                              src_input=message)

      return translation
Finally, it could be beneficial for language learners to have a summary of the key language learning points of the generated conversation script, be it key vocabulary, grammar points, or function phrases. For that, we can include a self.summary() method:
def summary(self, script):
    """Distill key language learning points from the generated scripts.
    """

    # Instantiate summary bot
    if self.engine == 'OpenAI':
        # Reminder: need to set up openAI API key
        # (e.g., via environment variable OPENAI_API_KEY)
        self.summary_bot = ChatOpenAI(
            model_name="gpt-3.5-turbo",
            temperature=0.7
        )

    else:
        raise KeyError("Currently unsupported summary model type!")

    # Specify instruction
    instruction = """The following text is a simulated conversation in
    {src_lang}. The goal of this text is to aid {src_lang} learners to learn
    real-life usage of {src_lang}. Therefore, your task is to summarize the key
    learning points based on the given text. Specifically, you should summarize
    the key vocabulary, grammar points, and function phrases that could be important
    for students learning {src_lang}. Your summary should be conducted in English, but
    use examples from the text in the original language where appropriate.
    Remember your target students have a proficiency level of
    {proficiency} in {src_lang}. You summarization must match with their
    proficiency level.

    The conversation is: \n
    {script}."""

    prompt = PromptTemplate(
        input_variables=["src_lang", "proficiency", "script"],
        template=instruction,
    )

    # Create a language chain
    summary_chain = LLMChain(llm=self.summary_bot, prompt=prompt)
    summary = summary_chain.predict(src_lang=self.language,
                                    proficiency=self.proficiency_level,
                                    script=script)

    return summary
Similar to the self.translate() method, we employed a basic LLMChain to perform the desired task. Note that we explicitly ask the language model to summarize key language learning points based on the user’s proficiency level.
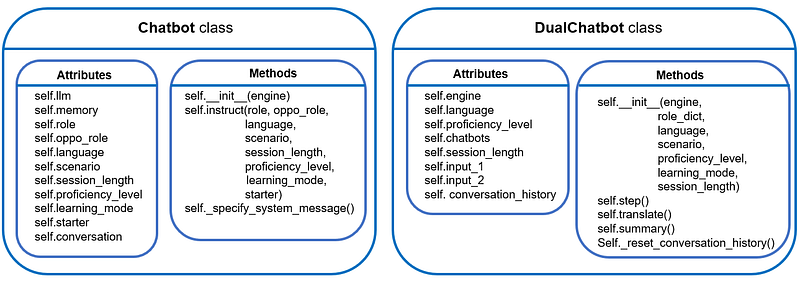
With that, we have completed the development of the dual-chatbot class 🥂 As a quick summary, this is what we have developed so far:
4. App Interface Design with Streamlit
We are now ready to develop the user interface 🖥️ For this project, we will use the Streamlit library to construct the frontend.
If you’re unfamiliar, Streamlit is an open-source Python library for creating interactive web applications focused on data science and machine learning. It simplifies the process of building and deploying apps by providing an easy-to-use API, live code reloading for instant updates, interactive widgets for user input, support for data visualization libraries, and the ability to incorporate rich media.
Let’s initiate with a new Python script app.py, and import the necessary libraries:
import streamlit as st
from streamlit_chat import message
from chatbot import DualChatbot
import time
from gtts import gTTS
from io import BytesIO
Alongside the main streamlitlibrary, we also import the streamlit_chat library, a community-built Streamlit component specifically designed for creating chatbot UIs. Our previously-developed DualChatbot class is stored in the chatbot.py file, so we need to import that as well. Lastly, we import gTTS, which stands for Google Text-to-Speech, to add audio to the bot-generated conversation script in this project.
Before we configure the Streamlit interface, let’s first define the language learning settings:
# Define the language learning settings
LANGUAGES = ['English', 'German', 'Spanish', 'French']
SESSION_LENGTHS = ['Short', 'Long']
PROFICIENCY_LEVELS = ['Beginner', 'Intermediate', 'Advanced']
MAX_EXCHANGE_COUNTS = {
    'Short': {'Conversation': 8, 'Debate': 4},
    'Long': {'Conversation': 16, 'Debate': 8}
}
AUDIO_SPEECH = {
    'English': 'en',
    'German': 'de',
    'Spanish': 'es',
    'French': 'fr'
}
AVATAR_SEED = [123, 42]

# Define backbone llm
engine = 'OpenAI'
The AVATAR_SEED is used for generating different avatar icons for different chatbots.
We begin by setting up the basic layout of the user interface and establishing options for the user to select:
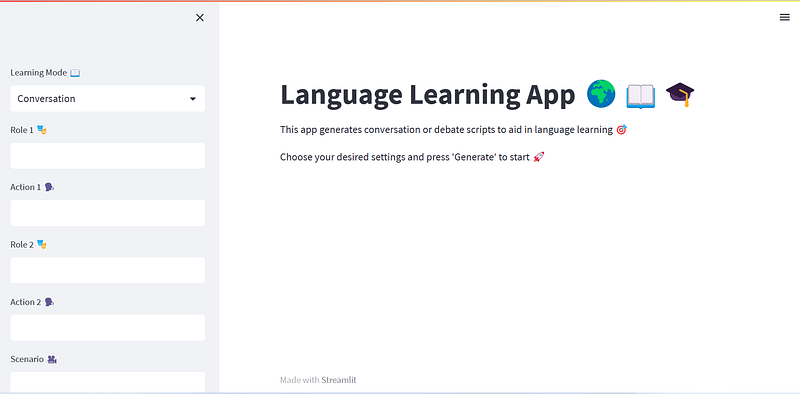
# Set the title of the app
st.title('Language Learning App 🌍📖🎓')

# Set the description of the app
st.markdown("""
This app generates conversation or debate scripts to aid in language learning 🎯

Choose your desired settings and press 'Generate' to start 🚀
""")

# Add a selectbox for learning mode
learning_mode = st.sidebar.selectbox('Learning Mode 📖', ('Conversation', 'Debate'))

if learning_mode == 'Conversation':
    role1 = st.sidebar.text_input('Role 1 🎭')
    action1 = st.sidebar.text_input('Action 1 🗣️')
    role2 = st.sidebar.text_input('Role 2 🎭')
    action2 = st.sidebar.text_input('Action 2 🗣️')
    scenario = st.sidebar.text_input('Scenario 🎥')
    time_delay = 2

    # Configure role dictionary
    role_dict = {
        'role1': {'name': role1, 'action': action1},
        'role2': {'name': role2, 'action': action2}
    }

else:
    scenario = st.sidebar.text_input('Debate Topic 💬')

    # Configure role dictionary
    role_dict = {
        'role1': {'name': 'Proponent'},
        'role2': {'name': 'Opponent'}
    }
    time_delay = 5

language = st.sidebar.selectbox('Target Language 🔤', LANGUAGES)
session_length = st.sidebar.selectbox('Session Length ⏰', SESSION_LENGTHS)
proficiency_level = st.sidebar.selectbox('Proficiency Level 🏆', PROFICIENCY_LEVELS)
Note the introduction of a time_delayvariable. It’s used for specifying the waiting time between displaying two consecutive messages. If this delay is set to zero, the exchanges generated between two chatbots will appear in the app swiftly (limited only by OpenAI’s response time). However, for user experience, it could be beneficial to allow enough time for the user to read the generated message before the next exchange appears.
Next, we initialize the Streamlit session state to store user-specific session data in the Streamlit app:
if "bot1_mesg" not in st.session_state:
    st.session_state["bot1_mesg"] = []

if "bot2_mesg" not in st.session_state:
    st.session_state["bot2_mesg"] = []

if 'batch_flag' not in st.session_state:
    st.session_state["batch_flag"] = False

if 'translate_flag' not in st.session_state:
    st.session_state["translate_flag"] = False

if 'audio_flag' not in st.session_state:
    st.session_state["audio_flag"] = False

if 'message_counter' not in st.session_state:
    st.session_state["message_counter"] = 0
Here we answer two questions:
1️⃣ First of all, why do we need “session_state”?
In Streamlit, every time the user interacts with the app, Streamlit reruns the entire script from top to bottom, updating the app’s output accordingly. However, this reactive nature of Streamlit can pose a challenge when you want to maintain user-specific data or preserve state across different interactions or pages within the app. Since Streamlit reloads the script on every user interaction, regular Python variables would lose their values, and the app would reset to its initial state.
This is where the session_state comes in. Session state in Streamlit provides a way to store and retrieve data that persists throughout the user’s session, even when the app is reloaded or the user navigates between different components or pages. It allows you to maintain stateful information and preserve the app’s context for each user.
2️⃣ Secondly, what are those variables stored in the session_state?
“bot1_mesg” is a list, where each element of the list is a dictionary that holds the messages spoken by the first chatbot. It has the following keys: “role”, “content”, and “translation”. The same definition applies to the “bot2_mesg”.
“batch_flag” is a boolean flag to indicate whether the conversation exchanges are shown all at once or with a time delay. In the current design, the chats between two bots will appear with a time delay when their conversation is generated for the first time. Afterward, the user may want to see the translations of or add audio to the generated conversation, the stored conversation messages (in “bot1_mesg” and “bot2_mesg”) will be shown all at once. This is beneficial as we don’t need to call OpenAI API again to reduce cost and latency.
“translate_flag” and “audio_flag” are used to indicate if the translation and/or audio will be shown next to the original conversation.
“message_counter” is a counter that adds one whenever a message from chabot is displayed. The idea is to assign the message ID with this counter, as Streamlit requires that each UI component needs to have a unique ID.
Now we can introduce the logic of letting two chatbots interact and generate conversations:
if 'dual_chatbots' not in st.session_state:

    if st.sidebar.button('Generate'):

        # Add flag to indicate if this is the first time running the script
        st.session_state["first_time_exec"] = True

        with conversation_container:
            if learning_mode == 'Conversation':
                st.write(f"""#### The following conversation happens between
                                {role1} and {role2} {scenario} 🎭""")

            else:
                st.write(f"""#### Debate 💬: {scenario}""")

            # Instantiate dual-chatbot system
            dual_chatbots = DualChatbot(engine, role_dict, language, scenario,
                                        proficiency_level, learning_mode, session_length)
            st.session_state['dual_chatbots'] = dual_chatbots

            # Start exchanges
            for _ in range(MAX_EXCHANGE_COUNTS[session_length][learning_mode]):
                output1, output2, translate1, translate2 = dual_chatbots.step()

                mesg_1 = {"role": dual_chatbots.chatbots['role1']['name'],
                        "content": output1, "translation": translate1}
                mesg_2 = {"role": dual_chatbots.chatbots['role2']['name'],
                        "content": output2, "translation": translate2}

                new_count = show_messages(mesg_1, mesg_2,
                                          st.session_state["message_counter"],
                                          time_delay=time_delay, batch=False,
                                          audio=False, translation=False)
                st.session_state["message_counter"] = new_count

                # Update session state
                st.session_state.bot1_mesg.append(mesg_1)
                st.session_state.bot2_mesg.append(mesg_2)
Upon running the script for the first time, there will be no “dual_chatbots” key stored in the session_state (as the dual-chatbot has not been created yet). As a result, the code snippet shown above will be executed when the user hits the “Generate” button on the sidebar. The two chatbots will chat back and forth a given number of times, and all the conversation messages are recorded in the session_state. The show_message()function is a helper function designed to be the sole interface to style the message display. We will go back to it at the end of this section.
Now, if the user interacts with the app and changes some settings, Streamlit will rerun the entire script from the top. Since we have already generated the desired conversation script, there is no need to invoke OpenAI API again. Instead, we can simply retrieve the stored information:
if 'dual_chatbots' in st.session_state:

    # Show translation
    if translate_col.button('Translate to English'):
        st.session_state['translate_flag'] = True
        st.session_state['batch_flag'] = True

    # Show original text
    if original_col.button('Show original'):
        st.session_state['translate_flag'] = False
        st.session_state['batch_flag'] = True

    # Append audio
    if audio_col.button('Play audio'):
        st.session_state['audio_flag'] = True
        st.session_state['batch_flag'] = True

    # Retrieve generated conversation & chatbots
    mesg1_list = st.session_state.bot1_mesg
    mesg2_list = st.session_state.bot2_mesg
    dual_chatbots = st.session_state['dual_chatbots']

    # Control message appearance
    if st.session_state["first_time_exec"]:
        st.session_state['first_time_exec'] = False

    else:
        # Show complete message
        with conversation_container:

            if learning_mode == 'Conversation':
                st.write(f"""#### {role1} and {role2} {scenario} 🎭""")

            else:
                st.write(f"""#### Debate 💬: {scenario}""")

            for mesg_1, mesg_2 in zip(mesg1_list, mesg2_list):
                new_count = show_messages(mesg_1, mesg_2,
                                        st.session_state["message_counter"],
                                        time_delay=time_delay,
                                        batch=st.session_state['batch_flag'],
                                        audio=st.session_state['audio_flag'],
                                        translation=st.session_state['translate_flag'])
                st.session_state["message_counter"] = new_count
Note that there is another flag called “first_time_exec” in the session state. This is used to indicate if the originally generated script has already been shown on the app. If we remove this check, the same messages will appear twice when running the app for the first time.
The only thing left is the inclusion of the summary of key learning points in the UI. For that, we can use st.expander. In Streamlit, st.expander is useful when we have a large amount of content or information that we want to present in a condensed form, initially hidden from view. When the user clicks the expander, the content within it will expand or collapse, thus revealing or hiding the additional details.
    # Create summary for key learning points
    summary_expander = st.expander('Key Learning Points')
    scripts = []
    for mesg_1, mesg_2 in zip(mesg1_list, mesg2_list):
        for i, mesg in enumerate([mesg_1, mesg_2]):
            scripts.append(mesg['role'] + ': ' + mesg['content'])

    # Compile summary
    if "summary" not in st.session_state:
        summary = dual_chatbots.summary(scripts)
        st.session_state["summary"] = summary
    else:
        summary = st.session_state["summary"]

    with summary_expander:
        st.markdown(f"**Here is the learning summary:**")
        st.write(summary)
Since the summary of key learning points is also generated by calling OpenAI API, we can save the generated summary to the session_state so that the content can be retrieved if the script is run a second time.
Finally, let’s complete the Streamlit UI design with the helper function show_message:
def show_messages(mesg_1, mesg_2, message_counter,
                  time_delay, batch=False, audio=False,
                  translation=False):
    """Display conversation exchanges. This helper function supports
    displaying original texts, translated texts, and audio speech.

    Output:
    -------
    message_counter: updated counter for ID key
    """

    for i, mesg in enumerate([mesg_1, mesg_2]):
        # Show original exchange ()
        message(f"{mesg['content']}", is_user=i==1, avatar_style="bottts",
                seed=AVATAR_SEED[i],
                key=message_counter)
        message_counter += 1

        # Mimic time interval between conversations
        # (this time delay only appears when generating
        # the conversation script for the first time)
        if not batch:
            time.sleep(time_delay)

        # Show translated exchange
        if translation:
            message(f"{mesg['translation']}", is_user=i==1, avatar_style="bottts",
                    seed=AVATAR_SEED[i],
                    key=message_counter)
            message_counter += 1

        # Append autio to the exchange
        if audio:
            tts = gTTS(text=mesg['content'], lang=AUDIO_SPEECH[language])
            sound_file = BytesIO()
            tts.write_to_fp(sound_file)
            st.audio(sound_file)

    return message_counter
A few points warrant further explanation:
1️⃣ The message() object
This is part of the streamlit_chat library and is used to display messages. In its simplest form, we have:
import streamlit as st
from streamlit_chat import message

message("Hellp, I am a Chatbot, how may I help you?")
message("Hey, what's a chatbot", is_user=True) 
where the argument is_user determines if the message should be left-aligned or right-aligned. In our code snippet for show_message, we have also specified avatar_style and seed to set the avatar icons for two chatbots. The key argument is merely for assigning a unique ID for each message, as required by the Streamlit.
2️⃣ Text-to-speech
Here, we use gTTS library to create audio speech in the target language based on the generated script. This library is straightforward to use, but it does have a limitation: you can only have one voice. After the audio object is generated, we can usest.audio to create an audio player for each message in the app.
Great! We have now completed the UI design :) Type the following command in your terminal:
streamlit run app.py
You should see the app in your browser and be able to interact with it. Great job!
5. Learnings and Future Extensions
Before we finish, I want to share with you some key learnings from this project and potential directions for future enhancements.
1️⃣ How to stop the conversation?
This problem is actually harder than it looks if you want to do it right. Ideally, we would like the conversation to end naturally. However, in some of my experiments, I noticed that the chatbots will just keep saying “thank you” or “goodbye” to each other toward the end of the conversation, which unnecessarily elongated the conversation. A few potential solutions to this issue include:
- Hard Limiting of Exchange Rounds: This is perhaps the easiest solution and it’s also what we have adopted in this project. However, it might not always be ideal as it can lead to prematurely terminated conversations. As a workaround, we’ve instructed the bot in the
SystemMessageto finish the conversation within a set number of exchanges. - Use of “Signal Words”: The chatbot could be programmed to say specific ‘signal words’ (e.g., ‘Conversation over’) when it deems the conversation to have naturally ended. A logic could then be implemented to spot these ‘signal words’ and end the loop accordingly.
- Post-Processing of the Conversation: Once the chatbots have generated the conversation, another LLM could be deployed as an “editor” to prune the conversation. This could be an effective approach. However, its drawbacks may include designing an additional prompt, incurring extra costs from calling the OpenAI API again, and increasing latency.
2️⃣ How to control language complexity?
In my experience, the developed chatbots seemed to have difficulty following the instructions regarding the language complexity used in the chat: sometimes “intermediate” level of language usage will appear even though the proficiency level is set to be “beginner”. One reason may be the current prompt design is not sufficient for specifying the nuance between different complexity levels.
There are a couple of ways to address this issue: to begin with, we can perform in-context learning. That is to say, we provide examples to the chatbots and show them what kind of language usage we desire for different complexity levels. Another way forward is similar to what we have discussed above: we could use another LLM to adjust the complexity of the conversation. Essentially, this extra LLM can use the generated script as a starting point and rewrite a new script to match the desired proficiency level of the user.
3️⃣ Better text-to-speech library?
The current project only utilized the simple gTTS library to synthesize voices, there’s room for improvement. More advanced libraries offer multilingual support, multiple-speaker support, and more natural-sounding speech. To name a few: pyttsx3, Amazon Polly, IBM Watson TTS, Microsoft Azure Cognitive Services TTS, Coqui.ai-TTS, as well as a recent release from Meta, Voicebox.
4️⃣ More tests with different scenarios?
Due to time constraints, I tested only a few scenarios to ascertain whether the chatbots can generate meaningful conversations. These tests identified issues in my initial prompt design, providing opportunities for refinement. Additional scenario tests would likely reveal overlooked areas and suggest ways to enhance the prompt. I’ve compiled a comprehensive list of typical “conversation” scenarios and “debate” topics. Feel free to try them out and assess the performance of the current prompt design.
5️⃣ Include other forms of Generative AI?
This project primarily explored text-to-text (chatbot) and text-to-speech generative AI techniques. We could enhance the user experience further by leveraging other forms of generative AI, such as text-to-image or text-to-video.
- Text-to-Image: For every user-inputted scenario, we could use text-to-image models to create corresponding figures. Displaying these figures alongside the generated conversation can provide visual context and enhance language learning engagement. Models like StableDiffusion, Midjourney, and DALL-E could be used for this purpose.
- Text-to-Video: To make the app more multimedia-focused, we could generate videos based on input scenarios. A tool like RunwayML could help with this. Furthermore, we might even attempt to create digital humans to present the conversation, which could dramatically enhance user experience if executed correctly. Synthesia might be a suitable tool for this purpose.
6️⃣ More language learning settings?
At present, our app mainly focuses on “conversation” and “debate” learning modes. However, the potential for growth is substantial. For instance, we could introduce other learning modes such as “storytelling” and “cultural learning.” Additionally, we could expand the chatbots’ interaction to cater to more professional and technical scenarios. These might include settings like meetings, negotiations, or sectors like sales and marketing, law, engineering, and more. Such a feature could be helpful for language learners aiming to bolster their professional language proficiency.
6. Conclusion
Wow, what a journey! Thanks a lot for sticking with me so far :) From designing prompts to creating chatbots, we’ve certainly covered a lot of ground. Using LangChain and Streamlit, we’ve built a functional dual-chatbot system that can be used for learning language, not bad!
If you find my content useful, you could buy me a coffee here 🤗 Thank you very much for your support!


