
Spring Boot | Star Vote
Building a Single Spring Boot App with Keycloak or Okta as IdP: Frontend Implementation
A step-by-step guide for implementing the frontend of the StarVote application

This article is part of a series that explores the implementation of a Single Spring Boot application called StarVote. The application will use Keycloak or Okta as Identity Provider.
In the introductory article, we outline the sections we will cover.
Here’s a sneak peek of how the StarVote application will be at the end!
In this particular article, we’ll shift our focus to the frontend development of the StarVote application. We’ll explore building the user interface with Thymeleaf and HTML.
So, let’s get started!
Still Some Backend Tasks
Add the Thymeleaf dependency
Let’s add the following dependency to the pom.xml file:
<dependency>
   <groupId>org.springframework.boot</groupId>
   <artifactId>spring-boot-starter-thymeleaf</artifactId>
</dependency>
Thymeleaf is a modern server-side Java template engine for web applications. It is widely used with the Spring Framework for creating dynamic web pages. The spring-boot-starter-thymeleaf dependency includes all the necessary libraries and configurations to integrate Thymeleaf into a Spring Boot application.
Create the StarUIController class
In the controller package, create the StarUIController class with the following content:
package com.example.singlestarvoteapp.controller;

import com.example.singlestarvoteapp.model.Star;
import com.example.singlestarvoteapp.service.StarService;
import jakarta.validation.Valid;
import lombok.RequiredArgsConstructor;
import org.springframework.stereotype.Controller;
import org.springframework.ui.Model;
import org.springframework.validation.BindingResult;
import org.springframework.web.bind.annotation.GetMapping;
import org.springframework.web.bind.annotation.PathVariable;
import org.springframework.web.bind.annotation.PostMapping;

@RequiredArgsConstructor
@Controller
public class StarUIController {

    private final StarService starService;

    @GetMapping("/")
    public String index() {
        return "index";
    }

    @GetMapping("/stars-list")
    public String starsList(Model model) {
        model.addAttribute("stars", starService.getStarsSortedByCreated());
        return "stars-list";
    }

    @GetMapping("/stars-rank")
    public String starsRank(Model model) {
        model.addAttribute("stars", starService.getStarsSortedByVotes());
        return "stars-rank";
    }

    @GetMapping("/add-stars")
    public String addStars(Model model) {
        model.addAttribute("addStarRequest", new AddStarRequest());
        return "add-stars";
    }

    @PostMapping("/add-star")
    public String addStar(@Valid AddStarRequest addStarRequest, BindingResult result) {
        if (result.hasErrors()) {
            return "add-stars";
        }
        Star star = new Star();
        star.setName(addStarRequest.getName());
        starService.saveStar(star);
        return "redirect:/stars-list";
    }

    @GetMapping("/vote-stars/{id}")
    public String voteStar(@PathVariable Long id) {
        Star star = starService.getStarById(id);
        starService.incrementStarVotes(star);
        return "redirect:/stars-list";
    }
}
The StarUIController class is a controller that handles HTTP requests and directs them to the appropriate views. It is annotated with @Controller and contains methods annotated with @GetMapping and @PostMapping, which define the URL endpoints for specific actions.
Here’s an overview of the main functionality provided by the methods:
- The
indexmethod handles the root URL (“/”) request and returns the “index” view. - The
starsListmethod handles the “/stars-list” URL request and adds a list of stars sorted by creation date to the model. It returns the “stars-list” view. - The
starsRankmethod handles the “/stars-rank” URL request and adds a list of stars sorted by votes to the model. It returns the "stars-rank" view. - The
addStarsmethod handles the “/add-stars” URL request and adds a newAddStarRequestobject to the model. It returns the "add-stars" view. - The
addStarmethod handles the form submission for adding a star (“/add-star” URL) and performs validation using the@Validannotation. If there are validation errors, it returns the “add-stars” view. Otherwise, it creates a newStarobject, saves it using theStarService, and redirects to the “/stars-list” URL. - The
voteStarmethod handles the “/vote-stars/{id}” URL request, where{id}is a path variable representing the ID of the star to vote for. It retrieves the star using theStarService, increments its vote count usingincrementStarVotes, and redirects to the “/stars-list” URL.
JavaScript Libraries
The StarVote application frontend incorporates the following JavaScript libraries:
- Semantic UI: A front-end framework known for clean and intuitive user interfaces. It offers a wide range of pre-designed components and styles, allowing us to create visually appealing and responsive interfaces effortlessly.
- jQuery: Used for selecting and manipulating HTML elements with CSS-style selectors. jQuery simplifies web development by providing a concise and robust toolkit for HTML document manipulation, event handling, AJAX requests, and dynamic web experiences.
Implementing Frontend
To implement the frontend of the StarVote application, we require five Thymeleaf HTML templates: header.html, index.html, add-stars.html, stars-list.html, and stars-rank.html. Let’s proceed with their creation.
Create the header.html
In resources/templates folder, create the header.html file with the following content:
<!DOCTYPE html>
<html lang="en" xmlns:th="http://www.thymeleaf.org">
<body>

<header>
    <div class="ui massive menu">
        <div class="item">
            <i class="video camera icon"></i>
            StarVote
        </div>
        <a class="item" th:href="@{/}">
            Home
        </a>
        <a class="item" th:href="@{/add-stars}">
            Add Star
        </a>
        <a class="item" th:href="@{/stars-list}">
            Star's List
        </a>
        <a class="item" th:href="@{/stars-rank}">
            Star's Rank
        </a>
    </div>
    <div class="ui divider"></div>
</header>

</body>
</html>
The header.html is responsible for rendering the header section of an HTML document. It contains a navigation menu with links to various pages within the StarVote application. The links are defined using Thymeleaf expressions (th:href) to generate the correct URLs.
Furthermore, the header.html file will be included in all the subsequent Thymeleaf templates we'll discuss, ensuring a consistent header across the application.
Create the index.html
Create the index.html file in the resources/templates folder and populate it with the following content:
<!DOCTYPE html>
<html lang="en" xmlns:th="http://www.thymeleaf.org">
<head>
    <meta charset="UTF-8">
    <title>StarVote</title>
    <link rel="stylesheet" href="https://cdnjs.cloudflare.com/ajax/libs/semantic-ui/2.5.0/semantic.min.css">
</head>
<body>

<div th:insert="~{header :: header}"></div>

<main>
    <div class="ui container">
        <div class="ui basic segment">
            <div class="ui huge center aligned header" style="font-size: 4em">
                Welcome to StarVote
            </div>

            <div class="ui divider"></div>

            <div class="ui five centered doubling cards">
                <div class="card">
                    <div class="image">
                        <img class="ui fluid image" src="https://images.unsplash.com/photo-1532800783378-1bed60adaf58?ixlib=rb-4.0.3&ixid=M3wxMjA3fDB8MHxzZWFyY2h8OTZ8fG1vdmllfGVufDB8MHwwfHx8Mg%3D%3D&auto=format&fit=crop&w=800&q=60">
                    </div>
                </div>
                <div class="card">
                    <div class="image">
                        <img class="ui fluid image" src="https://images.unsplash.com/photo-1594189683218-b5a9a346a43f?ixlib=rb-4.0.3&ixid=M3wxMjA3fDB8MHxzZWFyY2h8MzM1fHxtb3ZpZXxlbnwwfDB8MHx8fDI%3D&auto=format&fit=crop&w=800&q=60">
                    </div>
                </div>
                <div class="card">
                    <div class="image">
                        <img class="ui fluid image" src="https://images.unsplash.com/photo-1460881680858-30d872d5b530?ixlib=rb-4.0.3&ixid=M3wxMjA3fDB8MHxzZWFyY2h8Njd8fG1vdmllfGVufDB8MHwwfHx8Mg%3D%3D&auto=format&fit=crop&w=800&q=60">
                    </div>
                </div>
                <div class="card">
                    <div class="image">
                        <img class="ui fluid image" src="https://images.unsplash.com/photo-1592685530107-f2227c2c6bb3?ixlib=rb-4.0.3&ixid=M3wxMjA3fDB8MHxzZWFyY2h8MjkxfHxtb3ZpZXxlbnwwfDB8MHx8fDI%3D&auto=format&fit=crop&w=800&q=60">
                    </div>
                </div>
                <div class="card">
                    <div class="image">
                        <img class="ui fluid image" src="https://images.unsplash.com/photo-1613679074451-9ddcc1103cc8?ixlib=rb-4.0.3&ixid=M3wxMjA3fDB8MHxzZWFyY2h8MjAwfHxtb3ZpZXxlbnwwfDB8MHx8fDI%3D&auto=format&fit=crop&w=800&q=60">
                    </div>
                </div>
            </div>

            <div class="ui divider"></div>

            <div class="ui large center aligned header">Find the best star for your movie</div>
        </div>
    </div>

</main>

<script src="https://cdnjs.cloudflare.com/ajax/libs/jquery/3.7.0/jquery.min.js"></script>
<script src="https://cdnjs.cloudflare.com/ajax/libs/semantic-ui/2.5.0/semantic.min.js"></script>

</body>
</html>
The index.html serves as the main page. The page features a selection of five captivating Unsplash images to enhance its visual appeal and engage the users.
Create the add-stars.html
In resources/templates folder, create the add-stars.html file with the following content:
<!DOCTYPE html>
<html lang="en" xmlns:th="http://www.thymeleaf.org">
<head>
    <meta charset="UTF-8">
    <title>StarVote</title>
    <link rel="stylesheet" href="https://cdnjs.cloudflare.com/ajax/libs/semantic-ui/2.5.0/semantic.min.css">
</head>
<body>

<div th:insert="~{header :: header}"></div>

<main>
    <div class="ui text container">
        <div class="ui basic segment">
            <form id="starForm" class="ui big form" th:action="@{/add-star}" th:object="${addStarRequest}" th:method="post">
                <h4 class="ui dividing header">Star</h4>
                <div class="required field" th:classappend="${#fields.hasErrors('name')} ? error">
                    <label>Name</label>
                    <input type="text" name="name" th:field="*{name}" autocomplete="off">
                </div>
                <button class="ui blue button" type="submit">Save</button>
            </form>
        </div>
    </div>
</main>

<script src="https://cdnjs.cloudflare.com/ajax/libs/jquery/3.7.0/jquery.min.js"></script>
<script src="https://cdnjs.cloudflare.com/ajax/libs/semantic-ui/2.5.0/semantic.min.js"></script>
<script>
$(function () {
    $('input[name="name"]').focus()

    $('#starForm').on('submit', function(event) {
        if (!$("#name").val()) {
            alert('Please, inform the name of the star!')
            event.preventDefault()
        }
    });
})
</script>

</body>
</html>
The add-stars.html is the page for admins to add new stars. It features a text field where administrators can inform the name of the star that they want to add.
Create the stars-list.html
Create the stars-list.html file in the resources/templates folder and populate it with the following content:
<!DOCTYPE html>
<html lang="en" xmlns:th="http://www.thymeleaf.org">
<head>
    <meta charset="UTF-8">
    <title>StarVote</title>
    <link rel="stylesheet" href="https://cdnjs.cloudflare.com/ajax/libs/semantic-ui/2.5.0/semantic.min.css">
</head>
<body>

<div th:insert="~{header :: header}"></div>

<main>
    <div class="ui floating warning message" th:if="${#lists.isEmpty(stars)}">
        <div class="ui center aligned header">The stars list is empty. Add some now!</div>
    </div>

    <div class="ui container">
        <div class="ui basic segment">
            <div class="ui five stackable doubling centered cards">
                <div class="card" th:each="star:${stars}">
                    <div class="image">
                        <img th:src="@{${star.avatarUrl}}">
                    </div>
                    <div class="content">
                        <div class="header" th:text="${star.name}"></div>
                    </div>
                    <div class="extra content">
                        <div class="ui large circular black label">
                            Votes
                            <div class="detail" th:text="${star.votes}">214</div>
                        </div>
                        <a class="ui right floated primary basic blue button"
                           th:href="@{/vote-stars/{id}(id = ${star.id})}">Vote</a>
                    </div>
                </div>
            </div>
        </div>
    </div>
</main>

<script src="https://cdnjs.cloudflare.com/ajax/libs/jquery/3.7.0/jquery.min.js"></script>
<script src="https://cdnjs.cloudflare.com/ajax/libs/semantic-ui/2.5.0/semantic.min.js"></script>

</body>
</html>
The stars-list.html is the page that lists all the stars and allows users to vote for them.
Create the stars-rank.html
In resources/templates folder, create the stars-rank.html file with the following content:
<!DOCTYPE html>
<html lang="en" xmlns:th="http://www.thymeleaf.org">
<head>
    <meta charset="UTF-8">
    <title>StarVote</title>
    <link rel="stylesheet" href="https://cdnjs.cloudflare.com/ajax/libs/semantic-ui/2.5.0/semantic.min.css">
</head>
<body>

<div th:insert="~{header :: header}"></div>

<main>
    <div class="ui floating warning message" th:if="${#lists.isEmpty(stars)}">
        <div class="ui center aligned header">The stars list is empty. Add some now!</div>
    </div>

    <div class="ui container">
        <div class="ui basic segment">
            <div class="ui massive ordered middle aligned divided list">
                <div class="item" th:each="star:${stars}">
                    <div class="right floated content">
                        <div class="description">Votes: <span th:text="${star.votes}"></span></div>
                    </div>
                    <img class="ui avatar image" th:src="@{${star.avatarUrl}}">
                    <div class="content">
                        <div class="header" th:text="${star.name}"></div>
                    </div>
                </div>
            </div>
        </div>
    </div>
</main>

<script src="https://cdnjs.cloudflare.com/ajax/libs/jquery/3.7.0/jquery.min.js"></script>
<script src="https://cdnjs.cloudflare.com/ajax/libs/semantic-ui/2.5.0/semantic.min.js"></script>

</body>
</html>
The stars-rank.html is the page that presents a ranking list of stars based on the number of votes, with the stars having the highest votes appearing at the top.
Testing StarVote UI
In a terminal, make sure you are in the root folder of the StarVote application. Then, run the following command to start the application:
./mvnw clean spring-boot:run
Once the application is started, let’s open a browser and access: http://localhost:8080. The following should be displayed:
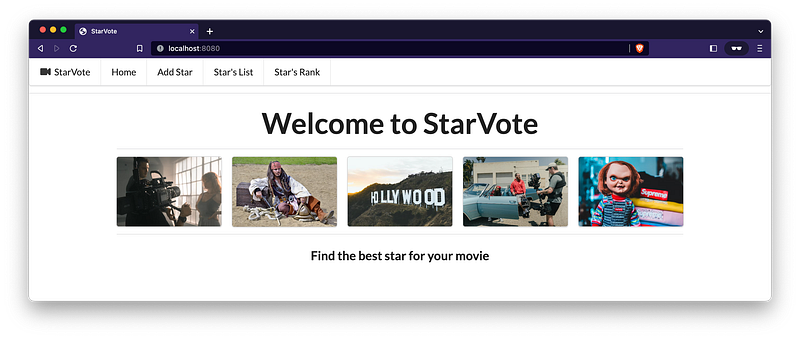
Congratulations! The StarVote Website is working! 🎉
Please feel free to play with it! 😃 You can add some movie stars and vote for them! Also, you can check the Star’s rank.
To shut it down, go to the terminal where it’s running and press Ctrl+C.
Up Next
We will explore how to implement security to the StarVote application.
We hope you are enjoying the StarVote Tutorial series!
Support and Engagement
If you enjoyed this article and would like to show your support, please consider taking the following actions:
- 👏 Engage by clapping, highlighting, and replying to my story. I’ll be happy to answer any of your questions;
- 🌐 Share my story on Social Media;
- 🔔 Follow me on: Medium | LinkedIn | Twitter | GitHub;
- ✉️ Subscribe to my newsletter, so you don’t miss out on my latest posts.


