
Spring Boot | Star Vote
Building a Single Spring Boot App with Keycloak or Okta as IdP: Enabling Okta as IdP
A step-by-step guide on how to enable Okta as Identity Provider to the StarVote application

This article is part of a series that explores the implementation of a Single Spring Boot application called StarVote. The application will use Keycloak or Okta as Identity Provider.
In the introductory article, we outline the sections we will cover:
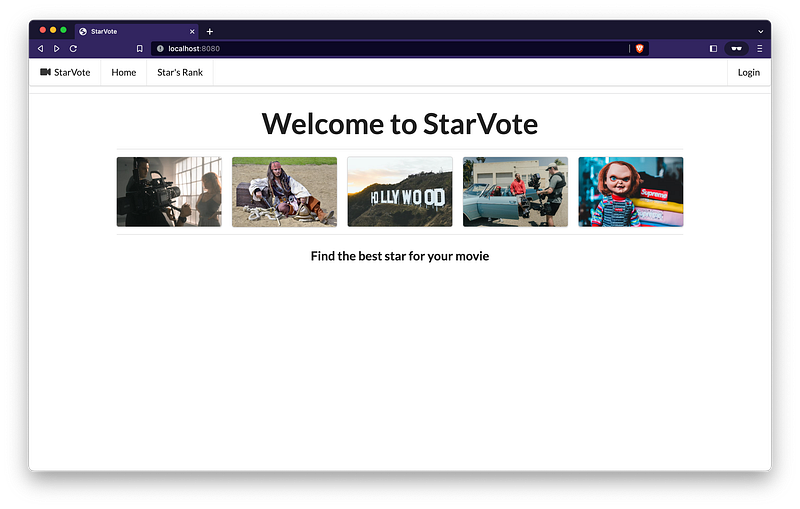
Here’s a sneak peek of how the StarVote application will be at the end!
In this particular article, we’ll explore how to enable authentication using Okta as an Identity Provider, covering the necessary configurations and integration steps.
So, let’s get started!
Configuring Okta
Access Developer Edition Account
- If you don’t have a Developer Edition Account yet, you can create one by visiting https://developer.okta.com/signup/.
- If you already have an account, simply access https://developer.okta.com/login/.
Add Application
- In the “Okta Admin Dashboard” main menu on the left, click “Applications” menu and then “Applications” sub-menu;
- On the next page, click
Create App Integrationbutton; - Select
OIDC - OpenID Connectas “Sign on method”,Web Applicationas “Application type”, and clickNext; - In the “New Web App Integration” form:
- Set
star-votein “App integration name” field; - Check
Authorization CodeandImplicit (hybrid)in “Grant type”; - For “Sign-in redirect URIs”, add
http://localhost:8080/login/oauth2/code/oktaandhttp://localhost:8080/api/callback/token; - For “Sign-out redirect URIs”, add
http://localhost:8080; - For “Controlled access”, select
Skip group assignment for now; - Click
Save;
5. The Client ID and Client Secret are generated. The Okta Domain can be obtained by clicking the button-menu present on the up-right corner of the screen.
Create groups
- In the “Okta Admin Dashboard” main menu on the left, click “Directory” menu and then “Groups” sub-menu;
- Let’s create the Admin’s group:
- Click
Add Group; - Enter
STAR-VOTE-ADMINfor the “Name” text-field; - Click
Save;
3. Let’s repeat the same process to create the Users’s group:
- Click
Add Group; - Enter
STAR-VOTE-USERfor the “Name” text-field; - Click
Save;
Add an Admin
- In the “Okta Admin Dashboard” main menu on the left, click “Directory” menu and then “People” sub-menu;
- Click
Add personbutton; - Enter the following information for the Admin:
- For “First name”, set
App; - For “Last name”, set
Admin; - For “Username”, set
[email protected]; - The “Primary email” will be filled with the same content as the “Username”;
- In “Groups”, start typing
STAR. TheSTAR-VOTE-ADMINgroup will pop up. Select it to add it; - In “Password”, select
Set by admin; - Set a strong password in the text-field that will appear;
- Uncheck the check-box that says "User must change password on first login";
- Click
Save.
Assign Groups to Application
- In the “Okta Admin Dashboard” main menu on the left, click “Directory” menu and then “Groups” sub-menu;
- Select the
STAR-VOTE-ADMINgroup by clicking on its name; - Click “Applications” tab and then, click
Assign Applications; - Click the
Assignbutton related tostar-voteapplication and then clickDone; - Repeat the same process for the
STAR-VOTE-USERgroup.
Add Claim
- In the “Okta Admin Dashboard” main menu on the left, click “Security” menu and then “API” sub-menu;
- In “Authorization Servers” tab, select the
defaultby clicking on its name; - In “Claims” tab, click
Add Claim; - Enter the following information for the new claim:
- For the “Name”, type
groups; - For the “Include in token type” field, select
Access Tokenand keepAlwaysin the right field; - For the
Value type, selectGroups; - For the “Filter” field, select
Matches regrexand set.*in the right field - For the “Include in” select
Any scope; - Click
Create.
Enable the Registration of New Users
- In the “Okta Admin Dashboard” main menu on the left, click “Directory” menu and then “Self-Service Registration” sub-menu;
- In the “Self-Service Registration” screen, click
Enable Registrationbutton or, in case you have already done it before, edit the “Self-Service Registration” form; - Make sure the “Self-service registration” field is set to
Enabled; - In “Registration” section, set
STAR-VOTE-USERgroup to the field “Assign to group”; - In “Post-registration” section, “Activation requirements” field, disable the checkbox that says: “User must verify email address to be activated”;
- Click
Save.
That is it. Okta is configured!
Backend & Frontend Modifications
Update the application.properties
Let’s add the following lines to application.properties file:
jwt.auth.converter.principal-attribute=email

spring.security.oauth2.resourceserver.jwt.issuer-uri=https://${OKTA_DOMAIN}/oauth2/default

spring.security.oauth2.client.provider.okta.issuer-uri=https://${OKTA_DOMAIN}/oauth2/default
spring.security.oauth2.client.provider.okta.user-name-attribute=${jwt.auth.converter.principal-attribute}

spring.security.oauth2.client.registration.okta.clientId=${OKTA_CLIENT_ID}
spring.security.oauth2.client.registration.okta.clientSecret=${OKTA_CLIENT_SECRET}
spring.security.oauth2.client.registration.okta.scope=openid,profile,email- The
jwt.auth.converter.principal-attributeproperty configures the principal attribute. It determines how the user is identified in the JWT. - The
spring.security.oauth2.resourceserver.jwt.issuer-uriproperty specifies the URI of the issuer for JWT tokens. The issuer URI is used to verify the authenticity and integrity of the JWT token received by the resource server; - The
spring.security.oauth2.client.provider.okta.issuer-urispecifies the URI of the OpenID Connect (OIDC) provider (in this case, Okta) for the OAuth 2.0 client. This URI is used to configure the client to authenticate and interact with the OIDC provider during the OAuth 2.0 flow; - The
spring.security.oauth2.client.provider.okta.user-name-attributespecifies the attribute in the JWT token that represents the username or user identifier. The username attribute is used to identify the user in the application; - The
spring.security.oauth2.client.registration.okta.clientIdspecifies the client ID for the OAuth 2.0 client. - The
spring.security.oauth2.client.registration.okta.clientSecretspecifies the client secret for the OAuth 2.0 client; - The
spring.security.oauth2.client.registration.okta.scopespecifies the scope requested by the OAuth 2.0 client during the authorization process. Scopes define the permissions and access rights requested by the client. In this configuration, the client requests theopenid,profile, andemailscopes, which are commonly used to access basic user information and profile details.
Update the login.html
Let’s apply the following change (highlighted in bold) in login.html:
<!DOCTYPE html>
<html lang="en" xmlns:th="http://www.thymeleaf.org">
...

<body>

<div class="ui center aligned basic segment">
    ...
    <div class="ui compact labeled icon menu">
        <a class="item" th:href="@{/oauth2/authorization/okta}">
            <i class="openid alternate icon"></i>
            Okta
        </a>
    </div>
</div>

...
</body>
</html>
The th:href="@{/oauth2/authorization/okta}" is a Thymeleaf attribute used in an anchor tag (<a>) to specify the URL for the Okta authentication. This endpoint initiates the OAuth2 authorization flow with the chosen identity provider. When the user clicks on the corresponding link, it triggers the authentication process and redirects them to the appropriate authorization page.
Update the StarAPIController class
Let’s add a new endpoint in StarAPIControlle class:
@RequestMapping("/api")
public class StarAPIController {
    ...

    @PostMapping("/callback/token")
    public Map<String, String> callbackToken(@RequestBody MultiValueMap<String, String> queryMap) {
        return queryMap.toSingleValueMap();
    }
}
The callbackToken method handles a POST request sent to the /api/callback/token endpoint. This endpoint is used to handle the callback from Okta after successful authentication, extracting relevant information from the request.
Update the WebSecurityConfig class
In WebSecurityConfig class, let’s implement the following changes:
- Let’s modify the configuration to allow unrestricted access to perform HTTP POST requests to the
/api/callback/tokenendpoint; - Provide the implementation to the
extractRolesmethod.
public class WebSecurityConfig {
    ...

    @Bean
    public SecurityFilterChain securityFilterChain(HttpSecurity http) throws Exception {
        return http
                .authorizeHttpRequests(authorizeHttpRequests -> authorizeHttpRequests
                        ...
                        .requestMatchers(HttpMethod.POST, "/api/callback/token").permitAll()
                        ...
    }

    private Collection<? extends GrantedAuthority> extractRoles(Jwt jwt) {
        Collection<String> groups = jwt.getClaim("groups");
        if (groups == null) {
            return Collections.emptySet();
        }
        return groups.stream()
                .map(role -> new SimpleGrantedAuthority("ROLE_" + role))
                .collect(Collectors.toSet());
    }
}
Testing StarVote application
Start StarVote
Make sure you are in the root folder of the StarVote application in the terminal.
Export to the OKTA_DOMAIN, OKTA_CLIENT_ID and OKTA_CLIENT_SECRET environment variables, the values provided by Okta.
export OKTA_DOMAIN=<your-okta-domain>
export OKTA_CLIENT_ID=<star-vote-client-id-provided-by-okta>
export OKTA_CLIENT_SECRET=<star-vote-client-secret-provided-by-okta>
Then, run the following command:
./mvnw clean spring-boot:run
Testing StarVote UI
Once the application is started, let’s open a browser and access: http://localhost:8080.
Then, click the Login button present on the top-right of the screen and select Okta.
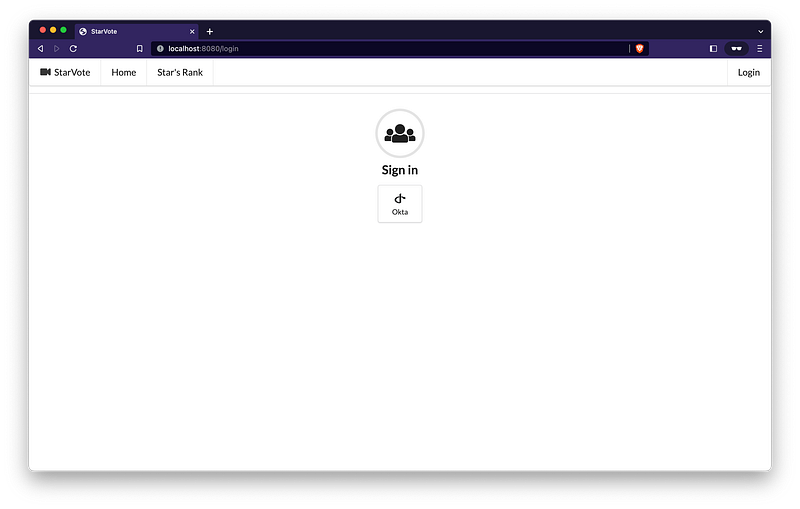
The Okta login page will appear.
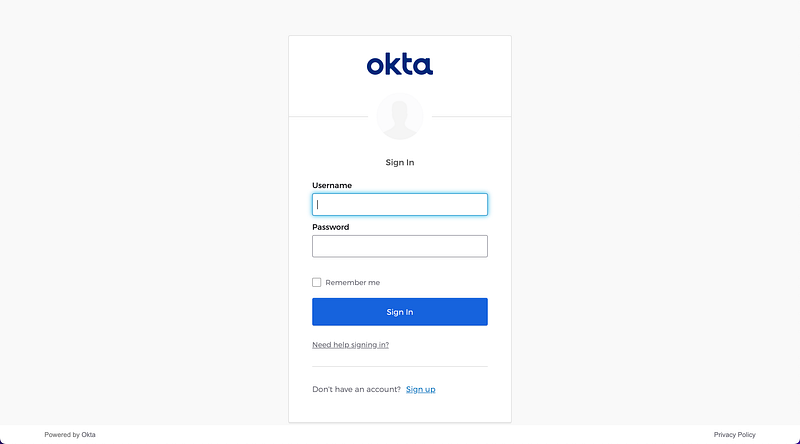
Enter [email protected] in the “Username” field, and provide the password you used during the admin creation in the “Password” field.
You are in! 🎉

Feel free to add your favorite movie stars or even register as a new user on StarVote! 😃
Testing StarVote API
Once the application is started, we can submit requests to its endpoints. Let’s try to retrieve all the stars. So, open another terminal and run the following command:
curl -i http://localhost:8080/api/stars
This command will return an HTTP 401 response, as the endpoint is now secured.
In order to access it, we need to provide an Bearer access token.
- In a terminal, create the following environment variables:
OKTA_DOMAIN=<your-okta-domain>
OKTA_CLIENT_ID=<star-vote-client-id-provided-by-okta>
2. Then, run the following commands to get “Okta Access Token URL”:
OKTA_ACCESS_TOKEN_URL="https://${OKTA_DOMAIN}/oauth2/default/v1/authorize?\
client_id=${OKTA_CLIENT_ID}\
&redirect_uri=http://localhost:8080/api/callback/token\
&scope=openid\
&response_type=token\
&response_mode=form_post\
&state=state\
&nonce=myNonceValue"

echo $OKTA_ACCESS_TOKEN_URL
3. Copy the “Okta Access Token URL” from the previous step and paste it in a browser;
4. The Okta login page will appear. Provide the app-admin’s Username & Password and click Sign In;
5. It will redirect to api/callback/token endpoint of star-vote application and the Access token will be displayed, together with other information:
{
    "state": "state",
    "access_token": "eyJraWQiOiJ2SnpILThkQlV1X0RuX19fNVJ4MVV...",
    "token_type": "Bearer",
    "expires_in": "3600",
    "scope": "openid"
}
6. Let’s copy and set it to another environment variable called APP_ADMIN_ACCESS_TOKEN
Note: you will get a different
access_token!
APP_ADMIN_ACCESS_TOKEN=eyJraWQiOiJ2SnpILThkQlV1X0RuX19fNVJ4MVV...
We can inspect the access token using jwt.io website. After decoding it, we have the following for header and payload:
header
{
  "kid": "vJzH-8dBUu_Dn___5Rx1UzPMUkM0AwwB274iwLgh3eQ",
  "alg": "RS256"
}
payload
{
  "ver": 1,
  "jti": "AT.P9qYWLfFskfDRPGXV5elUejIzlFcHycehWwIGTpf7q0",
  "iss": "https://dev-xxxxxx.okta.com/oauth2/default",
  "aud": "api://default",
  "iat": 1686244166,
  "exp": 1686247766,
  "cid": "0oaszfsj6qbrvYHZ2357",
  "uid": "00uszg1vv6oElxd3z357",
  "scp": [
    "openid"
  ],
  "auth_time": 1686244165,
  "sub": "[email protected]",
  "groups": [
    "Everyone",
    "STAR-VOTE-ADMIN"
  ]
}
Looking closed the payload, we can see the “groups” field. It contains the role STAR-VOTE-ADMIN.
7. Let’s proceed and provide the APP_ADMIN_ACCESS_TOKEN in the next call to the /api/stars endpoint. Here is the updated cURL command:
curl -i http://localhost:8080/api/stars -H "Authorization: Bearer $APP_ADMIN_ACCESS_TOKEN"This command should return an HTTP 200 response with an array of stars (maybe empty in case you haven’t added any star).
The API is working great! 🎉
8. To shut it down, go to the terminal where it’s running and press Ctrl+C.
Okta Cleanup
Once you no longer require the Okta configuration, let’s clean up the configuration that we have set up.
Delete Admin
- In the “Okta Admin Dashboard” main menu on the left, click “Directory” menu and then “People” sub-menu;
- Select the
App Adminby clicking on its name; - In
App Adminprofile, clickMore Actionsmulti-button and thenDeactivateand confirm deactivation; - Still in
App Adminprofile, clickDeletebutton and confirm deletion;
Delete Groups
- In the “Okta Admin Dashboard” main menu on the left, click “Directory” menu and then “Groups” sub-menu;
- Select
STAR-VOTE-ADMINgroup by clicking on its name; - In
STAR-VOTE-ADMINprofile, clickActionsand then clickDeletesub-button. Confirm deletion by clickingDelete Groupbutton; - Do the same process to
STAR-VOTE-USERgroup.
Delete Application
- In the “Okta Admin Dashboard” main menu on the left, click “Applications” menu and then “Applications” sub-menu;
- In Application list whose status is
ACTIVE, clickstar-vote's gear icon and then clickDeactivate; Confirm deactivation by clickingDeactivate Applicationbutton; - Now, in Application list whose status is
INACTIVE, clickstar-vote's gear icon and then clickDelete. Confirm deletion by clickingDelete Applicationbutton;
Delete Claim
- In the “Okta Admin Dashboard” main menu on the left, click “Security” menu and then “API” sub-menu;
- In “Authorization Servers” tab, select the
defaultby clicking on its name; - In “Claims” tab, click the
xicon related to thegroupsclaim created; - Confirm deletion by clicking
OKbutton.
Disable the Registration of New Users
- In the “Okta Admin Dashboard” main menu on the left, click “Directory” menu and then “Self-Service Registration” sub-menu;
- In the “Self-Service Registration” screen, click the
editlink present on the right of the screen; - Select the
Disabledfor “Self-service registration” field; - Click
Save.
That’s it
This concludes the series where we provided detailed explanations on implementing the StarVote application using Spring Boot and securing it with Keycloak or Okta as Identity Provider.
We hope you found it enjoyable and informative.
Support and Engagement
If you enjoyed this article and would like to show your support, please consider taking the following actions:
- 👏 Engage by clapping, highlighting, and replying to my story. I’ll be happy to answer any of your questions;
- 🌐 Share my story on Social Media;
- 🔔 Follow me on: Medium | LinkedIn | Twitter | GitHub;
- ✉️ Subscribe to my newsletter, so you don’t miss out on my latest posts.


