
Building a RESTful API with NestJS, TypeScript, and ExpressJS: A Comprehensive Guide
NestJs for beginners

NestJS is a rapidly growing Node.js framework gaining popularity for its robust architecture, TypeScript support, and extensive features for building scalable and maintainable applications. In this article, I’ll walk you through building a RESTful API from scratch using these technologies.
Prerequisites
Before we dive into building our API, make sure you have the following prerequisites:
- Node.js and npm (Node Package Manager): Ensure you have Node.js (v12 or higher) and npm (v6 or higher) installed on your machine.
- Familiarity with RESTful API concepts.
- IDE/Text Editor: Choose an IDE or text editor of your preference. Popular options include Visual Studio Code, WebStorm, and Atom.
- TypeScript: Basic knowledge of TypeScript and you should have it installed globally. If not, you can install it with the following command.
npm install -g typescript
Setting Up the Project
Let’s start by creating a new NestJS project using the Nest CLI (Command Line Interface). Open your terminal and run the following commands:
npm install -g @nestjs/cli
nest new nestjs-api
cd nestjs-api
This will create a new NestJS project with the necessary boilerplate code and dependencies.
Creating a RESTful Resource
In our API, we’ll create a simple resource for managing tasks. We’ll have endpoints to list all tasks, get a single task, create a new task, update a task, and delete a task.
Generate a Task Module
In NestJS, modules are used to organize code. Let’s generate a module for our task resource:
nest generate module tasksThis command creates a tasks directory with the necessary module files.
Generate a Task Controller
Controllers handle incoming HTTP requests. Generate a controller for our tasks:
nest generate controller tasks
This command generates a tasks.controller.ts file with a basic controller structure.
Define a Task Model
We need a data structure to represent tasks. Create a task.model.ts file inside the tasks directory:
Implementing the Task Controller
In tasks.controller.ts, define the routes and implement the CRUD operations for tasks:
// src/tasks/tasks.controller.ts

import { Controller, Get, Post, Put, Delete, Body, Param } from '@nestjs/common';
import { Task } from './tasks.model';

@Controller('tasks')
export class TasksController {
  private tasks: Task[] = [];

  @Get()
  getAllTasks(): Task[] {
    return this.tasks;
  }

  @Get(':id')
  getTaskById(@Param('id') id: string): Task {
    return this.tasks.find(task => task.id === id);
  }

  @Post()
  createTask(@Body() task: Task): Task {
    task.id = (this.tasks.length + 1).toString();
    this.tasks.push(task);
    return task;
  }

  @Put(':id')
  updateTask(@Param('id') id: string, @Body() updatedTask: Task): Task {
    const taskIndex = this.tasks.findIndex(task => task.id === id);
    if (taskIndex !== -1) {
      this.tasks[taskIndex] = updatedTask;
      return updatedTask;
    }
    return null;
  }

  @Delete(':id')
  deleteTask(@Param('id') id: string): void {
    this.tasks = this.tasks.filter(task => task.id !== id);
  }
}
Creating a Service
Controllers should delegate business logic to services. Generate a service for tasks:
nest generate service tasks
This command generates a tasks.service.ts file. Implement the service to manage tasks:
// src/tasks/tasks.service.ts

import { Injectable } from '@nestjs/common';
import { Task } from './task.model';

@Injectable()
export class TasksService {
  private tasks: Task[] = [];

  getAllTasks(): Task[] {
    return this.tasks;
  }

  getTaskById(id: string): Task {
    return this.tasks.find(task => task.id === id);
  }

  createTask(task: Task): Task {
    task.id = (this.tasks.length + 1).toString();
    this.tasks.push(task);
    return task;
  }

  updateTask(id: string, updatedTask: Task): Task {
    const taskIndex = this.tasks.findIndex(task => task.id === id);
    if (taskIndex !== -1) {
      this.tasks[taskIndex] = updatedTask;
      return updatedTask;
    }
    return null;
  }

  deleteTask(id: string): void {
    this.tasks = this.tasks.filter(task => task.id !== id);
  }
}
Wiring Everything Together
Now, let’s connect the controller and service by modifying the tasks.module.ts file:
// src/tasks/tasks.module.ts

import { Module } from '@nestjs/common';
import { TasksController } from './tasks.controller';
import { TasksService } from './tasks.service';

@Module({
  controllers: [TasksController],
  providers: [TasksService],
})
export class TasksModule {}
Setting Up Routes and Validation
NestJS makes it easy to define routes and add validation to our API. To do this, we’ll need to install a few packages.
Installing Dependencies
Install the following dependencies:
npm install --save @nestjs/swagger class-validator class-transformer@nestjs/swagger: Provides decorators for generating Swagger documentation.class-validatorandclass-transformer: Help with data validation and transformation.
Configuring Validation
In main.ts, add the following code to the existing code to enable global validation and transformation:
import { NestFactory, Reflector } from '@nestjs/core';
import { TasksModule } from './tasks/tasks.module';
import { ValidationPipe, ClassSerializerInterceptor } from '@nestjs/common';

async function bootstrap() {
  const app = await NestFactory.create(TasksModule);

  // Enable global validation
  app.useGlobalPipes(new ValidationPipe());

  // Enable serialization of response objects
  app.useGlobalInterceptors(new ClassSerializerInterceptor(app.get(Reflector)));


  await app.listen(3000);
}
bootstrap();
Adding Validation to DTOs
Create DTOs (Data Transfer Objects) for request and response payloads. For example, create a create-task.dto.ts file:
import { IsNotEmpty } from 'class-validator';

export class CreateTaskDto {
  @IsNotEmpty()
  title: string;

  @IsNotEmpty()
  description: string;
}
Then, use these DTOs in your controller methods, you can create updateTaskDto validation depending on the project specification:
// src/tasks/tasks.controller.ts

import { Body, Param, ParseIntPipe } from '@nestjs/common';
import { CreateTaskDto } from './dto/create-task.dto';
// ...

@Controller('tasks')
export class TasksController {
  // ...

  @Post()
  createTask(@Body() task: CreateTaskDto): Task {
    // ...
  }

  @Put(':id')
  updateTask(
    @Param('id', ParseIntPipe) id: number,
    @Body() updateTaskDto: UpdateTaskDto,
  ): Task {
    // ...
  }
}
You can update your code with updateTaskDto if it's created.
Your controller file will end up looking like this:
// src/tasks/tasks.controller.ts

import { Controller, Get, Post, Put, Delete, Body, Param } from '@nestjs/common';
import { Task } from './tasks.model';
import { CreateTaskDto } from './dto/create-task.dto';

@Controller('tasks')
export class TasksController {
  private tasks: Task[] = [];

  @Get()
  getAllTasks(): Task[] {
    return this.tasks;
  }

  @Get(':id')
  getTaskById(@Param('id') id: string): Task {
    return this.tasks.find(task => task.id === id);
  }

  @Post()
  createTask(@Body() task: CreateTaskDto): Task {
    const newTask: Task = {
      id: (this.tasks.length + 1).toString(),
      title: task.title,
      description: task.description,
      done: false,
    };
    this.tasks.push(newTask);
    return newTask;
  }

// you can add
  @Put(':id')
  updateTask(@Param('id') id: string, @Body() updatedTask: Task): Task {
    const taskIndex = this.tasks.findIndex(task => task.id === id);
    if (taskIndex !== -1) {
      this.tasks[taskIndex] = updatedTask;
      return updatedTask;
    }
    return null;
  }

  @Delete(':id')
  deleteTask(@Param('id') id: string): void {
    this.tasks = this.tasks.filter(task => task.id !== id);
  }
}TasksControllerdefines routes for handling GET, POST, PUT, and DELETE requests for managing tasks.- It uses the
CreateTaskDtoclass for request validation when creating a new task. - The
CreateTaskDtoclass is defined in thecreate-task.dto.tsfile and enforces that thetitleanddescriptionfields are not empty.
Testing the API
With the API implementation in place, it’s time to test it:
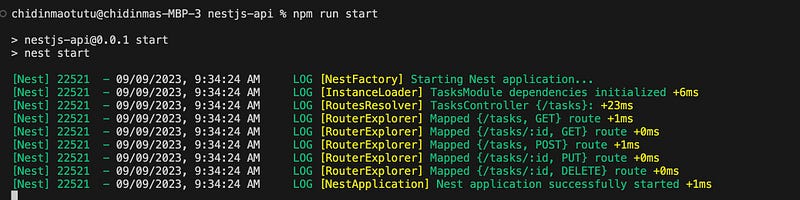
- Start the NestJS application:
npm run startYour terminal should look like this
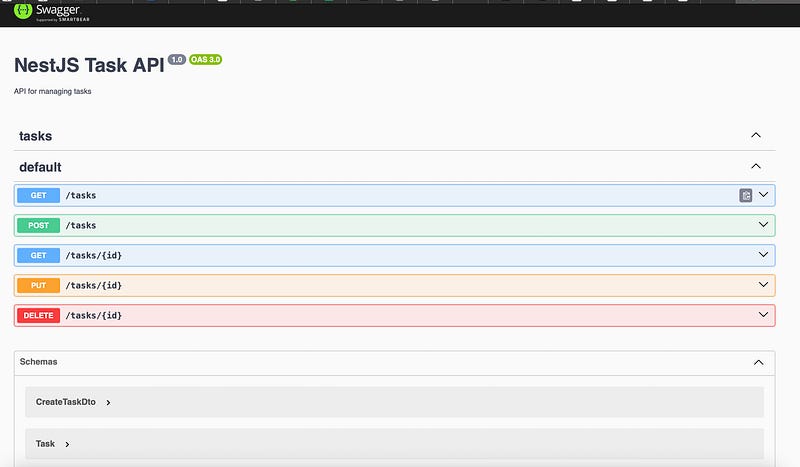
- Open your browser and navigate to
http://localhost:3000/apito access the Swagger documentation for your API. It should look like this:
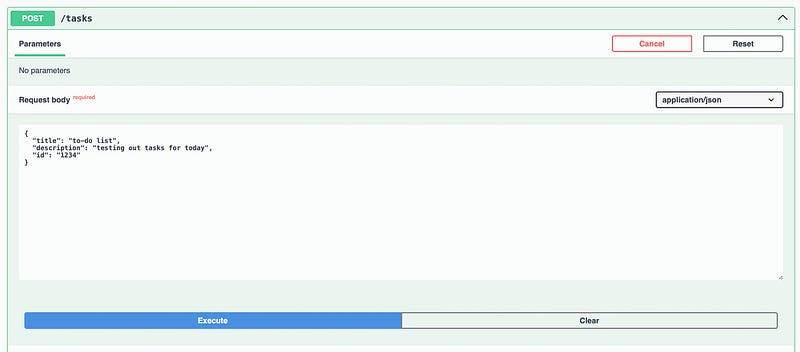
- Use Swagger’s interface to test the API endpoints you’ve created.
Example:
Creating a task
{
  "title": "to-do list",
  "description": "testing out tasks for today",
  "id": "1234"
}
We click on the POST method and paste the JSON object of the value we want to pass:
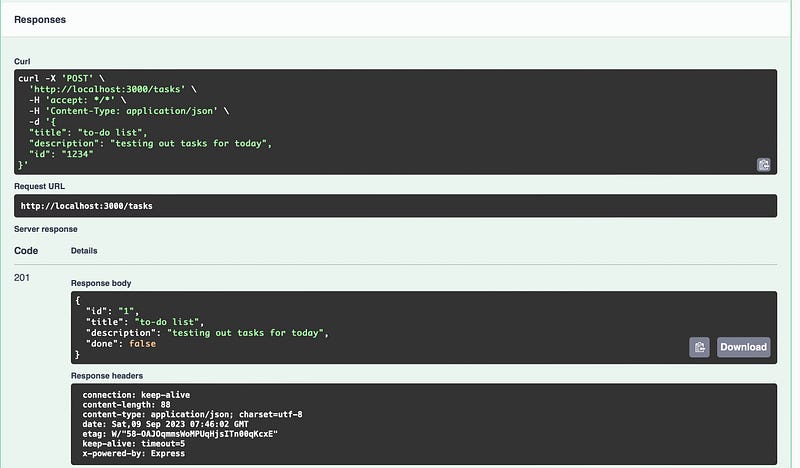
Click on execute to get the response:
You’ve successfully built a RESTful API using NestJS, TypeScript, and ExpressJS. This comprehensive guide covered the entire process, from project setup to implementing CRUD operations and adding validation and documentation.
You can further enhance your API by adding authentication, database integration, and more features as needed. Feel free to ask any questions in the comments. Goodluck coding!
I hope you enjoyed reading this. If you’d like to support me as a writer, consider signing up to become a Medium member. It’s just $5 a month, and you get unlimited access to Medium.


