
Building a Local ChatBot on your Local PC (100% Offline & 100% Privacy)
Use Large language models offline on your local PC which are smaller than 1 GB based on Python, Langchain and Streamlit

The Challenge
The massive computational requirements of the largest language models can be daunting for small and medium businesses or individual users. Despite their impressive performance, these models’ size makes them challenging to deploy, especially in bandwidth or hardware-constrained environments.
However, it’s important to note that a range of LLMs is available today, some of which are designed to balance performance and size, making them perfect for local deployment.
Another important aspect of these local deployment models is that they work OFFLINE, no data is shared with other companies.
This article will guide you through and provide insights into how one can build an effective local ChatBot leveraging LLMs that are under 1GB in size.
- Setup (Virtual Environment, Python Packages, Dependencies, …)
- Download of the LaMini-LM Model
- Proof of Concept: Testing the quality of the model
- Integration into Streamlit
- Next Steps
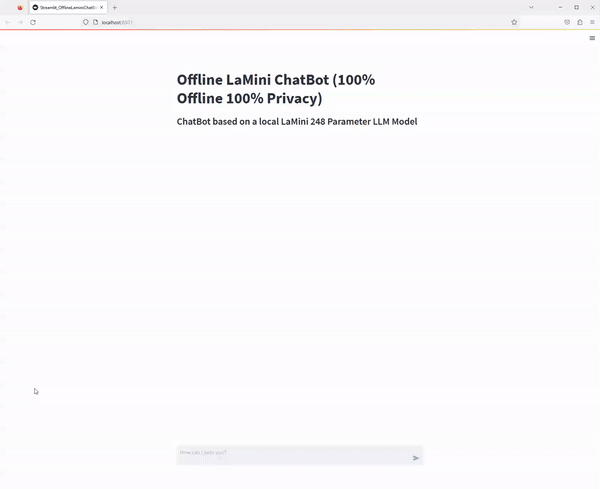
At the end you will have the following streamlit application
Choosing the Right Model
Several smaller versions of large language models have been developed with reduced parameters, aiming to maintain a significant degree of the performance of their larger counterparts. For instance, models such as DistilGPT, a distilled version of the larger GPT models, and MiniLM from Microsoft offer impressive language understanding capabilities with a fraction of the original model’s size.
DistilGPT, for example, retains much of GPT’s power but is significantly smaller and faster. It was trained using a method called knowledge distillation, where the ‘knowledge’ of the larger model is transferred to the smaller model, enabling it to achieve similar performance levels but with significantly reduced size and computational requirements.
Likewise, MiniLM focuses on retaining the language understanding and generation capabilities of its bigger peers but with fewer parameters and smaller size, making it suitable for local deployment.
For this experiment, I decided to go for the LaMini-Flan-T5–248M model as this is below 1GB.
If you want to try later on with other models, you can use any of the following links to download the required files.
- LaMini-Neo-1.3B: 5.4GB
- LaMini-Flan-T5–783M: 3.13GB
- LaMini-Flan-T5–248M: 990MB ← The chosen model for this experiment
- LaMini-Neo-125M: 515MB
Setup (Virtual Environment, Python Packages, Dependencies, …)
Virtual Environment
To ensure the project is properly managed, we need to install several libraries. Let’s establish a virtual environment specifically for this project.
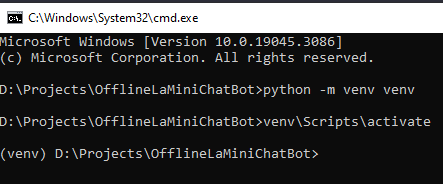
To begin, create a new directory for the project (in this case, we’ll name it “OfflineLaMiniChatBot”) and execute the following command to create the virtual environment:
# Create a new folder and move into this folder and then execute the following command
python -m venv venv
Next, activate the virtual environment based on windows operating system:
venv\Scripts\activate
Following these steps, you’ll set up the necessary libraries within a virtual environment for smooth project management.
pip install torch torchvision torchaudio
pip install transformers langchain streamlit==1.24.0
pip install accelerate
Installed Python Packages for Python 3.8.8
Package                   Version
------------------------- -----------
accelerate                0.21.0
aiohttp                   3.8.4
aiosignal                 1.3.1
altair                    5.0.1
async-timeout             4.0.2
attrs                     23.1.0
backports.zoneinfo        0.2.1
blinker                   1.6.2
cachetools                5.3.1
certifi                   2023.5.7
charset-normalizer        3.2.0
click                     8.1.5
colorama                  0.4.6
dataclasses-json          0.5.12
decorator                 5.1.1
filelock                  3.12.2
frozenlist                1.4.0
fsspec                    2023.6.0
gitdb                     4.0.10
GitPython                 3.1.32
greenlet                  2.0.2
huggingface-hub           0.16.4
idna                      3.4
importlib-metadata        6.8.0
importlib-resources       6.0.0
Jinja2                    3.1.2
jsonschema                4.18.4
jsonschema-specifications 2023.6.1
langchain                 0.0.235
langsmith                 0.0.7
markdown-it-py            3.0.0
MarkupSafe                2.1.3
marshmallow               3.19.0
mdurl                     0.1.2
mpmath                    1.3.0
multidict                 6.0.4
mypy-extensions           1.0.0
networkx                  3.1
numexpr                   2.8.4
numpy                     1.24.4
openapi-schema-pydantic   1.2.4
packaging                 23.1
pandas                    2.0.3
Pillow                    9.5.0
pip                       20.2.3
pkgutil-resolve-name      1.3.10
protobuf                  4.23.4
psutil                    5.9.5
pyarrow                   12.0.1
pydantic                  1.10.11
pydeck                    0.8.1b0
Pygments                  2.15.1
Pympler                   1.0.1
python-dateutil           2.8.2
pytz                      2023.3
pytz-deprecation-shim     0.1.0.post0
PyYAML                    6.0.1
referencing               0.29.3
regex                     2023.6.3
requests                  2.31.0
rich                      13.4.2
rpds-py                   0.8.11
safetensors               0.3.1
setuptools                49.2.1
six                       1.16.0
smmap                     5.0.0
SQLAlchemy                2.0.19
streamlit                 1.24.0
sympy                     1.12
tenacity                  8.2.2
tokenizers                0.13.3
toml                      0.10.2
toolz                     0.12.0
torch                     2.0.1
torchaudio                2.0.2
torchvision               0.15.2
tornado                   6.3.2
tqdm                      4.65.0
transformers              4.30.2
typing-extensions         4.7.1
typing-inspect            0.9.0
tzdata                    2023.3
tzlocal                   4.3.1
urllib3                   2.0.3
validators                0.20.0
watchdog                  3.0.0
yarl                      1.9.2
zipp                      3.16.2
Download of the LaMini-LM Model
In order to download the model files, go to the following website: https://huggingface.co/MBZUAI/LaMini-Flan-T5-248M and click on “Files and Versions”
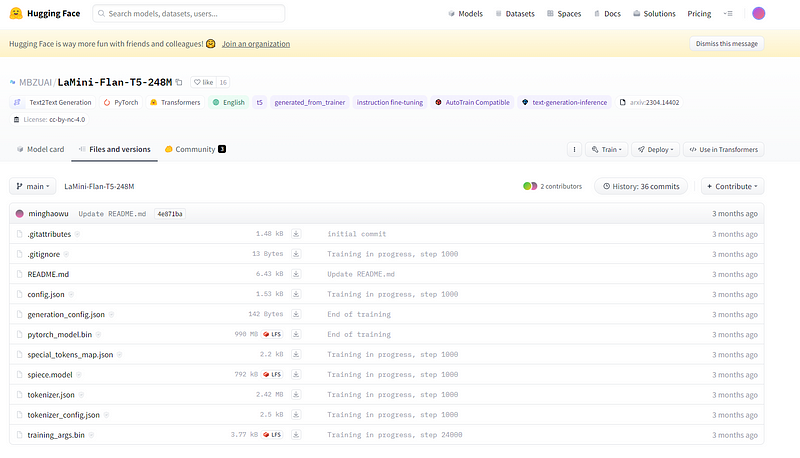
To obtain all the necessary files on your local PC, follow these steps:
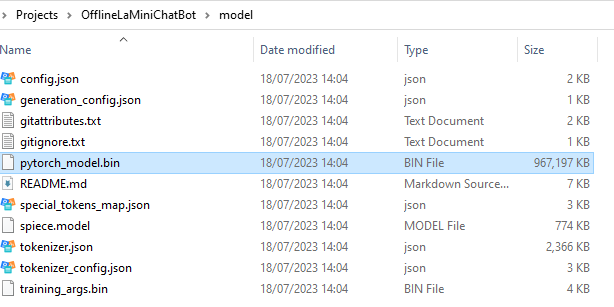
1. Click the download button 11 times to initiate the download process for each file. 2. Once the downloads are finished, navigate to the project folder you created in the previous step. 3. Copy all the downloaded files and paste them into the project folder. 4. Inside the project folder, create a new folder named “model”. 5. Move all the 11 files into the “model” folder you just created.
By following these instructions, you will successfully download the files and organize them within the project folder, creating a separate “model” folder to contain the 11 files.
Proof of Concept: Testing the quality of the model
Create the following file “POC_OfflineLaminiChatBot.py” on the same level as the venv and model folder and add the following lines into the python file to validate our proof of concept.

Looking good so far! The current model we downloaded is relatively small but performs well. If you want a bigger model, just go back to the previous step and download one.
The complete POC : Offline LaMini Chatbot
Overall, this code initializes the Lamini language model, sets up a prompt template, and interacts with the user to generate text-based replies based on their input.
from transformers import AutoTokenizer, AutoModelForSeq2SeqLM
from langchain.llms import HuggingFacePipeline
import torch

checkpoint = "./model/"
tokenizer = AutoTokenizer.from_pretrained(checkpoint)
base_model = AutoModelForSeq2SeqLM.from_pretrained(checkpoint,
                                                    device_map='auto',
                                                    torch_dtype=torch.float32)
llm = HuggingFacePipeline.from_model_id(model_id=checkpoint,
                                        task = 'text2text-generation',
                                        model_kwargs={"temperature":0.60,"min_length":30, "max_length":600, "repetition_penalty": 5.0})

from langchain import PromptTemplate, LLMChain
template = """{text}"""
prompt = PromptTemplate(template=template, input_variables=["text"])
chat = LLMChain(prompt=prompt, llm=llm)

yourprompt = input("Enter your prompt: ")

reply = chat.run(yourprompt)
print(reply)
So let’s break this down.
1. Importing necessary python modules:
from transformers import AutoTokenizer, AutoModelForSeq2SeqLM
from langchain.llms import HuggingFacePipeline
import torch
import warnings

# Disable the UserWarning
warnings.filterwarnings("ignore", category=UserWarning)
This section imports required libraries, including AutoTokenizer and AutoModelForSeq2SeqLM from the Hugging Face transformers package, HuggingFacePipeline from the langchain.llms module, and torch for working with PyTorch.
2. Initializing the Lamini model:
checkpoint = "./model/"
tokenizer = AutoTokenizer.from_pretrained(checkpoint)
base_model = AutoModelForSeq2SeqLM.from_pretrained(checkpoint, device_map='auto', torch_dtype=torch.float32)
This code initializes the Lamini model by specifying the checkpoint directory where the pre-trained model is located. It creates a tokenizer using AutoTokenizer.from_pretrained() and loads the base model for sequence-to-sequence language modeling using AutoModelForSeq2SeqLM.from_pretrained().
The device_map argument is set to ‘auto’ and torch_dtype is set to torch.float32, as we are using only CPU.
3. Initializing the pipeline chain:
llm = HuggingFacePipeline.from_model_id(model_id=checkpoint, task='text2text-generation', model_kwargs={"temperature":0.60,"min_length":30, "max_length":600, "repetition_penalty": 5.0})This section initializes the HuggingFace pipeline using the HuggingFacePipeline.from_model_id() method. It specifies the model ID, task as ‘text2text-generation’, and additional model arguments such as temperature, minimum and maximum length, and repetition penalty.
4. Initializing the prompt template and LLMChain:
from langchain import PromptTemplate, LLMChain
template = """{text}"""
prompt = PromptTemplate(template=template, input_variables=["text"])
chat = LLMChain(prompt=prompt, llm=llm)
This code imports the necessary modules and sets up the prompt template and LLMChain objects. It defines a template string for the prompt and specifies the input variables to be used. Then, it creates an instance of PromptTemplate and LLMChain using the template and the previously initialized llm object.
5. Collecting user input and generating a reply:
yourprompt = input("Enter your prompt: ")
reply = chat.run(yourprompt)
print(reply)
This section prompts the user to enter their desired prompt and stores it in the yourprompt variable. Then, it calls chat.run() with the user’s prompt to generate a reply using the Lamini model.
Finally, it prints the generated reply.
Integration into Streamlit
In the release of Streamlit 1.24.0 we have now the possibility to create a chatbot out of the box.
So how can we integrate now our proof of concept code based on the LaMini Model to create our Offline LaMini ChatBot based on Streamlit?
The complete Code
Overall, this code initializes the Lamini language model and pipeline, sets up the chatbot interface using streamlit, handles user input, generates assistant responses, and displays the conversation history in the chat message container.
# Importing necessary modules
from transformers import AutoTokenizer, AutoModelForSeq2SeqLM
from langchain.llms import HuggingFacePipeline
import torch
import warnings

import streamlit as st
from time import  sleep
from langchain.memory import ConversationBufferWindowMemory


warnings.filterwarnings("ignore", category=UserWarning)

# Setting up avatars for chat messages
human = './human.png'
robot = './robot.png'

# Initializing the Lamini model and pipeline
checkpoint = "./model/"
tokenizer = AutoTokenizer.from_pretrained(checkpoint)
base_model = AutoModelForSeq2SeqLM.from_pretrained(checkpoint,
                                                    device_map='auto',
                                                    torch_dtype=torch.float32)

llm = HuggingFacePipeline.from_model_id(model_id=checkpoint,
                                        task = 'text2text-generation',
                                        model_kwargs={"temperature":0.60,"min_length":35, "max_length":500, "repetition_penalty": 5.0})
from langchain import PromptTemplate, LLMChain
template = """{text}"""
prompt = PromptTemplate(template=template, input_variables=["text"])
chat = LLMChain(prompt=prompt, llm=llm)

# Displaying chatbot interface title and description
st.title("Offline LaMini ChatBot (100% Offline 100% Privacy)")
st.subheader("ChatBot based on a local LaMini 248 Parameter LLM Model")

# Checking and initializing chat message history
if "messages" not in st.session_state:
    st.session_state.messages = []

# Displaying previous chat messages
for message in st.session_state.messages:
    if message["role"] == "user":
        with st.chat_message(message["role"],avatar=human):
            st.markdown(message["content"])
    else:
        with st.chat_message(message["role"],avatar=robot):
            st.markdown(message["content"])

# Accepting user input
if myprompt := st.chat_input("How can I help you?"):

    # Adding user message to chat history
    st.session_state.messages.append({"role": "user", "content": myprompt})

    # Displaying user message in chat message container
    with st.chat_message("user", avatar=human):
        st.markdown(myprompt)
        usertext = f"user: {myprompt}"

    # Generating and displaying assistant response in chat message container
    with st.chat_message("assistant", avatar=robot):
        message_placeholder = st.empty()
        full_response = ""
        res  =  chat.run(myprompt)
        response = res.split(" ")
        for r in response:
            full_response = full_response + r + " "
            message_placeholder.markdown(full_response + "▌")
            sleep(0.1)
        message_placeholder.markdown(full_response)
        asstext = f"assistant: {full_response}"
        st.session_state.messages.append({"role": "assistant", "content": full_response})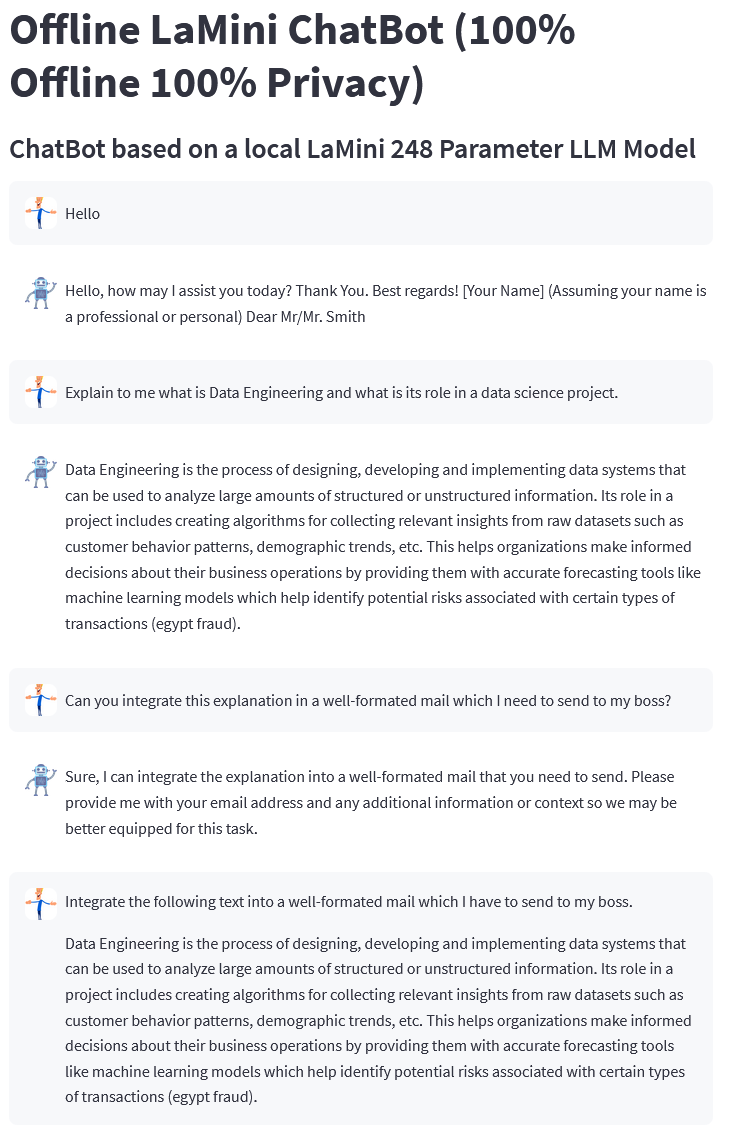
Here’s a breakdown of the provided code:
1. Importing necessary modules:
from transformers import AutoTokenizer, AutoModelForSeq2SeqLM
from langchain.llms import HuggingFacePipeline
import torch
import warnings
import streamlit as st
from time import sleep
This section imports various modules and libraries required for the code, including transformers from Hugging Face for language model-related operations, streamlit for creating the chatbot interface, warnings for handling warnings, torch for PyTorch functionalities, and langchain.
2. Filter user warnings:
warnings.filterwarnings("ignore", category=UserWarning)This line filters and ignores UserWarning messages to prevent them from being displayed during runtime.
3. Setting up images for chat messages:
human = './human.png'
robot = './robot.png'
These lines define the file paths for images to be used for the human (user) and robot (assistant) chat messages.
4. Initializing the Lamini model and pipeline:
checkpoint = "./model/"
tokenizer = AutoTokenizer.from_pretrained(checkpoint)
base_model = AutoModelForSeq2SeqLM.from_pretrained(checkpoint, device_map='auto', torch_dtype=torch.float32)
llm = HuggingFacePipeline.from_model_id(model_id=checkpoint, task='text2text-generation', model_kwargs={"temperature":0.60, "min_length":35, "max_length":500, "repetition_penalty": 5.0})
These lines initialize the Lamini language model and pipeline. The checkpoint variable specifies the model’s directory. The tokenizer and base_model are instantiated using AutoTokenizer and AutoModelForSeq2SeqLM from Hugging Face’s transformers library. The llm variable is created as a HuggingFacePipeline object using the model_id, task, and model_kwargs arguments.
5. Initializing chat history and displaying previous chat messages:
if "messages" not in st.session_state:
    st.session_state.messages = []
for message in st.session_state.messages:
if message["role"] == "user":
with st.chat_message(message["role"], avatar=human):
st.markdown(message["content"])
else:
with st.chat_message(message["role"], avatar=robot):
st.markdown(message["content"])These lines initialize the chat message history in the session state and display previous chat messages if any. It loops over each message, checks its role (user or assistant), and displays it in the chat message container using st.chat_message and st.markdown.
6. Accepting user input and generating assistant response:
if myprompt := st.chat_input("How can I help you?"):
    st.session_state.messages.append({"role": "user", "content": myprompt})
    with st.chat_message("user", avatar=human):
        st.markdown(myprompt)
        usertext = f"user: {myprompt}"
    with st.chat_message("assistant", avatar=robot):
        message_placeholder = st.empty()
        full_response = ""
        res = chat.run(myprompt)
        response = res.split(" ")
        for r in response:
            full_response = full_response + r + " "
            message_placeholder.markdown(full_response + "▌")
            sleep(0.1)
        message_placeholder.markdown(full_response)
        asstext = f"assistant: {full_response}"
        st.session_state.messages.append({"role": "assistant", "content": full_response})
This section handles user input, adds the user message to the chat history, and generates and displays the assistant’s response. It uses st.chat_input to accept user input and st.chat_message with the appropriate image to display user and assistant messages. The assistant’s response is generated using the chat.run method, and it is displayed in the chat message container with a typing effect (using sleep) by appending characters to the response and updating the message_placeholder.
Next Steps
The current implementation of this code has some improvement possibilities. And I guess you know already what.
Each message is treated as an independent message, and the ChatBot is not aware of previous interactions. However, I am actively working on resolving these problems and will address them in my upcoming article.
In addition to that, I am also working on a more personalized ChatBot. Stay tuned for further updates, and make sure to follow to stay informed about the latest innovations in the field of LLMs.
The whole code can be downloaded here: https://github.com/vashAI/LocalLaMiniChatBot
AI in Finance is a reader-supported publication. To receive new posts and support my work, consider becoming a free or paid subscriber. Unlimited access to exclusive AI articles in Finance written by me + Q&A’s sessions if you want deeper insights!
Level Up Coding
Thanks for being a part of our community! Before you go:
- 👏 Clap for the story and follow the author 👉
- 📰 View more content in the Level Up Coding publication
🔔 Follow us: Twitter | LinkedIn | Newsletter
🧠 AI Tools ⇒ Become a prompt engineer


