
Building a Cluster using Google Colab in 5 Minutes
Sometimes you need more compute, but a traditional cluster might be overkill. This is a simple way to use multiple Colab notebooks to run the same code on multiple workers.

Step 1) Define an Experiment
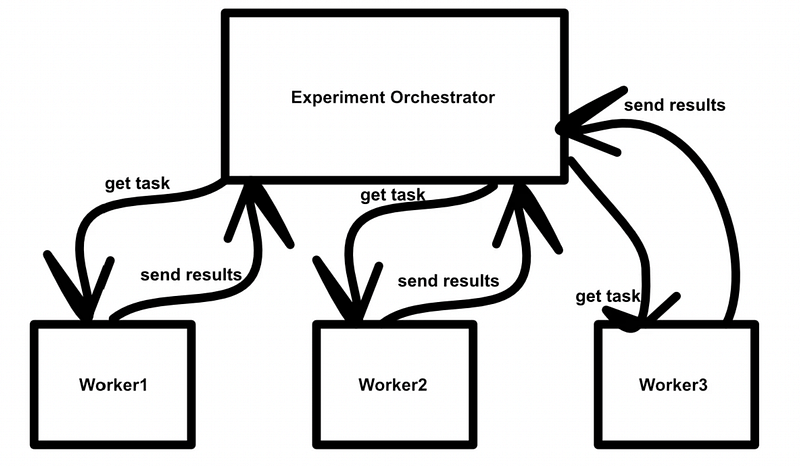
In this example we’ll be conducting a hyperparameter sweep across multiple model types and databases in order to explore general performance characteristics. We’ll be using a custom orchestrator (which I discussed in another article) to tell individual workers which model should be used with which hyperparameters on which dataset. This orchestrator will also ingest results and aggregate them into a single database for further analysis.
You are likely working in a simpler use case in which W&B Sweeps will be a perfectly acceptable orchestrator for you to use. W&B sweeps are also described in the previous article.
Step 2) Define Experiment Code
Naturally this will change depending on your experiment, but will likely look something like this:
- Get API token or authentication credential
- Connect to orchestrator
- declare an experiment/sweep, or get an existing one
- Ask the orchestrator for a task for that experiment/sweep
- Execute that task
- Send Results
- Repeat steps 4–6 until the experiment is complete
In my example, I have a list of databases and models (each model having it’s own hyperparameter space) and I want to execute 60 training/testing jobs for each model-database pair with different hyperparameter values. The experiment code will be a Colab notebook that does all of those things. For the purposes of this post, we will call this document MAIN.
"""MAIN.ipynb
This is pseudo code for the notebook
"""

# Get API Keys and set up communication authentication
dataset_API_Key = readDatasetKey()
orchestrator_API_key = readOrchKey()
setupComs(dataset_API_Key, orchestrator_API_key)

#Declaring a new experiment with the orchestrator, or getting an existing experiment by the same name
exp_name = 'sample_experiment'
exp = declareExp(exp_name)

#running until experiment is complete
while exp.noDone():

  #getting a current task to work on
  task = exp.getTask()

  #do whatever you need to do
  task.compute()

  #send data to the cloud
  task.sendData()

  #mark the task as done
  task.done()
Step 3) Define a Worker
We have a notebook which includes all of the code necessary to initiate communication with the orchestrator, declare an experiment, get a task, run that task, and log results. Now, we can run the same exact code in other notebooks. To do this we’ll create a worker notebook which mounts google.colab.drive , reads our MAIN notebook, and executes all of the MAINnotebook’s cells.
""" Setup
mounting the drive and grabbing main
"""

from google.colab import drive
import os
drive.mount('/content/drive')

main_file = 'path/to/MAIN'

""" Running
Parsing the content to get all code cells, and running them sequentially.
"""

import json
import nbformat

for cell in nbformat.read(main_file, as_version=4).cells:
    if cell['cell_type'] == 'code':
        if len(cell['source']):
            src = cell['source']
            if src[0] == '!':
                #only works if ! is the only line in the block
                print('============= running command "{}" =============='.format(src[1:]))
                os.system(src[1:])
            else:
                try:
                    exec(src)
                except Exception as e:
                    print('---------')
                    print(src)
                    print('---------')
                    raise(e)
Naturally, with the use of exec and os.system running arbitrary code, it’s very important that you’re sure that your MAIN file is from a trusted source, preferably yourself. We’ll call this notebook the worker notebook.
Step 4) Copy and Run
Great, now that you have a MAIN notebook with your code, and a worker notebook that reads MAIN and runs the code, you can simply copy your worker notebook to create as many workers as you need!
Naturally, to get your code running, you will have to open all workers and run them. You can use Runtime > Run All to quickly run all cells in a worker node.
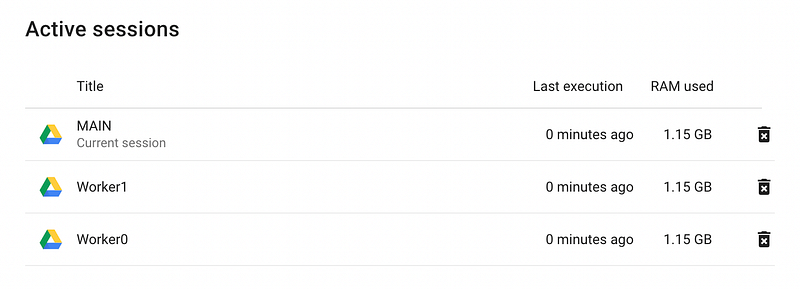
Luckily, Colab allows you to centrally manage your workers from here on out. If you click the RAM/disk usage on the top right of any notebook, then “manage session”, you will be able to view and terminate any active session.

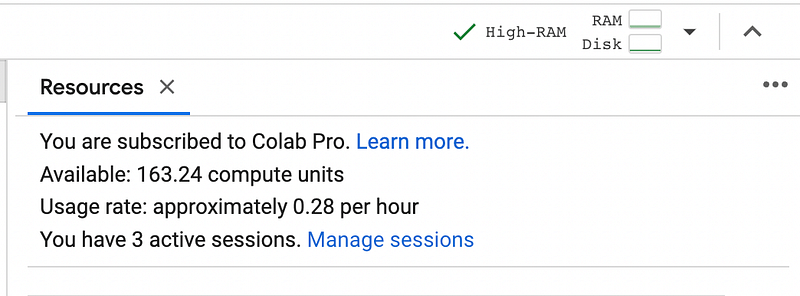
Based on my experimentation, it appears that Google Colab allows you to run 6 sessions simultaniously. Thats a modest amount of compute ready to go at a moments notice!
Follow For More!
In future posts I’ll be describing several landmark papers in the ML space, with an emphasis on practical and intuitive explanations.
Attribution: All of the images in this document were created by Daniel Warfield, unless a source is otherwise provided. You can use any images in this post for your own non-commercial purposes, so long as you reference this article, https://danielwarfield.dev, or both.


