
Building a ChatBot in Python — The Beginner’s Guide
Create your first artificial intelligence chatbot from scratch
Welcome to Beginner’s Guide to Building a Chatbot in Python
In this article, I will show you how to build a simple chatbot using the python programming language. We will not use any external chatbot packages. The whole project will be written in plain Python. This is a great way to understand how chatbots actually work. Learning behind the scenes will also give us an insight into the chatbot packages. I will share some Chatbot building platforms in the introduction section of this article. Feel free to check them later if you are interested to learn more about Chatbots. I can’t wait to walk you through this project; let’s get started!
Table of Contents:
- Introduction
- Step 1 — User Templates
- Step 2 — ChatBot Responses
- Step 3 — Response Function
- Step 4 — Relation Function
- Step 5 — Send Message Function
- Final Step — Testing the ChatBot
- Video Demonstration
Introduction
In 1994, when Michael Mauldin produced his first chatbot and called it“Julia” and that’s the time when the word “chatterbot” entered first time in our dictionary. A chatbot is described as a computer program designed to simulate conversation with human users, particularly over the internet. It is software designed to mimic how people interact with each other. It can be seen as a virtual assistant that interacts with users through text messages or voice messages and this allows companies to get more close to their customers.
There are many ChatBot platforms that help companies to create personalized chatbots. The database and APIs play a big role in these chatbot platforms. Some of those platforms are Amazon Lex, Microsoft Azure Bot, ChatterBot. You can check their websites to learn more.
Hopefully, in a future article, I would like to show how to create an advanced level chatbot using one of those platforms, but for today we will keep things simple and basic. If you are ready, let’s start programming!
Step 1 — User Templates
First thing first, we will tell the chatbot to ask the user’s name. This will make our chatbot more realistic and practical. Let’s run this line in our Jupyter Notebook:
print("BOT: What do you want me to call you?")
user_name = input()
Now, let’s create the templates. In this chatbot project, we will have only two people: the user, and the chatbot. When printing out the conversation timeline, these templates will help us to know who is saying what. The values that will go between the curly brackets will be responsive, and you will understand what I mean in the next step.
bot_template = "BOT : {0}"
user_template = user_name + " : {0}"
Step 2 — ChatBot Responses
This step is a little long because it handles most of the conversation. We are defining the chatbot in this step. We have to put in the questions that our chat is expected to hear and the answers that the chatbot has. To make things more interesting, I’ve created three responses for each question. This way, the bot will have a different answer to the same question. More details will be under the code. Let me show the code first:
name = "Funny Bot 101"
weather = "rainy"
mood = "Happy"
responses = {
"what's your name?": [
"They call me {0}".format(name),
"I usually go by {0}".format(name),
"My name is the {0}".format(name) ],"what's today's weather?": [
"The weather is {0}".format(weather),
"It's {0} today".format(weather),
"Let me check, it looks {0} today".format(weather) ],"Are you a robot?": [
"What do you think?",
"Maybe yes, maybe no!",
"Yes, I am a robot with human feelings.", ],"how are you?": [
"I am feeling {0}".format(mood),
"{0}! How about you?".format(mood),
"I am {0}! How about yourself?".format(mood), ],"": [
"Hey! Are you there?",
"What do you mean by saying nothing?",
"Sometimes saying nothing tells a lot :)", ],"default": [
"this is a default message"] }- At the beginning of this code, we are defining some variables that we want to use in the conversation. The great thing about this is that it can be reusable in the code. And when we want to change the value, we don’t have to go through all the lines. Changing the variable’s value will be updated automatically within the whole code.
- As you can see, we are using “format()” in the responses. This function helps us to pass the values inside the strings very easily. The format is much clear this way. Also, you can pass more than one variable using the format function. So there is no limit if you want to add more layered conversations.
- The responses are created as dictionaries. So the answers are found after knowing the question. To make things cool, I’ve even added some responses even when the user replies without writing anything.
Step 3 — Response Function
Nothing complicated here. We are defining the function that will pick a response by passing in the user’s message. For this function, we will need to import a library called random. Since we don’t want our bot to repeat the same response each time for the same quick; we will pick a random response each time the user asks the same question.
def respond(message):if message in responses:
bot_message = random.choice(responses[message])else:
bot_message = random.choice(responses["default"])return bot_messageStep 4 — Relation Function
This is an extra function that I’ve added after testing the chatbot with my crazy questions. So, if you want to understand the difference, try the chatbot with and without this function. You will see why I decided to write this function. And one good part about writing the whole chatbot from scratch is that we can add our personal touches to it.
In the Chatbot responses step, we defined answers lists to specific questions. And since we are using dictionaries, if the question is not exactly the same (literally), the chatbot will not return the response for that question we tried to ask. Sometimes, we might forget the question mark, or a letter in the sentence or something else.
In this finding relation function, we are checking the question and trying to find the key terms that might help us to understand the question. You will understand what I mean when you see the function:
def related(x_text):
  if "name" in x_text:
    y_text = "what's your name?"
elif "weather" in x_text:
y_text = "what's today's weather?"elif "robot" in x_text:
y_text = "are you a robot?"elif "how are" in x_text:
y_text = "how are you?"else:
y_text = ""return y_textI used if and else statements, but it could be done using switch cases too. Feel free to convert it to a switch case. Also, this is just to give some idea. There are many other techniques to increase the understanding, for example, by using NLP (Natural Language Processing) techniques.
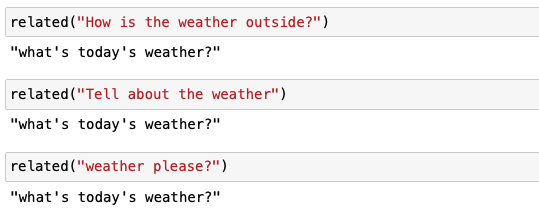
Here is a simple example of how the function returns the question that probably asked by the user:
Step 5 — Send Message Function
Almost done, this is the last step of us writing a function. In this function, we are writing the conversation in timeline order and also calling the response function that was created earlier. After getting the answer from the response function, we are passing it into the conversation print outs. This is a short function, and here it is:
def send_message(message):
  print(user_template.format(message))
  response = respond(message)
  print(bot_template.format(response))
Final Step — Testing the ChatBot
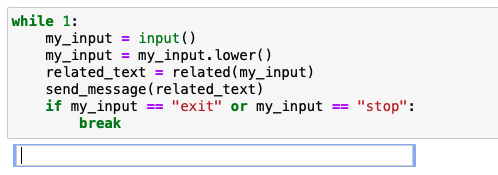
Great, you made it to the final step! Everything is ready. All we need is to get the program started. We will write a while loop and pass the functions inside it. I preferred using infinite while loop so that it repeats asking the user for an input.
while 1:
  my_input = input()
  my_input = my_input.lower()
  related_text = related(my_input)
  send_message(related_text)
if my_input == "exit" or my_input == "stop":
break- Firstly, we are asking for an input from the user. We can think of it as our bot is listening to the user here.
- Secondly, we are lowercasing all the letters in the input. This way we don’t have to worry if the user used capital or lower case letters. It makes strings easier to understand.
- Thirdly, we are running the related function. This way, we predict the question asked by checking the keywords.
- Fourthly, we are sending the returned question to the bot using the send_message function that we created in the fifth step. The response function going to be called under the send_message function.
- Lastly, I’ve added an if statement to check if the user wants to quit the conversation. Entering “exit” or “stop” into the input box will trigger the program to stop. Since we are in a while loop, this also helps to break the loop.
After running the while loop block, this is how the conversation begins:
Video Demonstration
Congrats!! You have a created a Chatbot from scratch without using any chatbot modules (packages). My goal in this project was to give some understanding how chatbots work and they can be improved. Working on hands-on programming projects like this one is the best way to sharpen your coding skills. That’s all for this article. Hope to see you in the next one.
Thank you,
Here is my blog and YouTube channel to stay inspired.