
Build Fast, JSON-Powered Forms on Angular With Ngx Formly
Forms can be a nightmare — let’s make them better

In this article, I’ll show you how you can build JSON-powered forms in Angular with Ngx Formly. Afterward, you’ll be able to create forms faster than you normally do.
We’ll dive into what types of input fields we can use and how we can integrate Formly with a UI framework like Material, Bootstrap, Ionic, PrimeNG, Kendo, and NativeScript. In this article, I’ll use the integration with Angular Material.
Forms Are a Developer’s Worst Nightmare
Every developer using Angular to build cool web applications knows forms are among the most common things to build. We are building by hand with all the tools Angular gives us.
But to be honest, I think we all spend too much time on building forms, validations, conditional fields, etc.
I want to introduce you to Ngx Formly, which helps my team build advanced forms in Angular in minutes instead of hours.
This article is a big thank you to the team building Ngx Formly as an open-source tool. They’re making it super easy for us to build those time-consuming forms.
This post is the first part of a two-part series called “JSON-Powered Forms on Angular.”
Part 1
1. What’s Ngx Formly?
2. Install Dependencies
3. Set Up an Angular Project
4. Add Ngx Formly and Your UI Framework
5. Create a Simple Form
6. Check the Data From the Form
Part 2
1. Validation
2. Repeating Sections
3. Conditional Fields
4. Reset Form
5. Submit Form1. What’s Ngx Formly?
NGX Formly was built as an open-source project, which you can find on GitHub. The tool lets you create forms based on a JSON structure. This makes it super easy and fast to build small and advanced forms in no time.
It’s no problem when you use Angular with Material, Bootstrap, Ionic, PrimeNG, Kendo, and NativeScript. They have a plugin for all of them.
2. Install Dependencies
To set up an Angular project, we need a few dependencies.
- Install Node.js (If you’re working on a Mac, I recommend to install it via nvm)
- Install TypeScript:
npm install -g typescript - Install the Angular CLI:
npm install -g @angular/cli
When the dependencies are all installed on your computer, you have to check if the Angular CLI works on your computer. With ng --version you can do that. If you don’t get an error from your terminal, you’re good to go.
3. Set Up an Angular Project
In your terminal, navigate to the directory where you put all your projects.
Run ng new project-name, and Angular will ask you a few questions. You can select your choices by pressing the arrows on your keyboard.
I’ve chosen the following answers:
- “Would you like to add Angular routing?” Yes.
- “Which stylesheet format would you like to use?” SCSS.
When the CLI is done, navigate to your project folder and open your IDE. I’m personally a big fan of Visual Studio Code.
4. Add Ngx Formly and Your UI Framework
Let’s add Ngx Formly to our Angular project to see how easy it is to build forms with it.
4.1 Install Ngx Formly with your UI framework
If you started a blank Angular project, I assume you didn’t install a UI framework yet. With the command below, you can install Ngx Formly together with a UI framework.
ng add @ngx-formly/schematics --ui-theme={material|bootstrap|etc}4.2 Add modules to ‘AppModule’
If you installed Ngx Formly together with your UI framework, then you can skip this step because that command already added the needed modules to your AppModule.
If you installed Ngx Formly differently, you have to make sure the modules are added to the AppModule.
import { AppComponent } from './app.component';
import { ReactiveFormsModule } from '@angular/forms';
import { FormlyModule } from '@ngx-formly/core';
import { Formly{uiFramework}Module } from '@ngx-formly/{uiframework}';
@NgModule({
imports: [
BrowserModule
ReactiveFormsModule,
FormlyModule.forRoot(),
Formly{uiFramework}Module
],
...
})
export class AppModule { }Ngx Formly is built on top of Angular Reactive forms, so we have that together with FormlyModule and the Formly{uiFramework}Module. (Replace {uiFramework} and {uiframework} with the name of your framework of choice.)
Now, I recommend starting your Angular application by running npm start to check if you have any errors and if everything is installed correctly.
Let’s build a form in the next step.
4.3 Add your UI framework
If you’re working on an existing project, you can probably skip this step.
Now, we’re going to add the UI framework to our Angular project. Since I’m using Angular Material, I can run this command. If you’re using another UI framework, then you need to check that out in the documentation of that framework.
ng add @angular/materialNext to that, we need to add the styling to the style.scss file.
@import '@angular/material/prebuilt-themes/deeppurple-amber.css';In the index.html file, we can load the Material font.
<head>
        <meta charset="utf-8" />
        <title>AngularNgxFormlyMaterial</title>
        <base href="/" />
        <meta name="viewport" content="width=device-width, initial-scale=1" />
        <link rel="icon" type="image/x-icon" href="favicon.ico" />
        <link href="https://fonts.googleapis.com/css?family=Roboto:300,400,500&display=swap" rel="stylesheet" />
        <link href="https://fonts.googleapis.com/icon?family=Material+Icons" rel="stylesheet" />
    </head>
To use the form components from Angular Material, we need to add them to the import array in app.module.ts. Since Angular 9, it’s recommended to only import what you need.
import { BrowserAnimationsModule } from '@angular/platform-browser/animations'
import { BrowserModule } from '@angular/platform-browser'
import { NgModule } from '@angular/core'
import { AppRoutingModule } from './app-routing.module'
import { AppComponent } from './app.component'
import { ReactiveFormsModule } from '@angular/forms'
import { FormlyModule } from '@ngx-formly/core'
import { FormlyMaterialModule } from '@ngx-formly/material'
import { FormlyMatDatepickerModule } from '@ngx-formly/material/datepicker';
import { FormlyMatToggleModule } from '@ngx-formly/material/toggle';import { MatDatepickerModule } from '@angular/material/datepicker'
import { MatDialogModule } from '@angular/material/dialog'
import { MatFormFieldModule } from '@angular/material/form-field'
import { MatInputModule } from '@angular/material/input'
import { MatRadioModule } from '@angular/material/radio'
import { MatSelectModule } from '@angular/material/select'
import { MatButtonModule } from '@angular/material/button'
import { MatCheckboxModule } from '@angular/material/checkbox'
import { MatNativeDateModule } from '@angular/material/core'@NgModule({
declarations: [AppComponent],
imports: [
BrowserModule,
AppRoutingModule,
BrowserAnimationsModule, ReactiveFormsModule,
MatCheckboxModule,
MatButtonModule,
MatDatepickerModule,
MatDialogModule,
MatFormFieldModule,
MatInputModule,
MatRadioModule,
MatSelectModule,
MatNativeDateModule,
FormlyMatDatepickerModule,
FormlyMatToggleModule, FormlyModule.forRoot(),
FormlyMaterialModule,
],
providers: [],
bootstrap: [AppComponent],
})
export class AppModule {}Errors when running the application?
If you have trouble with running the application because of an error in your terminal, this tells you that you’re missing some dependencies.
Run npm install @angular/material @angular/cdk --save. I had some issues with that, too.
5. Create a Simple Form
Now, we’re at the point where we can make a form with all kinds of input fields.
- String
- Number
- Checkbox
- Radio
- Select and multiselect
- Date
- Text area
5.1 Add a form to a component
Now, we’re going to build a form with any possible type of input to see how it works.
Let’s add the form to the AppComponent, or if you want your form in any other place, please do so.
import {Component} from '@angular/core';
import {FormGroup} from '@angular/forms';
import {FormlyFieldConfig} from '@ngx-formly/core';
@Component({
selector: 'app',
template: `
<form [formGroup]="form" (ngSubmit)="onSubmit(model)">
<formly-form [form]="form" [fields]="fields" [model]="model"></formly-form>
<button type="submit" class="btn btn-default">Submit</button>
</form>
`,
})
export class AppComponent {
}Inside our AppComponent class, we’re going to declare some properties we need to build up our form.
export class AppComponent {
  form = new FormGroup({});
  model = { email: '[email protected]' };
  fields: FormlyFieldConfig[] = [
    {
      key: 'email',
      type: 'input',
      templateOptions: {
        label: 'Email address',
        placeholder: 'Enter email',
        required: true,
      }
    }
]; onSubmit() {
console.log(this.model);
}
}Let’s break this down to understand why we define all the properties and methods.
form = new FormGroup({}): Ngx Formly is built on top of the Reactive forms in Angular. So we have to define aFormGroupto be able to add fields to the form.model = { email: '[email protected]' }: In the model, we want to have all the information we want as values in our form. In the next step, you’ll see in theemailfield that the value is going to be'[email protected]'.fields: FormlyFieldConfig[] = []: In thisArrayofFormlyFieldConfig[], we’re going to add objects that’ll represent our form. In those objects, we define the key, type, label, placeholder, and other information we need for our forms.
5.2 Let’s add more input fields
A form in our applications will, most of the time, have a lot of input-field types. So let’s add a bunch of input types so we can see which are supported.
5.2.1 Add text field
{
    key: 'name',
    type: 'input',
    templateOptions: {
      label: 'Name',
      placeholder: 'Enter name',
    }
  },
5.2.2 Add email field
  {
    key: 'email',
    type: 'input',
    templateOptions: {
            type: 'email',
      label: 'Email',
      placeholder: 'Enter email',
    }
  },
5.2.3 Add number field
  {
    key: 'amount',
    type: 'input',
    templateOptions: {
            type: 'number',
      label: 'Amount',
      placeholder: 'Enter amount',
    }
  },
5.2.4 Add date field
  {
    key: 'date_of_birth',
    type: 'datepicker',
        templateOptions: {
      label: 'Datepicker',
      placeholder: 'Placeholder',
      description: 'Description',
      required: true,
    },
  },
For your UI framework, you have to make sure this type is supported. I know Angular Material does support this after installing the Ngx Formly UI framework-specific plugin.
5.2.5 Add checkbox field
  {
    key: 'terms',
        type: 'checkbox',
    templateOptions: {
      label: 'Accept terms',
      description: 'Please accept our terms',
      required: true,
    },
  },
5.2.6 Add toggle field
  {
    key: 'terms',
    type: 'toggle',
    templateOptions: {
      label: 'Accept terms',
      description: 'Please accept our terms',
      required: true,
    },
  },
5.2.7 Add textarea field
  {
    key: 'description',
    type: 'textarea',
    templateOptions: {
      label: 'Description',
      placeholder: 'Enter description',
    }
  },
5.2.8 Add radio buttons
  {
    key: 'gender',
    type: 'radio',
    templateOptions: {
      label: 'Gender',
      placeholder: 'Placeholder',
      description: 'Fill in your gender',
      options: [
        { value: 1, label: 'Male' },
        { value: 2, label: 'Femail' },
        { value: 3, label: 'I don\'t want to share that' },
      ],
    },
  },
5.2.10 Add select or multiselect field
We can give the select options manually to the select or via a defined enum . In order to get all the information from the enum, we have to store them in the ProductTypeNames which output an Array from the enum .
export enum ProductType {
  PRODUCT_A,
  PRODUCT_B,
  PRODUCT_C,
}
export const ProductTypeNames: any[] = Object.keys(ProductType)
.map((x) => {
if (new RegExp(/[0-9]/g).test(x)) {
return ProductType[x].toLowerCase()
}
}).filter((x) => x !== undefined)Field config In the field config, we can choose to use the enum or define the options manually.
{
  key: 'product_type',
  type: 'select',
  templateOptions: {
    label: 'Product type',
    placeholder: 'Product type',
    description: 'Select the product type',
    required: true,
    options: [
      { value: 'single', label: 'Single product'  },
      { value: 'bulk', label: 'Bulk product'  },
    ],
  },
},
// Or data from the enum
{
key: 'product_type',
type: 'select',
templateOptions: {
label: 'Product type',
placeholder: 'Product type',
description: 'Select the product type',
required: true,
options: ProductTypeNames.map((value, index) => {
return {
value: index,
label: value,
}
}),
},
},{
key: 'product_types',
type: 'select',
templateOptions: {
label: 'Product type',
placeholder: 'Product type',
description: 'Select the product type',
required: true,
multiple: true,
selectAllOption: 'Select All',
options: [
{ value: 'single', label: 'Single product' },
{ value: 'bulk', label: 'Bulk product' },
],
},
},5.3 Combine all the types of fields
Now that we know all the input types there are available, we can fill the array with all the input objects.
This is how my fields array looks:
fields: FormlyFieldConfig[] = [
    {
      key: 'name',
      type: 'input',
      templateOptions: {
        label: 'Name',
        placeholder: 'Enter name',
      }
    },
    {
      key: 'email',
      type: 'input',
      templateOptions: {
        type: 'email',
        label: 'Email',
        placeholder: 'Enter email',
      }
    },
    {
      key: 'amount',
      type: 'input',
      templateOptions: {
        type: 'number',
        label: 'Amount',
        placeholder: 'Enter amount',
      }
    },
    {
      key: 'date_of_birth',
      type: 'datepicker',
      templateOptions: {
        label: 'Datepicker',
        placeholder: 'Placeholder',
        description: 'Description',
        required: true,
      },
    },
    {
      key: 'terms',
      type: 'checkbox',
      templateOptions: {
        label: 'Accept terms',
        description: 'Please accept our terms',
        required: true,
      },
    },
    {
      key: 'terms_1',
      type: 'toggle',
      templateOptions: {
        label: 'Accept terms',
        description: 'Please accept our terms',
        required: true,
      },
    },
    {
      key: 'description',
      type: 'textarea',
      templateOptions: {
        label: 'Description',
        placeholder: 'Enter description',
      }
    },
    {
      key: 'gender',
      type: 'radio',
      templateOptions: {
        label: 'Gender',
        placeholder: 'Placeholder',
        description: 'Fill in your gender',
        options: [
          { value: 1, label: 'Male' },
          { value: 2, label: 'Femail' },
          { value: 3, label: 'I don\'t want to share that' },
        ],
      },
    },
]
Paste this array into your app component or the component you have put in your form. After saving, check your browser, and you’ll see a form like this:
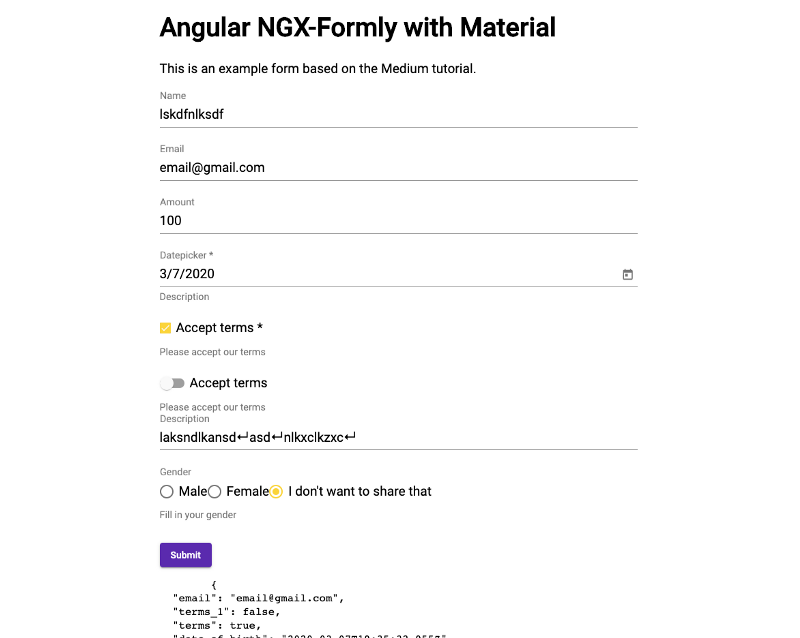
You can also check out my demo. Or check the code on GitHub.
6. Check the Data From the Form
Now that we have our form ready, we want to be able to see what data is in the form fields.
When you click on the submit button, you can see in the console of the browser what the data is.
But since this data is updated in real time, we can also show it in our application.
<pre>{{model | json}}</pre>Add this to the HTML of your component, and you can see it update in real-time.
Continue to Part 2
I hope you have enjoyed this tutorial. Thanks for following this tutorial this far. You can also check out the Github repo I created as a reference for this post.
Thanks!

After reading this story, I hope you learned something new or are inspired to create something new! 🤗
If I left you with questions or something to say as a response, scroll down and type me a message. Please send me a DM on Twitter @DevByRayRay when you want to keep it private. My DM’s are always open 😁


