
Build Better APIs With Python
How to build production-ready APIs with FastAPI

API development is a huge domain with a thriving ecosystem. Unsurprisingly, Python is a big player in this space.
That also means that there are many frameworks designed or supporting API development in Python. There are a few big names that seem to dominate though —like Flask, Django, and FastAPI.
Both Flask and Django are general web development frameworks, and they’re great at what they do — API development included.
FastAPI on the other hand is a smaller project, focused solely on API development. Now, FastAPI simply excels in this domain. Although both Flask and Django are good, it’s hard to argue in their favor over FastAPI.
So, this article will introduce FastAPI. We will take a look at why it’s so powerful, and how we can get started with it — covering:
> Why FastAPI?> Building an API> API DocumentationWhy FastAPI?
There are four big reasons:
- Native async support
- Superfast speeds
- Incredible ease of use
- Automated documentation
Asynchronous
FastAPI natively supports asynchronous calls.

So for example, if we send multiple requests to our API, it would be great if we could execute those requests in parallel. That’s exactly what we can do with FastAPI.
This approach is used everywhere, so having an API that supports it is incredibly important.
Superfast
FastAPI is fast in every way, but here I refer to latency speeds. It is easily the fastest option we have for API development in Python. We can compare it to other popular frameworks using TechEmpower — the results look like this:
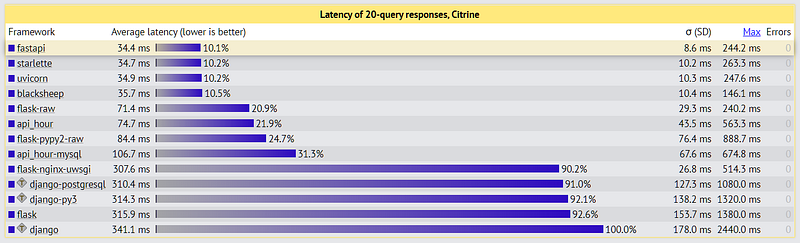
Between Flask to FastAPI, we have a speedup of ~10x — which is insane.
Ease of Use
You will see how easy the framework is to use throughout this article, but as a quick taster, we code a GET request like this:
@app.get()
def func_name():
    ...
    return response
Documentation
Easily my favorite little feature is the flashy API documentation that is automatically generated when we deploy our API.
We will cover it near the end of this article — but in short — any method contained by our API will be identified and used to produce clean, but detailed documentation using Swagger UI.
Building an API
We create our API script file, typically this would be called main.py when working with FastAPI — but we can call it anything.
Inside this script, we will build a simple API with three methods — GET, POST, and DELETE.
Feel free to refer to the full script at the end of this section, or on GitHub here.
Setup
APIs built with FastAPI are incredibly easy to setup. Here we import fastapi and initialize our API like so:
from fastapi import FastAPIapp = FastAPI()GET
To add a GET request method, we simply decorate our get function with @app.get() — meaning that we place this on the line above the function that we would like to run whenever sending a GET request to our API.
If our API contains multiple endpoints, we define which endpoint to use with @app.get("/endpoint").
We won’t be using multiple endpoints in this example, but we will define a single endpoint of places to see how they work — this is not required though!
So, we want our GET request to return all of the places contained in a dataset (which we will define next). To do this, we write:
@app.get("/places")
def get_places():
    return {'data': DATA}, 200
It’s that simple! The only unknown here is the DATA variable. Typically we would use something like a SQL database connected to the API, but for the sake of simplicity, here we will use a dictionary defined within main.py:
DATA = {
    'places':
        ['rome',
         'london',
         'new york city',
         'los angeles',
         'brisbane',
         'new delhi',
         'beijing',
         'paris',
         'berlin',
         'barcelona']
}
There’s one last thing we need to do to complete our GET request. To allow asynchronous operations, we simply add async to our function definition:
@app.get("/places")
async def get_places():
    return {'data': DATA}, 200
Our API so Far
Okay so we’ve initialized our API, defined our data, and added the GET method — how does all of this fit together?
And that’s it, we have a functioning, albeit incomplete API.
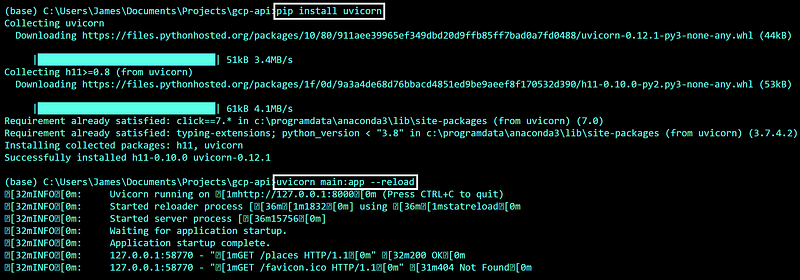
We can test our API by switching over to a CLI (such as CMD Prompt on Windows) and deploying our API with uvicorn.
To do this, we first install the library with pip install uvicorn. Once installed, we type uvicorn main:app --reload — from within the directory that contains main.py.
We should see something like this:
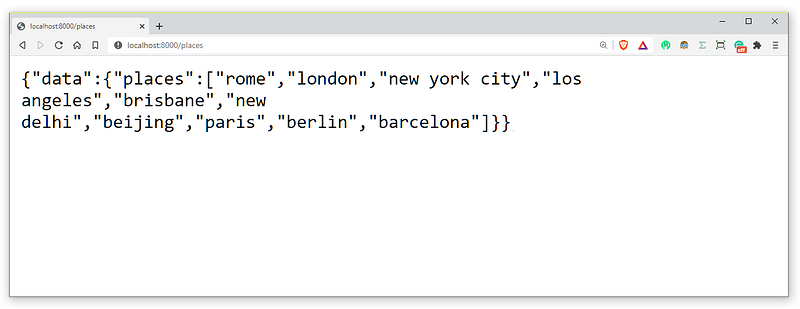
Now, if we switch over to our browser and navigate to https://127.0.0.1:8000/places we should see our JSON response containing DATA:
Now, whenever we want to test our API, we can deploy it using uvicorn main:app --reload.
Testing Our API
Realistically, we don’t want to rely on our browser for testing our API. Throughout this tutorial, we will be using an API development tool called Insomnia — which you can install here.
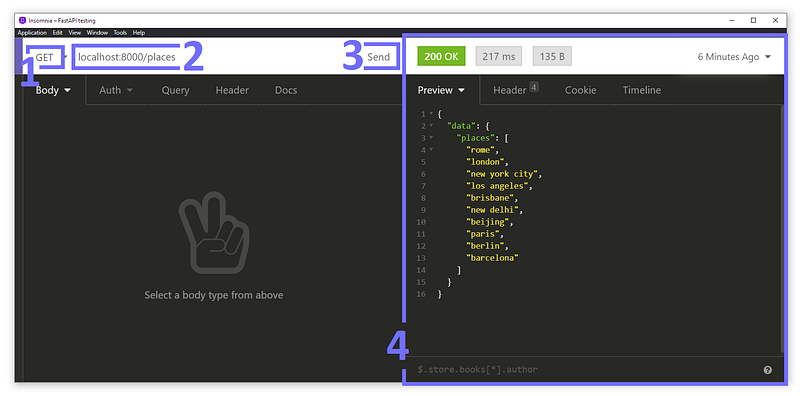
Insomnia is very easy to use. Once it is set up we simply (1) select GET, (2) write our API address, and (3) submit the request. We should see our response in the window on the right (4)!
POST
Next up is our post method. This allows us to add records to our data, which in this case are new locations. The decorator we will be using is @app.post()
Here we will need to pass data to our API, otherwise, it can’t know what location we would like to add to our places data. We pass data to our API using parameters in our URL.
To pass a value to the location parameter we write:
POST http://127.0.0.1:8000/places?location=moscowWe handle this in our API by adding the PlaceItem object we defined earlier to our function definition, which gives us:
@app.post("/places")
def post_place(item: PlacesItem):
    ...
Now we just need to create the logic within our post method. All we want to do here is append location to DATA['places'] — but we need to check that location does not already exist.
First, we check if location already exists within DATA['places']. If it does, we respond with a 200 OK code and a message explaining that the location already exists.
If location does not exist already we simply append it to DATA['places'] and respond with 200 OK and a message confirming that the location has been added!
Test With Insomnia
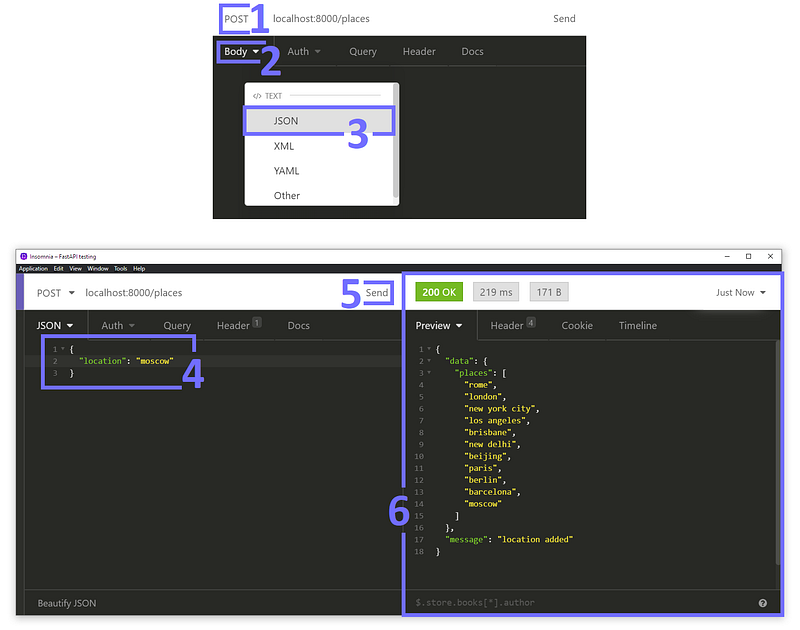
To test our POST method, we head back over to Insomnia. We (1) switch to POST, (2) click the body dropdown, and (3) select JSON. Next, (4) we write our request body, and (5) send the request.
Our response should look something like the window shown in (6) — where we can see all of our original locations, with moscow added at the end.
If we send the request a second time we should see the returned message change to
DELETE
Our final method to implement is the delete method. We will be passing a value to the location parameter just like we did for POST.
DELETE http://127.0.0.1:8000/places?location=londonTo define the DELETE method, we use the exact same pattern as we did in POST:
@app.delete("/places/{location}")
    def delete_place(location):
The logic in our DELETE method must allow us to delete a location if it exists in DATA['places'].
In the case that the given location does not exist, then we can simply return 200 OK along with a message telling the user that the location does not already exist (either way, the outcome is the same).
Test With Insomnia

To test our DELETE method with Insomnia we (1) select DELETE, (2) change our location to london, and (3) send the request.
We should return a 200 OK response with our list of places with London in absentia.
Putting it All Together
Finally, we have our first API built with FastAPI! But wait, there’s more…
API Documentation
By now, I’m sure you’re convinced that FastAPI is a winner in how remarkably simple it is to use.
But that’s not all! By far one of the coolest features of FastAPI is its automatic documentation generation.
How do we use this automatic documentation feature?
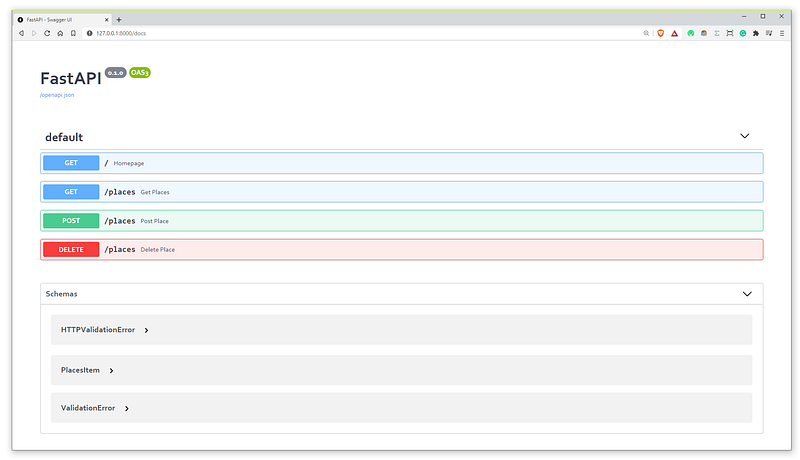
Well, we already have! We navigate to 127.0.0.1:8000/docs to view our documentation:
We can click on each available method to view more information about it. So if we would like to understand how to use the /places POST method, we can!
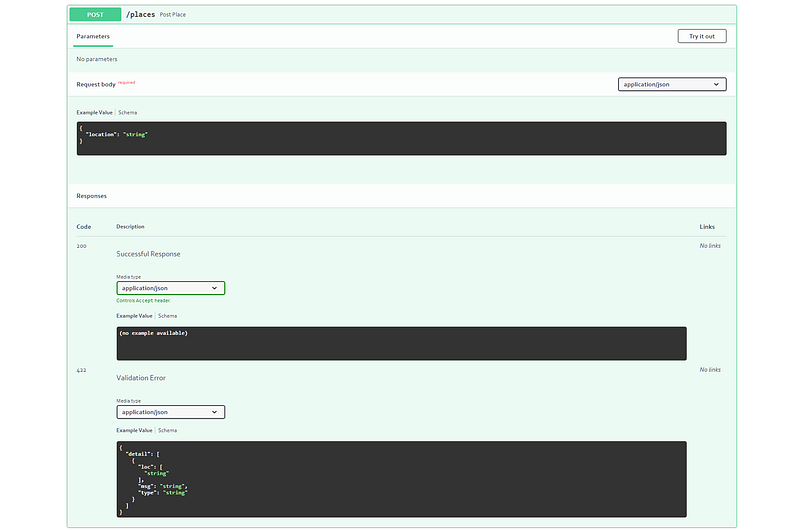
Immediately we can see that we need to include a request body, which requires just one argument location which is of type string.
If you’re not a big fan of Swagger UI documentation, we can switch over to 127.0.0.1:8000/redoc for a change of scenery:
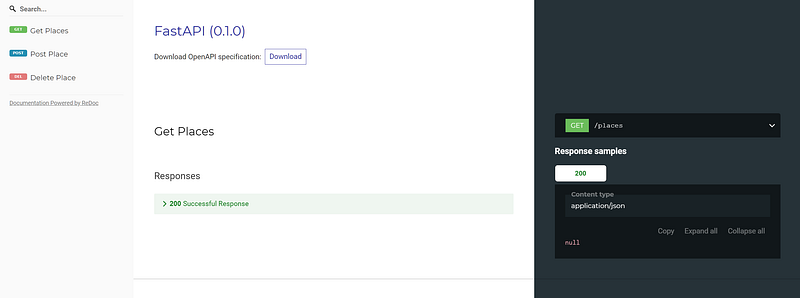
The OpenAPI specification and FastAPI documentation are particularly useful for better understanding the automated documentation features.
The End
That’s all for this introduction to FastAPI — we’ve covered:
- Why FastAPI is so good
- How to build a simple API with GET, POST, and DELETE methods
- How to deploy and test our API
- Viewing our automatically generated documentation
I’m sure I don’t need to tell you how powerful FastAPI is — it’s an amazing library that I’ve found to be multitudes better than the other API frameworks available for Python.
I hope you will find FastAPI as useful as I do.
If you’d like more, I post programming tutorials on YouTube here! Otherwise, if you would like to give me feedback, ask questions, or have a cool idea — let me know via Twitter or in the comments below.
Thanks for reading!
Although FastAPI is certainly the tool of choice for API development in Python, it can be useful to compare the framework to others. If you’re interested, I’ve covered API development with Flask too!
🤖 70% Discount on the NLP With Transformers Course
*All images sourced by the author where not stated otherwise.


