Build a To-Do App in React With Easy Peasy and Ant Design
How to integrate Easy Peasy in your React app

To-do apps are prevalent around us. They help us keep track of tasks and get things done throughout the day.
In this guide, you will learn how to build a to-do list web application using React. To store and share data between multiple components, we will leverage the Easy Peasy state management library. Furthermore, to make our UI look more appealing, the project will source components from the Ant Design library.
To learn the fundamentals of Easy Peasy, check out this article.
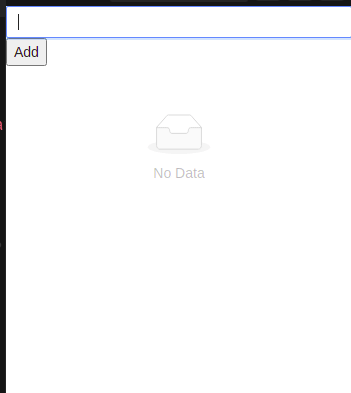
This will be the outcome of this article:
Let’s get started!
Getting Started
Project setup
To create a blank React repository, run the following terminal command:
npx create-react-app todo-easy-peasyInstallation of modules
Our project requires the following dependencies:
easy-peasy: This will allow us to store user data and share it throughout parts of the app.antd: This module will help us use components from the Ant Design package.nanoid: To assign ID fields to our items.
To install these packages, run this bash command:
npm i easy-peasy antd nanoidProject folder structure
In this section, we will create some folders in our project. This will encourage code organization and thus, cleanliness.
Locate the src directory in your repository. Here, make the following folders:
components: This folder will hold our custom components.store: Will hold our Easy Peasy store. This is where we will store our states and actions.
To create these directories, run this bash instruction:
cd src #go to directory
mkdir components store
When that’s done, your project should look like this:
Creating Our Todo Application
To-do item component
In this part of the article, our plan is to code a custom component that will represent each item in the to-do list.
In your components folder, create a file called TodoItem.js . Here, start by writing the following code:
- Line 4: The
TodoItemmodule will accept atodoprop. This corresponds to an item in the list. - Line 8: Display the
taskfield of thetodoobject.
Creating our store
In your store folder, create a file called todoStore.js . This file will contain our state variables and their actions.
In store/todoStore.js , write this snippet of code:
- Line 4: Define the
todosstate. - Line 9: Create our store and export it. This will allow us to link our store with the project.
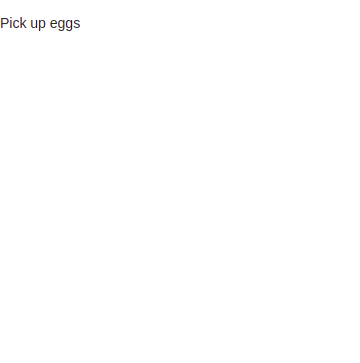
Displaying our todos
Now that we have created our store, it’s time to build a React component that will be responsible to display the user’s items in a list.
In your components folder, create a file called TodoList.js . Here, write the following block of code:
- Line 5: Extract the
todosstate from our store. - Lines 9–12: List out all the to-do items using the
Listcomponent. Each list item will be rendered via theTodoItemcomponent.
When that’s done, all that remains for us is to connect our store with the project. To do so, replace all the code in src/App.js with the following:
- Wrap our
TodoListcomponent withStoreProvidertags. Thestoreprop points towards the store that we want to use. We have now connected our store with this application.
This will be the output of the code:
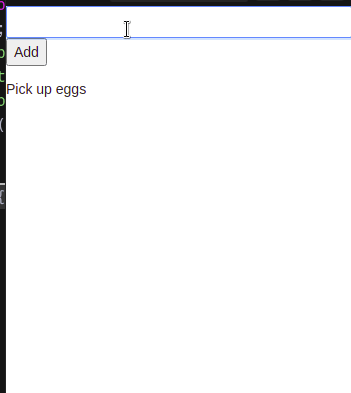
Adding to-dos
In this section, we will write a function that will help the user add tasks to the to-do list.
In store/todoStore.js , find your todoModel object and add the addTodo property like so:
- Line 4: Create our
addTodoaction. - Line 5: Assign the
idof the new item using thenanoidmodule. - Line 6: In the end, append the new task to the
todosarray.
Next, go to your components folder. Here, create a file called AddTodo.js . This component will allow users to input data into the store.
In components/AddTodo.js , write this block of code:
- Line 6: Retrieve the
addTodofunction from the store. - Line 13: The
onSubmitmethod is a handler for this form. This means that if the user submits the form, the program will invoke theaddTodomethod. As a result, this will append a new item to the list. - Lines 14–19: The
Controllercomponent allows us to capture user input.
All that remains for us is to display the AddTodo component to the DOM. To do so, go to App.js and alter the return block like so:
- Line 4: Render the
AddTodocomponent as a child component ofStoreProvider. This means thatAddTodonow has access to our store.
Run the code. This will be the output:
Removing to-dos
In this section, we will write some code to let the user delete items from their list.
To do so, go to store/todoStore.js . Here, add this piece of code:
- Line 2: Declare our
removeTodoaction. - Line 3: Search for the specified item in the array and delete it.
To learn about JavaScript’s
filtermethod, check out this post by Brandon Morelli.
Let’s test it out!
As the final step, go to components/TodoItem.js and add this snippet of code:
- Line 3: Get our
removeTodomethod from the store. - Line 7: The
actionsprop accepts an array of components which allows us to interact with the list item. Here, we are passing in aButtonelement. When the user clicks on the button, the app will call theremoveTodomethod. This will delete the desired item from the list.
This will be the result:
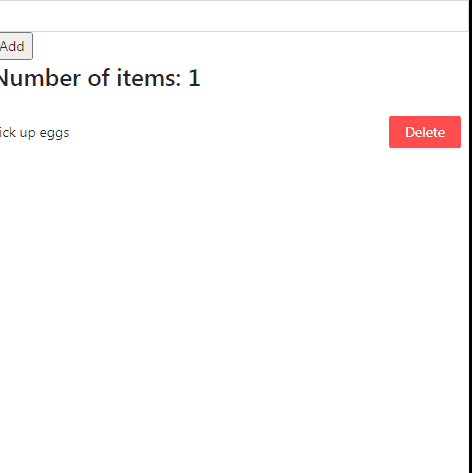
Displaying the number of items via computed properties
In a nutshell, computed properties are states derived from other states. In this project, we will use computed states to display the quantity of tasks in the to-do list.
Navigate to store/todoStore.js . Here, find your todoModel object and add a numberOfItems property like so:
- Line 4: The
numberOfItemsstate will be derived from thetodosarray. Here, we are storing the length of thetodosstate and assigning it tonumberOfItems.
Let’s now use this state! To do so, go to components/TodoList.js and append this piece of code:
- Line 3: Get the
numberOfItemsstate from the store. - Line 6: Display the value of
numberOfItemsto the user interface.
Result:
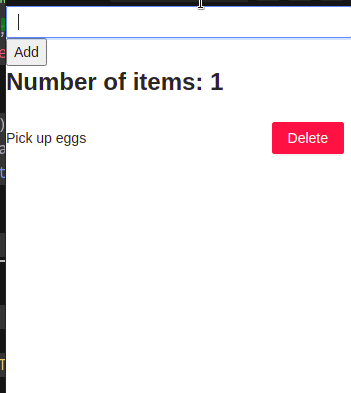
And we’re done!
Further Resources
Here is the CodeSandbox repository for this project.
- Easy Peasy in a nutshell — Devlin’s blog.
- Easy Peasy React state management library — Flavio Copes
- Implement a Redux Store with Easy Peasy and React Hooks — Mark Shust
Conclusion
In this article, you learned how to build a to-do app with Easy Peasy as a data storage solution. If you want a great state management library, then Easy Peasy will be a great fit for your project. Moreover, since it is easy to use, it helps developers get up and running within a short span of time.
Thank you so much for reading!


