
Build a Stock Earnings Calendar of your Favorite Stocks in Python
A Streamlit App to Display a Calendar with Month, Week, Day, List View of Stock Earnings of Your Favorite Tickers
If you own a portfolio of stocks (or a watchlist), you will likely be interested in their future earnings releases dates. While it is not difficult to Google for the earnings releases for them, doing it for each of your favorite stocks and recording it down is likely going to be tedious.
Even if you find a consolidated view of earnings dates in a calendar, such as the one from Earnings Whispers below (which I myself use very often), you may still find it distracting and hard to isolate the companies that you are interested in.
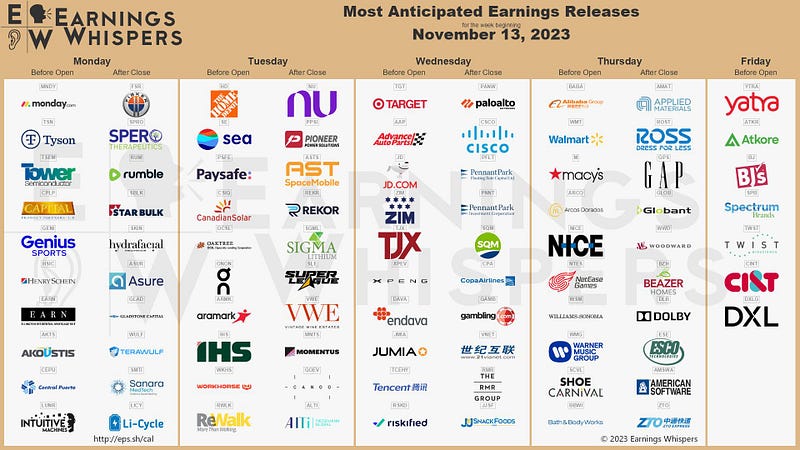
Wouldn’t it be great to have a consolidated calendar of earnings, only for YOUR own selected stocks of interest? That’s exactly what we will build today.
A Stock Earnings Calendar App Deployed on HuggingFace Spaces
I have written a Streamlit Stock Earnings Calendar app (deployed here), and will be sharing how I did it, step by step. All you need to do in the app is to key in the ticker symbols of your favorite stocks (e.g. “AAPL, GOOG, META”), and the app shows the earnings dates of these stocks in Monthly Grid View, Weekly View, Daily View and List View, whichever your prefer!
Here are the screenshots of some of the different views as described.
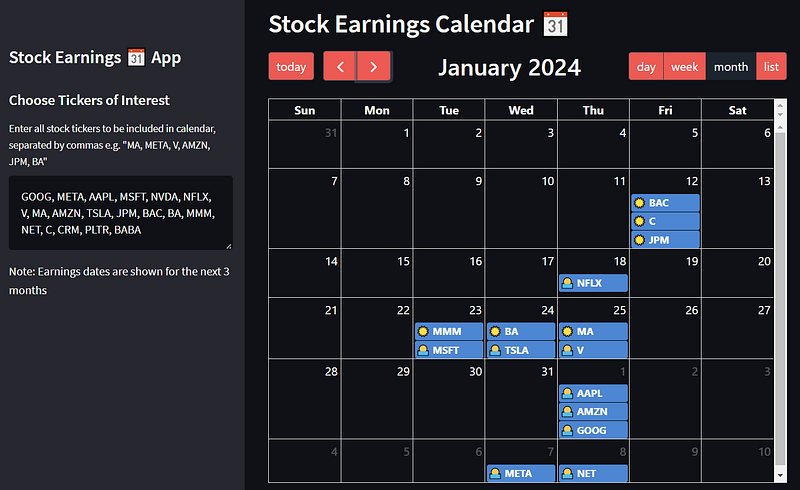
Monthly Grid View
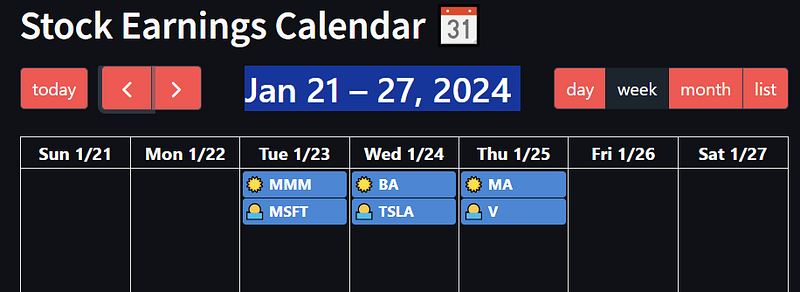
Weekly View
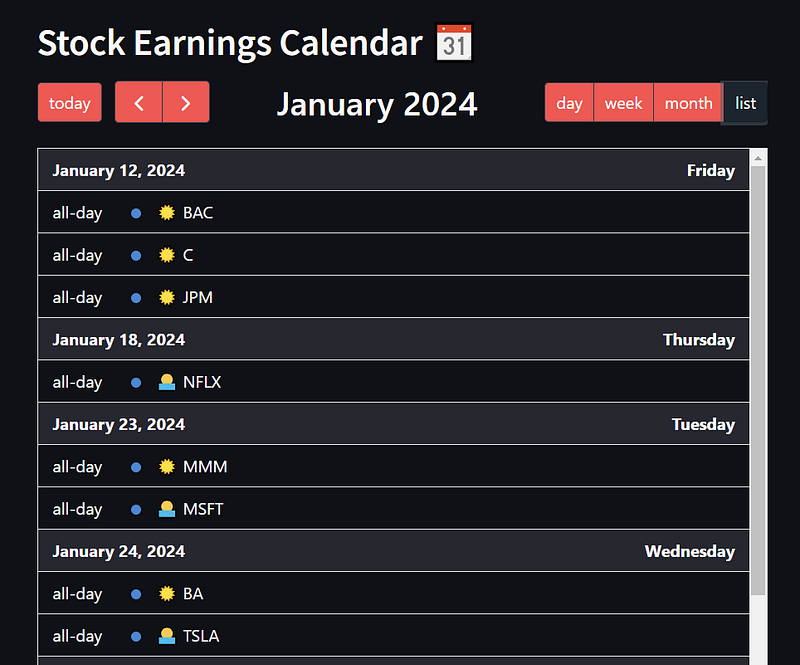
List View
The app is deployed here:
https://huggingface.co/spaces/bohmian/stock_earnings_calendar
The full code is given here:
Let’s get started!
1. Import Packages
First, we import the packages needed. We are going to need streamlit for the overall UI of the app, as well as streamlit_calendar for displaying our calendar in streamlit. Make sure to install both the packages using pip install streamlit and pip install streamlit_calendar.
We also need packages to parse the Earnings Dates data from Financial Modelling Prep API. The data from Financial Modelling Prep API is in a JSON format, which we will need to parse into a Python dictionary through the packages and function below.
# Importing required modules
import streamlit as st # for overall GUI
from streamlit_calendar import calendar # to show calendar
from dateutil.relativedelta import relativedelta # for addition to dates
import datetime
import os # for extracting environment variable
from urllib.request import urlopen # for getting data from FMP API
import json # for parsing data from FMP API

# For parsing data from API from JSON to a Python Dictionary
def get_jsonparsed_data(url):
    response = urlopen(url)
    data = response.read().decode("utf-8")
    return json.loads(data)
2. Obtain Earnings Releases Dates from Financial Modeling Prep API
The Financial Modeling Prep (FMP) API is an accurate financial data (i.e. stocks, earnings, historical data, market sentiment, financial statements etc.) API. You need to obtain the Financial Modeling Prep (FMP) API key (sign up here). There is a free version which you can sign up for too. Today, we are using it to obtain the earnings releases dates for the next 3 months. You can read about how the API works to retrieve the dates in this link.
2.1. FMP API Key and Endpoint
Next we define the base URL endpoint for the FMP API “https://financialmodelingprep.com/api/v3/", and we get our FMP API key from environment variables and store it in the apiKey variable (I will show you how to store the API Key in the HuggingFace spaces environment later). The code below does it in a safe way without revealing it to the user. If you are just going to run the streamlit app locally on your computer, you may choose to copy the API key directly into the apiKey variable. If you are very sure no one will ever see your code and steal your key.
# Financialmodelingprep (FMP) api base url
base_url = "https://financialmodelingprep.com/api/v3/"

# Get FMP API stored as environment variable
apiKey = os.environ['FMP_API_KEY']
2.2. Get Dates of Interest
The FMP API endpoint allows us to feed to a range of dates of interest in string format (e.g. 2023–12–01). Here, we use Python’s datetime library to get today’s date and add 3 months to it, before converting the dates to string format which we will pass into the FMP API endpoint. This is the date range within which we want to get our earnings dates.
# Get today's date and add 3 months to it
# Convert both today's date and the 3 months later date to strings (for input into API endpoint URL later)
# This is the date range within which we want to get our earnings dates
today = datetime.datetime.today()
today_string = today.strftime('%Y-%m-%d') # convert to string
future_string = (today + relativedelta(months=3)).strftime('%Y-%m-%d')
2.3. Define Full FMP API Endpoint
Here, we define the full endpoint to get the earnings dates, by passing in the earning_calendar endpoint, together with the today_string and future_string earlier and the apiKey to the base_url of the API.
# This is the full API endpoint to get the earnings dates from today to 6 months after
url = f"{base_url}earning_calendar?from={today_string}&to={future_string}&apikey={apiKey}"
2.4. Get the Earnings Dates and Parse into a List of Python Dictionaries
Next, we write a function get_earnings_dates for getting the earnings releases dates and parsing them.
Do not miss out the@st.cache_resource decorator above the function! This decorator ensures that the call to the FMP API will only run once when the streamlit app is started. The data will be cached after the function runs. Without this decorator, the API will be called each time you click something in the streamlit app and it is going to lag.
# This decorator ensures that the call to the FMP API will only run once at the start of this app
# The data returned will be cached after the function runs
# Without this decorator, the API will be called each time you click something in the streamlit app
@st.cache_resource
def get_earnings_dates(url):
    events = get_jsonparsed_data(url)
    return events

events = get_earnings_dates(url)
The data returned by FMP API will then be stored in the events variable in the format shown below. Note that it gives the date, the ticker symbol and even data like revenueEstimated and time (whether it is bmo (before market opens) or amc (after market closes).
[{'date': '2023-11-16',
  'symbol': 'VK.PA',
  'eps': None,
  'epsEstimated': None,
  'time': 'bmo',
  'revenue': None,
  'revenueEstimated': 1144000000,
  'fiscalDateEnding': '2023-09-30',
  'updatedFromDate': '2023-11-12'},
 {'date': '2023-11-16',
  'symbol': 'BTCM',
  'eps': None,
  'epsEstimated': -0.25,
  'time': 'bmo',
  'revenue': None,
  'revenueEstimated': None,
  'fiscalDateEnding': '2023-09-30',
  'updatedFromDate': '2023-11-12'},
 {'date': '2023-11-16',
  'symbol': '5140.KL',
  'eps': None,
  'epsEstimated': None,
  'time': 'bmo',
  'revenue': None,
  'revenueEstimated': None,
  'fiscalDateEnding': '2023-09-30',
  'updatedFromDate': '2023-11-06'}]
3. Write Streamlit UI for User to Select Tickers of Interest
3.1. Streamlit Components to Get User Input Tickers
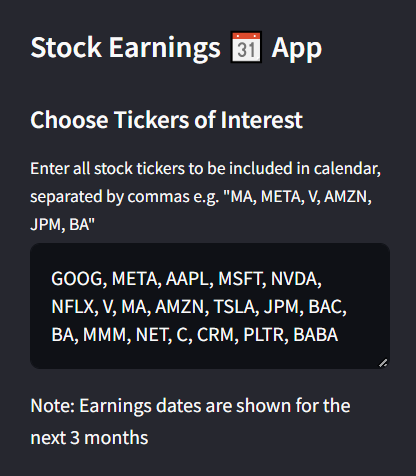
Next, we write a UI in streamlit for the user to select tickers of interest and store it in the tickers_string variable which we will parse later. As shown in the code below, we make use of the st.text_area component (for long text input of tickers) and the st.sidebar to put this input into the sidebar. We also include some st.title and st.header text in the sidebar (feel free to change the text).
with st.sidebar:
    st.title("Stock Earnings 📆 App")
    st.header("Choose Tickers of Interest")

    # For users to enter tickers of interest
    tickers_string = st.text_area('Enter all stock tickers to be included in calendar, separated by commas \
        e.g. "MA, META, V, AMZN, JPM, BA"',
        value = 'GOOG, META, AAPL, MSFT, NVDA, NFLX, V, MA, AMZN, TSLA, JPM, BAC, BA, MMM, NET, C, CRM, PLTR, BABA').upper()
    st.write("Note: Earnings dates are shown for the next 3 months")
I have chosen to use ‘GOOG, META, AAPL, MSFT, NVDA, NFLX, V, MA, AMZN, TSLA, JPM, BAC, BA, MMM, NET, C, CRM, PLTR, BABA’ as the default input value for the text_area component just to showcase a variety of tickers. The earnings dates of these tickers will be populated into the calendar by default.
3.2. Parse User Input Tickers
After the user gives the input in the tickers_string variable, we need to parse it. In the following code, we remove all the spaces in the users input and split the string by commas to get each ticker. This is then stored in the tickers list.
# Parse user input into a list
tickers_string = tickers_string.replace(' ', '')
tickers = tickers_string.split(',')
4. Parse Earnings Events from FMP API to Populate Into Calendar
The list of events given by the FMP API (as shown in Section 2.4, copied below for convenience) is in a list of Python Dictionaries. However, each dictionary is in a different format compared to what the streamlit_calendar component requires as input.
{[{'date': '2023-11-16',
  'symbol': 'VK.PA',
  'eps': None,
  'epsEstimated': None,
  'time': 'bmo',
  'revenue': None,
  'revenueEstimated': 1144000000,
  'fiscalDateEnding': '2023-09-30',
  'updatedFromDate': '2023-11-12'},
 {'date': '2023-11-16',
  'symbol': 'BTCM',
  'eps': None,
  'epsEstimated': -0.25,
  'time': 'bmo',
  'revenue': None,
  'revenueEstimated': None,
  'fiscalDateEnding': '2023-09-30',
  'updatedFromDate': '2023-11-12'}]
The streamlit_calendar minimally requires each event dictionary to have the title key (name of event) and the start key (event start date/date and time) as input to populate the calendar. There are other fields such as end key (for end time) and even resource (venue used for the event) which we will ignore for now.
In the code below, we loop through each event dictionary given by the FMP API (in the events list earlier), convert them into the required format, and append them to the calendar_events which will be used to populate the calendar eventually.
# Converts the parsed json from FMP API into a list of events to be passed into streamlit_calendar
calendar_events = []
for event in events:
if event['symbol'] in tickers: # filter for user selected tickers
calendar_event = {}
calendar_event['title'] = event['symbol']
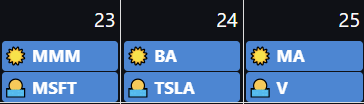
if event['time'] == 'bmo': # before market opens, add sunrise symbol
calendar_event['title'] = '☀ ' + calendar_event['title']
elif event['time'] == 'amc': # after market closes, add sunset symbol
calendar_event['title'] = '🌅 ' + calendar_event['title']
calendar_event['start'] = event['date']
calendar_events.append(calendar_event)- In the code above, we see that the
startfield of calendar event can be obtained from thedatefield of the event from the FMP API. - The
titlefield of calendar event can be obtained from thesymbolfield of the event from the FMP API. - In addition, we add a ☀ (sunrise) or 🌅 (sunset) symbol at the start of the title to denote whether the earnings releases take place before market opens or after markets closes respectively. This information can be obtained from the
timefield (which gives‘bmo’or‘amc’) of the event dictionary from FMP API.
The symbols actually look cute in the streamlit calendar, I think?
The final calendar_events list is stored in the format shown below.
[{'title': '☀ BABA', 'start': '2023-11-16'},
 {'title': '🌅 NVDA', 'start': '2023-11-21'},
 {'title': '☀ CRM', 'start': '2023-11-29'},
 {'title': '☀ BAC', 'start': '2024-01-12'},
 {'title': '☀ JPM', 'start': '2024-01-12'},
 {'title': '☀ C', 'start': '2024-01-12'},
 {'title': '🌅 NFLX', 'start': '2024-01-18'},
 {'title': '🌅 MSFT', 'start': '2024-01-23'},
 {'title': '☀ MMM', 'start': '2024-01-23'},
 {'title': '☀ BA', 'start': '2024-01-24'},
 {'title': '🌅 TSLA', 'start': '2024-01-24'},
 {'title': '🌅 V', 'start': '2024-01-25'},
 {'title': '☀ MA', 'start': '2024-01-25'},
 {'title': '🌅 GOOG', 'start': '2024-02-01'},
 {'title': '🌅 AMZN', 'start': '2024-02-01'},
 {'title': '🌅 AAPL', 'start': '2024-02-01'},
 {'title': '🌅 META', 'start': '2024-02-07'},
 {'title': '🌅 NET', 'start': '2024-02-08'},
 {'title': '🌅 PLTR', 'start': '2024-02-12'}]
5. Display the Calendar!
First, we define the calendar_options dictonary to include what we want to display and how interactive we want it to be. Please take a look at https://github.com/im-perativa/streamlit-calendar to learn more about what can be customized.
I mostly copied the calendar_options provided in the demo.py file here provided by the person who created this package, and added a change to the headerToolbar value.
calendar_options = {
        "editable": "true",
        "navLinks": "true",
        "headerToolbar": {
            "left": "today prev,next",
            "center": "title",
            "right": "dayGridDay,dayGridWeek,dayGridMonth,listMonth",
        },
        "initialView": "dayGridMonth"
    }
In the headerToolbar field above, the today button (which displays today’s events in the calendar), the prev and next buttons (which navigates to the previous or next day/week/month) are shown on the left. The title is shown at the centre.
The day, week, month buttons and the list button to switch between different calendar views are shown at the right. You can change its order in any way you like by editing the code above. Recall that these views were shown as screenshots at the start of the article. This is how the header toolbar will look for my configuration.

Next up, we can customize some css code for the calendar to edit its style. Once again, I copied this from the demo.py file here. Feel free to experiment and change some of the numbers below to make certain words bigger/smaller etc.
custom_css="""
    .fc-event-past {
        opacity: 0.8;
    }
    .fc-event-time {
        font-style: italic;
    }
    .fc-event-title {
        font-weight: 700;
    }
    .fc-toolbar-title {
        font-size: 2rem;
    }
"""
Finally, we pass our list of calendar_events, and the options and css into the calendar object from streamlit_calendar package to display the calendar!
calendar = calendar(events=calendar_events, options=calendar_options, custom_css=custom_css)6. Run the Streamlit App Locally
We are now ready to run the streamlit app locally. First, make sure that the above code is written in a single python file app.py. Then, open the terminal in the same directory and run streamlit run app.py. If all is good, you will see a terminal output similar to the following.
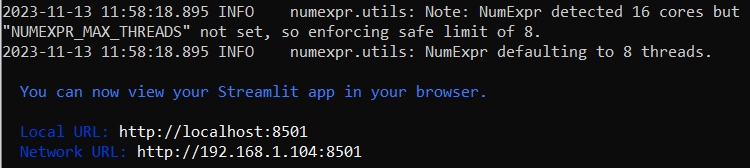
Now, enter http://localhost:8501 into your browser and the calendar app should pop up! Congratulations!
Next, we will learn how to deploy this app into HuggingFace Spaces as I have done here.
https://huggingface.co/spaces/bohmian/stock_earnings_calendar
7. [To Deploy on HuggingFace Spaces] Set Up Environment and API Key in HuggingFace Spaces
First we do a quick set up of the environment and API key as we will be deploying our app in HuggingFaces Spaces.
7.1. Set Up HuggingFace Spaces Environment
- To get started, create a Hugging Face account using this link.
- Create a new space by visiting this link and clicking on the
Create new Spacebutton.

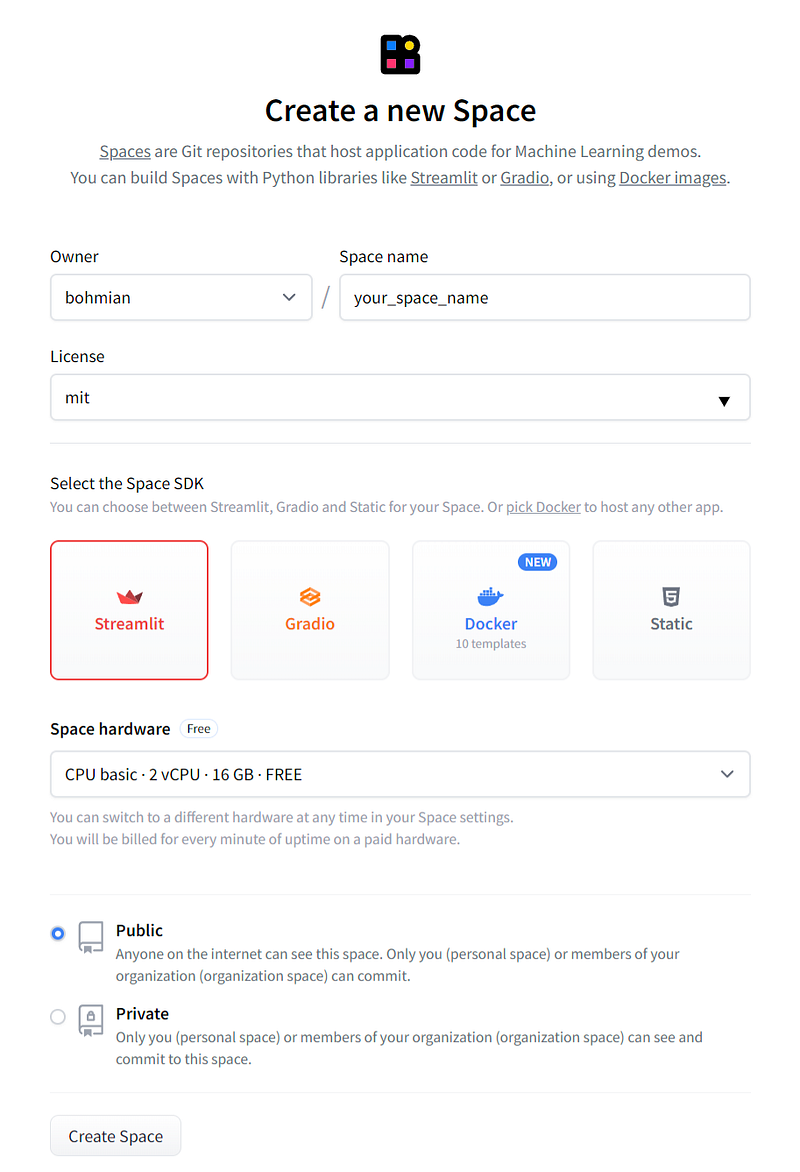
3. In the following page, enter any Space name and License type that you prefer, select Streamlit as the Space SDK and keep the default Space hardware. Choose Public for this space.
4. In the following page, you will see some instructions on how to quickly start running an app. Now click on Settings in the tab as shown below and stay on this page.

7.2. Set Up FMP API as a Secret Variable in HuggingFace Spaces
Once again, recall that we need to obtain the Financial Modeling Prep (FMP) API key (sign up here). There is a free version which you can choose too.
Next, store the key as a secret variable in your HuggingFace spaces environment. Let’s go back to the Settings page you navigated to earlier, and scroll down until you see the Variables and secrets section. At the right side, you will see a New secret button, click on it. In the popup box, enter FMP_API_KEY as the Name and copy your FMP API key inside the value field.
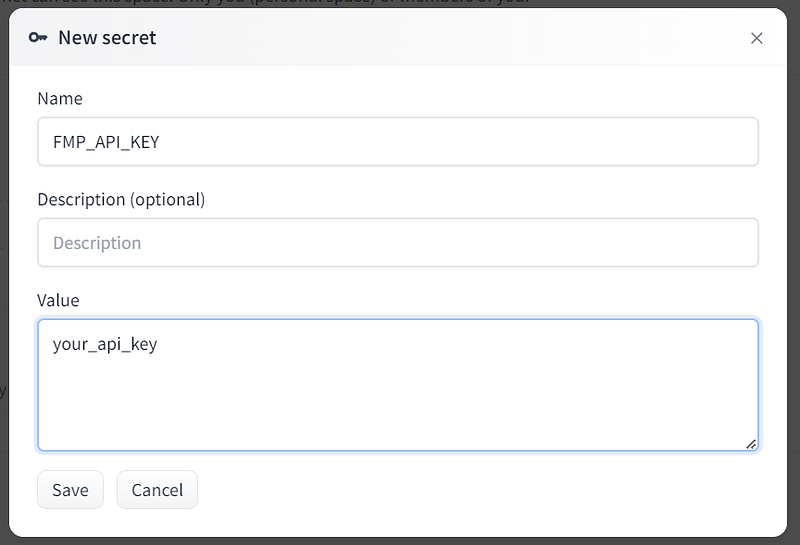
The code apiKey = os.environ[‘FMP_API_KEY’] written earlier in Section 2 will be able to read this secret variable automatically, without revealing anything to the user of the app.
7.3. Create app.py File and Copy all The Code Earlier Inside!
Now click on Files, then Add file and Create a new file as shown below.
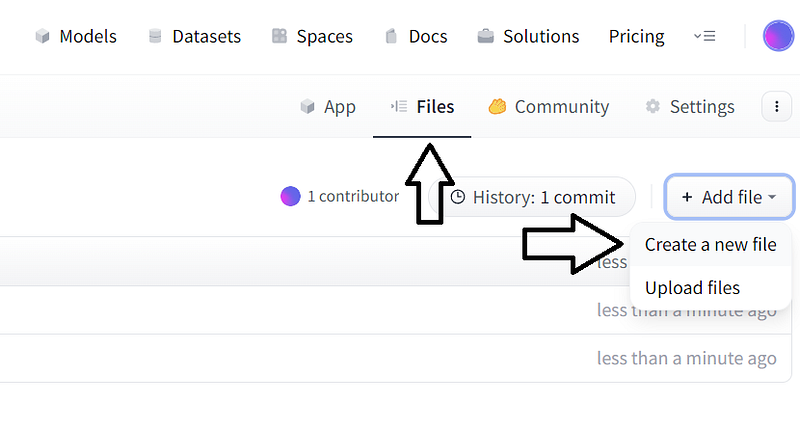
Another screen will appear, name your file app.py and copy all the Python code that we have written earlier inside! Then commit the file by pressing the commit button below!
8. Add a Requirements Text File
Now, HuggingFace Spaces needs to build the environment with the necessary packages before running the Streamlit app in the app.py file. To let it know what packages to include in the built, we create a requirements.txt file with the following package and its exact version. (Note: You do not need to add the streamlit package itself, because in the earlier step you already told HuggingFace that this is a streamlit app.) Once the file is committed, the app will start building!
streamlit-calendar==0.6.0Congratulations, you now have your app up and running! Have fun with the stock intrinsic value calculator! Once again, here is the app I have deployed:
https://huggingface.co/spaces/bohmian/stock_earnings_calendar
Admire Our Creation
Let’s take a look at January 2024 in the calendar. :)
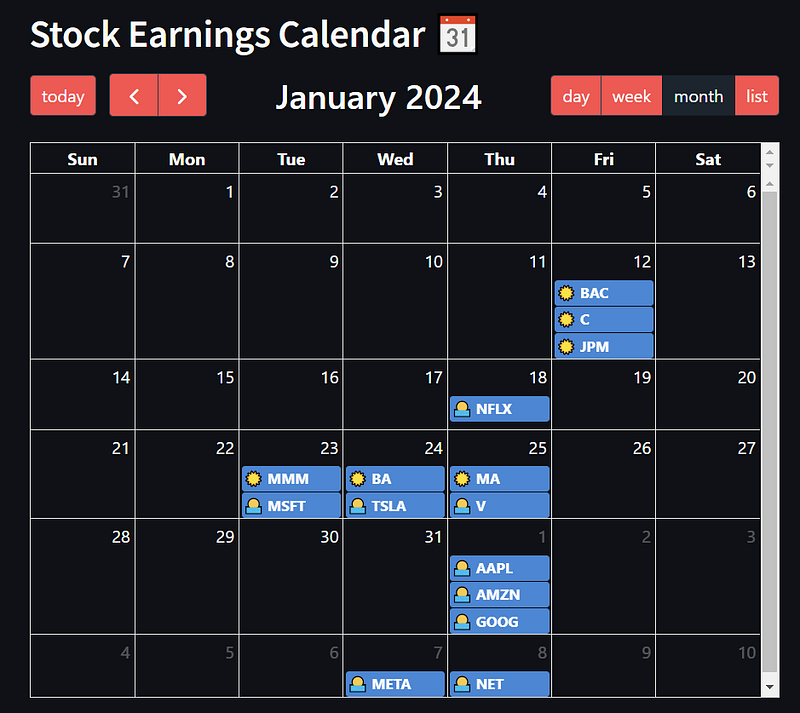
In the monthly view for January 2024 above, it is nice to see that the 3 banks, Bank of America (BAC), Citigroup ©, and JP Morgan (JPM) releasing their earnings together on 12 Jan 2024. Similarly the two credit card companies, Mastercard (MA) and Visa (V) are releasing their earnings together on 25 Jan 2024 too. We also see some big tech firms releasing their earnings as well.
I sure look forward to January 2024!
The stocks earnings dates from the above is scraped from the Financial Modeling Prep API, which is an accurate financial data (i.e. stocks, earnings, historical data, market sentiment, financial statements etc.) API. Once again, you can sign up for it at a discounted rate here, there is a free version too.
If you enjoyed this article, feel free to check out my other articles below and feel free to follow me. :)
Linkedin: https://www.linkedin.com/in/damian-boh/
Subscribe to DDIntel Here.
Have a unique story to share? Submit to DDIntel here.
Join our creator ecosystem here.
DDIntel captures the more notable pieces from our main site and our popular DDI Medium publication. Check us out for more insightful work from our community.
DDI Official Telegram Channel: https://t.me/+tafUp6ecEys4YjQ1


