
Build a Rails API With JWT
Set up your user auth using JavaScript Web Tokens for improved security

This is a guide on creating and setting up a Rails API application from scratch.
The focus will be on user login and sign up and authorizing/authenticating them with JWT (JSON Web Tokens). Keep in mind that this approach represents one of many. Let’s begin with the setup.
Setup
Let’s generate a Rails API. From the terminal, run the following command:
rails new jwt-rails-api-app --database=postgresql --apiThe flag --database=postgresql is included to indicate that PostgreSQL is to be utilized as the database instead of SQLite, and the flag --api is included to indicate that this application is to be set up as an API and to avoid generating the views and view helpers since they are not necessary for an API.
Open the newly generated folder and open Gemfile. We need to include a few gems as part of the setup.
The first is to uncomment/include:
gem 'bcrypt'Bcrypt will manage hashing the passwords for the user.
The second is to uncomment/include:
gem 'rack-cors'This allows the Cross-Origin Resource Sharing (CORS) in the API. CORS prevents API calls from unknown origins.
And finally, include:
gem 'jwt'From the terminal, run bundle install to install the three gems in the application.
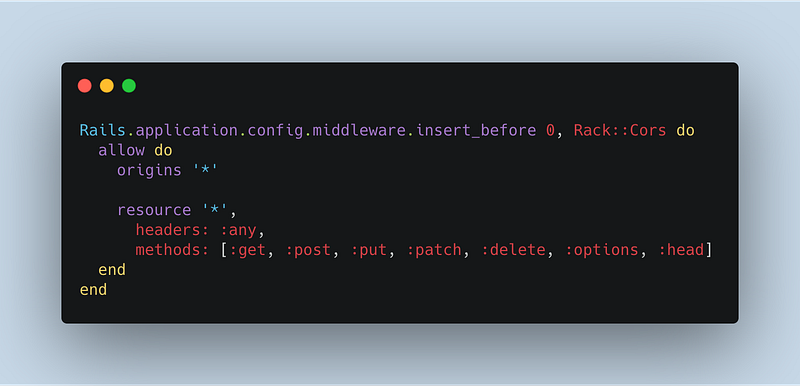
Next, navigate to config/initializers/cors.rb and uncomment the following and also replace “example.com” with an asterisk.
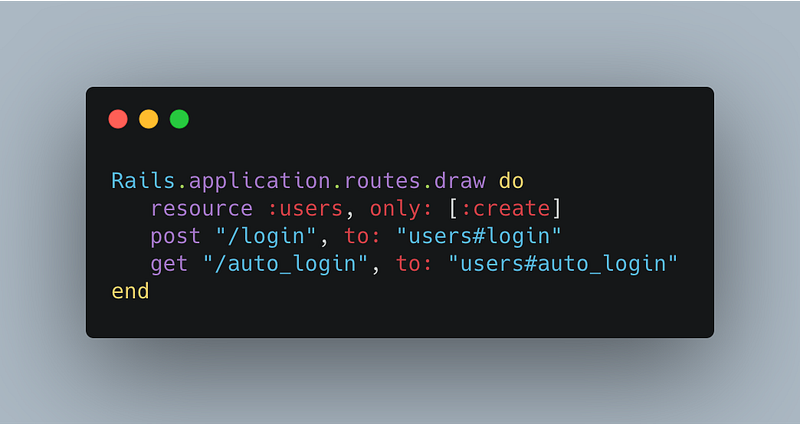
Now, navigate to config/routes.rb. We will define the routes accessible for this application.
For this guide, we will only focus on the routes that handle login, signing up a user, and auto-login. We will define a couple of custom routes to handle the login and auto-login.
For this guide, we will only focus on generating the controller and model for the User. Ideally, the same approach can be taken for others.
Let’s begin with generating the model for User. We want the following properties for a User instance, :username, :password, and :age.
rails g model User username:string password_digest:string age:integerJust a few things to note. With :password, if bcrypt is implemented, it is expecting a property of password_digest to hash the password.
Important: To ensure this feature is implemented, define the user macro, has_secure_password , in the User model. And finally, generate the User controller with:
rails g controller UsersThe model, controller, and routes for User are now set. Now, let’s run:
rails db:create && rails db:migrateFor test purposes, we can create one User instance in the db/seeds.rb file.
user = User.create(username: "reizl", password: "sample", age: 27)To seed the database, run rails db:seed. Now that the setup is finished and we have data to work with, we can now focus on the methods of controller.
Application Controller Methods
Let’s focus on the application controller. Methods defined in this controller can be accessible in other controllers such as the User. There are many methods defined here, essential to authenticate and authorize users.
Encode_token
Let’s begin with encode_token. When this method is invoked later, an object is sent as the argument.
The method encode provided by the JWT gem will be utilized to generate a token. JWT.encode takes two arguments, the payload object and a string that represents a “secret”. The method encode_token will return the token generated by JWT.
Now, with the rest of the methods, it would be more beneficial to explain starting from authorized and working our way up, considering that is the chain of events it takes. There will be some jumping back and forth between methods.
Before exploring the methods, the macro, before_action :authorized, essentially says that if any request is made to this API, the method, authorized, will always be called first.
Authorized
As the name implies, this method checks whether a user is authorized. But it is dependent on a chain of methods.
If a user is not logged in or a request is not sending the necessary credentials, this method will send back a JSON response, asking them to log in. To determine that information, the method logged_in? is called.
Again, as the name implies, it checks if a user is logged in or not. The logged_in? method returns true or false, depending on the return value of another method called inside of it.
Logged in user
The method logged_in_user calls, bear with me now, another method, decoded_token. From decoded_token, the auth_header method is called, which is looking at the information of the request.
The method is only concerned with the headers, specifically the key of “Authorization”. Ideally, this will contain a token generated by JWT and will be in the format of Bearer <token>, which is what auth_header will return.
To get just the token, we will use the .split(" ")[1] method on Bearer <token> . Once the token is grabbed and assigned to the token variable, the decode method provided by JWT will be utilized.
JWT.decode takes in four arguments, the token to decode, the secret string that was assigned when encoding, a true value, and the algorithm (‘HS256’ here). Otherwise, if there is an error, it will return nil.
The return value for decoded_token will represent an array from JWT.decode. We’re only concerned with the first index, which will be an object with a key of “user_id.” (this will come from the User’s controller).
From that “user_id”, we can determine if a User instance with that specific ID exists in the database. If there is, the user is “authorized”, if not, they are not.
(Feel free to read again since a sequence of methods is involved.)
User’s Controller
Now, let’s shift the focus to the User’s controller. We will focus on the user login, user sign-up (create user), and auto-login of a user. Many of the methods rely on the ones defined in the application controller.
Let’s start off with the macro, before_action :authorized, only: [:auto_login].
Similar to earlier, we are stating that if any route is accessed in application, the authorized method in application controller runs first. But it is only specific to the route, auto_login. That means that create or login can be accessed directly.
Create
When a user is signing up, a new user instance is being created in the back end. A POST request will be made to /users which will be redirected to the user controller create method.
Let’s examine what is happening in the create method.
A user instance is created. If it is valid, a payload object is created with the user instance’s ID and passed into the encode_token method, which is defined in the application controller. The payload object can contain more than one key if needed.
As discussed earlier, encode_token will return a token string generated by JWT. A JSON object is rendered with the key-value pairs of the user and token as a response.
Login
A similar approach is implemented when an existing user logs in. But instead, a POST request will be made to /login which will be redirected to the user controller login method.
The difference is that we’re checking for an existing user instance from the params passed, specifically the username, using the find_by method. Then, the authenticate method provided by bcrypt compares if the password passed from the params and the password stored in the database match.
If both the user instance and the authenticate method pass, a token is generated by JWT and a JSON object is rendered with the key-value pairs of the user and token and sent as a response.
Auto-login
Let’s examine the auto_login method located in user controller.
There’s really not much going on here. The big question is where the variable @user comes from?
Since the method, authorized, will run before auto_login, the chain of methods in the application controller will also run. One of the methods, logged_in_user, will return a global @user variable that is accessible.
Closing Remarks
With the routes and methods defined, our Rails API is set! We can run our server using rails s or rails s -p 4000 (if you want to run on a different port).
To test the routes and functionality, we can utilize Postman or connect from a client-side application such as React. Testing the routes and functionality will not be covered in this guide.
This guide focuses on the set up of a rails API with bcrypt hashing with JWT integrated to handle user authentication/authorization.
It also covers the logical process behind the methods implemented. Hopefully, this guide has provided guidance on structuring your Rails API with JWT. Thank you for reading!
Refer to my repository for details: