
Build a Python Flask App To See the Places You’ve Travelled
Pin your trip memories on a “HERE” map using Python

I hope you’ve had a great summer holiday. Wouldn’t you and your friends be happy to recall the places you visited together?
In this article, I’m going to show you how to create a custom map where you can pin vacation photos of all the places you have been to. You’ll have an option to add text to better describe your trip memories.
I’ve already written a tutorial about how to plan your holiday with HERE maps. This tutorial is independent, so you can start here, and check the other one later if you’re interested. We’re going to reuse some of the technologies and apply more enhancements. In the end, you’ll learn how to deploy your app to Heroku, so your friends can also see it.
Let’s begin!
Create The Project
Requirements
What you’ll need:
- Some awesome photos from your holiday.
- The coordinates of the places you visited. We’ll use the geopy Python library for this task:
pip install geopy- Flask — lightweight web application framework:
pip install Flask- HERE developer account. Click here for instructions on how to create an API key. We’ll need this to make the call to the HERE maps from our app.
- Heroku account — this tool is used to build, and run applications on the cloud. Currently, you can host one app for free if you don’t want a paid account.
Coding part
- Create a new Python file, for example,
app_runner.py, and paste the following code:
2. Create a new directory in the project’s folder called templates. Create the map.html file in that folder.
3. Paste the following content:
The most important parts of this code:
- We’ve imported the necessary scripts to render the map.
- Make sure to replace the HERE
apikeywith yours. - I’ve chosen Barcelona city for this project. It’s the default location on the map.
- The
addMarkerToGroup()function adds a location to the map. In this example, I created a single marker— Barceloneta Beach. We’ll see how to get the coordinates from a location shortly. Use this function to add as many places as you want. - The
addEventListener('tap')function gets invoked when you tap the location. - The
addInfoBubble()function shows our custom text and photo when the user clicks on the marker.
4. To extract a location’s latitude and longitude, create a separate Python file with this code:
We’ve just used the geopy library to get the coordinates:
la Barceloneta, Ciutat Vella, Barcelona, Barcelonès, Barcelona, Catalunya, 08001, España
(41.3806533, 2.1899274)
Note that you could also pass the location’s address instead of the name.
5. Repeat the step for all places you’ve visited.
6. Add the markers to the custom map. Basically, all you need to do is to add more places to the map using the addMarkerToGroup method.
- Add the latitude and longitude.
- Adjust the image width and height as per your needs.
- Replace the photo URL with yours.
For the sake of brevity, I’m not going to paste my whole code here, because I added a lot of places.
Test The Project
Now let’s run the Flask app locally:
python3 app_runner.pyOpen your browser at http://127.0.0.1:5000/ and click on the markers:
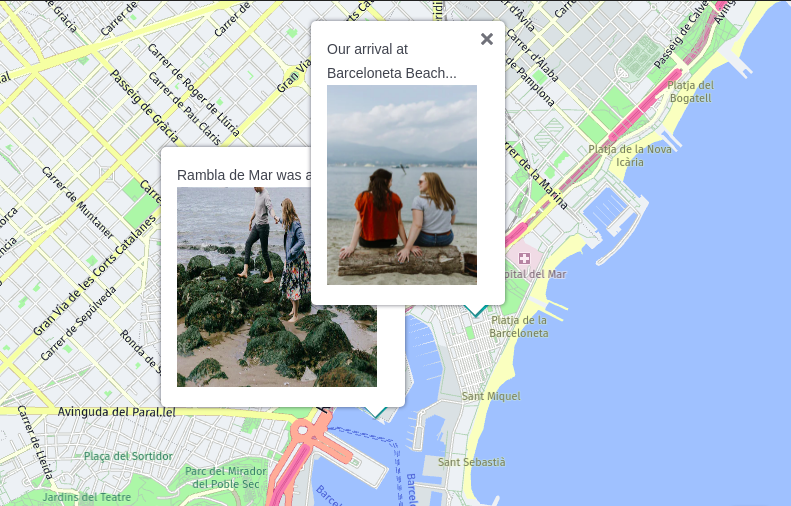
Awesome! The pictures are shown as expected.
Feel free to experiment with the marker’s HTML code to make the Info Bubble more exciting.
Disclaimer: I’ve collected some nice pictures from Unsplash for this tutorial. If you’ve wondered — these places are not from Barcelona.
Deploy the App To Heroku
Now let’s make the app public. We’ll deploy it to Heroku and share the link with others.
- Create a
requirements.txtfile in your project’s directory:
Flask==1.1.1
gunicorn==19.9.0
Jinja2==2.10.1
This file lets Heroku know which libraries to install. Feel free to change the versions.
2. Create a Procfile in the project’s folder:
web: gunicorn app_runner:appThis file defines commands which Heroku should run to start our application. The web command starts a web server using gunicorn as our Python WSGI HTTP Server. The app name is called app_runner based on the app_runner.py file.
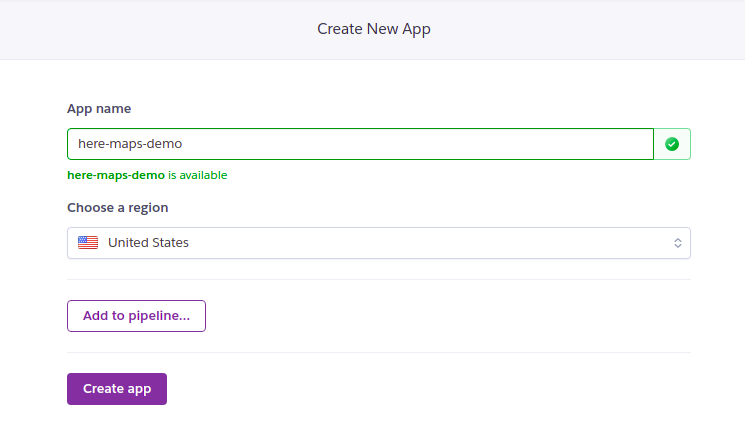
3. Log in to Heroku and create a new app:
4. There are multiple strategies for deploying an app to Heroku. In this example, we’ll use the Heroku CLI. You’ll need to download it.
5. Initialize a new Git repository in your project’s folder:
git init6. Add the app to remote:
heroku git:remote -a here-maps-demo7. Push the changes:
git add .
git commit -m "added app files"
git push heroku master
That’s it!
You should see that your app is being deployed by Heroku. If everything goes fine, you should see the app’s URL at the end of the command’s output:
remote: https://here-maps-demo.herokuapp.com/ deployed to HerokuFinally, open the app’s URL. The final result would look like this:
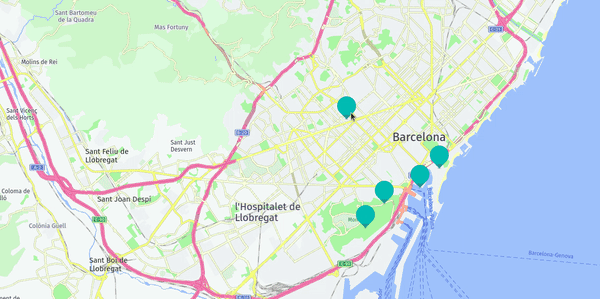
Great! Now your friends can rewind the beautiful memories and even download the pictures from your app.
Conclusion
In this tutorial, you learned how to create a custom map using HERE maps API. We created a simple web app using Flask and deployed it on Heroku to make it accessible to others.
Note that it’s not a good practice to expose API keys in the Git repository. I’ve not covered this topic in this article. But if you want to polish the app, consider using config vars in Heroku.
I hope that you’ve enjoyed this post and it gave you the inspiration to create your own map of good memories.
You might also like my other HERE Maps related tutorial:
Thank you for reading, and happy coding!


