
Brew Coffee Like A Boss Anywhere In The World
I spent four summers traveling from places like Armenia to Great Britain, Israel to Ukraine. One of the biggest challenges I encountered the first summer was finding good coffee.
I decided I would be prepared the following summer, so I started researching the best travel kits I could find. At the time, an Aeropress seemed like a great option, recommended by Tim Ferriss, one of my favorite podcasters. But that left out the grinder, the scale, the bag, etc. I also found a really cool Timbuk2 and Blue Bottle Travel Kit. That was another option, but too expensive for me (not sure they’re still selling these, it was a collab between the two companies). I ultimately resorted to gathering the items I needed to make my own kit.
Note: just this last year, I found the Pakt Coffee Kit, which looks like the best setup I’ve found to date, but it’s pricey at $160.
My Essentials
- Scale — $9.75
- Kalita Wave Dripper (size:185) — $33
- Hario Burr Grinder — $43
- Kettle — $24.99
- Filters (185) — $9.76
My kit: $120.50
You might be looking at the total, thinking, “Sheesh, it’s almost as expensive as one of the professional travel kits.” While true, this is the setup I have put together over several years, and it works well. There are pieces you can change in or out based on your preference or budget. That’s the beauty of DIY, you can mix and match. For instance, if you want a less expensive dripper, consider the plastic V60 for $8.25, and its filters for $9.38, or the Manual Coffee Grinder by Janda for $20. With all three switched in, suddenly your total is down to $72.37.
That being said, here’s my setup explained:
Scale
I use an American Weigh Scale Series: Digital Pocket Scale. It’s small but functional. I’ve had mine for several years, but there are a couple of downsides. For one thing, the blue light on my scale no longer works and it’s hard to see the numbers now. Also, if it gets wet, the numbers get wonky. You have to dry out before the scale before being able to use it again. I’ve put two and two together and concluded that, if it gets wet multiple times, the blue light will eventually go out for good(Sherlock Holmes, if you need a partner, hit me up).
Kalita Wave Dripper
For a long time, I used a plastic V60 and that worked pretty well for me. It’s cheaper than the Kalita Wave Dripper. The problem I encountered is the V60 hands more control to you, the brewer. You might be like — wait, that’s a good thing? But let me explain — in a scenario where you are using a makeshift setup while traveling, that isn’t necessarily what you want. We will get to the kettle I use in a minute, but suffice to say that, without a gooseneck kettle, you want a brewing method that limits your own effect on the outcome. I bought a stainless steel Kalita Wave Dripper at Reykjavik Roasters in Iceland, and haven’t looked back since.
Hario Burr Grinder
I have the Ceramic Coffee Mill-Original, which has worked well for me over the last four or so years. Not exactly sure how long I have had it, but it has been a good while. I had two other hand grinders before it, and neither lasted longer than a year. It grinds fairly evenly, but if I’m really gunning for an even extraction, I’ll run the grinds through twice. This isn’t always best practice because you can overcorrect, but in the world of travel coffee kits, you gotta compromise. This is the most expensive item on my list, and there’s a ton of great options out there at lower prices, so don’t feel like you need to stick with the Hario brand. The Manual Coffee Grinder by Janda I referenced earlier in the post has some great reviews and looks like it would do well for the coffee enthusiast traveler.
Kettle
I was given a Freshware Collapsible Kettle and it works great for me. My only complaint is the spout. Due to the limitations of a collapsible kettle (made for camping), you can’t really fit in a long, gooseneck spout. I try to pour as slow and controlled as possible by tilting it back to restrict the stream of water. If you have a little extra room in your bag, there’s a great list on Amazon of smaller gooseneck kettles that might work for you (some are electric, some aren’t).
As far as heating the water, if you opt to go with a small electric gooseneck kettle, problem-solved. If you’re using something like the Freshware collapsible kettle, you have to get creative. I rarely had issues finding hot water. In civilized locations, it’s relatively easy to find a water dispenser with hot water (if you were staying in a hotel, hostel, or AirBnB for instance).
Once I even went into a McDonalds and ordered two large glasses of hot water then made my own coffee (yea…I’m that guy). In rough and tough areas without access to electricity or modern comforts, I usually just heated water over a fire (which you can’t do with an electric kettle). I would say consider the type of traveling you usually do, then make a call!
Filters
Not a ton to say here, other than make sure your filters are compatible with your brewer. Kalita has two sizes, the 155 and the 185. I use the 185 dripper and filters. The 155 is for smaller, single-cup amounts. You could go either route, but I like the 185 because I can draw out more defined notes and better cups of coffee. This has to do with the brew recipe I prefer.
My Non-Essential Essentials:
- Filter Container — $16
- Coffee — ~$22
- Thermos — $25.83
- Carrier bag — ~$25
Filter Container
I definitely wouldn’t say this is a necessity, but if you want to protect the integrity of your coffee filters on long trips, consider getting one of these bad boys. The Sistema Breakfast Bowl Food Storage Container is the perfect size for 185 filters. You can carry a bunch around with you and not have them distorted by your travel.
Coffee Bags
I always just carried an entire bag around with me, but that was mostly because I was gone for long periods at a time. I would buy coffee on the road and not be able to store it anywhere. I went to some of the best shops in whatever city I was visiting and purchasing bags. If you’re just gone for a few days and know you won’t go through an entire bag, you could look for some kind of airtight container to store your beans in. Here’s a good option by YEEHO.
Thermos
I have struggled to find the perfect thermos. I currently use Zojirushi, but I’m not 100% satisfied with it. The coffee stays piping hot for 3+ hours. I also feel like I get a metallic whiff whenever I drink from it. The nice thing is that it does excel at keeping coffee hot and it doesn’t leak. I have tried a KeepCup as an alternative. It’s cool looking, with a cork sleeve and a glass body. However, I cannot recommend it for travel. It leaks easily and the crazy thing about glass is that… it’s breakable. Crazy, right? Most of the time I was in a place where I had access to a mug, so I would just brew my coffee into that.
Carrier Bag
I used a large shaving kit bag for a long time. Currently, I use a small backpack. I think whatever bag you use depends on the setup you settle on.
That concludes my rundown of a recommended DIY setup. I hope that through this post I have A) shown you what works for me but B) expressed that every person’s preference is different and the travel coffee kit that suits you might not work for somebody else. It’s possible to put together a solid travel kit for less than $100, especially if you’re using a backpack or thermos you already own.
Here’s a pic of my setup:
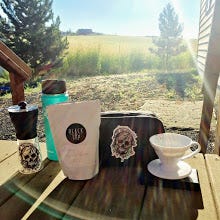
*Note: featured is my Dutch Bros Coffee Thermos and V60. I’ve since switched to the Zojirushi and Kalita Wave Dripper.


