avatarConstantin Stan

Free AI web copilot to create summaries, insights and extended knowledge, download it at here

3843

Abstract

n> arrowUp = <span class="hljs-number">4295426130</span>; <span class="hljs-type">static</span> <span class="hljs-type">const</span> <span class="hljs-type">int</span> arrowLeft = <span class="hljs-number">4295426128</span>; <span class="hljs-type">static</span> <span class="hljs-type">const</span> <span class="hljs-type">int</span> arrowDown = <span class="hljs-number">4295426129</span>; <span class="hljs-type">static</span> <span class="hljs-type">const</span> <span class="hljs-type">int</span> arrowRight = <span class="hljs-number">4295426127</span>; <span class="hljs-comment">// decimal masks</span> <span class="hljs-type">static</span> <span class="hljs-type">const</span> <span class="hljs-type">int</span> maskW = <span class="hljs-number">8</span>; <span class="hljs-comment">// 1000</span> <span class="hljs-type">static</span> <span class="hljs-type">const</span> <span class="hljs-type">int</span> maskA = <span class="hljs-number">4</span>; <span class="hljs-comment">// 0100</span> <span class="hljs-type">static</span> <span class="hljs-type">const</span> <span class="hljs-type">int</span> maskS = <span class="hljs-number">2</span>; <span class="hljs-comment">// 0010</span> <span class="hljs-type">static</span> <span class="hljs-type">const</span> <span class="hljs-type">int</span> maskD = <span class="hljs-number">1</span>; <span class="hljs-comment">// 0001</span></pre></div><p id="2978">We then listen to keyboard events on the entire screen (while it is in focus).</p><div id="725d"><pre><span class="hljs-selector-tag">return</span> <span class="hljs-selector-tag">RawKeyboardListener</span>( <span class="hljs-attribute">autofocus</span>: true, <span class="hljs-attribute">focusNode</span>: <span class="hljs-built_in">FocusNode</span>(), <span class="hljs-attribute">onKey</span>: (RawKeyEvent keyboardEvent) { <span class="hljs-comment">// on keyboard event</span> } );</pre></div><p id="a288">When a specific key is pressed we make sure we turn on the bit corresponding to that key and when it is released we make sure we turn off only the corresponding bit. Turning a specific bit on is done using the <code>|</code>(OR) operator and the mask. Turning it off is done using the <code>&</code> (AND) operator and negation of the mask. The negation of the mask helps us keep the other bits unaltered.</p><p id="b2fc">For example, below we have the code that does what I just described:</p><div id="2325"><pre>// the complete code is <span class="hljs-keyword">in</span> this CodePen if(keyboardEvent.runtimeType == RawKeyDownEvent) { switch(keyboardEvent.logicalKey.keyId) { case keyD: case arrowRight: <span class="hljs-keyword">state</span> |= maskD; break; case keyS: case arrowDown: <span class="hljs-keyword">state</span> |= maskS; break; case keyA: case arrowLeft: <span class="hljs-keyword">state</span> |= maskA; break; case keyW: case arrowUp: <span class="hljs-keyword">state</span> |= maskW; break; } } else { switch(keyboardEvent.logicalKey.keyId) { case keyD: case arrowRight: <span class="hljs-keyword">state</span> &= ~maskD; break; case keyS: case arrowDown: <span class="hljs-keyword">state</span> &= ~maskS; break; case keyA: case arrowLeft: <span class="hljs-keyword">state</span> &= ~maskA; break; case keyW: case arrowUp: <span class="hljs-keyword">state</span> &= ~maskW; break; } }</pre></div><p id="da51">After we altered the state we process it and do what is to be done:</p><div id="1669"><pre>// the complete code is <span class="hljs-keyword">in</span> this CodePen if(<span class="hljs-keyword">state</span> == <span class="hljs-number">0</span>) {</pre></div><div id="1c76"><

Options

pre> <span class="hljs-attr">left</span> = (MediaQuery.of(context).size.width-PenConfig.logoSize)/<span class="hljs-number">2</span><span class="hljs-comment">;</span> <span class="hljs-attr">top</span> = (MediaQuery.of(context).size.height-PenConfig.logoSize)/<span class="hljs-number">2</span><span class="hljs-comment">;</span></pre></div><div id="10dc"><pre>} else if(<span class="hljs-keyword">state</span> != (maskA+maskD+maskW+maskS) && <span class="hljs-keyword">state</span> != (maskA+maskD) && <span class="hljs-keyword">state</span> != (maskW+maskS)) {</pre></div><div id="937f"><pre> left += (<span class="hljs-keyword">state</span> & maskD == maskD)?moveBy:<span class="hljs-number">0</span>; // move right top += (<span class="hljs-keyword">state</span> & maskS == maskS)?moveBy:<span class="hljs-number">0</span>; // move down left -= (<span class="hljs-keyword">state</span> & maskA == maskA)?moveBy:<span class="hljs-number">0</span>; // move left top -= (<span class="hljs-keyword">state</span> & maskW == maskW)?moveBy:<span class="hljs-number">0</span>; // move up</pre></div><div id="7a43"><pre>}</pre></div><p id="e394">A <b>state</b> equal to <b>0 </b>means that no key is pressed and in this case, we set the position of the <b>AnimatedPositioned</b> widget to screen's center.</p><p id="7b63">Then, after we make sure not all keys or opposite direction keys are pressed at the same time, we modify the visual positioning of the logo with the <code>moveBy </code>amount to reflect the <b>state</b>'s current value.</p><h2 id="d1f0">Conclusions</h2><p id="5008">This way we manage to condense the state of 8 buttons (2 for each direction) on 4 bits inside a single <b>int</b>eger.</p><p id="192a">The alternative would be to store each key state in a dedicated <b>bool</b>ean value and then manage <b>4 variables</b>.</p><p id="ed91">When it comes to an online multiplayer game having a player input mapped like this may save important time in sharing user actions across all players and servers.</p><p id="0114">Also, working with bits and binary operators may be a bit faster (depending on the platform, the quantity of operations, and other factors).</p><p id="f7f8">For understanding the previous example, it is very important to understand the <b>binary</b> system and its operators.</p><div id="f11e" class="link-block"> <a href="https://readmedium.com/an-intro-to-numeral-systems-ceab9f711018"> <div> <div> <h2>An Intro to Numeral Systems</h2> <div><h3>A very, very short one, with a focus on binary</h3></div> <div><p>medium.com</p></div> </div> <div> <div style="background-image: url(https://miro.readmedium.com/v2/resize:fit:320/1*paq35S9hTZ5yMlvOVsoWgA.jpeg)"></div> </div> </div> </a> </div><p id="5a83">I’ve also detailed the insides in a practical example of using bit masking and binary in your software with pros and cons.</p><div id="32e1" class="link-block"> <a href="https://readmedium.com/bit-masking-a-practical-example-657ea8b621a8"> <div> <div> <h2>Bit Masking: A Practical Example</h2> <div><h3>How to store data on teeny-tiny bits</h3></div> <div><p>medium.com</p></div> </div> <div> <div style="background-image: url(https://miro.readmedium.com/v2/resize:fit:320/1*OTh6eLWIgQlDuXYJHUphIw.jpeg)"></div> </div> </div> </a> </div><p id="6f43">If you want to find more such use cases, please let me know and I’ll be happy to bring more to the surface.</p><p id="2970">Tha(nk|t’)s all!</p></article></body>

Bit Masking: Control Movement

Move widgets bit by bit

Photo by Euwen on Unsplash

This example is provided as a FlutterPen and I won’t detail how to create a Flutter app. Instead, I will explain the code that manages the state as a decimal value using bitwise operators like AND, OR, or NOT.

Control movement

We’ll alter a state using the WASD keys (or the equivalent arrow keys ⇧⇦⇩⇨) and use that state to move an object on the screen.

That object will be a logo and its default position will be centered on the screen. The AnimatedPositioned widget will help us to move a bit more fluid, but the example would also work with a simple Positioned widget.

The state is kept in an integer and its default state equals 0. The binary representation where we need to store all 4 possible movement directions is 4 bit long: 0000

The mask values that we’ll use are as follows:

Keys and their equivalent bit position and decimal mask

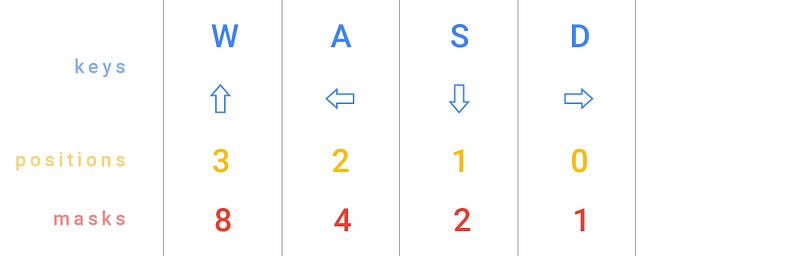
The following code snippets are written in Dart (Flutter’s core programming language).

We define some constants that will hold our raw key codes and their masks. These will help us identify which key was pressed or released.

static const int keyW = 119;
static const int keyA = 97;
static const int keyS = 115;
static const int keyD = 100;
static const int arrowUp = 4295426130;
static const int arrowLeft = 4295426128;
static const int arrowDown = 4295426129;
static const int arrowRight = 4295426127;
// decimal masks
static const int maskW = 8; // 1000
static const int maskA = 4; // 0100
static const int maskS = 2; // 0010
static const int maskD = 1; // 0001

We then listen to keyboard events on the entire screen (while it is in focus).

return RawKeyboardListener(
  autofocus: true,
  focusNode: FocusNode(),
  onKey: (RawKeyEvent keyboardEvent) { 
    // on keyboard event
  }
);

When a specific key is pressed we make sure we turn on the bit corresponding to that key and when it is released we make sure we turn off only the corresponding bit. Turning a specific bit on is done using the |(OR) operator and the mask. Turning it off is done using the & (AND) operator and negation of the mask. The negation of the mask helps us keep the other bits unaltered.

For example, below we have the code that does what I just described:

// the complete code is in this CodePen
if(keyboardEvent.runtimeType == RawKeyDownEvent) {
  switch(keyboardEvent.logicalKey.keyId) {
    case keyD:
    case arrowRight:
      state |= maskD;
      break;
    case keyS:
    case arrowDown:
      state |= maskS;
      break;
    case keyA:
    case arrowLeft:
      state |= maskA;
      break;
    case keyW:
    case arrowUp:
      state |= maskW;
      break;
  }
} else {
  switch(keyboardEvent.logicalKey.keyId) {
    case keyD:
    case arrowRight:
      state &= ~maskD;
      break;
    case keyS:
    case arrowDown:
      state &= ~maskS;
      break;
    case keyA:
    case arrowLeft:
      state &= ~maskA;
      break;
    case keyW:
    case arrowUp:
      state &= ~maskW;
      break;
  }
}

After we altered the state we process it and do what is to be done:

// the complete code is in this CodePen
if(state == 0) {
  left = (MediaQuery.of(context).size.width-PenConfig.logoSize)/2;
  top = (MediaQuery.of(context).size.height-PenConfig.logoSize)/2;
} else if(state != (maskA+maskD+maskW+maskS) 
  && state != (maskA+maskD) 
  && state != (maskW+maskS)) {
  left += (state & maskD == maskD)?moveBy:0; // move right
  top += (state & maskS == maskS)?moveBy:0; // move down
  left -= (state & maskA == maskA)?moveBy:0; // move left
  top -= (state & maskW == maskW)?moveBy:0; // move up
}

A state equal to 0 means that no key is pressed and in this case, we set the position of the AnimatedPositioned widget to screen's center.

Then, after we make sure not all keys or opposite direction keys are pressed at the same time, we modify the visual positioning of the logo with the moveBy amount to reflect the state's current value.

Conclusions

This way we manage to condense the state of 8 buttons (2 for each direction) on 4 bits inside a single integer.

The alternative would be to store each key state in a dedicated boolean value and then manage 4 variables.

When it comes to an online multiplayer game having a player input mapped like this may save important time in sharing user actions across all players and servers.

Also, working with bits and binary operators may be a bit faster (depending on the platform, the quantity of operations, and other factors).

For understanding the previous example, it is very important to understand the binary system and its operators.

I’ve also detailed the insides in a practical example of using bit masking and binary in your software with pros and cons.

If you want to find more such use cases, please let me know and I’ll be happy to bring more to the surface.

Tha(nk|t’)s all!

Flutter
Dart
Programming
Programming Languages
Recommended from ReadMedium