
Be the Master of the Event Loop in JavaScript (Part 2)
Event bubbling, capturing, and delegation
In my previous post, I talked about the basic concept of the JavaScript event loop, the queues, and how the tasks are executed by the JavaScript engine. If you haven’t read my previous post, I recommend you read it first, since this is part two of the event loop series.
Like the previous post, I will start this post with a quiz.
<body>
  <div id="myDiv">
    <button id="myBtn">Click me</button>
  </div>
</body>
Here, we have the DOM elements shaped like this.
const div = document.getElementById('myDiv');
const btn = document.getElementById('myBtn');
const t = () => {
setTimeout(() => console.log('setTimeout in 10ms'), 10);
requestAnimationFrame(() => console.log('rAF'));
Promise.resolve().then(() => console.log('Promise'));
}div.addEventListener('click', () => { console.log(1); t(); });
btn.addEventListener('click', () => { console.log(2); t(); });Now, guess the answer.
If you don’t know the clear answer or if you feel like it’s quite confusing or tricky enough to give you a headache, you’re in the right post for a better understanding of the event loop!
In this post, we’ll cover:
- DOM events
- Event bubbling and capturing
- Event delegation
- Event propagation
- Quiz answer
DOM Event
Imagine there’s an element in body tag.
<div id="myDiv">Hello</div>Every DOM element can have callbacks on events, such as a click or double click. The #myDiv element doesn’t have any callbacks connected to the event module. Even though there is nothing connected to its click event, the DOM module still looks into the queue of the callbacks once it’s clicked.
There are three ways to add your callback function(s) to the DOM element as the event callback.
<div onclick="console.log('div')">Hello</div>This is an inline event callback. You can connect a callback function directly to the DOM. This method has a higher priority to be executed compared to the other methods.
div.onclick = () => console.log('div');The second method is to bind a callback function directly to the onclick method of the DOM.
div.addEventListener('click', () => console.log('div'));The last way is to use a DOM API, addEventListener . It takes two arguments — the name of an event, and the callback function once the event is fired. There are many different events (you can check them out here). Make sure to write the right name of the event type, since it’s a case-sensitive string.
This would probably be the most typical way to bind an event callback function because of these reasons:
- There is a counterpart function for
addEventListener— it'sremoveEventListener.
You can pass the declared function to addEventListener instead of an anonymous function. Once the program gets bigger and more complex, you might want to control your events more delicately.
div.addEventListener('click', callbackOne);
div.addEventListener('click', callbackTwo);
-- Later --div.removeEventListener(callbackOne);div ends up having only one callback after it deregisters callbackOne .
2. Unlike binding a callback function right to the DOM’s method, such as onclick, you can register multiple callback functions to addEventListener .
// All of these callback functions
// are executed in first-register-first-execute order
// once the button is clicked
div.addEventListener('click', () => console.log(1));
div.addEventListener('click', () => console.log(2));
div.addEventListener('click', () => console.log(3));
3. Only addEventListener supports event bubbling and capturing. We will talk about these deeper in a little bit.
Event Bubbling and Capturing
In W3C(World Wide Web Consortium) documentation, the event bubbling is described as follows:
The process by which an event can be handled by one of the target’s ancestors after being handled by the event target. See the description of the bubble phase in the context of event flow for more details.
Like the name of this concept, bubbling, you can imagine a small water bubble going all the way up to the surface.
<div onclick="console.log('div')">
  <p onclick="console.log('p')">
    <span onclick="console.log('span')">
    </span>
  </p>
</div>
Once the span tag is clicked, the event callback console.log('span') is executed. Then, JavaScript looks up its ancestors. In this case, the p tag is the parent element of span, so its callback, console.log('p'), is executed. Then its parent’s callback function is executed. So, the order for invoking the callback functions is:
span → p → divThe event capturing, on the other hand, works differently. JavaScript “captures” the topmost event and goes all the way down to the child elements to see if there’s a callback.
To make JavaScript event capture the events, you should use addEventListener. There are two ways to set the callback function as a capturing function:
div.addEventListener('click', () => console.log('div'), true);
div.addEventListener('click', () => console.log('div'), { capture: true });
Both ways are okay. But if you pass an object to addEventListener, you can set more options — check them out here.
div.addEventListener('click', () => console.log('div'), true);
p.addEventListener('click', () => console.log('p'), true);
span.addEventListener('click', () => console.log('span'), true);
Once span is clicked, the order of printing is as follows.
div → p → span- Bubbling: The innermost element → the second innermost element → … → the outermost element
- Capturing: The outermost element → the second outermost element → … → the innermost element
Guess the result of this clicking event.
div.addEventListener('click', () => console.log('div'));
p.addEventListener('click', () => console.log('p'), { capture: true });
span.addEventListener('click', () => console.log('span'));
div and span use bubbling, and p uses capturing. All of those elements are in the same hierarchy. What would happen then? The answer is:
p → span → divWhy? Because capturing is triggered earlier than bubbling.
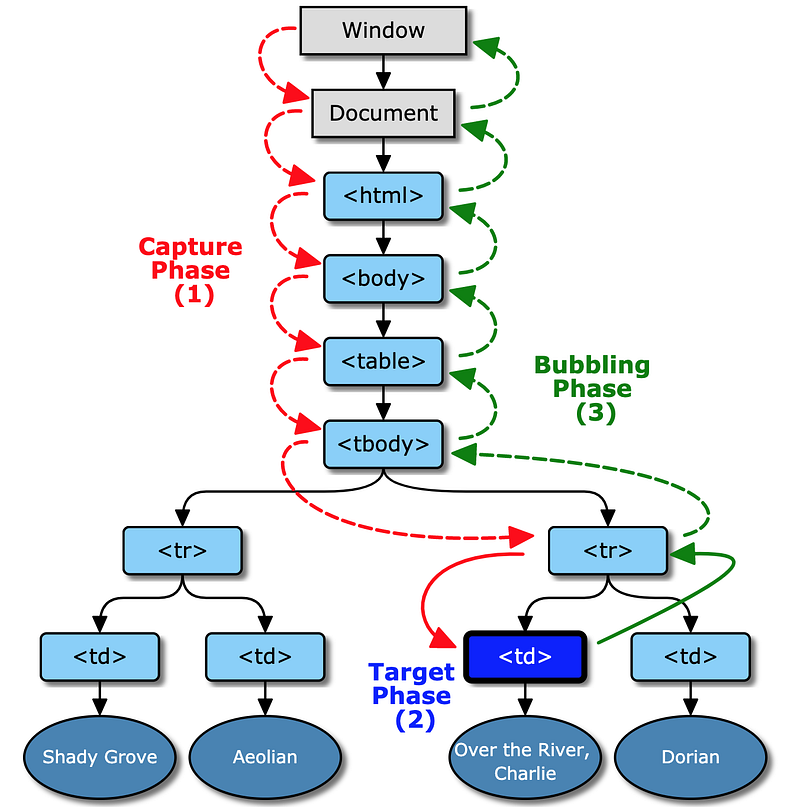
At first, JavaScript triggers the event from the topmost element to all the way down to the element where the event has been triggered (Target Phase(2)), then goes to the outermost element again.
Event Delegation
This is more about the performance. Imagine there are a hundred list elements. And whichever you click, you want to know it’s ID. How can you do that?
const ul = document.getElementById('myUL');for (let i = 0; i < 100; i += 1) {
const li = document.createElement('li');
li.textContent = `li-${i}`;
li.id = `li-${i}`;
li.addEventListener('click', e => console.log(e.target.id));
ul.appendChild(li);
}In this example, the event click has been registered a hundred times, to each li. But what if you have to make a thousand elements? Registering the same event callback to every element isn’t best practice when it comes to the performance.
You can fix this problem with event bubbling. Once any li is clicked, JavaScript looks for callback functions in li ’s callback list, then goes to the outer element and looks for callback functions again.
li → ulThen you can register the callback function to ul tag. Even though li wouldn’t have any event callback function, bubbling will get to the ul tag after all.
const ul = document.getElementById('myUL');for (let i = 0; i < 100; i += 1) {
const li = document.createElement('li');
li.textContent = `li-${i}`;
li.id = `li-${i}`;
ul.appendChild(li);
}ul.addEventListener('click', e => console.log(e.target.id));Now there is only one event callback function.
Event Propagation
Above, I explained that bubbling comes after capturing. But what if you don’t want the bubbling or capturing to be triggered?
Every event callback function takes an argument — the event object. It has several useful methods. The one for stopping propagating the events to the other elements is stopPropagation. It stops bubbling and capturing. Let’s look at an example.
<div>
  <p>
    <span>Click me</span>
  </p>
</div>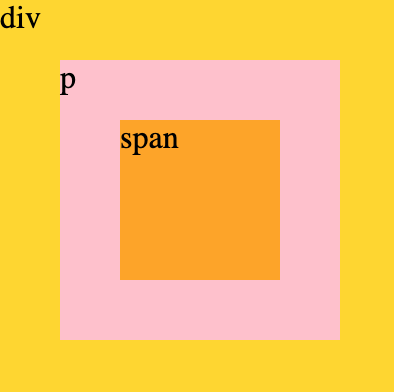
div.addEventListener('click', () => console.log('div'));
p.addEventListener('click', () => console.log('p'));
span.addEventListener('click', () => console.log('span'));
If you click p, then the result will be p → div by bubbling. But if you use stopPropagation, the result will be different.
p.addEventListener('click', e => {
  e.stopPropagation();
  console.log('p');
})
If you click the p tag again, the result will be just p, because stopPropagation “stopped” the event being bubbled up.
div.addEventListener('click', () => console.log('div'), true);
p.addEventListener('click', e => {
  e.stopPropagation();
  console.log('p');
});
span.addEventListener('click', () => console.log('span'), true);
Now, bubbling and capturing are mixed up. Click the span tag. The result will be div → span → p. Remember that capturing comes first. So, div is an ancestor element of span , and its callback is executed first. p has a callback function, but it isn’t for capturing. Then span ’s callback function is executed as the final capturing step. Now bubbling is triggered. span doesn’t have any callback functions registered for bubbling, so nothing happens. p, on the other hand, has a callback function for bubbling and it’s executed. Also, none of the callback functions of div are for bubbling, so nothing will be printed.
addEventListener can add multiple callback functions.
div.addEventListener('click', () => console.log('div'), true);
p.addEventListener('click', () => console.log('p - capturing'), true);
p.addEventListener('click', e => {
  e.stopPropagation();
  console.log('p - bubbling');
});
span.addEventListener('click', () => console.log('span'), true);
If span is clicked, the printing order will be div → p-capturing → span → p-bubbling.
Note that not every event can be bubbled. For example, focus and blur events don’t support bubbling. Hence, you should check ahead of time if an event you want to use support bubbling. You can check the W3C documentation or MDN documentation.
Quiz Answer
Now, you can guess the right answer to this quiz I gave you at the beginning of this post:
const div = document.getElementById('myDiv');
const btn = document.getElementById('myBtn');
const t = () => {
setTimeout(() => console.log('setTimeout in 10ms'), 10);
requestAnimationFrame(() => console.log('rAF'));
Promise.resolve().then(() => console.log('Promise'));
}div.addEventListener('click', () => { console.log(1); t(); });
btn.addEventListener('click', () => { console.log(2); t(); });div and btn doesn’t have a callback function for capturing. So now you know once btn is clicked, the order of the events will be btn → div. 2 will be printed first, obviously. And there are three different tasks in the function, t.
As I explained in the previous post, Promise is a microtask. Microtasks are only executed once the task queue is completely empty. After console.log(2) is executed, nothing is in the task queue, so console.log('Promise') is now executed. setTimeout and rAF, however, are macrotasks. They can be executed after all of the tasks and the microtasks are completely executed.
Then the event is bubbled up to div. And console.log(1) is executed. Then Promise is executed by the same reason as in btn . Then so far, the order is 2 → Promise → 1 → Promise. And all of the tasks and the microtasks are dequeued. rAF is dequeued first because it’s always ahead of the rendering, unlike setTimeout. So the final answer is as follows.
2 → Promise → 1 → Promise → rAF → rAF → setTimeout → setTimeoutHowever, the result will be different if you click btn with the JavaScript click method.
btn.click()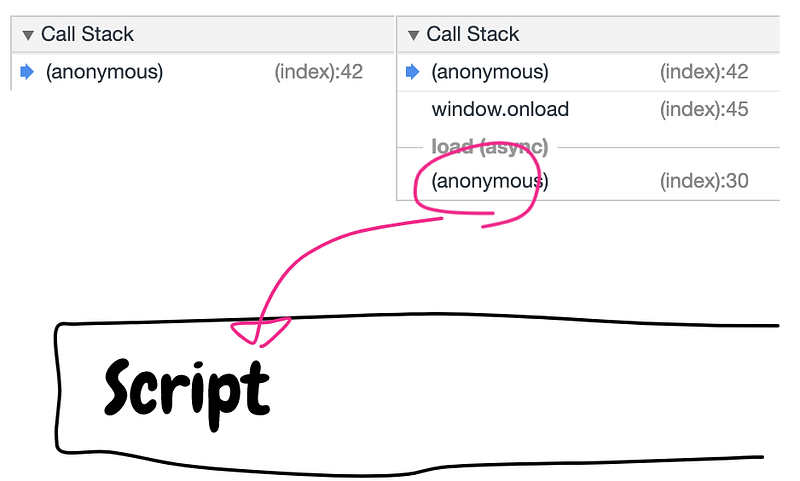
The left call stack is when you click btn on the browser, and the right call stack is when you click btn with JavaScript. Since JavaScript clicked the button, script is in the task queue. Then, it affects the result. Microtasks can only be executed when the task queue is completely empty, but because of script, the task queue won’t be empty until every task is executed first. So with the JavaScript click, the result will be as follows:
2 → 1 → Promise → Promise → rAF → rAF → setTimeout → setTimeoutConclusion
JavaScript event is very mystical and interesting. But once you understand how JavaScript events work, you can reduce mistakes and get rid of the fears.
One thing that has been interesting was that the DOM element’s event was different depending on how you occur the event. When you clicked the button with your mouse, JavaScript didn’t push “script” task into the task queue, however, it did when you clicked the button with JavaScript code, such as btn.click(). I hope you do your own experiment about this mystical issue!
More in this series
- Read Be the Master of the Event Loop in JavaScript (Part 1)
- Read Be the Master of the Event Loop in JavaScript (Part 3)