
Basic Kubernetes in 5 minutes — A beginners guide
Kubernetes is a container orchestration framework often used in DevOps to implement applications primarily in a cloud environment. By using containers applications can be managed centrally, adapt their resources as per the demand, and be bundled up with their dependencies allowing developers to spin up as many instances of a service as required.
The benefits of container orchestration are as follows:
- High availability — Multiple instances of the same service/application ensure that any failed containers can be replaced seamlessly.
- Scalability — Since containers can be created and destroyed in such a short space of time, we can automatically scale the entire environment to the resources demand.
These create a very effective environment setup and already get all the benefits containerization brings: flexibility, standardization, portability, agility & security.
Kubernetes architecture and components
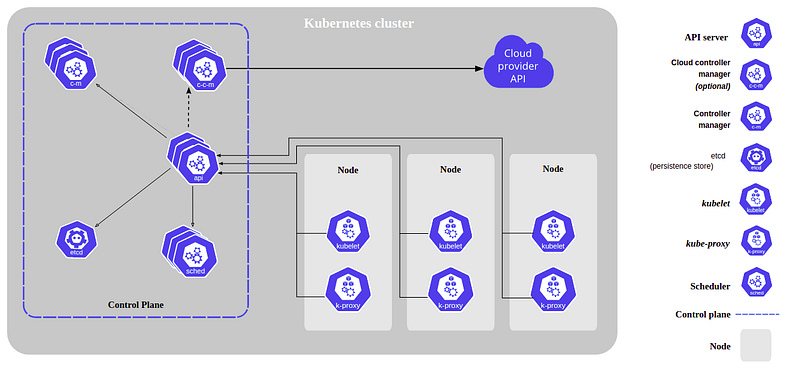
Kubernetes is run across a set of nodes, these can either be virtual machines or physical servers. This section will go into detail about what makes up a Kubernetes Cluster and what services/components are involved.
Pods
As per the Kubernetes documentation a pod is …
“Pods are the smallest deployable units of computing that you can create and manage in Kubernetes”.
Pods can hold multiple containers, however, you should think carefully before doing so. Containers that are hosted in a pod should be closely related and have the same goal and lifespan.
Nodes
Kubernetes nodes come in two forms, a master node, and a worker node. A master node will run the Control Plane Components and will manage the cluster. Worker nodes host the Pods which are the components of the application workload.
Control Plane Components
The Kubernetes control plane is a set of services that run on the master nodes to manage the cluster.
- kube-apiserver — This service exposes the Kubernetes API and provides the front end to the Control Plane. This can be managed to scale by deploying more instances to balance traffic.
- etcd — A store for all the cluster data, consistent and highly available.
- kube-scheduler — scans for newly created pods and assigns them nodes based on a variety of factors including resource requirements, hardware/software constraints and data locality.
- cloud-controller-manager — Controller manager for cloud-specific services. Supports linking your cluster to cloud providers' API and separates cloud components from your cluster. This is only required for cloud environments.
- kube-controller-manager — Controller manager than runs several controllers. Controllers run loops to ensure the configuration matches actual state of the running cluster. These controllers are as follows:
- Node controller — Checks and ensures nodes are up and running
- Job Controller — Manages one-off tasks
- Endpoints Controller — Populates endpoints and joins services and pods.
- Service Account and Token Controller — Creation of accounts and API Access tokens.
Worker node components
Whilst the Control Plane components run on the master nodes, there are a few services running on the worker nodes to support the cluster. These are:
- kubelet —Ensures the pods running on the node are running and are healthy.
- kubeproxy — Proxy network running on the node that manage the network rules and communication across pods from networks inside or outside of the cluster.
- Container runtime — Software that’s responsible for running containers.
In addition to the components described above, many Kubernetes setups include addons with additonal functionality. More infromation can be found on the Kubernetes documentation page.
Installing Kubernetes Development Environment on your local machine.
Installation of Kubernetes on a large cluster of a production system is a complex topic. Here I’ll show you how to get Kubernetes up and running on your development machine so you can play around and explore the tools.
Firstly, we will install the Kubernetes command-line tool, kubectl. This allows you to run commands against Kubernetes clusters.
Secondly you’ll also need minikube — this will run a simple Kubernetes cluster in a VM on your local computer.
Apart from these two programs, you’ll also need a containerization platform, I would highly recommend using Docker. If you’re using either Windows or a Mac, you’ll also need to setup a Hypervisor. Luckily Hyper-V comes built into Windows 10 as a feature that can be turned on from the Control Panel. As for Mac, HyperKit comes bundled as part of Docker Desktop for Mac.
Awesome! Now we’re all set up and ready to go. For reference for the rest of this guide, I’ll be using the minikube cluster setup on my Ubuntu machine.
Setting up a cluster
Now we’ve setup and installed minikube, docker and kubectl on our local system, we can start by setting up a simple cluster. We’ll begin by starting up minikube, we can do that by executing the following command:
$ minikube startYou can also stop minikube by executingminikube stop .
We’re going to create a new Pod to do this we will use the run command. We’ll start off by creating a pod to house a simple PHP container and expose its HTTP port.
# Run command syntax:
# kubectl run <pod name> --image=<image name> --port=<port to expose>
$ kubectl run first-pod --image=php:7.2-apache --port=80Now, lets check that’s been created successfully by running:
$ kubectl get pods# NAME READY STATUS RESTARTS AGE
# first-pod 1/1 Running 0 2m50sWe should now be able to see our first-pod listed in the terminal in the running state, it may take a few minutes to create. If you navigate to our localhost page you’ll notice we still can’t see anything. That’s because even though we ran the pod with port 80, we have not exposed that port from outside the cluster. In Kubernetes, we can expose pods and make them accessible by using a service. We’ll create a service to do this now...
$ kubectl expose pod first-pod --type=LoadBalancer --port=80

# service/first-pod exposed
In this case, we’ve created a service of the type LoadBalancer. This is because we would like to expose the port to outside of the cluster, there are four types of service: ClusterIP, NodePort, LoadBalancer and ExternalName.
Let's make sure our new service is running by executing:
$ kubectl get service#NAME TYPE CLUSTER-IP PORT(S) AGE#first-pod LoadBalancer 10.98.190.43 80:30876/TCP 4m23s#kubernetes ClusterIP 10.96.0.1 443/TCP 10mAwesome, now we’ve got our service setup we can access our pod. We will run the following command to access our service.
$ minikube service first-pod We can use this command to access the URL of the service we’ve just created. Running this should open up a link in your browser to the cluster and our pod. If you’ve done everything right this should show the landing page for our container.
Congratulations, you’ve now got your first pod and service up and running. I highly encourage you to explore the wonderful world of containerization and orchestration. Follow for more stories where we take advantage of some of the features and discuss storage, configuration of secrets, communication, and scalability.
References:
IBM Benefits of containerization — https://www.ibm.com/cloud/blog/the-benefits-of-containerization-and-what-it-means-for-you
Cloud-Native with Kubernetes — Raul Alexander
Kubernetes documentation https://kubernetes.io/docs/concepts/overview/components/


